Leaderboard

Popular Content
Showing content with the highest reputation on 03/07/2020 in all areas
-
Howdy folks, It's with no small amount of sadness that I'm posting this today to announce that I'll be stepping down as LSP administrator as soon as I've fulfilled my current set of obligations. The reasons are many and complex, and I won't go in to them here. Suffice it to say that it has been my pleasure to serve the LSP community this past 10 years or so, and that this decision didn't come easily. Staff have been briefed, and a succession plan is being formulated. I'll be around for as long as that process takes to come to fruition, and will probably remain in the background for technical support and looking after the website. As such, there's no fixed date for this, but most of my moderation duties will cease effective immediately. As they say in the classics: goodbye, and thanks for all the fish! Kev18 points
-
As the rest of the mods have said Kev LSP is one of the best modeling sites on the planet, that attracts some of the most talented modelers anywhere, and you have been a major reason that is factual. A decade or more of voluntary work around here is a long run. May all your future endeavors be prosperous and happy. You will certainly be missed around here.10 points
-

1/32 ERA-3B Skywarrior - 3D printed / scratchbuilt
HerculesPA_2 and 8 others reacted to Starfighter for a topic
It's probably getting a bit boring but it's all I can show at the moment... I have finished the basic structure of the A_LORAN console behind the Plane Captain's seat. New side consoles for Pilot and Navigator are ready as well. Next, I will draw and print the fron IP before I can get back to some 'real modelling. And the one with a ruler requested by Mark.9 points -

Bitten by a 1/24 Cyber Mozzy....
Trak-Tor and 6 others reacted to Crossofiron for a topic
Firstly, I have stripped pretty much everything off the kit; I am opening up the kit with the Service Hatch & Dingy Going to show the Radiator and Cooling System; Thanks for looking!7 points -
posted on britmodeller, first pics of Z-37 Cmelak (Bumblebee) legendary yellow crop duster in Czechia and Slovakia, with long combat records fighting the insect I spent hours watching this plane over the fields like a boy, must have for me! jan test shots6 points
-
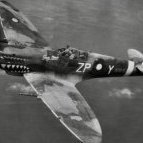
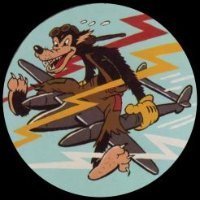
Hello. Been away from the bench and the site for a bit. Been swamped with work, but I've also had a few stalled projects that possibly stalled because they were too involved. Decided to get back into it with a simple mostly out of the box build of the Hasegawa P-47. Didn't unfortunately take a lot of in progress photos because I wasn't sure about doing a build log. The P&W R2800 is OOB. The more I look at it the more likely I think I will add some wiring to it. I used a Eduard "Look" set for the instrument panel and the harness. They're not nearly as nice as HGW, but for a 10 minute job not too bad. The information placards aren't 100% accurate and the oxygen hose isn't correct. Just thought I'd busy up the very visible cockpit area. I need to weather everything up further before I seal it them up in the fuselage and cowl. I plan on marking it up as LT Ray Knight's "Oh Johnnie". Mostly because I have a 4yr old at home who loves the Goofy on the unit emblem on the fuselage. Thanks for looking, hopefully I'll be able to get this one through to the finish line for a change. Jeff6 points
-

F-4E 496th TFS Hahn AB
F`s are my favs and 5 others reacted to scott_t for a topic
I am in with an F-4E from the 50th TFW, 496th TFS from Hahn AB, Germany from 1979. The picture is what I would like to come close to. This will be the Tamiya kit with an Avionix cockpit, Wingman Models slatted wing conversion with the TISEO, and AirDOC decals. Interesting is the gray and blue sealant used on a few panels under the forward cockpit and it looks like someone touched up some paint up front with what looks like olive drab. Work will start with the kit fuselage …..sanding down the raised panels that should not be raised, rescribing once those panels are leveled out, a few panel line corrections in the ass end area, and fitting seamless intakes. Will post some pics as things progress. Thanks for looking ! Scott https://imageshack.com/a/kCvn7/16 points -
Finished ! A big thank you to my French friends for their help. And another big thank you to you, for your friendly comments!6 points
-
It was a great pleasure meeting you last September in Melbourne for a chat over a coffee, where I gained a little insight into the workload that your position on LSP involves, so quite frankly I’m not surprised at your decision. You have made this forum what it is during my time here, my modelling home and my first “cyber” port of call each morning. Thank you for your tireless service, enjoy your “retirement” and happy modelling!6 points
-
Understandable Kev. Thanks for doing such a great job and here's to seeing you on the forums posting builds and enjoying the hobby. Again...Thanks so much. Cheers Brent6 points
-
Hi Guys, This is my Revell/Monogram F-102. Engraved, Aires cockpit and wheel bays (fit is terrible), Reskit wheels, Master pitot, Fündekals. A lot of work to make it look decent. This plane was based in Langley during the late 50'. Cheers Tristan [/url] [/url] [/url] [/url] [/url]5 points
-
Being on a roll modelling MoJo-wise - and in a bit of a tinkering mode, I dug her out again earlier and did some more work on the masters for new waist positions, as well as a little more filling odd 'sunk' joint lines with thin superglue... Starting to get there shape-wise: And I've also been looking at the wings. With the release of the 1:48 B-17s from HK Models there was some talk about the vertical position of the outer nacelle on each wing - so I thought I'd go compare the 1:32 kit with photos. It does indeed look like they are too high on the wing - with the perfect side profile curves appearing to be 180 degrees out when looking from the side - i.e. reverse the top and bottom profile curves and you'd have something that looked better and lowered the position of the cowl with respect to the wing leading edge. But as well as cutting out the nacelle and rotating it 180 viewed from the front, you'd also have to swap over the cut-outs for the turbo-superchargers as well. Looking at photos of the completed model, especially David Parker's masterpiece, I'm going to let sleeping dogs lie - or I'd never get this finished. I think the overall effect will work without major surgery... Filled areas of fuselage now drying off before more sanding later. When I'm in the right mood I'll then re-scribe everything - and do some final shaping on the window patterns. Have fun... Iain5 points
-
Progress has mostly stopped as my airbush took a tumble off the desk and broke the needle chuck. The only thing i've been able to work on is the propellor. I used the same method as the previous prop with an oil wash at the end. I'll add a light coat of clear yellow once my airbrush arrives.5 points
-
Safe and Happy trails to you Kev! You and your tireless hours working behind the scene to keep this site running is greatly appreciated! Thanks for all your help over the years.......... Dan5 points
-
Bitten by a 1/24 Cyber Mozzy....
Fencer-1 and 3 others reacted to Crossofiron for a topic
Apologies Wolf for stealing your Tagline... Also apologies for all that have followed my other posts, things have been fraught the past year or so, but, I have been busy... I have decided, to increase my modelling enjoyment, to take things to another level. A Good friend of mine, Mark is helping me and what you will see on this thread, will be available eventually... I have always loved the Mosquito (doesn't everybody?) and I love the 1/32 Tamiya Kit, especially with the fact that they push boundaries every time a new kit comes out. So why not make the Airfix Kit as every part as good as the Tamiya Kit? That is where it started... I am throwing everything at this kit; Made a very worthwhile visit to the De Havilland Museum to study the real thing; The Airfix FB.VI Kit of course Well, everything on Scalemates My own photoetch 3D Designed and printed Nose Guns with Master Barrels; 3D Designed and printed Belly Cannons with Master Barrels; 3D Designed and printed Starboard Engine Various other 3D Printed bit like the fuel tanks, more on that as I go... My subject is NS850 'Black Rufe' of 418 Squadron RCAF I am using the rather stunning Aviaeology 1/24 RCAF Mosquitos in Fighter Command Set. So all, to the build...4 points -

P-39 Airacobra, by Kitty Hawk
jgrease and 3 others reacted to Dpgsbody55 for a topic
I agree, Gazzas. It's a very sleek design and very clean too. Interesting that it was about 20mph faster than the P-40, with the same engine and about the same weight. I think I mentioned previously that I had put the wings together, so I was able to quickly add these. I found the joint needed a little work around the mating surfaces, but the joint needs very little filler, as the picture shows. I glued one wing into place and set the dihedral carefully, then let this dry before doing the same with the other wing. If you get both top and bottom wing joints tight, you'll get the right dihedral. The tail planes are one piece, so they went on after the wings had set and were taped into place. Then the top of the gun compartment went on, and was taped into place using the gun covers to get the piece properly centred. Next up, I started to add the canopy, but ran into the same issue as Kevin with his build. I my case, the issue is caused by the instrument panel fowling the canopy interior. I found that the canopy interior has a raised line around the base of the windscreen, so this was scraped away, after masking the insides so as not to damage the clear windows. As not shown in the picture above, my now opaque scrapings won't be seen once the masking is removed. I hope . This improved things a bit, but the main culprit is the IP, which is mounted too far forward and is too thick. Chamferring the top creates some more room to bring the canopy closer, but still no enough. The last mod was to insert a push rod to push the IP back about 1mm. Once dry, this mod was painted flat black too, but I don't think it will be seen when I remove the masking. Success . It still needed only a little pressure to make it sit properly and was held in place with tape wrapped around the forward fuselage. With a little clean up, it should look OK. This was an issue that I didn't check for when I was building up the cockpit. I made sure to mount the IP assembly into place square to the floor, but the IP once assembled is very thick, with a front piece and a back piece glued together, with the rudder pedals trapped in between. I think this is only part of the cause, however, and perhaps the IP needs to be mounted about 1mm further back in the cockpit. I think it won't fowl any other parts if you do that, such as the side detail, but you'd need to check carefully. One other criticism is that this kit offers a number of optional parts, but doesn't give any clue as to which option is for which variant. I'm not overly happy with the gunsight and this is one of the optional parts, so I chose the option that I thought would not fowl the windscreen. I'll bet I chose the wrong one!! So here is what it looks like now. Again, you can see very little filler is needed on the wing joint, but some will be needed on the fuselage joint. I've used Mr Surfacer 500 on the tail joints, but this still needs filing back. Overall, the model needs cleaning up before paint, and there are still some parts to be added before I can do that. As I've not really followed the instructions to the letter on this, I'm checking them carefully to make sure I don't forget any bits. The radiator is also missing, and I will have to remove all trace of the 30 cal wing guns. I also will not be adding the gun pods (ditto the bomb and rack) as very few Russian P-39Q's had them. The Russians thought the plane had enough guns with the cannon and the two 50 cal fuselage guns, and the 30 cal guns were not worth the weight of carrying them around. Perhaps this also made the plane more nimble with all that weight removed from the outer wings. Certainly the Luftwaffe pilots weren't keen to go near them. Lastly, here's a view into the cockpit. It's not a great shot, having taken it with my phone, but you get the idea. Cheers, Michael4 points -
I have to add my sincere thanks for all you've done. Like your earlier colleagues, Saso and Chris, there comes a time when the torch must be passed. That said, your leadership will be missed, and hopefully a reduction in your admin workload translates into an increase in your bench time. You have really helped shape what this community has become, and I am grateful.4 points
-
Being a moderator and an admin is very though and it can go very personnal at times and quite often you have to put your reputation on the line From another forum moderator and admin, you did terrific job and you'll be missed. You are instrumental in what this forum represent for all of us and you did a terrific job for us all I think we won't be able to thank you enough for all you've done Thank you VERY much and like my fellows I hope you will be around showing us that you enjoy the hobby4 points
-
You’ll be missed! all the best man!4 points
-

Standing Down
BiggTim and 3 others reacted to Jeff Herne for a topic
As a long-time member of this community, albeit infrequently these last few years, the contributions you have made to the art of 1:32 and this group is second to none. It is with my sincere hopes that you are moving onto and into bigger and better things. I wish you the best of luck in all your endeavors and thank you for keeping this group in line. Jeff Herne4 points -

What is the oldest original kit in your stash?
kalashnikov-47 and 3 others reacted to Rick Griewski for a topic
litter box scale?4 points -
Good luck and best wishes Kev.4 points
-
I certainly understand, Kev. Between the rest of the staff and myself, we'll soldier on the best we can. Thanks very much for all the work you've done for the site over the years.4 points
-

Macchi M-5
Fvdm and 3 others reacted to sandbagger for a topic
Hi all, The fuselage decal are now on. As the kit supplied decals are translucent and darker colours underneath show through, I had to cut out white decals for the roundels and skulls. Not easy but at least the darker wood colour doesn't show through, Mike4 points -

HH-60G Pavehawk Kitty Hawk 1/35 DONE!!
Starfighter and 2 others reacted to Pete Fleischmann for a topic
Hey all- pressing on with the cabin- the Robbie tank won’t be installed. The CSAR birds have a section of fabric snapped to the aft bulkhead that the PJ’s equipment attaches to. I made this from Apoxie Sculpt. The equipment bags are from Reedoak and are a very close representation of the medical gear bags for the PJ’s. Also started sorting out the armor plating for the cabin floor- cheers Pete3 points -
Thank you Kevin. This site is an important part of every day for me. I enjoy everything about this site. Thanks again for helping to bring it to my house. Dan3 points
-
TEST SHOT Vampire looks good so far. Bring it on HPH/Infinity! Only thing I don't like is the out of scale plastic cup in the background of pic 1, and the horrible wood grain decal on that cabinet in the background. The hand doesn't look realistic either as the fingers look 1/48! Maybe, I should wait to see it in person to draw a conclusion, hmmmmm? Lol Alfonso3 points
-

Infinity Models de Havilland DH.100 Vampire - first test shots
D.B. Andrus and 2 others reacted to wunwinglow for a topic
Not just my cup runnething over, now the saucer is too......3 points -
Definitely fun Alain - and just what I needed, I think... Here's where we are - most sub-assemblies done, some even sanded. About to dive in and add some Airscale instruments to the instrument panel (the instrument decal that comes with the kit is crude and just doesn't look right) and detail paint the cockpit. Hopefully some more later... Iain3 points
-
Your unselfish hard work and commitment has helped make this site what it is today - still one of the very best anywhere. Thank you for all your dedication and hard work that you have put into LSP over the past 10 years. I hope that you have time to make some models and 'hang around' a while longer in a more relaxed fashion! Derek3 points
-

Standing Down
Anthony in NZ and 2 others reacted to Plane Crazy for a topic
Hi Kevin, Now, I have to be careful how I put this but I’m glad you’ve made the call. Over recent years, each time we speak, you’ve been so busy your opportunities to actually build have been greatly restricted. I hope that with whatever else your life consists of, your decision will assist you in enjoying the hobby from a building perspective and maybe even get back to the odd club meeting where we first met all those years ago. Thanks for all the hard work and the to the rest of the team to make LSP a regular stop off point when on the net. Take care Martin3 points -
In a country across the North Sea, many years ago this kit was purchased and started as well as adding some aftermarket goodies. I have trimmed the KMC cockpit to fit the fuselage and scribed most of the panel lines. Some parts are glued together and sanded, but there's a fair bit of work left as I want to add the open electronics bay, "hyd hatch" and resin wheel wells. Some scratchbuilding will be required as well to make the Aero 3 catamaran launchers, and I need some resin wheels and AIM-9Bs. Would this be OK for entry? In terms of theme, it doesn't get much more "Cold War" than a Norwegian Starfighter...:)3 points
-

Standing Down
Anthony in NZ and 2 others reacted to Subodai for a topic
I'm fairly new here but you made me feel very welcome immediately, so thank you for that. I've modded a few forums before so I know the feeling of stepping away, never taken lightly or without reserve. I hope everything is alright and that whatever life has dealt you, you can make a winning hand of it. This site and community is testament to all the work you've clearly put in, and what you have achieved, I think you should be proud of that definitely. Good luck and make plenty of lemonade. Sub3 points -

Standing Down
Anthony in NZ and 2 others reacted to Lothar for a topic
Thank you very much indeed for all your work and maintaining the best modelling site there is. Lothar3 points -

Standing Down
USMC Herc and 2 others reacted to Wolf Buddee for a topic
Well done Kev! You’ve been head honcho here since I‘ve been a member and your warm welcome was, and still is today, greatly appreciated! Hopefully it will be our good fortune to see more of your builds on the forums if that’s what living at the speed of life allows. Thanks for all your hard work! Cheers, Wolf3 points -

Standing Down
Anthony in NZ and 2 others reacted to tomprobert for a topic
Fair play, Kev. You’ll forever be a legend around these parts and your hard work and dedication never forgotten. Maybe with a bit more time on your hands you can get back to the bench and share some epic builds. All the best, Tom3 points -

Standing Down
LSP_Kevin and 2 others reacted to Anthony in NZ for a topic
Kev, you have been a legend with all the work you have put into LSP and I can assure you it was always appreciated! Glad you'll still be around showing us your lovely work and receiving your honest encouragement Thanks for all you did in those 10 years and......…..lets get some modelling done now aye! Cheers Anthony3 points -
.thumb.jpg.5da8bff9741de420eb2e87addd8f2cf6.jpg)
What is the oldest original kit in your stash?
Alain Gadbois and 2 others reacted to RadBaron for a topic
From memory, probably an original Matchbox Tigermoth, 1978. Bought purely because of the box art. That series of large scale Matchbox kits had the most gorgeous artwork!3 points -
Thanks Troy. It is one of the kit schemes. Sometimes the box decals do the job. A couple did silver badly. My weathering removed it from sight, I am happy to say. Although I was concerned. Thanks again to everyone who has commented. I find myself inspired.3 points
-
Thank you! Tonight I've managed to paint the white sections using a mix of Tamiya XF-2 and XF-19, then oversprayed with LifeColor Incinerated White so they blend in with the spinner. And I managed to break the tail wheel leg...grrr Matt3 points
-
Probably 1961 1/92 Revell Liberator3 points
-

F-16B Royal Danish Air Force ET-210 "JSF Test Support"
Starfighter and 2 others reacted to kkarlsen for a topic
First small 'baby steps' on this build.. The Resin tail has been 'carved' out and I have started rebuilding the interior. Long ways still to go... Kent3 points -

What is the oldest original kit in your stash?
Alain Gadbois and 2 others reacted to kalashnikov-47 for a topic
I have this purrfect Revell kit from 1959:3 points -
Thanks so much, Kev!!!2 points
-
Thank you for all your hard work and dedication. Best wishes, and hope we'll still see you posting here.2 points
-

Infinity Models de Havilland DH.100 Vampire - first test shots
Rick Griewski and one other reacted to scvrobeson for a topic
Not 100% sure on the shape of those cannon barrels, but the rest of it looks pretty great. Can't believe we're getting a 1/32 Vampire in plastic. Matt2 points -
Infinity Models de Havilland DH.100 Vampire - first test shots
Rick Griewski and one other reacted to Anthony in NZ for a topic
It's the year of the DeHavillands... Tiger Moth Rapide Vampire Life is good LOL2 points -
OK I have made a start. Dutifully following the instructions I started with the cockpit. The quality of the resin is really awesome and compared to HpH there is very little clean-up required. The IP is made of a photoetch face to be glued on the resin dash with a acetate sheet with the dial printed on it in between. There was just a little problem with that: The dials on the acetate sheet do not match the photoetch face So I got rid of the acetate sheet and used airscale early jet decals and the ginter book as reference. Decals went on the resin dash: Then I glued the photoetch face and added UV cured glue (Bondic) to simulate the glass, problem solved Cheers, David2 points
-
I had this one from 1957 in my stash: but I liked it so much I had to build it: And the owner of the real one liked the model of it so much he took me for a fly in it!2 points
-

Mirage IIIE Italeri EC3/3 1:32
daveculp and one other reacted to Scalefighter for a topic
The surface of the kit was almost completely redone by engraving new Panel lines and stitching rivets.2 points