Leaderboard


Popular Content
Showing content with the highest reputation on 01/08/2019 in all areas
-

Skyraider 1/32 Trumpeter.
ShotMagnet and 10 others reacted to Jankowski for a topic
Hey folchs..... go to Workbench 100% full ..... Art box. Engine cables. Firewall. Adjust…. Correct the fluid tank. Assembly test. Radiator full scratch Aluminun coat. Cockpit parts. Speed brake. Speed brake support in aluminun. Functional system. Tail… By my friends….11 points -

LEM Mig -9 FINISHED
Martinnfb and 8 others reacted to blackbetty for a topic
A real tiny twin engined plane, actually the smallest in my stash. got to finish the skyknight first, but i´m in! 01 by karl holubar, auf Flickr9 points -
Started on the 9th of December... Every year I try to do a 'clear the bench' build over Christmas, this year it was this one: Not sure why folks seem to shy-away from the Trumpy 109E kits almost all the completed ones that I have seen here are from the Eduard and Dragon kits. Ahh well... I thoroughly enjoyed every minute of this one. Perfect fit everywhere, lots of detail, excellent etch, decals and phenomenal clear parts. (not so excellent rubber tyres tho'). For a change I broke-out my enamels for the 74/75/76/04 colours, all of which I mixed using my preferred Mk.I eyeball method. Highly recommend this to anyone contemplating a 1:32 build and perhaps a wee bit put-off by the excessive parts-count and cost of some of the 'uber kits' around just now - I got this off a well-known on-line auction site from a Chinese based seller for just £16.50 !!!!! (that's as good as giving it away) even down here to NZ the postage was just ten-quid. So here t'is all done only addition is the kit specific Eduard Zoom set which includes the harness too; And I have to admit that I'm very pleased with it. Please feel free to hurl any criticism, ask any questions or make any comment at all. Thanks for taking the time to look and Happy 2019 to all here. Ian.9 points
-

B17G "D Day Doll"
Model_Monkey and 7 others reacted to Simmo.b for a topic
Since I had completed one wheel bay I figured that I would re-start the build by finishing the other. Then I figured that I would complete the wings as doing this would remove a large swath of plastic from the sprues and at least give me the impression that I am making good progress!! The bays were painted MRP black followed by various shades of Alclad, I applied a wash using Flory dark dirt, I went with Flory as being clay based this wash negated the need to seal the Alclad with clear (I would have used Tamiya X22 not floor cleaner!) Fitting the bays required much thinning of plastic both on the completed bays and the inside of the wings, this may have been my fault as the fit tolerences are tight and any slight fit issues on the bays caused by errant paint on mating surfaces causes issues with joining the wing halves. I eventually got the wings together however the engine nacels required much shimming up and filling. I just need to re-scribe and rivet some lost detail and the wings are done. More soon, thanks for stopping in!8 points -
Hi all, I'm new to this forum and recently reacquainted with this fantastic hobby. My first build was this same model and it's fair to say I made a pretty poor job of it... so I decided to have another go. I'm building this straight out of the box, no add-ons and not hugely concerned with accuracy against a specific aircraft, I'm mostly using it to hone my techniques and learn new skills. I would appreciate any suggestions, criticism from you talented lot! Here's where I'm up to: This is the completed cockpit, not sure if the minor weathering looks any good... and I've done the best I can with the meager gauge panel. On the basis that most of this can't be seen from inside the fuselage, I'm not going to do anymore... and I dont have the necessary materials (or patience) to add finer detail! I suspect the colours aren't quite accurate, but every photo I could find of this beast was different! Shame about the size of the decals! Spot the mistake on this picture... think I might have to disassemble and paint the plastic disk behind... matt black??? I'll post more as I progress, thanks for looking. as I mentioned before... please provide any criticism or advice.7 points
-

A nice set of 1/32 'Jug's'
JefH and 6 others reacted to David Mooney for a topic
After completing the second of the two P-47D, I couldnt help myself with the title of this post :-) This aircraft is 42-75242 which was flown by Capt Michael Quirk flying for 62nd FS/56th FG, Halesworth. Now the two Jug's together...... Jug #2 can be seen @ Thanks for looking at me Jugs7 points -
Here is my entry into the group build. Still rounding up the last of the after market parts I need.7 points
-

Lockheed S-3B Viking - scratchbuilt - NEW PHOTOS!
Mel and 5 others reacted to Starfighter for a topic
Happy New Year everybody! It's about time to post the pics of my finished 1/32nd scale Viking. The background is not ideal as the photo booth is too small. No way to take photos of the diorama either - I'll have to wait for better weather to take these photos. Anyway, no need for a lot of text this time - for those interested in the building process, here's the link to the WIP: Comments, critique and questions are welcome as usual!6 points -
One pod down, one to go. Believe it or not, this took me about 8 hours to do in fits and starts, given my hamfists and all those incredibly fiddly parts. Lots of cuss words, glued fingers, and long breaks to recover my perspective. How I hate little PE parts! Tim6 points
-
Thanks Joachim. I am very happy with the RP tools punch and die set. I have both the small and large sets and use them all the time. A reasonably large investment but I am a firm believer that a quality tool in hand is better than an unbuilt kit in the stash, so I don’t mind diverting funds toward that sort of thing. I am having a fair bit of trouble settling on a particular aircraft to depict. The Attacker had two slightly different versions, being the F.1/F.B.1 and the FB.2 both sort of able to be made from the kit. The kit as presented I believe represents an in between mix of both versions and some thought will be required if you wish it to be an accurate depiction of a certain aircraft. I am certainly open to suggestions and also correction if I have the details wrong. I have a mask cutter, so I am not limited to the kit provided decals for the serial number. The F.1 was equipped with an earlier version of the Nene and had a cleaner fuselage. The kit has 4 vents around the tailcone (see the post regarding my exhaust mod to see what I am talking about) which was a feature of the FB.2 so these will need to be removed. Conversely, the FB.2 whilst featuring the vents also had two small intakes, one on either side of the rear fuselage adjacent to the front of the tail fillet. These are not supplied in the kit so will need to be scratchbuilt if wanting to depict an FB.2. Neither mod would be too hard to give either version but I like to try and get things right. The quandary that I now have myself in is which one to pick? I had a rough idea of the features and scheme that I would like but finding one that has all the boxes ticked has proven difficult. My list so far; F.1 spec, Large J on the tail, red nose, earlier un framed canopy and also the large underbelly fuel tank. Finding a picture that has all of those has so far eluded me. It seems like the best compromise would be to go for the later framed canopy which would give me the rest of the features and all I would have to do is remove the vents around the tailcone. Whilst I try and work out what I want to do (I am going through the same process with my Booemrang build) I can fiddle with some of the smaller details to buy me some time. The kit represents the wingtip nav lights with engraved detail. I cut out the area of the lights and tacked in a piece of clear resin This was easy enough to shape with a coarse sanding stick I refined the final shape by using a finer sanding stick followed by some wet and dry. These lights are easy enough to pop off and I will dip them in clear red and green paint and reattach them once I have finished painting the model.6 points
-
I built this kit last year straight OOB and rather enjoyed it.6 points
-
I've decided to jump into the GB train with this old kit I have bought some 30 years ago. I think I need to build this one as it was my teenage dream, but I have never managed to get to it. But it survived all those years in my possession, so it deserves some attention. It should be just an OOB build, as quick as possible. Which means one year should be enough for me to finish it. "My Dad" version is the plan, but I doubt the decals will be fit to use, so we will see. Juraj5 points
-

P-51K Nooky Booky IV
Rocat and 4 others reacted to Miloslav1956 for a topic
P-51K Maj. Leonard "Kit" Carson 1/32 Tamiya HGW wet transfers & belts Barracuda wheels Colors MRP, Gunze Sangyo, Alclad5 points -
I remember when I use to say the same exact thing...... But then a great deal came up on a B-25 I could not resist. Its big, but still small enough to fit the display case. Of course, the 17 is just a little bit bigger, why not? Oh, lookie here. A B-24 that goes with the 17. Is that a Lancaster in 1/32? Oh man, can't resist..... So how slippery this slope is?? Yea, bring on that 29. They can hang it in my ward in the asylum.5 points
-
Lack of updates last few days - still thinking through the full changes to the wing - but I think I have a full solution worked out that gives the correct cross sectional profile and angle of incidence, whilst also giving the correct thickness taper towards the tip (and slight wash-out). It will involve a lot of moulded in plastic material from the wings though, plus a little brute force. Also pretty certain I'll have to remove the wing tip sections to deal with separately. Oh - and the chord of the wing as kitted may be a little narrow by a couple of mm - need to corroborate - but I may just ignore this as being not particularly noticeable. All good fun! Iain5 points
-

Zoukei Mura P-51D
Landrotten Highlander and 4 others reacted to Ryan for a topic
Tonight I wrapped up the replacement carb levers, one step closer to paint. Levers by The 3rd Placer, on Flickr Levers by The 3rd Placer, on Flickr Ryan5 points -
It's more likely to mean that the engines are underscale in order to accommodate the thickness of the cowl plastic. This is a common problem with aircraft models that feature exposed (or exposable) engines. Kev5 points
-

New decals - F-4B/F-4J Phantom Airframe Data/Panels (stencil type)
Daniel Leduc and 3 others reacted to ziggyfoos for a topic
This sheet provides the extensive F-4 Phantom airframe data (including panel numbers/labels) for either an F-4B or F-4J. The airframe data included is the painted (open stencil) type of markings commonly seen in the 1960's into the early 1970's on USN/USMC F-4B and F-4J Phantoms. Includes placards for the landing gear, speed brakes, speed brake wells, auxiliary air doors, wing external fuel tanks, and main and nose gear doors. Also includes markings for all pylons, bomb adapter racks (inboard and outboard pylon types), and LAU-7 rail markings. Note that this is not the printed (full letter) style of airframe data - check references for which style of airframe data was applied for a specific F-4. Expected Feb/Mar Now available at: www.AOAdecals.com4 points -

My 2018 builds finally!!
florin13 and 3 others reacted to alaninaustria for a topic
Here you go, comments and critiques welcome! Enjoy! Cheers Alan4 points -

'Grace' type two-seat Spitfire in 1:32
geedubelyer and 3 others reacted to Iain for a topic
I'll give that a try with the fuselage roundels Carl. Mean-time; where we're at - fixed wings and all: Progress! Blue skies... Iain4 points -
evening folks & thanks for stopping by Yep, thanks Jay, I spotted that on the drawing, it was just easier to start with a rough shape and get rid of the form to capture the intake - please keep your notes coming though as I easily miss things! I think it might be - it's certainly directing airflow somewhere:) so, more mustang mayhem... ..after shaping the basic filler construction of the airscoop, next was cutting out the air intake on the roof - I made a template from the drawing.. ..then with filler & dremal work I got the rounded sections done.. ..after this I had toreskin the inside as the skins I put in earlier had a join line down the middle and the real one doesn't. To dothis I lined the interior with tape and drew out the boundaries to when I remove the tape I can unravel it and get a template for one piece of rivetted litho to dress the inside in one go.. ..next I wanted to get the positioning right so I can partly skin the scoop in aluminium and fit it so I can add all the fuselage skinning later on.. This took the entire morning to get right as it is such a critical feature of the airframe (not helped by the plans I was using having it in the wrong position too far back...) I put tape on the mating faces and added tiny drops of CA to hold it in position so I could add the filler - this process was then reversed to I make the part match the fuselage - the net result is the parts fit together seamlessly... ..it was also braced inside before I started so the filler didn't collapse under load... ..then the fist bit of ali skinning on this model - coincidentally the first on my Spitfire was also an air intake.. ..hard to see whats going on here, but on the right hand side is a sheet of soft ali under some masking tape - it is being held, rubbed,, stroked and tapped with a tiny hammer to start to conform to the shape of the roof. the black tape borders can also be seen at the nose - these leave an imprint in the ali so I know where the borders are. Its a tricky shape as not only the shape of the scoop, but also the flaring at the top where it fairs into the fuselage... ..I end up with a useable part that has adopted the shaping well.. this was added with contact adhesive... ..then the other side - this time with the added complication of the intake aperture.. ..it proved impossible to do the little intake in one piece so I added another in the inlet,,, then after cementing all the tape is removed and we have the base layer of ali down... you can see it's quite rough and creased in places, but this all sands out... after sanding aout all the defects the first sking is done & just needs finessing & rivet details but I will leave that until later ..the intentionj is to get all i can done while I have access (so a bit of the wing surface where this sits needs to be done too) and then fix the scoop in place,, the nose intake is next and that is going to be a real challenge TTFN Peter4 points
-
Just to show I am making some progress ...... I have both engines assembled ......some components can be removed for paint and I left off a couple of lines on each for painting them separately (call out for red and blue on those. No that I am looking at these .....I should of rotated them and got pictures from the other end ....will do that later and post them. Thanks for looking ! -Scott4 points
-
Looks good to me, the main thing is to enjoy yourself. Cheers Dennis4 points
-
4 points
-

"The Star of Africa" - Hans-Joachim Marseille's Do-335 A-2/Trop - Yellow 14 - FINISHED!
Alain Gadbois and 3 others reacted to Out2gtcha for a topic
I gathered the white 3 info from two different places about Marseille, but it could have been fabricated for all I know. Since it's a what if, I'm probably just going to leave it.......... On another note thanks to an LSP member I may have another couple of surprises for the Do-335! In the form of two Ruhrstahl wire guided missiles.4 points -

HK Models 1/32 Avro Lancaster
Whitey and 3 others reacted to richardchapman5 for a topic
This arrived in the mail today. Very happy with the quality of the PH and decals.4 points -
Thanks for all the info Jay - I have found the drawings of the panels and copied them to make up PE versions - also caught they are different each side as there is a hatch at the front of one side.. the panels denote the aperture angle so I will go with that - I think they will turn out pretty cool as I can get all the fastners etc as well. I am just about to get a test shot for a new Hobbyboss B24 cockpit set I am doing so have made up a P51 set with a load more bits & external panels I can get run in that test shot Thanks Kage - very useful - I am talking to Arthur about getting a 1/18 set but also he has some amazing CAD I want section drawings of too, however he is a bit busy with kit CAD work so will be a while I expect.. I will get there eventually - there is a difference by the sounds of it - to quote Arthur in recent correspondence: "the wings of the P51B and C were very different structurally from the P51D. The rib positions in the gun bay area were different, the wing root and undercarriage doors were different and the cut line for the outer wing tips was in a different location" I assume if the ribs were in different locations, the doors would be different too? so, Happy New Year folks & onto this P51.. having corrected the fin and added a dorsal fin, the stabilisers were next. I checked the parts and again unfortunately they were not up to my accuracy standards so I set about making new ones. I learned from my Spit not to make and skin the stabilisers before adding them (easy to damage the skins..) so I thought I would just get them built & added now.. ..started with the mounts & fillets - first I copied the aerofoil section in brass and used drawings to locate them, after that I added a brass tube to mount them to and started to set out the slight incidence they have... ..once all was set up they were cemented into position and filler added to start to blend them in - this is P40 car filler and is super useful for modelling - I taped up the brass face so as not to have to clean it up later.. ..after shaping & priming they were done.. ..the stabilisers themselves were taken from drawings and set out on 3mm plastic card (with marked rib positions) - as were the spars.. ..test fitting.. ..bulked out with more P40 and sanded until I can see the blach sharpie lines along the tops of the ribs.. ..and fixed with JB Weld - I drilled small holes on the mating faces to let the adhesive really get a good hold of the parts.. ..will clean them up later.. ..while they were drying, I started to think about the airscoop.. pretty challenging set of curves nad the resin part that came was not quite right, passable, but not perfect.. you can see the features here include a straight, sharp top, curved bottom and 'V' shaped fairing between it and the fuselage... going to be a laugh skinning this in litho thats for sure.. ..again, all the drawings are in aircorps library so I scaled a set of formers and a keel - the keel has had a bit of the hollow inside removed... ..this is the assembled according to the former positions and a big, hard card lip so get that top edge right.. ..I want to skin the inside in litho so made up paper & tape templates to get the shapes.. ..cut out the shapes, added rows of rivets and fitted them to the central tunnel.. you can see it is slathered in CA to give the whole thing rigidity as much will be removed from the structure.. also added a dam from card at the top to roughly shape the triangle fillet where it joins the fuselage... ..then the whole thing is covered in more P40... ..lost of sanding to do, so thats a job for the garden tomorrow before I go back to work on Wednesday TTFN Peter4 points
-
Post title says it all! Going to build this concurrently with the Mosquito. Tamiya F-15C + Speed Hunter decals + Eduard interior + Phase Hangar exhaust and seamless intakes. Will be ordering the resin when the intakes go live (hopefully this week), and there is plenty that can be done before those arrive. I started this kit a few weeks back - base painting in the cockpit tub, side walls and nose well, tub/well joined and nose weight added. No attention will be paid to the avionics bays as I'm building with canopy and panels closed.3 points
-
Howdy folks, I've just published my review of the new Halberstadt Cl.II (Late) kit from Wingnut Wings: Wingnut Wings 32062: Halberstadt Cl.II (Late) Thanks as always to Wingnut Wings for the review sample. Enjoy! Kev3 points
-

Italeri F-35A RNethAF
The Madhatter and 2 others reacted to mgbooyv8 for a topic
...And here is the F-35 with all its masking removed: I'm now in the process of gloss coats, polishing, another gloss coat etc. For gloss coat, I use alclad Aqua Gloss. For the Have Glass effect, I will use MRP Have Glass matt laquer. But being matt, that will have to be applied after decalling. To be continued! However, that will take some time, because I will be on a business trip the next couple of weeks. Cheers, Peter3 points -
I received a nice thick envelope in the mail today. It was from the the Archive Division of the Smithsonian Air and Space Museum. Some time ago I asked them if they had any material relating to the Aeromarine 75 Flying Boats of the 'West Indies Airways'. I didn't get any response via mail, so I figured the were busy or didn't have anything. So it was nice to get these documents from 1920, regarding the conversion of the US Navy F5L's into Aeromarine Airliners . Among the papers are some very detailed descriptions of what was changed, additional equipment, escape hatches and the like... Even descriptions of the layout of seats and materials used for the interior conversion... NICE! Thank you Smithsonian!!! This is just great stuff... Cheers: Kent3 points
-
Wow that looks awesome bub! It really makes things pop when its got that coat of primer on it. Fiddly, yes but the scale fidelity of the PE parts there is really noticeable. Looks way better than chunky plastic.3 points
-

2nd build in 30 years... Trumpeter 1/32 F4U-1D
Out2gtcha and 2 others reacted to R Palimaka for a topic
Welcome aboard! You're going about it the right way, don't fuss about detailing and accuracy and have fun. Build it for yourself, to a standard you're happy with. It's easy to get into a trap looking at some of the mind-blowing builds on this website, and thinking, "I could never do that!" ...and then not post photos. Of all the sites I look at, this is the only one I post on regularly, because the inmates here are generous and encouraging with their experience and advice. You will learn plenty here. And besides, you are doing excellent work so far. Keep it up and please keep posting. Richard PS: Welcome from a fellow Ontarian!3 points -
It all starts like this..................... First you get into a kit like this and just kind of jump in. Then you start figuring out techniques that work for you as an individual modeler. They will start coming more naturally as you get to using techniques that match up with the results you want. This goes for weathering too. Its all down to your individual tastes. Clean build, dirty build, try it all! You can chalk builds like this up to learning experience if it does not turn out exactly to your liking. Either way, its good just to experiment with things and see what you like and what works for you.3 points
-
Have been adding decals - using the kits decals for national markings - really not impressed with how they perform - and they needed lots of MicroSol to get them to bed down. Fuselage roundels will need a little more persuasion to fully conform around the rear canopy rail 'ears' - or I may have to slice and do some touch-up afterwards. Not had a chance to get any photos - but, maybe, later in the week. Iain3 points
-

Marine F-4J Phantom - Decal time!
Greg W and 2 others reacted to Durangokid for a topic
I decided to stick with the kit sparrow's since they seem fairly accurate. I just made a few adjustments to improve the look. I used this neat little tool for the rivets: For the lights I superglued aluminum foil down before adding the lens, it helps bring it out a bit. Couldn't find a lot of pics for the tank but I noticed this was missing: Another mod was to sand down the fuel door, it was way too pronounced according the the photos I was looking at. If I'm reading Daco's book correctly, my aircraft was an early J model so it still had the old radar scope. I cut it off the kit part and made some updates. I wasn't happy with the fit of the lens so I made my own. The superglue shrinks so it takes a few applications. I will sand it flush when it's all dry. Thanks for the nice comments and if any experts see something I'm missing, please let me know. Sorry I'm all over the place with the updates, I'm just trying to get caught up with what I have done so far. Bryan3 points -
Marine F-4J Phantom - Decal time!
Greg W and 2 others reacted to Durangokid for a topic
This is kind of a boring update but here is a few other modifications: I used iridescent film for my hud lens. It's really easy to do and it looks neat especially looking at it from different angles. The camera doesn't really pick that up though. I just glued to pieces on the bottom and it's done. I'm one of those weirdos that likes doing the weapons and pylons. I actually like it more than airbrushing which I always put off until the last moment, crazy I know. I try to look at them as a kit unto themselves. Which reminds me, I just spent a lot of money buying a bunch of weapons from Video Aviation and Eduard MER's and TER's. I really like the Video Aviation stuff and for this build I bought the MK-82's and the MK-20's. The kit MK-82's aren't all that great and it doesn't come with the MK-20's. I just can't see going all out on a kit and half assing the weapons plus I got a little extra Christmas money So here is the basic pylon. They need some extra detail and need some modification. The parts that attach to the MER don't look right and they don't match up well. After some mods and adding rivet detail. Sorry I don't know the name but I modified the parts that attach to the MER's. I'll just call these hooks that attach to the inboard pylons and this is the original I glued evergreen pieces to the bottom so I could reshape them: Then sanded them to this: I forgot to mention that I attached the tiny washers: I also added this: Here are the MER's and TER's. I glued evergreen to the attachments to they would fit snug to the pylon, it worked surprisingly well: Here they are attached to the pylons: The Eduard MER/TER's are nice but if I had to do it all over again I would have just modified the kit ones. Honestly, I expected them to have a bit more detail. You might notice some of the photos are a little better, I finally got my good camera working. More boring updates ahead!3 points -

Bang seat paint explosion help
Scale32 and 2 others reacted to Isar 30/07 for a topic
If there is a chance to untighten (I´m sorry, if this is not the correct term) the cushions without any damage, that´s the first step. Option #1: cover these parts with lead foil. Then you could do some crinkles to the into the lead foil, depending on the wear and tear the seat should have. Be careful that the parts would fit onto the seat once you put the lead foil on the parts - maybe you need some trimming. Add some filler (i. e. Gunze) if you like and then paint. Some wash and/or drybrushing would do the rest. Option #2: put some tissue onto these parts, dip some water with a drop of white glue onto using a brush. I would recommend to put the tissue plain to the parts without or without any huge crinkles (I haven´t seen any worn seat cushions so far but no rule without an exeption....). When the tissue has dried once again some filler and paint. Option #3: sand off the paint and some glue onto the parts. Mayabe you have to repeat this a few times to soften the styrene. Then you can do some crinkels using a knife, a little screwdriver or whatever you like. If you´re satisfied, let it dry. Next step is painting. Option #3a: Soften the styrene using glue, then press something onto the parts to create some texture, i. e. rough sanding paper. . I would recommend to try these options first, using some spare parts. You will see which one is perfect to your eye. HTH. Cheers Reimund3 points -

Revell 1/32 Lockheed P-38J Lightning
Trak-Tor and 2 others reacted to D.B. Andrus for a topic
Tim, thanks for taking the time to give the ins and outs of Trump's P-38. From what you say it'll make into a good looking model w/o heroic efforts. Was considering a Ju 88, but will start by trying Woody's (Archer Fine Transfers) technique of filling divots on the 38 - link is on his F4F build post. Appreciate You, (Time honored East Texas expression) D.B.3 points -
Everything that Tim posted is right on the money. The Trumpeter is a better kit, but depending how you want to go, it can be a lot of work or a whole lot of work. Did do a build on one for a GB, a lot of work but i'm happy with the results. If i did another i would still start with the Trumpeter kit... Don3 points
-
Yes, the Trumpeter kit is light years better for overall accuracy, though still not perfect. It's chief shortcoming is that the recessed rivets are way too big and deep, as are the panel lines. However, most of that can be corrected by some primer and sanding, which you'd want to do anyway to get the finish smooth, get low spots out, etc. The lines aren't too bad for placement, either. The pit and gear bays are still pretty sparse and not 100% accurate, but they can benefit from some good AM, of which there is quite a lot available. The gun bay is crap, though, so I'd close it up unless you want to do a ton of scratching. Even the available AM for the gun bay doesn;t even get it close, to my eye, anyway. Having built both, the Trumpeter kit is still the way to go if you're wanting an accurate final product but it will still take some work. I keep hoping someone like Tamiya, HK, or ZM will eventually make a really good one. The Revell kit is still a fun OOB build for the price if you wanna bang one together in a weekend for giggles. And Juraj is the guy who can pull this one off like no other! Tim3 points
-
Steve, wow - thanks for the kind words! I'm still kicking around, though the past year has been a bit of a knock down - drag out sort of fight for me. Suffice it to say (without getting into too many boring details) that I'm up, I'm more or less ok, and I have every intention of finishing this kit at my first opportunity. I've found another - far crazier than I - who's done even more impressive work to update and correct the numerous small, but important inaccuracies of the Trumpeter kit. John Wolstenholme has an absolutely stunning WIP going on over at ARC. Absolutely worth a click through and a few minutes to see the art he's created as well. Many of the fixes were almost identical to my own, but many many more were pure genius in how he solved a number of issues. At any rate, thanks again for checking in. I hope to be back in the modeling saddle again sometime this year. Cheers! Brian~3 points
-
Yes, that lower intake on B/C/D mustangs is offset from the lower wing surface due to boundary layer interactions (I'm an AERO eng). That weird thing on the drawing is in fact a fresh air intake and I think it might be cockpit fresh air?3 points
-
FINISHED: Eduard 1/32 P47D Thunderbolt “Dottie Mae”
coogrfan and 2 others reacted to Sir Spendalot for a topic
More work on the Jugg. As per Matt’s post, the butchered front end. A quick test fit shows this to work a treat: Main engine parts before weathering: Main engine parts assembled with ignition wires and a bit of weathering (black and burnt umber oil mix): I plan to finish the weathering with a few pigments. And finally, the wheel wells. I initially tried Tamiya’s yellow green but it appeared to be too green. This final colour is AK's new Real Color Yellow Chromate: That's all for now. Paul3 points -

ZOUKEI MURA 2019-2020 - NEW P-51B/C, Bf-109G and Ar-234 ANNOUNCED!!!!!!
Rick Griewski and 2 others reacted to LSP_K2 for a topic
I don't really have a preference for either brand, as long as the finished product gets reviewed out as OK. I have no particular loyalty to any brand.3 points -

CSM Nieuport 17 (Late)
Rick Griewski and 2 others reacted to Bill_S for a topic
Some more details... Cockpit bracing is complete. I don't much care for passing the EZ-Line back through one of Bob's Buckles tubes! A couple of small parts still to add - I painted them on the sprue. Finally, some assembly. Rudder pedals, control stick and seat still to come...3 points -
The wing join makes the cannon fairings a bit misaligned as the join passes straight through them. I wanted to make sure the barrels lined up and also fix up the area in question at the same time. First up, I drilled out the holes that the barrels fit into and fitted some brass tube. I then used the length of the brass tube to ensure that it was aligned with the longitudinal axis of the the model and glued it in place. I repeated it for the other barrel and did the same on the other wing. These tubes were then cut off with a small amount protruding to match the area where the barrels fair into the wings and the rear of the barrels themselves, I punched out some disks from plastic card that exactly match the diameter of the cannons. These disks were then fitted over the ends of the brass tubes already glued into the wing and then the wing was filled and sanded to match the diameter of the disks. Notice that I have also drilled a section of brass rod into the barrels that will give them plenty of strength and and also slide straight into the tubes glued into the wings. Dry fitted. I can leave these off until the last minute to prevent them from becoming damaged.3 points
-
building the interior, many parts and lot of painting thanks for looking jan3 points
-
And here are examples of the paint scheme, from the Classic Colours Jagdwaffe series: I actually hope to do "White III" some day, too.
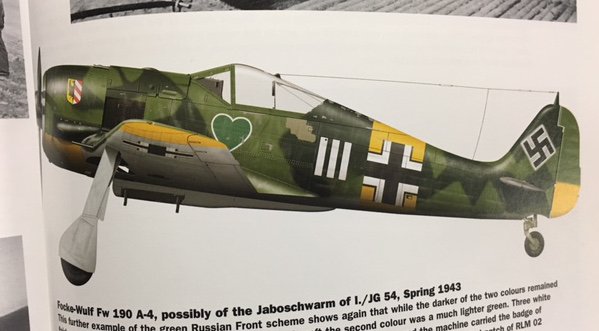
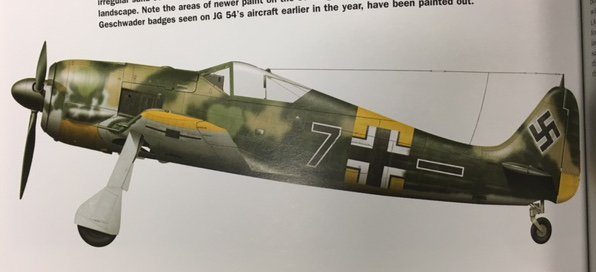 3 points
 -

Academy F/A-18 kit Landing gear
ringleheim and one other reacted to red Dog for a topic
never had a problem with mine2 points