

airscale
-
Posts
2,736 -
Joined
-
Last visited
-
Days Won
87
-screenshot.thumb.jpg.298329c8beec50ab4251aadd92774628.jpg)


Recent Profile Visitors
24,532 profile views


-
 scvrobeson reacted to a post in a topic:
airscalePro 1/32 Typhoon - kit design WIP
scvrobeson reacted to a post in a topic:
airscalePro 1/32 Typhoon - kit design WIP
-
 scvrobeson reacted to a post in a topic:
airscalePro 1/32 Typhoon - kit design WIP
scvrobeson reacted to a post in a topic:
airscalePro 1/32 Typhoon - kit design WIP
-
scvrobeson reacted to a post in a topic:
airscalePro 1/32 Typhoon - kit design WIP
-
Zola25 reacted to a post in a topic:
airscalePro 1/32 Typhoon - kit design WIP
-
Zola25 reacted to a post in a topic:
airscalePro 1/32 Typhoon - kit design WIP
-
KUROK reacted to a post in a topic:
airscalePro 1/32 Typhoon - kit design WIP
-
 Kagemusha reacted to a post in a topic:
airscalePro 1/32 Typhoon - kit design WIP
Kagemusha reacted to a post in a topic:
airscalePro 1/32 Typhoon - kit design WIP
-
Hubert Boillot reacted to a post in a topic:
airscalePro 1/32 Typhoon - kit design WIP
-
Grunticus reacted to a post in a topic:
airscalePro 1/32 Typhoon - kit design WIP
-
JayW reacted to a post in a topic:
airscalePro 1/32 Typhoon - kit design WIP
-
it's not the end of the world, just frustrating.. there are many places where it is too thick but I have nearly solved that with a full rebuild of the internal surfaces using a much simpler method.. the fin tip was too thin so the whole fin has been redesigned as I couldn't just reshape it - we are talking tenths of a mm, but rules are rules the chin can't be done as I designed it - i already split it off at panel lines as it was too difficult to assemble as was (sliding the wing belly into the nose with a cockpit sat on it), but the radiator shroud inside it can't be done as I want it so thats a head scratcher.. the fin post was too thick in total so risk of sink marks but I can redo that now I have a new fin the prop boss mount on the forward fuselage left a dead angle in the mould that meant the part wouldn't come out with a separate chin, so that will need to be another part the cockpit around the IP and door must be 0.5mm, they don't like it, but I won that one but still need to make transition changes to the thicker full part skin ..I have exploded all the surfaces and have started the rebuild, you can just see the split of the chin - this is a natural panel break, but the fit needs to be bob on thing is, this is all stuff you learn once, so i am hoping I cut my teeth with this and then I can knock up a kit a week after that Peter
- 81 replies
-
- 11
-
-
-
airscale reacted to a post in a topic:
airscalePro 1/32 Typhoon - kit design WIP
-
airscale reacted to a post in a topic:
airscalePro 1/32 Typhoon - kit design WIP
-
..and the verdict is in.. guess what, I have to completely redesign it... ..this kit is going to take longer than I thought...
-
the new parts for this build will arrive tomorrow better resin and brass cores - much improved Peter
-
airscale reacted to a post in a topic:
Airscale 1/24 Bolton Paul Defiant
-
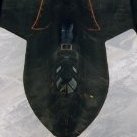
Hi Jay - in this case I do have drawings, well access to lots of them anyway from Ian Slater's collection at Typhoon Legacy, but there isn't a drawing for everything obviously. In the absence of a drawing there are a number of valid options - you ask how much guesswork? Some, sometimes.. Lets say you want something like a Defiant fuselage (and the same for the Veltro I started) - there are no drawings; that I have access to anyway so what to do? Well, I started with every 3 view (especially Jumpeii Temma's) and photo I could find, especially any that are in near linear views like side, plan, front etc. I also bought model kits, the Defiant had just been produced by Airfix in 1/48 after LIDAR scanning Cosfords so that was assembled and sectioned in 1cm bits which gave me about 15 cross sectional outlines after photographing them. All of this is rolled up into a draft 3D curve model in Rhino as the basis of the shape. After that it is photo interpretation, like where do the exhausts go - well, find a good period photo and line up enough valid reference points and it goes where the photo(s) show. Rinse and repeat. For more complex details a bit more work is required. The cockpit, undercarriage or systems parts for example - here the same process is used but to scale something you don't have drawings or linear photo's of means you have to use what you do know. For example I know the dimension in the nose between the skins that this radiator sits in.. ..that means every other dimension can be derived (guesswork see..) and copied allowing for printing limitations so it can be reproduced.. ..the 'shock cone' thing on the front is reproduced in the same way - what do you see.. ..you see the outer ring is angled,the inner 'pipe' is straight, the inner vanes are at 45 degrees, there is a lip at the rear so reproduce what you see. It's depth is unknown to me so play until it looks right (guesswork again..) rinse & repeat.. ..my folders are stacked full of images I have imported into rhino to do this.. ..and therin lies in my mind, kit perfection.. Very well produced IM major parts that have excellent surface detail and good assembly qualities, partnered with incredibly finessed 3D parts that take away all the limitations of IM parts for details That is kit experiment number two Peter
- 81 replies
-
- 18
-
-
airscale reacted to a post in a topic:
airscalePro 1/32 Typhoon - kit design WIP
-
airscale reacted to a post in a topic:
airscalePro 1/32 Typhoon - kit design WIP
-
airscale reacted to a post in a topic:
airscalePro 1/32 Typhoon - kit design WIP
-
airscale reacted to a post in a topic:
airscalePro 1/32 Typhoon - kit design WIP
-
airscale reacted to a post in a topic:
airscalePro 1/32 Typhoon - kit design WIP
-
..another milestone, the IM fuselage blank is complete for assessment by the mouldmakers.. ..there are many new rules of design I am not sure I have met yet, but this after weeks of work is at least the start.. clearly the cockpit needs cutting out and many other structural bits need doing, but the area there needed to be thin for all the cockpit structure..plus all the surface detail needs doing of course.. ..we will see, I will probably have to completely redesign it Peter
- 81 replies
-
- 21
-
-

-
airscale reacted to a post in a topic:
MDC + Revell car door Hawker Typhoon kit bash
-
just wonderful to see Jay - every part engineered as it was designed and finished to perfection I would love to put Cripes and Lopes Hope together one day Congratulations on the end of an epic project - to say you have come a long way since you started would be a huge understatement, your skills and critical thinking to get from archive to bench are highly tuned now So, your next subject... I too was in the rabbit hole that is the wonderful Aircorps Library - the thrill of finding the right drawing and developing a component, then up the tree until you have all the components, added to the deep seated need and assurance it is 'right' is truly addictive and kept me in a box for a long time.. In my case, they also had to be natural metal as I can't (& don't like) painting so even more restrictive. I guess I am saying over time and maybe not the next model but one day, I would love to see you break out of that cage and take on something else - it is so liberating. I am with OBG, as observers we all want something new - you have done a P47 and with what you bring to this place we would all love to see a new bird, but of course the choice is yours and we will root and gaze in awe at whatever it is The SBD, F6F, Bearcat, Wildcat, P39, P40, TBM and even the PT17, N3N & Staggerwing are very well represented with drawings - I used to check can I find a seat, a panel, U/C legs and good cross section 3 views - if I could, I was in - it could be done anyways, whatever is next, I felt it my job to turn the screw slightly and perhaps make you think all the best & again well done, it's been a blast Peter
-
Hawker Hurricane 1/12 scale scratch build
airscale replied to hurribomber's topic in Works in Progress
fantastic work, truly superb I am sure you do this already, but I learned the hard way so will share with others - when you have original drawings like this, ALWAYS, and I mean always check both the lateral and vertical dimensions where stated are what they are. Just an example of each will do. So if it says 15 inches, is that still 15 inches when relative to a vertical measurement. I learned the hard way that digital repro's of these sorts of drawings get all sorts of distortions. For example I am working with Typhoon drawings and every single one is squashed laterally no matter where I got it... Peter -
I am sorry this didn't work out.. ..but then again, this is one of the best build threads I have ever read, I love the way you write So, in summary, while you did not enjoy yourself very much, I can tell you for the greater good, I did....... very much Peter
-
review Airscale Pro 1:32 Boulton Paul Defiant Mk.1
airscale replied to Iain's topic in LSP Discussion
Hi Ray - yes, the first 100 are long gone and the second batch of 50 nearly so I am very happy I have proven the experiment, got my money back and can invest in my next kit -
review Airscale Pro 1:32 Boulton Paul Defiant Mk.1
airscale replied to Iain's topic in LSP Discussion
Hi Neils - they have just taken delivery of an order of airscale stuff, but no kits. Despite requests, I have not made them available to any retailer or distributor simply because the trade rate is such a substantial whack on kits that are very limited high cost / high effort productions, that it soon becomes uneconomic. I hope that changes with my next kit. Until then, I can only apologise Peter -
airscale reacted to a post in a topic:
Airscale Pro 1:32 Boulton Paul Defiant Mk.1
-
I am sorry to hear about these delays in customs - if they contact you about any order please let me know and likewise I will let you know if they contact me. It seems sporadic, some get through and some seem to be in there for days hopefully they will all flow through soon Peter
-
thank you for your considered points of view chaps couple of things - firstly only the wing surfaces (incl. belly) and fuselage halves will be injection moulded - absolutely everything else will be 3D printed. I have indeed spent a lot of time thinking about it and doing my research, some of it one of the world's best kit designers so I am comfortable the output will not be 'a limited run kit' kind of vibe - these will be IM parts of the highest quality if I design them right. in fact Brett Green had this to say about their last production "Although this is still technically a limited run kit, the quality really is very good. The plastic parts are well moulded with no sink marks or other obvious flaws. Flash is minimal Surface texture is particularly good. The fuselage accurately depicts overlapping panels, while the rest of the kit features crisp and consistently recessed panel lines and rows of rivets." That, with the quality of the Defiant clear parts is enough for me in terms of it being the right choice in terms of mouldmaker. In terms of why do it at all, I think that even though I did my best with the Defiant, there are (and will always be) layer lines - fine if you can have at it with a sanding sponge as there is recessed detail, but it is very hard to work around anything raised. that, plus my inability to get clean mating edges AND surface detail in the same print (I got one or other in testing) means for the end user - you guys, IM parts for the main structures is a win, win. All that plus I can make more means it is a compelling reason to redesign I will soon know if I was right or not, if my sanity lasts that long that is Peter
- 81 replies
-
- 21
-
-
-
well.... i am doing it - the main parts will be IM great for you guys, but sad for me - this lovely wing for example... scrap... weeks of work... ..I can use some of the design as templates, but IM has very specific rules for successful mould separation and surface detail, none of which is complied with in this design.. back to the drawing board.. I would love to, but that's even more design & complexity so to keep a reasonable timeframe I have not chosen to do open panels, or an engine - much as I want to clearly it is, surely...well maybe, well maybe not... I know what I want to do next which will be Biblical if I can pull it off Got to stay focused and get on with the rebuild.. Peter
- 81 replies
-
- 21
-
-
-
thank you everyone very kind a little development update... I am talking to the IM folks about doing the fuselage & wings in plastic - the Defiant clear parts were so good and they have 'previous' which is very very high quality it all comes down to cost as usual, but I think this might change the game a bit as with a good subject like this I can shoot for higher numbers and a lower price will update here of course if anything comes of it, but I need to decide as the design is obviously different for IM parts, but it would massively simplify things as unlike the Defiant, the pilot sat on the wing spars as part of an open tubular structure which means I am having trouble with basic modular decisions like how to fit the wings, how & where to split the fuselage, in what axis - all printing design problems taken away by IM interesting times Peter
- 81 replies
-
- 16
-
-
-
thanks all fantastic encouragement well Max, as an exception I will print a few bits for your superb build and hope they compliment it ..and this is why every day is a schoolday... exactly the kind of feedback this WIP is here to get What thought did I give? not much as my brain was in 'can it be done' mode. Now, however, I can have a think and a play with some tests to see how I could make painting easier. The little tank at the wing root, is coming out, the piston assembly would be better as a part, or I may just take the complete spar and it's lower wing panel out as a separate part thank you Tony, a great reminder that sometimes it seems achieving one goal, can be at the cost of others Peter
- 81 replies
-
- 11
-
-