Leaderboard

Popular Content
Showing content with the highest reputation on 12/28/2021 in all areas
-

My 2021.
Anthony in NZ and 13 others reacted to Stokey Pete for a topic
As 2022 approaches, and I have my Group build completion submitted, I thought I’d share my completed works for this year. I’ve had quite a productive one compared with previous years, for me anyway. 4 builds across the 4 quarters of the year. Trumpeter Harrier Gr7, not my finest finish, and a bit of a bear to build. A Kitty Hawk Mirage 2000C. A nice enough kit with a few curious engineering choices, but it’s built up nicely enough for my cabinet. Next we go big or go home. Trumpeters epic Flanker. I threw the kitchen sink at this one, including the most ambitious paint job I’ve undertaken. And, I’m rounding of the year with my Shelf of Doom Group Build entry. Tamiya’s F-15E, with a deadly arsenal of JDAMs and AAMs from Reskit and Zactomodels respectively. And that’s my year done. I have a couple of projects for 2022 that will take up my year, and I think that will be it for me, my stash will be empty. I have the Jetmads Viggen, and 6 colourful Vipers to build. After that I have no idea what, or indeed, if I’ll continue to build anything. Best wishes to you all, and here’s to a better year in ‘22.14 points -

My completed builds for 2021
Granger Davis and 8 others reacted to Pete Fleischmann for a topic
Here are my completed builds for 2021: cheers P9 points -

RAF FG.1 XV571 WILD HARE Phantom Conversion
Rockie Yarwood and 8 others reacted to Anthony in NZ for a topic
Thanks Zac, and of course thanks Gene from me also! Thanks Kev, I am pleased you are hanging in there with this with me! Quick snap before bed. Tonights efforts are sorting the thrust line of the Spey and setting the engine section angles and heights. But I soon realized the intake trunking went too far back and I had to get my cutter out and move them forward about 8mm. This took the fan front to the correct station frame. How I got the station frame wrong I dont know, but its right now and the engine fronts look much better further forward. And Kerry's lovely CAD engines are more visible. Anyhoo.... off to bed9 points -
RAF FG.1 XV571 WILD HARE Phantom Conversion
Seversky and 8 others reacted to Anthony in NZ for a topic
Thanks @vvwse4. They are really good photos. On seeing those it confirms to me what a brilliant job @Gene K has done. I still have the centre piece to put on top of the main plate but I am just getting a nice tidy edge where it is glued on. Interestingly the Brit ones had a lot of PEC type filler all around these plates, but on other photos they look very clean like these ones you posted. Here is where I am at And have started working on the structure inside the Aux air doors... Cheers Anthony9 points -
Last update for this year still needs fine tuning but thats next up in the new year. Mark7 points
-

My completed models 1/32, in 2021.
Jeff T and 6 others reacted to Miloslav1956 for a topic
7 points -
Well I couldn't leave this alone: Cheers, Tom7 points
-
"The sky over Munster was boiling. They took a bearing on it and checked their ground-speed. Bang on time—good. Some aircraft must be off track, though; else the Munster gunners would have nothing to shoot at. But for the most part the concentration looked tight. Bombers were actually visible all around them and Queenie bounced over many a slip-stream. The force flew on past the Ruhr. In Frankfurt the sirens sounded the alarm. In Remsheid they unwittingly signalled all-clear. Then the stream wheeled westward. Throttles rammed forward, noses dropped, airspeed indicators pointed towards 250. Surprise demanded speed and every aircraft was straining forward. The Remsheid sirens, recently so smug, changed their minds and tunes to quick alarm. Fighters circling over Frankfurt received frenzied orders to hurry to Remsheid. But the bombers had a fifty-mile start. Tactics had succeeded." Ollis, Ray. 101 Nights . Wakefield Press. Kindle Edition. Happy Holidays everyone! I've most recently focused on finishing the nose art, which for this Lancaster meant both port and starboard. I found this tribute to the artist, Tom Walton, to be valuable: https://clarencesimonsen.wordpress.com/category/tom-walton/ In an interview he mentions that he used green for the Vargas girl's dress and shoes, something I didn't realize when I modified the Kits World Decals. Here is what she looks like for "No, Not Now": ...and how I modified her: Kit's World has a white outline around the figure, but a close look at the original photos show's a very faint black outline. To match this I used a Sakura Pigma black 005 pen: It was my impression that the artist used stock colors for painting her, but in an interview from the attached link he indicates that her dress and shows were green, something I will have to correct. For her hair, shoes, and dress I used dilute coats of Vallejo paints until I was satisfied. The starboard nose art was trickier, and I made sure to practice first: And what I was striving for: Here's what I came up with: It's probably not perfect but I'm pleased to have this captured. I used the black pen again for the details, and a sharpened toothpick dipped in Vallejo paint for the text. Until next time! Cheers, Tom7 points
-
Hello everyone, Merry Christmas and Happy New Year to you. I want to share one of my recent completed models - 1/32 Siemens Schuckert D.III from Roden. I used only instrument decals, HGW seat belts and MG cowls as aftermarket parts for this build, everything else was from the box. Please enjoy the photos and subscribe to my YouTube channel - https://www.youtube.com/c/FlyingCircusModels to see build videos.6 points
-
I mean... to rectify that issue I should have to disassemble and destroy what I have done so far, and being unique parts I would have to redo them from scratch, also risking damaging the site in the spat. I'll simply live with this shame, moreover in such a perfect model... to be 100% honest, I should already have done those lights again... look at the real thing: you can see that the bulb is bigger, the bulb holder is round base, not square, and the circular inspection door is flushed with the spat. ah, and the parable is much more bright and shiny than the mine. better forget this chapter and carry on with other horrors... e.g. the cockpit's greenhouse. the kit's parts are as thick as a glass block wall, so I have put them aside (in the bin) and I'm trying to redo them with lids of food trays and plasticard. obviously they have a shape of their own, and they are also different from right to left. did I already mention that modeling is suffering? ok, let's say that roughly we are. mating with the rear slide also seems to be fine. but, but... what isn't good *italian terrible blasphemies* is the trend of the longitudinal frames of the sliding canopy! here you can see how they converge towards the tail, while those of the kit are parallel. *again, loudly* okay, I'll try to redo that canopy as well. form this time in plaster, which last night I didn't want to play with Fimo. from here on, fingers crossed, please. modeling is suffering, but also patience and perseverance. I can do it, uh-uh. cheers, Paolo6 points
-

Tamiya 1/48 F-16C
AlbertD and 4 others reacted to TankBuster for a topic
Hi, this is my first time at showing a model on this site and also first model with my new camera a Panasonic Lumix G-85 and 30mm macro lens. Model was not easy as all sprues were warped in box when opened, tailfin had to be replaced at my cost the rest I got away with although had trouble with seam between fuselage halves. Onto the pics if they show up. Cheers Bob.5 points -
LSP 2021 Christms Raffle Winners!!!
Rick Griewski and 4 others reacted to simon417 for a topic
I'm bit late to the party here but if it's good with everyone (admins etc) , I'm good with sending the kit over to Coogrfan. Simon5 points -
As promised, more pictures. I have completed assembly now apart from two antenna on the bottom, which will get added tomorrow. I have added the landing gear before painting so that I can get a good, solid, glued joint. Time will tell if that was not wise! Also added enough weight in the nose to avoid it tipping up. About 23 grams if my memory serves. Certainly not as much as the 40g in the instructions. Just some final clean up to do and then on to the paint booth.5 points
-

ICM doing a new Yak-9 family of fighters in 1/32?
Dpgsbody55 and 4 others reacted to Kagemusha for a topic
A few profiles to whet the appetite Komrades.5 points -

1/35 ch-47 chinook’s (yes two) :)
themongoose and 4 others reacted to matt_1185 for a topic
Dry fitting the larger parts there is a few decent gaps in areas and as Simmerit says the belly does not go together flat but should be able to work all that out.5 points -
Yes, have to think about it.... Here is some testing with main wheels...5 points
-
My completed models 1/32, in 2021.
dodgem37 and 3 others reacted to Miloslav1956 for a topic
4 points -

EA-6B Prowler (02 April: Done!)
JeepsGunsTanks and 3 others reacted to easixpedro for a topic
Quick update... been busily working on the stores. Have all 3 pods built and have slowly been detailing them. Same for the HARM LAU and the drop tank. Here's a poor pic as proof. Was checking the fitment before I move onto the others. Peter4 points -

Make the others jealous
dutik and 3 others reacted to Rick Griewski for a topic
I sold a few models to take a big step up from my Combat Models vac kit. Good friends came together and bought me a cool Lancaster kit.4 points -
A small Christmas update - She is up on her own three legs now! - It is not a tailsitter and the landing gear feels very sturdy and can easily take the weight of the model. I have the armament almost completed as well - I chose to swap them all out for the excellent Eduard Brassin sets. The included weaponry is perhaps the biggest letdown of this kit. Still have a fair few smaller things to complete before I can call this done - don´t know why but I always seem to drag my feet at this point in my builds... /Niels4 points
-

New ICM WW2 US plane kit?
Violator1991 and 3 others reacted to thierry laurent for a topic
Sorry but you are wrong. For Trumpeter engineers, TBD probably means To Be Delayed!4 points -

Make the others jealous
Uncarina and 3 others reacted to BloorwestSiR for a topic
Stopped by the LHS yesterday for Boxing Day and picked up a couple new kits. Like most Tamiya kits, cheaper here than buying overseas, especially with shipping these days.4 points -
It’s big girl time! got this kit for Christmas and I’m in love! Haha now I need to order some more live resin figures and some up grade parts for it. So keep an eye out lol this girl is big!3 points
-

My 2021 builds
Trak-Tor and 2 others reacted to Tolga ULGUR for a topic
Hello everyone, Here is my 2021 build list in chronological order. In advance, Happy new year to all 1- 1/32 Hasegawa – Grey Matter P-40L Warhawk 2- 1/32 Hasegawa Focke Wulf FW 190F-8 3- 1/32 PCM Spitfire Mk.XIVe 4- 1/48 Hasegawa TF-104G 5- 1/32 Hasegawa Spitfire MK.IIa 6- 1/32 Dragon Messerschmitt Bf 109E-7Trop 7- 1/32 Dragon Messerschmitt Bf-110D 8- 1/32 Hasegawa P-40N Warhawk 9- 1/32 Hasegawa Messerschmitt Bf-109G 6 10- 1/32 Special Hobby Hawker Tempest Mk.V 11- 1/32 Hasegawa P-40E Warhawk 12- 1/32 Special Hobby Westland Whirlwind Mk.1 13- 1/32 Hasegawa P-40N Warhawk3 points -

Engineering data for scratch builders - what is most helpful?
Anthony in NZ and 2 others reacted to AirCorps Library for a topic
Hi Mozart - one of the things that we've done on the site to try to make things easier is having our site members enter the descriptions on drawings, rather than only having them identified by their part number. Part numbers are the most efficient way to locate a drawing you are looking for (see my blog about this if you haven't already), but we wanted another way to navigate the site. You know from looking at drawings that there is a description of the part or assembly in the title block. When I initially upload a set of drawings to the site, they are only identified by part number, 89F71104 in the example P-47 drawing below. From there, any member can add the description, or title, to this file = "Bracket Assembly Gun Sight Support". Once that is done, if you were to search within the P-47 area for the term "Gun Sight" or "Bracket" etc, then this drawing would come up as a result, along with any others with those words in the title. This has been our way of making an "index" of sorts, but of course there are difficulties - the main one being that you have to know a bit about how the draftsmen were labeling drawings in order to get the right term for a part. When thinking about data packages for modelers, I suppose I could export a list of all the part numbers and the descriptions that people have added as a reference. Then they could just be in numerical order by part number (which would group similar assemblies together - if the manufacturer had a part numbering system) and would function in the same way that a numerical parts list does at the end of a parts catalog - only with descriptions.3 points -

LSP 2021 Christms Raffle Winners!!!
Rockie Yarwood and 2 others reacted to Phantom2 for a topic
A really big THANKS to all of you who organized and participated in this drawing! I almost feel bad about it now as I didn´t donate anything, makes me feel like a real cheapskate! But I promise, next year I WILL donate a kit, decals or resin sets! Cheers! Stefan3 points -
Thanks for pulling this together Kevin. And kudos to all LSP members making this possible.3 points
-
That would be great. PM sent.3 points
-
Thank you Kev. If it was a model type that I wanted, then yes, I would gratefully accept the offer. However, in this particular case, I am happy for it to be re-drawn or donated to another LSP member please (I am still very grateful to Simon for offering and donating it to me in the first place, it is a very generous thing to do - thank you). Derek3 points
-

New ICM WW2 US plane kit?
Rick Griewski and 2 others reacted to MikeC for a topic
"De gustibus non disputandum est" (In matters of taste, there can be no disputes). Anyway, whilst ICM are doing trainers, they're also doing late-30s/early 40s combat types like the Gladiator, so can I bring this back on topic by saying that an Avia B.534 series would be most welcome.3 points -
My completed builds for 2021
Anthony in NZ and 2 others reacted to Pete Fleischmann for a topic
you know what they say: big feet… big shoes. P3 points -

1/32 JA37 Viggen (Jetmads)
IvanVasili and 2 others reacted to Zola25 for a topic
Yes I also had issues with that joint. The middle fuselage section was pretty warped. I left out the inserts as they did not support the other part due to the warping anyway - but I found that the middle section could be forced into shape by applying some pressure to it so I glued the top half of the joint first and let that dry thoroughly. I then came back and glued the lower part while forcing it into shape with my thumbs. I kept holding it in place for about a minute to make sure the glue was dry. The lower part of the joint will mostly be covered by the Gun-Pack so you will not loose any detail when you sand it clean afterwards. /Niels3 points -

ICM 1/35 CH-54?
scvrobeson and 2 others reacted to Smeds for a topic
I am surprised no one has produced a 1/32/35 SeaKing yet, apart from the Sunray one that is.3 points -

Hawks Miller HM-1 " Time Flies" 1937 from scratch scale 1/32
Rick Griewski and one other reacted to Marcin_Matejko for a topic
Hello everyone As Wedell Wiliams 45 is slowly approaching the end of construction. So while the paint was drying, I started building a new project "Time flies". I recommend : https://en.wikipedia.org/wiki/Hawks_Miller_HM-1 https://www.efootage.com/videos/60380/frank-hawks-time-flies-speed-flight?fbclid=IwAR0P7FbX9LQlV6y6gZzPweJPrMi2_boDIXvjS3KZNgzis_FSXm_JUbk4QnE https://www.gettyimages.fi/detail/video/frank-hawks-demonstrates-his-new-six-miles-per-minute-uutismateriaali/1B012258_018?fbclid=IwAR30O_4orS9FAF4lznnLYTlPGqsIRosmra7Czsk9LdUOoDrHCVQtvrS0rg4 For the project, I will use elements of other models that will be appropriate for processing and changing the shape. Such modeling scrap recycling. The hull from the old "Meteor" 1/32 is a good base for this model. Maybe because the Lindberg model is an extremely hopeless set that does not resemble "Meteor", nothing at all. The hull, however, required narrowing and improvement of the upper part. I also removed the wing nests because the HM-1 has wings lower. The wings come from the old Monogram P-61 set, after modification they fit well. I made a base for the vertical and horizontal stabilizer from scratch. Now I have to fit it together. That's it for now, the next part will probably come one day2 points -
Hi all, Firstly, a very merry Christmas to you all! Like many of us I suspect, I'm a serial starter of builds, but not a serial finisher of them! I was offered this kit by a friend for a very reasonable price and couldn't refuse! He'd completed the first few construction steps up to and including joining the fuselage and painting the cockpit before shelving it. I'd heard great things about this kit and it's been a while since I've built a Tamiya kit. Starting point for me was tidying up, repainting and weathering the cockpit. Once I'd done that, I needed replacement belts because I'm really not a fan of belt decals, even Tamiya ones. I fashioned some primitive replacements. I've not decided if I'll display the engine, but regardless, painting it was a very enjoyable task! The fit of parts is really remarkable, especially the wing to fuselage join (dry fit above and glued below). And that's it so far, progress has inevitably slowed due to the festivities! Matt2 points
-
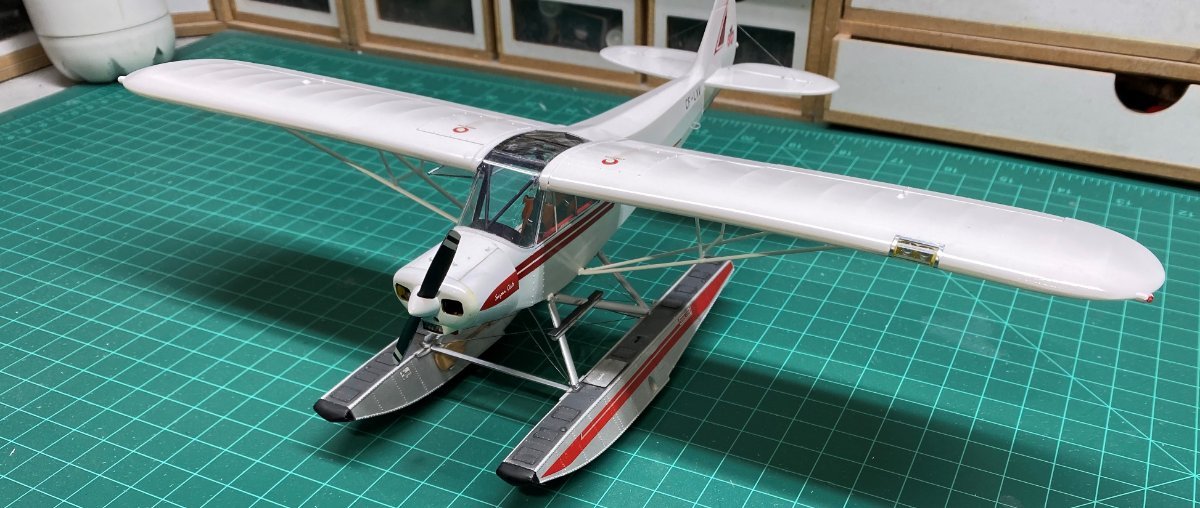
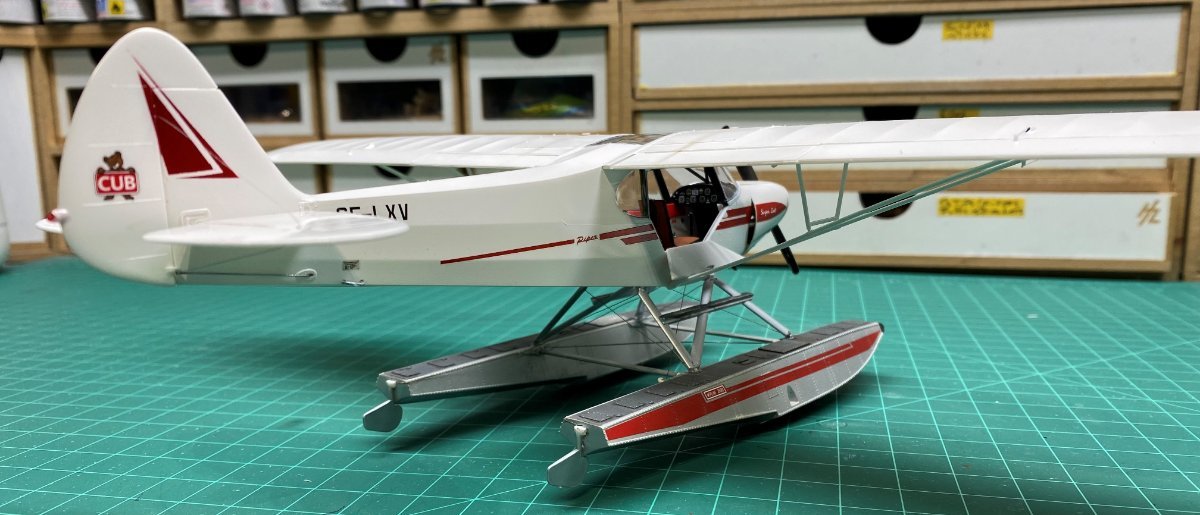
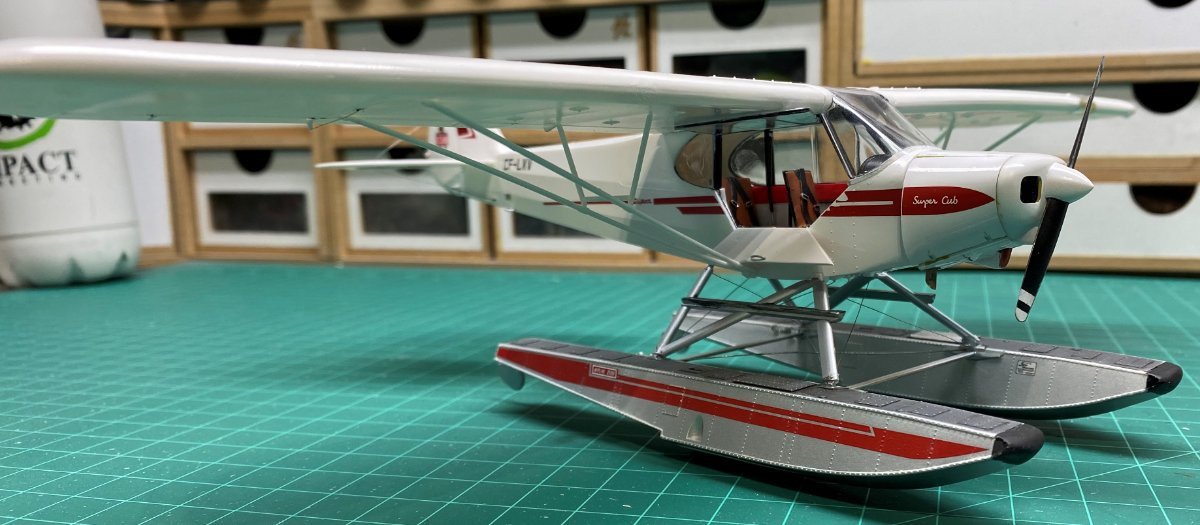
Kicking off the gallery in style is chrish with his very nice Piper 18 floatplane. Tremendous. Link to build thread;


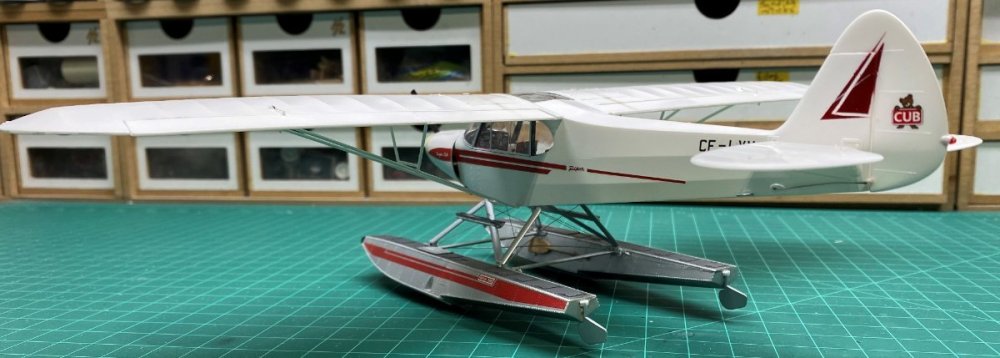
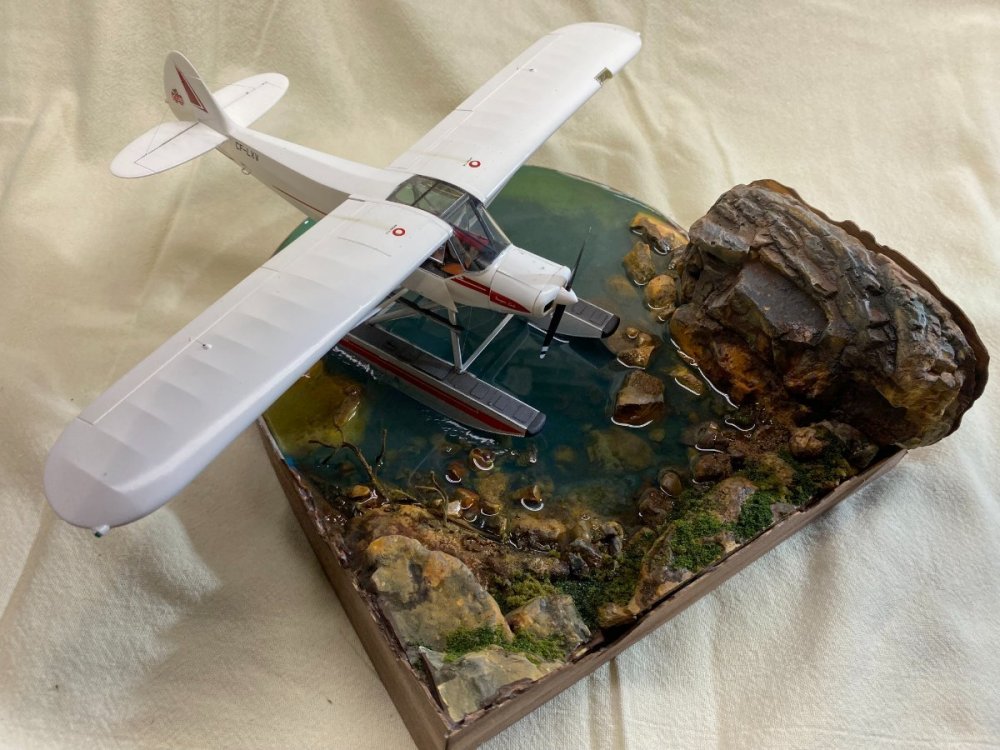
 2 points
 -

Possible solution to Ca application, and other delicate applications of liquid
Martinnfb and one other reacted to Citadelgrad for a topic
I have seen glue loopers, etc, the cut sewing needle, and other solutions for applying CA in small, controlled amounts. My experience with CA involves and endless yoyo between nowhere near enough to none in place, with instantly failing joins, to a flooded mess obscuring all detail. I recently got interested in watch repair videos on youtube, and saw something that might fit the bill. Watchmaking, repair, actually, involves use of fine oils and greases to pivots and jewels. Because of the dirt attraction properties, these lubricants need to go in very specific places. The tools used are, of course, applicators, they look like little spoons, of varying sizes depending on the viscosity and amount of material needed. I thought this might be the ticket for us CA impaired modelers. My set, ordered off ebay, came today. Here are photos, I won't get a chance to try them out for a few days. This particular set is a name brand, because I also plan to use them on watches, but there are, uh, generic copies, in single sizes or sets, for very reasonable prices. Here's a close up of the business ends If I can determine which one will hold just a drop of CA, I will report back. EDIT: Watchmaker's oilers will get you these tools on ebay https://www.ebay.com/itm/154685624454?_trkparms=ispr%3D1&hash=item2403fb5086:g:C4QAAOSwN0BhhQHU&amdata=enc%3AAQAGAAACoPYe5NmHp%2B2JMhMi7yxGiTJkPrKr5t53CooMSQt2orsStEKTPzZMfQmny3knR97t0L3yeh5bAJ2VVA3enGvWWIDnGD7hK0yjnDietRmjJmB7ztpj9ABrLhNXm0gHTmwe1fshXlYX99rISuHXuGoaWCsnmQTs7%2FCfHDVuXA3EtDF%2B7eqXTdxxHf5uaJNfr28j9P7kHOBGJF85jBk8FmiJhz4rbLVAgWXHL4kYyVJfwN2FQtTk%2Fz4BJTMzlFBhf%2BwaF4eBlYE%2BBF6t3%2FjBqAsAi0951jbIZ31RpIumm0dWlbUjk6zLm3o9lM14%2Bo814TIQb3EnQ7CgjiPqG5L0C53RNxjaoUjA7tUcQEKqDWjjXGHo5LFoPmMLsUR54mkdkrC9SrXlP%2BE5X%2BbGYdSQP0T3P67WX2%2BW557oYHYPrA%2Fx1cFRNnRC3x5kXiQlau8cf2nIh1rDTNLZRKFn%2BJhY5L%2B88Lq%2FMHk7tCYyiqDFrz64yrkEjeiRWqV5QgZY6S1WPwDxdXqsPJ0UW7fYQAmenIHyCLDENkeYDsjzdpc7Wsfku8FPiIDQilwEqPm%2BR8yooZLv%2B5BiWUi0g7tPmvBxchVrkLnf8Si9bnbk7HJcpPAJ%2F2Nnoefk9yvY3ZrZbjoNCYqjN95EDdMZWB1k%2F04K0tZf5sZ373th3fIuS1hOq%2FxSZKj8MRYdatjYy3JQ%2FjxfDjhFbMWIbDyk3A0X6zmbGm9S248qT79YNhOQdPPBiTsP%2BSrifZgMV26Uql4oo0mMy2rLEVJgA1wwYMLNIp0marmurZvZwF%2FYndoY4Q81wO%2B6FSC7KyT1HS6k%2FuVMgXrpBlVT5yvQwCzC%2Fe%2F84qP4nniY67vqy9ZCqC48dDEizBhfSiDIe%2Fz4WasCXI90NBaWyId9UA%3D%3D|clp%3A2334524|tkp%3ABFBM3pa8sMBf2 points -

HK Lancaster Cockpit
FreightDog and one other reacted to Greif8 for a topic
It has been a while since I posted a completed build; this past summer and fall were interesting times for me to say the least. I was able to get back to the bench in late November and finished the Lancaster cockpit kit I began working on in May. I did a lot of scratch building on this build adding several electrical and hydraulic lines, as well as making some electronic components. Scratch building is one of my weaker modeling skills so I was pretty satisfied with how the build turned out. The nose section is marked as an 83 Squadron (Pathfinder) aircraft circa the spring of 1943. Ernest The only weathering I did on this build was some very minor scuffing of the paint in a few areas. Most of the scratch building work I did can't be seen well - or at all - but, a few of the lines and pieces of equipment can be seen. I did a build thread on the "In Progress" thread, so if anyone would like to see more of the scratch building it can be seen there. The electrical lines turned out pretty well, and look the part after painting. I added a small red LED light thinking it might make for some neat "mood" pictures.2 points -

1/32 Trojan T-28B - Kitty Hawk
Brett M and one other reacted to Jarda_Hajecek for a topic
Happy to present a T-28B/D from Kitty Hawk. I would say many pages have been written on the kit itself. It is a well fitting over-engineered kit with much cleanup required and some illogical ejector studs increasing the cleanup time. Once you are past the initial part cleanup the kit fits together exceptionally well, its just the kit is pieced up to sometimes absurd number of sub-assemblies, which seem to be typical for Kitty Hawk. The kit was built as a commission build for a friend of mine that is building a collection of 1/32 aircraft in tribute to his father. I have enjoyed the build and took some artistic license on hanging the training weapons as the paint schemes for most aircraft in the kit are warbirds anyway. Based on the customer requirement the engine is all closed up, otherwise the kit provides opportunity to open the engine up. One word of warning: at least in my kit the balance weights provided were not enough and I ended up with a tailsitter that was solved by attaching the kit to a wooden base but please be aware and check before you get surprised. Cheers, Jarda Hajecek2 points -
Make the others jealous
Maxim61 and one other reacted to Rick Griewski for a topic
Christmas present to myself2 points -

LSP 2021 Christms Raffle Winners!!!
LSP_K2 and one other reacted to Phartycr0c for a topic
Thanks again Kev for running this always great event @themongoose Kitt will be got off to you tomorrow morning all being well. Congrats to all the winners.2 points -
ICM vs. Roden Stearman PT/N2S Kaydet ?
mozart and one other reacted to thierry laurent for a topic
Hi Dave. I do not have any of those two kits but have other Roden and ICM kits of the same era. I love the bold topic choices made by both companies but must admit that such ICM kits are clearly better molded and easier to assemble. If there is no accuracy difference I would choose the ICM option.2 points -

LSP 2021 Christms Raffle Winners!!!
coogrfan and one other reacted to Landrotten Highlander for a topic
Perhaps there is a solution to the t*****p with Coogrfan?2 points -

ICM Tiger Moth
jeroen_R90S and one other reacted to mozart for a topic
Thanks Zac, for me ( and I’m not sure if this is a blessing or a curse!), the devil is in the detail. The ICM kit has looks pretty good so far but it will be interesting to see how the build goes, plus AM of course. I’m sure the stitches are too heavy without sanding lightly Jeroen, I’m away from home at the moment but will have a better look at redressing this tomorrow. Cost though is an issue…..I’ll need more than one sheet for the wings but each sheet is quite expensive ($17.95 per sheet though I don’t know if that’s Canadian or US dollars) plus postage from Canada.2 points -

AIMS 1/32 Mistel S3
Paul in Napier and one other reacted to monthebiff for a topic
This is what I managed, took a little time but was pretty happy with the results Never used them but managed to get the shape after heat treating the brass. Regards. Andy2 points -

1:32nd scale Salmson 2-A2
airscale and one other reacted to sandbagger for a topic
Hi all, Just a few updates. The wheels have 'Aviattic' linen weave effect decal applied. The landing gear is painted ready to assemble. The two Lewis and single Vickers machine guns are prepared for fitting. The 'Proper Plane' laminated wood propeller has got it decals and semi-matte clear coat. All of these have yet to be weathered etc, Mike2 points -
Hawks Miller HM-1 " Time Flies" 1937 from scratch scale 1/32
R Palimaka and one other reacted to Marcin_Matejko for a topic
Wings fitted and glued to the fuselage: The next step is cutting out the main landing gear chambers and re-separating the wings from the fuselage.2 points -
Managed a sneaky hour yesterday afternoon! The Archer stitching transfers settled dow very well with a coating of MicroSol, but what is clear is that more than one sheet is required for a single aircraft, so another order's on its way Woody!2 points
-
JetMads 1/32 Viggen
mattcour and one other reacted to Stokey Pete for a topic
I’ve got to say a massive well done to Jetmads again. Not only did they get the missing parts out in quick time, but after some more dry fitting and attempting to get an acceptable fit, and failing, they’ve also offered to replace the fuselage parts. There was just no way I could confidently alter it without risk of breakage, or altering the shape, and causing further fit issues down the line.2 points -
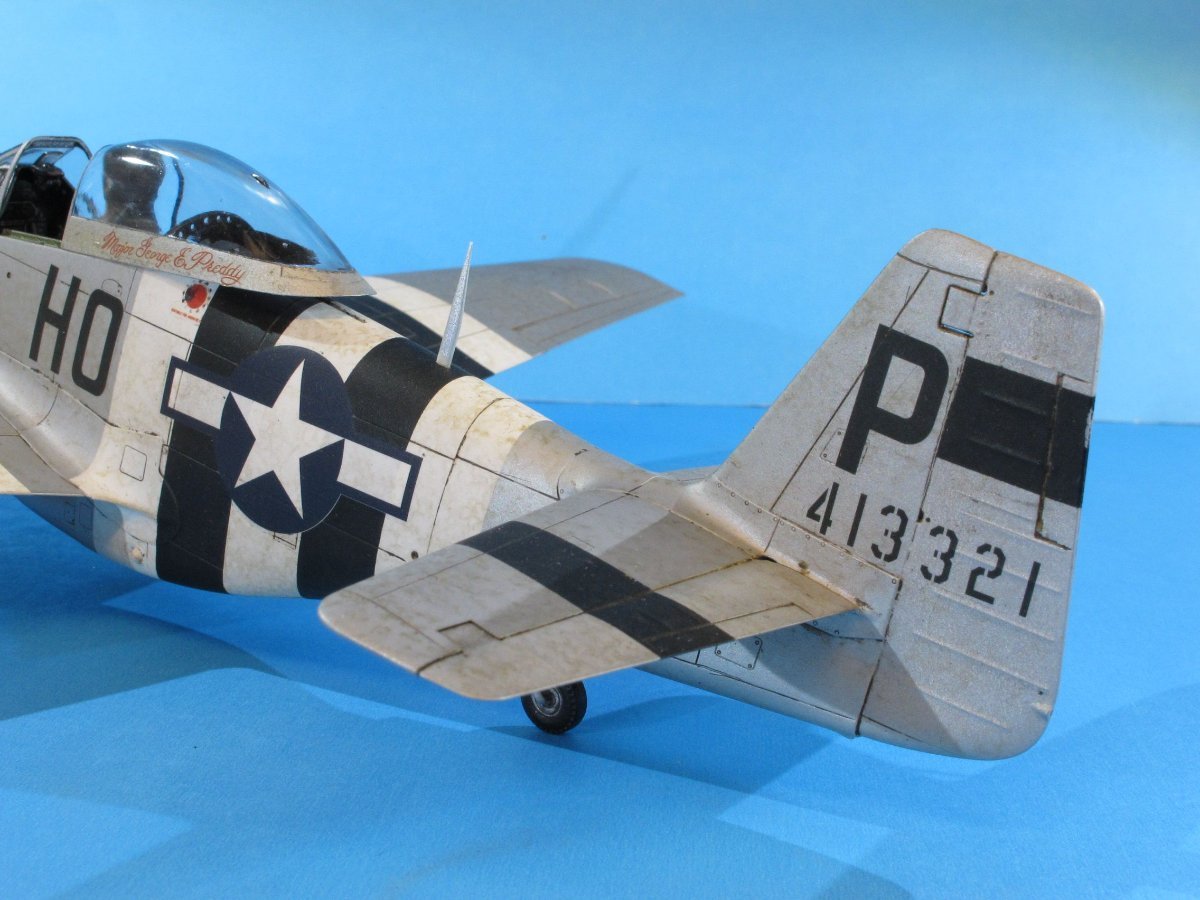
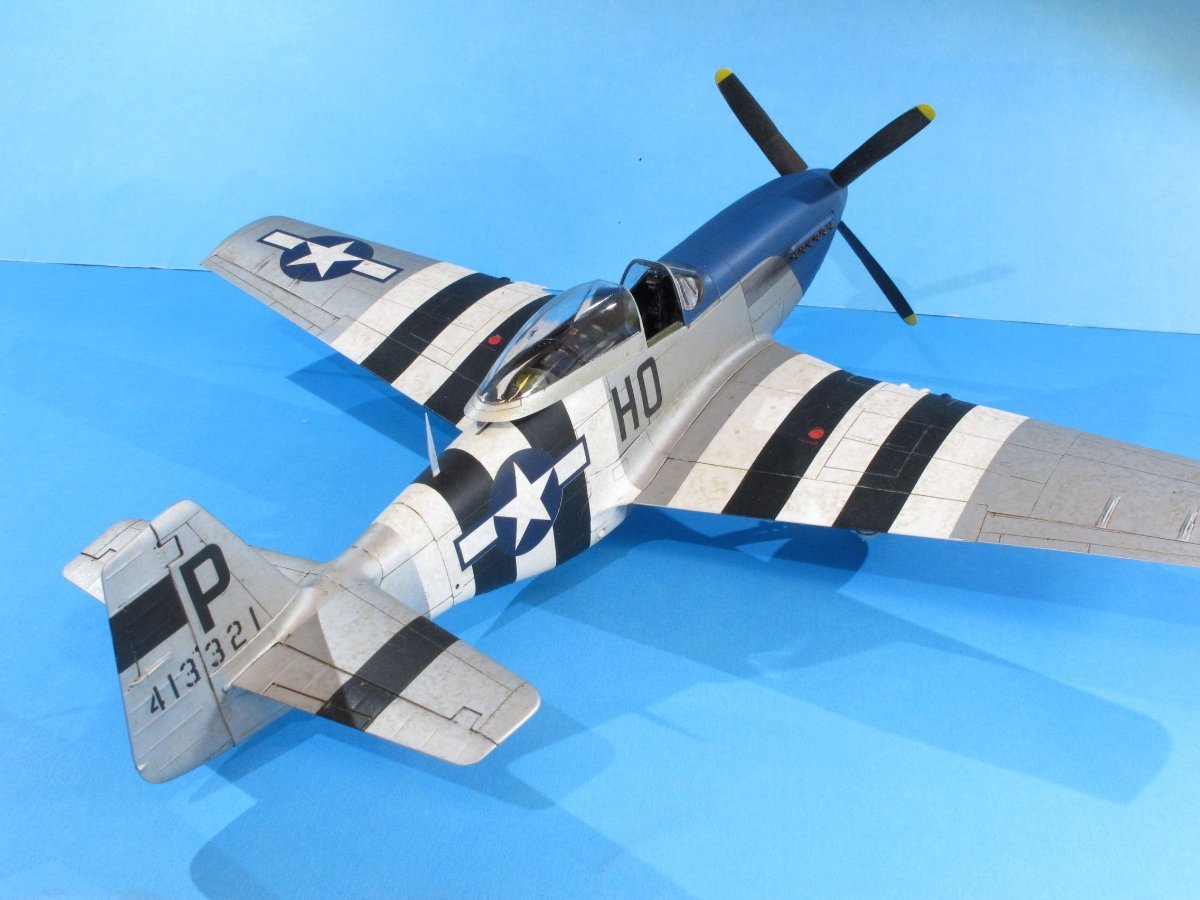
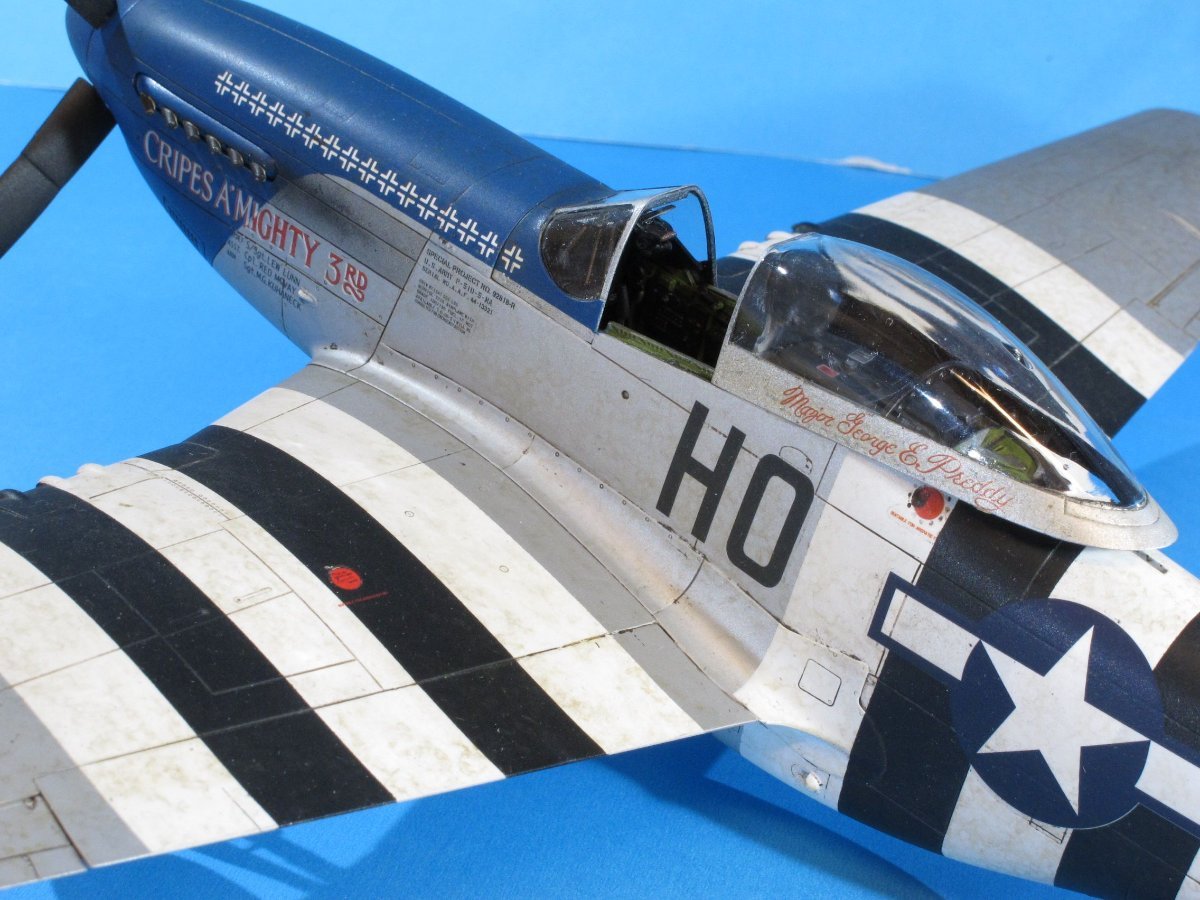
dmthamade brings us a blue nose P-51 from a blue box. Great work mate, I really liked the weathering. Link to build thread;


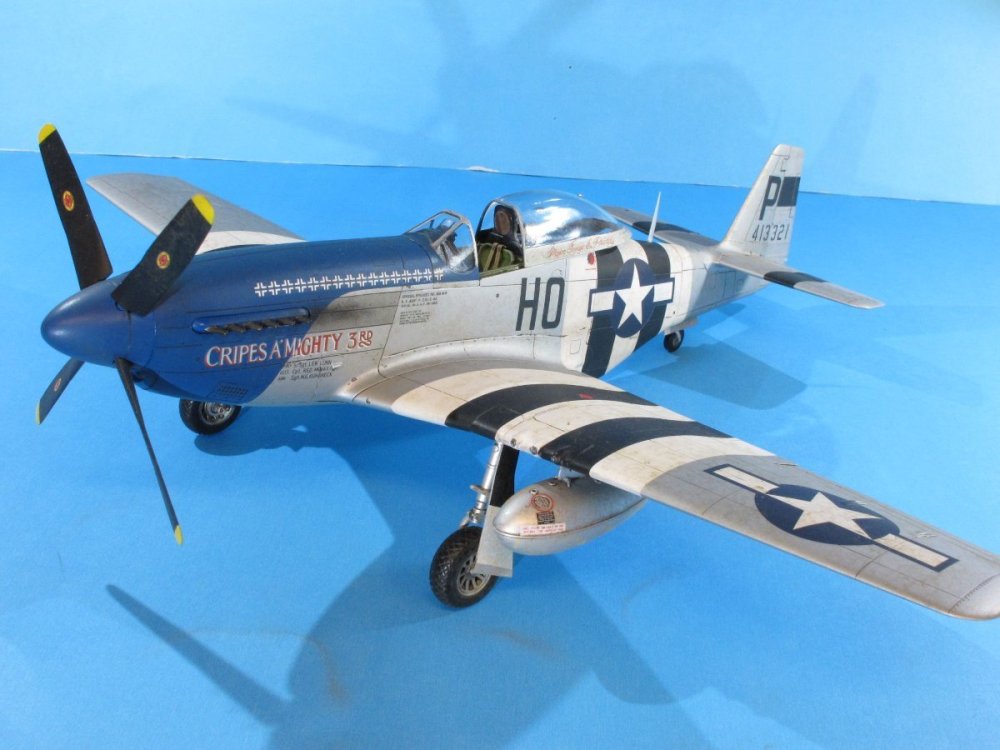 2 points