Leaderboard

Popular Content
Showing content with the highest reputation on 11/19/2022 in all areas
-
The Hurricane wing is a complex design that combines a horizontal middle section to which are attached outer sections that feature a dihedral as well as swept-back leading edge and swept-forward trailing edges, all of which have an aerofoil cross section that causes the wing to change from "fat" at the front to "thin" at the back. This means that by simply changing the angle of the camera, the wing will look differently. In any case, as I explained earlier in the thread, the model wing has the correct dihedral. The "flat wing" that you see in these photos is a visual artefact caused by the above-mentioned combination of the wing's many angles and the viewing angle of the camera. Here are some photos of the assembled test shot that I have in my possession. I also added a ruler to indicate the "horizontal". The propeller was removed for clarity. Please keep in mind that this is an even earlier test shot than that shown by Revell, so the final product will be different in some places. Also, this test shot was assembled in haste (test shot, not a competition model) so please ignore any assembly issues, glue blobs, uncleaned attachment points, etc that you may see. Just to give you an idea of how fickle camera vieweing angles are, have a look at the change in the angle of the wing top and bottom that happens if the camera is moved up and down just a couple of centimetres - this is caused by the fact that the wing not only has a dihedral but it also has a swept-back leading edge. It is subtle, but I am sure that you can see it. In any case, please be assured that the kit wing has the correct dihedral. I really hope this helps. Radu37 points
-

RAF FG.1 XV571 WILD HARE Phantom Conversion
amurray and 13 others reacted to Anthony in NZ for a topic
LOL, there is always one @Derek B thanks for the images. That piece on top of the scope panel really stumped me. It's on some and not others. Looking closely at XV571 and a couple of other period pics I decided to go with the version I did. Thanks Buddy, yes the dreaded pet mishaps! I've lost a few bits n pieces that way too! Thanks again for your help today mate, Kerry is pretty happy with your assistance So who knew Phantom Navy rudder pedals were different to Air Force ones? I didnt. Kerry surprised me with this fact last week and then after doing a CAD realised Brit ones were different again! So here are the kit ones This is Kerrys final renderings...they'll hardly be seen, so only we will know. But I am thrilled to know they are there and accurate But I did ask for help with the TESS outside section of the periscope...thanks again! Big shout out to Rick @Spooky56 for the very detailed set of measurements for this!! Thank you sir This is a global effort with this project and cant claim much praise for this myself. You guys here, Britmodeller and the British Phantom Aviation Preservation and Phantom Builders Facebook groups have humbled me with your collective efforts. I think I have learned more than I ever imagined about Brit Tooms than I thought I ever would have. All of you who who have helped me out to this point, a huge "THANK YOU" So back to plugging away on adding and detailing more in the front office I am hoping to get this front tub epoxied in soon Until then...see you soon Anthony14 points -
The model shown by Revell is built correctly. Due to the breakdown of parts it is impossible to build the model with "zero dihedral". Even if there was some way to build it with "zero dihedral" by accident or incompetence, there would be gaps in all kinds of places. How can one make angles in parts disappear without repercussions? As I explained already, what you see in the photos from Revell is an optical artifact caused by the camera angle. I have the model in hand now, I can replicate that "look" just by turning it in my hand. There is nothing wrong with the Revell model, it is all geometry and optics. Radu12 points
-

Z-M Messerschmitt Bf109G-14
TAG and 11 others reacted to tucohoward for a topic
Now that it was time for the wings I did deviate from the instructions a little bit. ZM would have you install the wings and then install the sperate fillets after. I decided to install the fillets first and was left with a basic Hasegawa-like wing installation. Fit remains fantastic. I had my doubts about the wings with so many pieces having to come together but it was great. Cheers, Jay .12 points -
The oft-quoted statement that “the camera never lies” is just that, a total lie, which I’m sure is also “true” in this instance of wings and dihedrals. An example from my own experience; when I did my Bf110G4 I went to extraordinary lengths to make as sure as possible that the FuG array on the nose was square and parallel in every plane…..not easy as those who have attempted it will testify. But come to taking pictures and……doh, the array looks all over the place! I believe this is a phenomenon known as parallax? Don’t trust photographs!!11 points
-

B-25J Mitchell "Ave Maria" 1/32
JayW and 10 others reacted to Tomas Duck for a topic
Thank you guys for all comments Today will be a small step only, gunner seat and my interpretation of leather. It's not something extra, but maybe it will be enough. Now I´m working on re-charging system of guns, after this I can assemble turret together. BR Tomas11 points -

HK A20 Sprue shots
blackbetty and 10 others reacted to Phartycr0c for a topic
engine nacelles. difficult to see the detail but its subtle and looks like it will take a wash well. Cockpit details NOTE! weighted wheels. Nose area detail. Note there is currently a full glass nose for the RAF versions in development which will be included in the kit. Pretty standard 50 cal renditions. The MG barrels aren't too bad but the build will definitely benefit from brass barrels. upper turret detail One of two engine sprues. cant be seen well in this photo but the cylinder moulding is lovely and crisp. That said, close look it appears that some of the cylinder head mouldings may have a few sink marks. This may not be an issue in subsequent copies. Engine nacelle parts. clear parts Superbly clear and free from defects so there you go. I have no instructions or decals options although there is a hankering for an A20 with invasion stripes. Wish me luck!11 points -
length; 26 inch wingspan: 20 inch10 points
-
Thanks for the comments everyone! I'm still waiting for some aftermarket items to arrive, most notably the Eduard PE Interior Set. Looking at the clear instrument panels, I discovered that the one for the Razorback does not have molded detail on the faces but the plastic is still very thick. So I fiddled with the idea of drilling out the gauges on the clear instrument panel... it did not go so well! Needing something else to play with without actually starting the build, I decided to check my color options for the Olive Drab/Neutral Grey finish. I have these colors in both Mr Hobby Aqueous and AK Real Colors. Here are the colors shot on a test mule with a flat coat applied. Mr Hobby on the Left, AK Real Color on the Right and my attempt at figure painting in the middle.10 points
-

Finished !! 1/32 Spitfire Mk.XII ( Hasegawa + Paragon + Warbird + Grey Matter )
MikeMaben and 8 others reacted to Tolga ULGUR for a topic
It's time to stand up I have used SAC metal landing legs. Ventral fuel tank hooks are from Tamiya Spitfire Mk.IX Exhaust stains and some weathering applied9 points -
Hello everyone, Here are some pictures of my F-16D taken from my book "Hangar No 1" co-created with the the excellent modeler Jarek Rydzu Rydzyński. Academy model with several additions including: - Cockpit: Wolfpack WP32030 - Canopy: Eduard 32692 - Wheel Bays: Aires 2129 - Exaust Nozzle: KASL Hobby K32002 - Decals: Techmod 32057 Happy modeling my friends, Rene joycraft.ca8 points
-
You do not need to worry about the correct configuration for the Mk.II. Everything is accounted for. As explained by Revell in their press release and by me in my posts, you are looking at test shots. Radu8 points
-
Z-M Messerschmitt Bf109G-14
Paul in Napier and 7 others reacted to tucohoward for a topic
Thanks, guys. I wanted to go with the tall tail but had already committed to the 30mm cannon cover in the cockpit before I did much research. At that that point I found that pretty much only WNF produced G-14s had the 30mm and that all WNF G-14s had the short tail. Would anyone actually notice or care? Very few, but I haven't built a short tail 109 in some time so it's fine. Tall tail on the next one. Rafju, hopefully this meets your requirements Jay8 points -
This time the most difficult model I've worked on. In addition, I received it already started. As it turned out, a lot of parts missing for example side windows. The model is difficult, the instructions are terrible, in fact, I can only recommend it to very advanced modellers. WESTLAND WESSEX HU.5 SKY 1:327 points
-

Mig-23ML Czechoslovak People's Army
Piero and 5 others reacted to Miloslav1956 for a topic
Today update.6 points -

WNW SE5a
R Palimaka and 5 others reacted to Greif8 for a topic
Plugging away on the build. I want to replicate the shadow of the framing on the underside of wings and tail. I decided to try to get the effect using the pre-shading method. After priming I sprayed the lower part of the wings and tail with some Tamiya Earth color. Though I sprayed all three parts with the Tamiya, I only went through the entire process with the upper wing, so that is what will be shown in the following photos. Spars, etc., masked off. This was a bit involved as I had to cut Tamiya tape into strips; 2mm wide for the spars and 1.5mm for everything else. I sprayed the wing with some MRP Clear Doped Linen (CDL) Varient 2. Right now the wing reminds me of some of the wooden framed houses one sees here in parts of Bavaria and Austria. I Then airbrushed several very light coats of the CDL to try to replicate the shadows of the wooden sections. The final result was not as good as I had hoped, I did not get the effect completely uniform. I am very likely going to revisit this to try to improve the effect when I work on the lower wing and tail.6 points -
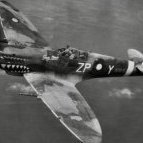
IIA wing? I'm in! (photos by my dad Dave Yates) (photo by me)6 points
-
HK A20 Sprue shots
Rick Griewski and 4 others reacted to Phartycr0c for a topic
Right folks, where did that week go? Anyhow, with grateful thanks to Neil at HK I was provided with a copy of the new A20 kit to build but before I do here are the sprue shots for you to peruse. To head off the are they releasing this that or the other, Neil has told me that the next version of this will be the A20 K . This is the G model. I am in no way a Havoc expert per se, and I must also point out that the photography is with my phone under my living room lights so its not perfect in any way. A first for HK, the kit has stressed skin rendering which is both subtle and not overdone. On with the show. Note the wing to fuselage attachment is HK's very successful bayonet solution. It means that the wings are easily removeable for storage or transportation. Internal detail is nice, a few ejector pin marks but they will likely be hidden anyhow. Wing texture is outstanding and rendered really crisply. Note, the wing internal structure and locator pins look like they will serve to form a sturdy structure. Bomb bay details. The marks accross the bottom of the bomb bay are structural moulding NOT ejector pin marks. on the subject of which there are a few on the Bomb bay firewalls. Again, not sure they would be seen. End part 15 points -

TopAces F-16’s
phasephantomphixer and 4 others reacted to Pete Fleischmann for a topic
Check it out- Ex Israel AF Vipers cheers P5 points -

received this one from Dan............guess what!!
scvrobeson and 4 others reacted to Dandiego for a topic
Glad to see that finally got there. Enjoy. Dan5 points -
First, it's difficult to believe that a kit with obvious details included that they wouldn't have gotten the dihedral right. The radiator, knuckled tailwheel fork, spinner, blades, fishtail exhausts, carb intake looks a little flat. This dihedral issue doesn't make sense as the final product. The 3.5 degree dihedral is on the top of the wing. The bottom dihedral is obviously much more due to the taper. The recent Revell P-51s and 262s have wing spars as part of the landing gear bay so it's logical they would have one here too.5 points
-
HK A20 Sprue shots
Supersonic and 4 others reacted to Phartycr0c for a topic
Part 25 points -

For People who fancy a really big Lanc.......
Kagemusha and 3 others reacted to notanotherrainydaykit for a topic
If you've got enough money, what a thing! Also there's some great Hi-res photo's for people with big Lanc's in their stash.... Lot 420 - Lancaster Bomber Cockpit, (flintsauctions.com)4 points -
There is no "horrible angle". To me the Hurricane looks great from any angle. Radu4 points
-
It's garnered a lot of discussion, and as P.T. Barnum once said; There is no such thing as bad publicity, though Gerard Ratner proved him wrong.4 points
-
There were two spent ammo ejector holes in the undersides. This how Fly tackled the issue, vinyl masks to scribe the panels/ejector holes, and resin gun barrels, but no bomb racks included.4 points
-

THE EYE OF THE STORM! Revell Hurricane
TankBuster and 3 others reacted to VMA131Marine for a topic
The test shot that Radu shows is correct, the model in the Revell promo material is wrong and clearly so. I'm now willing to ascribe that to a poorly constructed test shot versus problems with the parts themselves and I for one at glad to have been proven wrong by the additional image Radu provided. Revell did themselves no favours by publishing images of a test model that looks as incorrect as this one did.4 points -

RAF FG.1 XV571 WILD HARE Phantom Conversion
Derek B and 3 others reacted to Confusionreigns178 for a topic
Just to prove it's a small world, the brother of a friend of mine used to be a Toom navigator in this squadron. His aircraft is now preserved in the Battle of Britain hangar at Duxford. Thanks for sharing your build with us. Chris.4 points -
My thought as well. While there is a lot of flak regarding the shapes of this kit, the discussion centers around the released images, for better or worse. Let's not resort to belittling others for their comments regarding said images. Discuss the images. As always it is best to have a kit in hand; in lieu of that, all we have right now is these images. To me, shapes look good, but the cockpit looks worriesome.4 points
-
Finished !! 1/32 Spitfire Mk.XII ( Hasegawa + Paragon + Warbird + Grey Matter )
MikeMaben and 3 others reacted to Tolga ULGUR for a topic
By the way, after building this multi brand Spitfire XII, I hope that any company to release a large-scale new tool Spitfire Mk.XII model. Remember Murphy's rule..4 points -
It does help a lot - I'm sold!4 points
-
And please do not forget at an other forgotten pipe ;-)4 points
-

THE EYE OF THE STORM! Revell Hurricane
scvrobeson and 3 others reacted to Dpgsbody55 for a topic
The picture shown in the announcement does look poor if it's supposed to be a Hurricane MkIIb. I'd agree the wing dihedral looks wrong and the cockpit looks a bit like one of those photos taken through thin linen, but I'd like to wait until it's finally released before passing further comment on that. The one thing that is unarguably wrong is the lack of guns for a MkIIb which should have twelve guns. This one looks like a MkIIa, which was the fastest production Hurri, and perhaps the nicest to fly. More power than a MkI, but about the same weight. The Hurricane had a slow rate of roll, and sticking two more guns in the outer wings wouldn't help that. Personally, I hope all the criticism of this kit is not actually warranted and that the kit matches the standard of Revell's Me-262. Something better than the Fly kit is needed and if it is up to the same standard as the 262, then it should do well for them. And I hope the aftermarket chips in too. Lots of options for MkII Hurricanes. Cheers, Michael4 points -

Gloster Gladiator "Royal Egyptian Air Force" [ICM 1:32] - RFI
Panzerwomble and 3 others reacted to Alex for a topic
I decided that I ought to try and get the cabane struts attached to the fuselage prior to painting. The idea of trying to juggle all 8 struts simultaneously after all the pieces had been painted was giving me hives. So how to align them properly? The upper wing is much too heavy to use it as a form by taping the struts on (that was try #1). So I made this little jig that could fit around the tops of the struts and hold them at the spacing they need to have to interface with the upper wing. It's just a paper rectangle, as it appears. So I then taped the lower ends of the struts in place on the fuselage, and dropped the jig on top to get the top ends spaced correctly. The other important thing besides spacing is fore-aft position. Looking at the upper wing it's apparent that the tops of the forward interplane struts and the forward cabane struts basically fall along a single line. So I sighted this line on the model before gluing anything to make sure I was placed correctly. After double checking everything about eight times, I glued the forward cabane struts only. I let them firm up for ~30 minutes, then removed the jig and measured their separation and re-checked fore-aft. A tiny bit of pressure tweaked them to darn close. I then glued the rear ones one at a time, carefully measuring to make sure they had the proper rearward separation from the front ones (1-1/32") and were square and level with them. This is what it looks like with all four installed. As you can see, I've also mounted the landing gear legs. Further I've done a bunch of lingering fiddly things like removing the antenna mast from the top of the vertical stab (in the Mark II Gladiator it is on top of the rudder instead), drilling holes for the rigging that attaches to the vertical stab, masking off the cockpit, etc. I *think* that all is in place for me to shoot primer on the thing next. Obviously I also wedged that big piece of 5/8" dowel into the nose so I have a handle to hold it by while painting... One very nice feature of radial-engine prop fighters...4 points -
Dihedral-gate. Looking forward to the first build4 points
-

THE EYE OF THE STORM! Revell Hurricane
Fanes and 3 others reacted to D.B. Andrus for a topic
Deja Vu ...Z-M 109G-14 all over again......4 points -
Finished !! 1/32 Spitfire Mk.XII ( Hasegawa + Paragon + Warbird + Grey Matter )
D.B. Andrus and 3 others reacted to Tolga ULGUR for a topic
Some progress Exhausts are from Paragon set.4 points -
woops! John, you're right, I was so happy about the opportunity given by the Revell canopies, that I posted the wrong photo! here is the two late style ones some steps ahead, the temporarily installed one Hase, and the Revell in the background. some steps, I said... well, let's proceed in order. after gluing wing and fuselage, I encountered some fit issue, not recordered precedently. obviously the cause lies in my interventions in the flaps and undercarriage areas. for example, the central part of the landing gear bay previously fell into place with a touching "click". before... now, after a series of curses I had to detach it from the rear contact point and saw it at a seam front. to then reduce the internal thickness and remove just over a tenth in length to make it go in its place. oh, much better now. on the top seam there are a couple of imperfect spots, nothing that a little putty and abrasives can't fix. having the burrs in hand to work on the Karman, I couldn't resist just sketching out the air intake: above there will be a nice "nicht betreten" stencil, how can I resist?? after a bit of work with burrs and sandpaper, I fixed the wing-fuselage contact line, facilitated by the fact that in this area there are the doors for the wing cannons and the coupling plates which make the junction easier to manage. a coat of primer to check the goodness of the bodywork, and onother one of Alclad, only in the areas where there will be some scratches. another photo that adds nothing, if not confirmation of the elegance of the lines of this aircraft, before I go to devastate it with paints. here, in fact, goodbye to cleanliness and elegance. more than a classic preshading, I wanted to try a random one, made with black sprayed through a cooker hood sponge. on the belly even more heavily, considering the color that will go there. then hairspray and salt in preparation for the final colours. I'll close it for today with a shot of the quality control inspector making his tour. oh, he's got eyes everywhere, this one! cheers, Paolo4 points
-
Z-M Messerschmitt Bf109G-14
Martinnfb and 3 others reacted to tucohoward for a topic
Thanks, guys. Mike, just what I needed! A little piece of stainless tubing did the trick. Hard to see but hey, why not. Wings riveted and now the fun of getting all the pieces involved in attaching the wings. Hopefully the excellent fit continues here. Jay4 points -

Did we do Tamiya’s latest kit unveiling?
Tony T and 2 others reacted to Dave Williams for a topic
Guess the second secret Tamiya kit has finally been announced. 1/48 M8. https://www.themodellingnews.com/2022/11/preview-new-m8-in-48th-from-tamiya.html#more The Tamiya 1/32 LSP wishing will have be continued to next year at least.3 points -

DigiHell & the F/A-18F Super Hornet - 3rd Wire & On The Deck
F`s are my favs and 2 others reacted to themongoose for a topic
OK I managed some recovery this weekend. Ended up masking off the affected area and then dampening a half dozen cotton swabs with lacquer thinner in order to fix up my peeling paint issue. I gently worked away the paint till I got back to bare plastic. Then used a lacquer primer on it, let it sit a few hours, and then top coated it. All seems well now. I have a few more spots to do. Will use that same technique for these and clean it all up. While I had the spray booth on I went ahead and put 2 coats of gloss clear on the top of the fuselage and the nose. These pics don't do it justice vs seeing it reflect the lights in person. Ohhh boy does it look great!3 points -

1:32nd scale Sopwith Dolphin
dutik and 2 others reacted to sandbagger for a topic
Hi all, Moving along now. Upper wing halves and landing gear assembly are fitted. Rigging used is 0.5 mm diameter Nickel-Silver tube and 'RB Productions' 1/4 BSF streamline photo-etch wires. In reality the flying, landing and incidence wires were 5/16 BSF size and the landing gear bracing 9/32 BSF. However, I use the 1/4 BSF wires as that is what I had that was nearest is size. Next up rigging: Fin/tailplane bracing wire, which are 2BA size streamlined wire ('RB Productions') Aileron control wires, which are cable (monofilament) and 2BA size streamlined wire ('RB Productions') Elevator control cables, which are cable (monofilament) Rudder control cables, which are cable (monofilament) Fuselage/upper wing drag wires, which are cable (monofilament) . Mike3 points -

THE EYE OF THE STORM! Revell Hurricane
discus and 2 others reacted to thierry laurent for a topic
It is simply impossible to make a correct and full assessment of a model kit from some pictures. I'm not saying they are not useful. They are to give hints about items requiring further investigation and may show inaccuracies regarding small details. However, never base your final assessment on a bunch of pictures to assess accuracy of the global geometry.3 points -
Hobby 2000 Messerschmitt BF-109E-3 - Finished
scvrobeson and 2 others reacted to Dpgsbody55 for a topic
Had a visit from my friendly neighbourhood postal pixie yesterday, so another delay with this build is over. This took over a month to get here from England, so I can only assume the pommie postal pixies put it on Cook's Endeavour . I already have another figure I'm working on as you can see at left of the pic, and two of these figures will be used on my Z-M build, so now I can really finish this project very soon. Cheers, Michael3 points -

Minicraft 1/48 Beechcraft Bonanza
tucohoward and 2 others reacted to chrish for a topic
My pedestrian little piston pounder is still moving along. It took some serious concentration on my part but, I made my own windows to replace the very thick poorly fitting kit parts. In all honesty they could be better but I'm going with these. I made five of the rear trapezoidal windows before I was happy with fit on one side, one of my cast-offs fit the other side perfectly so I think the casting may not quite be perfectly symmetrical. The work in progress; Seating for four, I noticed the owner had tucked his shoulder harness into the pouches on the seat back, lead foil in use for belting .005" clear sheet cut to shape, glued in and "Futured" with a hint of Tamiya clear green all the interior components ready for install (done now and, fuselage joined at the time of posting these images) The long skinny strip is the roof console with vents and speakers. Thanks for looking3 points -
Immediatly before closing the fuselage: Front is to the left. The PE adds a lot. You can even read the dials. At least until now, before the fuselage will be buttoned up. The only drawback are the upright ribs to the right interfering with the lower righthand desk. I had to cut out a bit from one of the ribs to make the tub fit. Eduard was so kind to add some spare handles, levers and so on to replace small parts that got tweezer launched during the build. Which of course happened. But no problem - there are enough to get the job done I'll add the seatbelts after closing the fuselage. The headrest is not rigid enough as long as glued only to one fuselage half, even with some extra support provided by styrene bits. I have to apply some pressure while gluing the seatbelts on as well as I want to avoid of the seatbelts popping off when I have to squeeze the fuselage halves together while gluing them together. So after the fuselage has been closed. What I did a few minutes ago. Now it is resting at the workbench over night to let the glue cure fully. Engine is under construcktion now. Regards! - dutik3 points
-

HK A20 Sprue shots
Royboy and 2 others reacted to Dennis7423 for a topic
Looks like an absolute home run! For as few releases as HK puts out, they have made some wise decisions (regardless of accuracy issues). The first to kit a 1/32 B-17 series, the first to kit a 1/32 Lancaster series, the first to release a 1/32 B-25 series, scaled down their B-17 and Lancaster to challenge Revell and Tamiya, respectively, and have recently scaled down their B-25 to challenge the old Revell release. And now, the first to kit a 1/32 A-20, which I have to imagine they will eventually scale down, too, to challenge the old AMT kit. Several wise decisions that have led to some outstanding kits. If you are providing feedback at all, I noticed some sink marks on the nose gear well sides, too. If you're going to mention the ones about the cylinder heads, these would be worth mentioning, too. Looking forward to adding one of these to my stash, which will hopefully hit the bench shortly thereafter! Pacific scheme for me :-) - Dennis S. Mount Juliet, TN USA3 points -
HK A20 Sprue shots
Brock and 2 others reacted to Dennis7423 for a topic
Looks outstanding! And for those that don't want to look it up, the A-20K is essentially the same as the A-20J, with the difference being the engines. The A-20G and J used an R-2600-23, while the K used an R-2600-29. Both the J and the K had a bomber nose, rather than the gun nose here. Another neat part about the A-20, which harkens to us modelers, is the plane was build very modularly like our model airplanes. Not modular like a B-17 or B-29... the fuselage was build in two halves with much of the internal structure, then joined together, just like our models. - Dennis S. Mount Juliet, TN USA3 points -

THE EYE OF THE STORM! Revell Hurricane
Stevepd and one other reacted to Archimedes for a topic
What comes across to me is that everyone in this thread wants this release to be good. A mainstream early Hurricane has long been a gap in the range of offerings we have available. I think @Radub has done an excellent job of showing the kit does not have the issue raised (legitimately) as a concern. So thank you @Radub! Although I personally want a metal wing Mk1 for my BoB group of aircraft, this MkIIb is likely to be a welcome addition to what is available for many. I am very much looking forward to this release! Kind regards, Paul2 points -
For People who fancy a really big Lanc.......
Kagemusha and one other reacted to mark williams for a topic
hope the clear parts aren't cracked!2 points