Leaderboard

Popular Content
Showing content with the highest reputation on 03/19/2020 in all areas
-
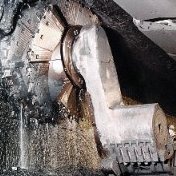
Hello again! I'm back home after my travels and like everyone else, trying to maintain some sanity in these crazy times. Since I traveled internationally, my work place asked that I work from home for the next two weeks. Which is fine by me as it allows me some... ahem... "flexibility" to re-adjust to the West Coast time zone. Gonna pick up my daughters from UC Berkeley and UC Davis as they are going to do the online class thing until further notice. Berkeley is in lock-down mode so hopefully, we don't run into issues moving and whatnot. Like I said, crazy times. Despite the coziness of self-quarantine, I've been busy doing this and that. When I last left the G-6, I had slapped on some Mr Surfacer putty along the main join between the AMUR Reaver engine cowling and the fuselage. That's been sanded, touched up with more putty and sanded again. I've worked on all of the joints and have re-scribed and riveted where necessary. I just shot the joints with Mr Surfacer 1200 through the airbrush to review the work so far. The joint on the starboard side at the cockpit came apart during riveting and will need to re-secured before moving forward. Popped the spinner into place and took a few more pics. There is some minor clean-up to do still but it looks good enough to move forward on this build.9 points
-

1/32 P-47D-40RA Hasegawa
Anthony in NZ and 6 others reacted to CZPetrP for a topic
P-47D-40RA, Big Stud Coll. Robert Baseler, 325th FG kit: Hasegawa engine: Quickboost cockpit: Aires wheel Bay: Aires wheel: Barracuda studio stencils: HGW Decals: Cartograf Masks: home made paint: Alclad II, Gunze C Photo: my good frend Miloslav(thank you)7 points -

Russian P-40E with Klimov M-105 engine
Starfighter and 6 others reacted to BiggTim for a topic
Some progress this past weekend. Finally got the resin nose and canopies fully integrated, primed, and re-scribed/riveted. Now waiting on the PE flaps so I can get started on the wing. I'm also going to try some of Archer's raised screw head details on the recessed cowl holes. I really wish I had a place set up to take better pics.7 points -
Been a bit, with the crazy world going on and some earth shaking in the Salt Lake area! But, progress is moving ahead. Landing gear attached, wheels and tires done, landing gear doors. Canopy painted and close to where I want it. Small touch ups here and there and then the radio rigging/antenna to be done. Let me know what you think so far!6 points
-

My Groundhog Day build.........WnW Fokker D.VIIF.......Finished
Dany Boy and 4 others reacted to monthebiff for a topic
So rather quicker than expected we have found ourselves in self isolation after my step daughter was sent home from school on Tuesday afternoon, annoyingly the girls had been at their Dads since Saturday when the syptoms apparently first started but where ignored and the first we knew of it was from the school, They normaly return back to us on Tuesday after school anyway but.......... Some people are really irresponsible but hey, i'll leave that one there. So I had no other option than to start a new build and decided on the Wingnut's Fokker D.VII, I missed out on the original D.VIIF boxing so I'm using the Early Fokker boxing, downloaded the D.VIIF insruction book from Wingnut Wings and purchased the extra BMW engine sprue and Fighting Fokkers F decal sheet. I've also got Taurus models engine detail set, HGW belts, Master barrels and Aviattic decals to add to the build. Not to much to show yet but spent yesterday preparing cockpit parts for paint, today I cocentrated on the wing assemblies and have them undercoated, pre shaded and glossed ready for decal application. Enjoying the chance to really get some serios modelling time in, I know its an awful situation we are all in but time to stay indoors and make the most of this fantastic hobby. Stay safe everyone and happy modelling. Regards. Andy5 points -

1/12 Maserati 250F
Alain Gadbois and 4 others reacted to mark31 for a topic
i have made a start one 1 wheel how it starts and after a time it looks like this Mark5 points -
Hey Dennis, If you go up to the upper right hand corner, and use the drop down arrow by your user name you will see "Account Settings". Click on that, then the page it brings up will have your settings off to the left, one of which is "Signature". Click on that and from there it brings up a box that will appear below your signature. Use the settings bar above the box to add hyperlinks (the small paperclip looking icon). The only thing we ask about signature is please keep them to links and small or flat pics only. We've had issue in the past with people sigs getting WAY crazy big out of control. Otherwise for links to builds and what-not its all good.5 points
-
I've wanted one of these in 1/32 scale for a long time so this was a definate wallet opener for me. Cheers Dennis5 points
-

Trumpeter MiG-29A.
Martinnfb and 3 others reacted to ade rowlands for a topic
Consider this post my placeholder for now. I was going to join in with a Tamiya F-15C but changed my mind. I’ll now be joining with this. To go along with it I have the full Zactomodels upgrade set, ColdWar Studios MiG-29 Cockpit set, Begemot Decals and full stencil set(I’ll be doing the Aggressor with Wasp/Hornet on the tail) Master Pitot, a Quickboost ejection Seat (the Cold War Studios one doesn’t have belts but the Quickboost one does) and in case the intakes probe to be a pain I have the Quickboost inlet and exhaust covers. Won’t be doing any work on it until next week. Then the Glacial progress will commence.4 points -

HPH FW 189 Eagle Owl.
Derek B and 3 others reacted to Phartycr0c for a topic
Not much of an exciting update really as those who have gone before me will attest, HPH kits deserve attention to detail in terms of the cleanup of parts involved as it will pay dividends later or so I would like to think! I have found that switching back and forth through the different parts of the kit allows an effective workflow as while one part dries another can be pieced together. This kit somehow allows that to take place probably due to its unusual design. Completely new methods of working are also required and extreme care should be taken when removing the pour blocks especially from the larger pieces. Some photos. Tail booms and the gaps requiring attention. x2 of these put together now awaiting the wheel well internal parts. the engine representation is made up of an "engine block " and 12 cylinders each one of which is made up of the cylinder and the rocker cover to produce this. I wont be spending too much time as they will hardly be seen inside the beautifully case engine cowlings, talking of which i put together the spinners and left them removeable due to HPH providing tubing. Diffusing a bomb may be easier than cutting the moulding blocks from the clear resin parts. I was apprehensive to say the least mainly as they are cast really nicely with lots of rivet detail which would be hard to replace I would imagine. Anyhow cut they were and a nice dip in clear produced some amazingly clear parts I imagined the clear parts to be really brittle but I need not have worried they are in fact quite soft and malleable which is probably why HPH provides full internal frame detail for the centre section of this lovely greenhouse. Bit of a boring update with not much going on really but there you go Resin Kits! my first time by the way!4 points -
hello all, all the parts glued together, it looks something like this the winch placed on the ship aft next extra detailling, then the diesel engine enjoy, Rammstein4 points
-

FW190-A3 by PCM - My Christmas Raffle Build- FINISHED
Martinnfb and 3 others reacted to themongoose for a topic
I kinda held off on any updates till this round of dry fitting was thru. This set of shots shows the detail and fine engraved lines in the PCM kit. first off the wing profile seemed to benefit from some support on the back half of the cord. This brought the profile up to match the fuselage and if you grab it by the wings won’t stress the glue joint in the future. This is the wing with no weathering in the wells followed by some weathering. Could it benefit from a dark wash to tie it all together? Under a satin black primer the thin panel lines seem to POP. Before primer it seemed you could hardly see them. Something tells me to really go easy on the coats of paint to keep these strong. Fuselage is an easy assembly Now the engine is nice, unfortunately it is almost completely hidden on this model behind the fan blades and props. For that reason it’s simple dry brushing and some grease stains. So that brings this week’s session to a close. Off for a poker weekend with my buddies. Back again next week!4 points -
what im building at the moment is the maserati 250F from MFH its a multi media kit so far the first 4 steps are done and the engine is ready next step will be the engine frame keep on building my friends Mark3 points
-

How Do I Attach a Build to My Profile?
Alain Gadbois and 2 others reacted to Dennis7423 for a topic
All- I see several posters that have their completed builds and stuff under construction posted to the bottom of their posts, like they are attached to their profile. How does one go about making that happen? See example below, shamelessly taken from an LSP_Mike post. Capture by Dennis SAuter, on Flickr Thanks! - Dennis S. Thornton, CO USA3 points -
How Do I Attach a Build to My Profile?
Out2gtcha and 2 others reacted to Dennis7423 for a topic
He sure did! And I figured out how to post them successfully. Appreciate the help! - Dennis S. Thornton, CO USA3 points -
hello all, USMC Herc not all items are glued to the ship, with painting in mind. Starting on the stern anchor winch, some of the parts. now glueing them together. Rammstein3 points
-
Thanks once again fellas for the kind words. I'm still working on finishing the last of my reviews, and organising the hand-over of all the relevant bits and pieces to the rest of the team. After that, I plan to work on some long-overdue upgrades to the website, and then hopefully settle in to some model building. Kev3 points
-

Macchi M-5
Rocat and 2 others reacted to sandbagger for a topic
Hi all, The propeller is finished. Hand made wood laminate special from 'ProperPlane'. Airbrushed with 'Alclad' Light Sheen (ALC-311) with a few drops'Tamiya' Hull Red (XF9). Erosion protection stripes (either Copper, Tin or Mondel (Copper-Nickel Alloy) brush painted. Propeller bosses brush painted with 'Mr. Colour' Stainless Steel (213). Final sealing coat of 'Tamiya' Clear Orange (X26). Propeller bosses coated with 'AK Interactive' Kersosene (AK2039). Mike3 points -
Jack Lynnwood put out some truly fine cover art for Revell. All dynamic. Their P-40, Corsair, P-38, B-24. Love his work. For me, Shigeo Koike, his later work rather than his earlier work. His earlier work had a high color contrast, leaning mostly toward the complementary, with a high contrast between figure and ground. This does not make it bad. His early work is pretty darn good. For me, these two contrasts makes his earlier work difficult to look at. His later work shows a different relationship between figure and ground, and the use of color and light. Early. Another. Later. Another. Anyway, I love his art. I have watched his growth over the years through his box art, which has influenced a generation of aviation artists. I also like John Steel. He brought a sometimes dynamic 'You are there' perspective' to box art which influenced his generation, including Jack Lynnwood. But sadly his faculties and abilities began to fade during his career. But there ain't nobody like Airfix . . . They go right for the jugular. Just my opinion. Great subject. At least for me. Sincerely, Mark3 points
-
Cracking start Andy! Iain2 points
-
That's what I used and was satisfied with the outcome. For blue, I either used H322 (blue angel blue) + a drop of black or straight H326, depending on scale results:2 points
-
How Do I Attach a Build to My Profile?
Trak-Tor and one other reacted to Dennis7423 for a topic
Thank you sir! - Dennis S. Thornton, CO USA2 points -

Russian P-40E with Klimov M-105 engine
BiggTim and one other reacted to Marcin_Matejko for a topic
2 points -
We still do the 1/32 legs for the Typhoon on the length of the legs there was a great debate at the time and compared our legs to the example at Hendon which has parts of the engine missing no oil, fuel, racks or ammunition it is a bit short, but we based our legs on combat aircraft fully fuelled and armed including externals which we thought most modellers would prefer. Bob2 points
-

Boxart
Troy Molitor and one other reacted to LSP_K2 for a topic
Two more of my favorites.2 points -
This just arrived today, a gift from a forum member (different forum) who prefers to remain anonymous. I just love it, the sexiest Ferrari ever designed.2 points
-

Painting WW2 RAF Roundels
BarryWilliams and one other reacted to Wackyracer for a topic
Ive used MRP for my builds2 points -

1/32 Messerschmitt Bf 108 'Taifun' by Eduard
Troy Molitor and one other reacted to Kagemusha for a topic
Some more decal options.2 points -
Macchi M-5
chukw and one other reacted to sandbagger for a topic
Hi all, I'm calling the fuselage finished. I've scuffed the underside roundel to represent water wear. The fuselage was given a weathering coat of Dark Dirt clay wash 'Flory Models' to represent general grime, especially as crew and mechanics had to walk on the cockpit decking. It was then sealed with 'Alclad' Light Sheen (ALC-311) lacquer. A second light wash of White was applied to give an indication of salt spray and to highlight the fuselage panel nail lines, then sealed again. Now onto the wings, Mike2 points -
Thank you Andy! Going into this build, I was very worried about the AMUR Reaver cowling as I had never attempted such a big resin replacement. I'm relieved that it turned out ok. Thanks Steve! I can't believe how quick this one went. My last build (Dora Black 1) took seven months to complete! Thank you Juraj! I drilled a hole in the attachment point on the fuselage. After I put the main aerial line into place. I glued the end of another piece of Uschi's thread into the hole in the fuselage. Once the glue was dry, I placed a tiny dab of CA glue on the horizontal aerial in the location where I wanted the vertical aerial to attach. I then gently stretched the Uschi thread into position and pulled it against the CA glue spot. I actually had to do this twice as the first time, I stretched the vertical line excessively and it ended up pulling down the horizontal aerial too much. Thanks Gaz! I really appreciated your presence during this build! Thanks Mark! First time using the Uschi thread... I'll be using it more often! Thank you so much Torben! That's very kind of you to say Martin! You're help on this build was essential so thanks for that! Thanks Brian! Another one down... on to the next one! Thanks Chuck! I've got some other LSPs coming up so please check in on those! Thanks everyone for following this build! The G-10 Erla is finished and I have posted photos over at RFI. Please check it out... http://forum.largescaleplanes.com/index.php?showtopic=72790 Here's a sneak peak....2 points
-

Looks like the Tamiya F-51D is out at Lucky Model
MikeMaben reacted to Dave Williams for a topic
In stock. Plus, they have a 10% off coupon code right now. https://www.luckymodel.com/scale.aspx?item_no=TA 603281 point -
Done Thx1 point
-
Yep! Now were getting somewhere bud. Looks great under primer! Paint and weathering will really bring it alive.1 point
-
Monogram '29 Ford Roadster Pickup
D.B. Andrus reacted to LSP_K2 for a topic
Body prep work is now well underway. It appears I may have to grind some material off of the bottom of the bed portion to get it to mate properly with the frame, but that should be a snap.1 point -

A Separate Little War - Strike Wing Mosquito FB.VI
John1 reacted to BloorwestSiR for a topic
Nice subject there John. If you end up needing the intake screens, Radu Brinzen makes them in PE. They also include replacement rad screens. http://www.radubstore.com/index.php?main_page=product_info&cPath=2_68&products_id=6471 point -

1/32 P-47D-40RA Hasegawa
Martinnfb reacted to alaninaustria for a topic
Outstanding! Cheers Alan1 point -
Infinity Models SB2C-4 Helldiver update
chrish reacted to alaninaustria for a topic
Looks amazing! I am very much looking forward to this release!! Cheers Alan1 point -
1 point
-
Dazzlingly good! Sincerely, Mark1 point
-

Boxart
Andrea Ferrari reacted to eoyguy for a topic
Really can't beat any of the classic late 60's/early 70's Revell kits. The P-40 especially comes to mind, as does the Corsair. And who can forget the big bomber kits in 1/48, the B-29, 17, and 24's...1 point -

USAAFE F-15C
F`s are my favs reacted to Cheetah11 for a topic
Before finishing the F-16 I did a bit more on the F-15. I shortened one of the tailpipes and used tape to cover the gaps. I then made a casting and made copies. I also glued the wings to the top fuselage as I believe this is easier to work on the joints. I also still need to fill some of the panel lines.I need to get some references for this. Pylons also done. Although this is a large kit it builds up quickly and easily.1 point -

Bell x-1 - come back build
F`s are my favs reacted to Mark M for a topic
well firstly id like to apologize for the lack of wip posts, but ive had a lot on my mind over the last few days so locked myself away in the 'office' and didnt realise how quickly the build was going together, it was never going to be a long build but never the less so all was going at a steady pace then next thing i knew it was done1 point -
Glad I hadn't stumbled across these Pics .. I'd never have finished mine!1 point
-
The Ministry of Defence does indeed own the trademark to the RAF Roundel for 'all commercial purposes' except when used on clothing, and that's confirmed by the Trade Marks Registry. https://assets.publishing.service.gov.uk/government/uploads/system/uploads/attachment_data/file/584237/20170117_MOD_Crown_Copyright_Licensing_Information_Version_v0_1.pdf1 point
-
After the Milliput dries, I've dabbed on some Mr Surfacer 1000 and began the sanding process. So far so good as a preliminary shot of primer shows. The chin intake was glued in. There are some gaps that will need to be addressed with Milliput. The control surfaces for the wings have been finished and are awaiting the completion of the cowling cleanup for attachment. I've dabbed on some more Mr Surfacer 1000 on the cowling joints and I'm going to let it cure for TWO WEEKS to ensure no shrinkage. :wink: This will be last view of the G-6 that you'll have for awhile. Tomorrow, I'm leaving for a trip overseas. Will be back in a couple of weeks to resume.1 point
-

Aeromarine 75/Curtiss F-5-L (Finished)
themongoose reacted to kkarlsen for a topic
Rigging done. Man that was a lot of threading!!! Went very well though, no 'incidents' or 'accidents'. I made the wings detachable, that made it all a lot easier. I really can't believe that I'm almost finished with the Aeromarine build, I'm so proud of 'her'. Cheers: Kent1 point -

Fisher AD-5W test build pics and tips
Whitey reacted to paul fisher for a topic
More progress on the guppy..... The sealing gasket on the radome is masked off with thin vinyl tape so it can be painted black. Before painting, the rest of the radome was masked off with strips of frog tape. After gluing in the cowl internal flaps I realized I had forgotten the paint the thin ring of silver Coroguard onto the front of the cowl. Bummer! So, I cut some vinyl tape down to .062" so it would follow the curve and masked off the outsides...Then the rest with frog tape. I dug around and found a pill bottle that was an exact fit for the inside of the cowl, sometimes you get lucky! Success! I managed to get it done without having to remove the internal flaps. The anti glare panel runs straight back at the top, this is important to get the look right once the windscreen is applied. The antenna coverings on each wig tip were originally filled in with Bondo and sanded smooth.After the Coroguard was applied I used squares of black decal to make them black as it's easier than masking and painting them. I used the national insignia and step lines, etc;from the AD-5 decals since i don't have the actual kit decals yet. Kicksteps are again cut from black decal paper to save masking. Here you can see the radome with the black gasket painted in.It is a true black, and slightly gloss to make it look different from the front of the radome. Amazing how just a few decals will make the model begin to snap into focus.....Can't wait to get it finished!1 point