Leaderboard


Popular Content
Showing content with the highest reputation on 03/03/2019 in all areas
-
Thanks guys! Since the punch set was already out, I decided to use it to make clear dial covers for each instrument. These little clear discs were secured into place using a drop of Alclad Aqua Gloss as an adhesive. One step up from simply using a drop of clear gloss to replicate the glass covers. It's hard to tell unless the glare reflects off the glass. I put the instrument panel parts in a little plastic baggy for safe keeping. I jumped over to the resin parachute to see how easy/difficult it would be to remove the casting block from the resin parachute. I was especially concerned about the delicate loops and buckles. Holding up the resin to the light, I can see that the resin is quite thin around alot of the parachute. These areas would be fairly easy to poke through with a single swipe of a sharp knife. But there are other parts that have some thicker resin underneath. Instead of trying to extract the piece in this state and risk a broken buckle, I sanded down the casting block until the excess resin was paper thin around the entire part. After that, tracing lightly around the parachute was enough to free it from the excess. But even with my precautions, I had some casualties. You can see that the release cord has broken. In the end, those delicate parts I had tried so hard to protect ended up breaking anyway. So I had to craft some replacements. The release cord is a piece of 0.15mm lead wire and the harness clips are from some Luftwaffe belts I had in the spare box.9 points
-
My last built , enjoy, url=https://www.casimages.com/i/190302015634538135.jpg.html][/url url=https://www.casimages.com/i/190302015634764639.jpg.html][/url url=https://www.casimages.com/i/19030201563524465.jpg.html][/url url=https://www.casimages.com/i/190302015635298443.jpg.html][/url] url=https://www.casimages.com/i/190302015635775596.jpg.html][/url url=https://www.casimages.com/i/190302015636533857.jpg.html][/url Voilà voilà8 points
-

Fw190 A5
Robert and 7 others reacted to David Mooney for a topic
Second one completed of 2019 is the Focke-Wulf Fw190 A5 from Hasegawa, this again (same as the Bf-109 G10) is a great kit, with no issues at all. Painted with Mr Colour paints and thinners (amazing products in my opinion). My choice of aircraft was quite easy as the Stab/Jagd-Erganzungsgruppe aircraft of Ost, Maj Herman Graf was so colourful and different, this was based in France 1943. If anyone can enlighten me on the markings, id be very grateful of the knowledge.8 points -

1/32 Tamiya F-16CJ
RALPHY ROCHA and 6 others reacted to Breaker for a topic
Finished photos of my TAMIYA,Inc. 1/32 F-16CJ. Built with AMS Resin ECM pod and L/h HARM pod, Eduard Model Accessories SNIPER pod, MASTER Static Dischargers, AIRES HOBBY MODELS wheels, GT Resin R/h targeting pod pylon and VideoaviationGBU-38s. Decals were a mixture of kit and Astra Decals. Painted with MRP & Mr Hobby. Seat belts are scratch built, Bomb rack is robbed from the Academy Hornet. I was planning on using the Quickboost seat and Aires wheel wells but they both were far too small! Massive thank you for Joe at Yellow Cake Models for sending my a new lower fuselage after I butchered mine and Fanch at Fancherello models & photos for cutting me the stencils for the tail.7 points -
Thanks for looking and commenting. I've spent an enjoyable few hours (ok most of the day, but it's still blistering cold and staying indoors is not only recommended its required) I've finally got the flaps and ailerons onto the wings, in my opinion the model just wouldn't look right unless they're all hanging. I'll be fixing clear parts and nav. lights next. I finally got the stripe on the gear cover on right way round The flaps etc. parts finally on and fitting clear parts.7 points
-
Thanks Ray... Round two of painting/ weathering. There will be further stages, so some of the following will be toned down somewhat but I’m quite pleased with the base now for future weathering. I’m planning on it being fairly subtle - I don’t want it to look over weathered, but obviously it will be a little dirty. I think getting the balance right is a really hard thing to do. There’s nothing worse than feeling you’ve over egged the pudding. Only time will tell! I’ve highlighted the panel lines with the standard (thinned & low pressure) dark brown and started the exhaust staining with brown & black in the recesses. Fairly subjective at this stage as to whether you like it or not I guess, but as I said, I’m happy so far. I had a minor disaster when I got that feeling that I’d messed up - there was a little overspray on the cockpit coaming (the hood slides on so it’s easy to just pull it back to check). I was worried that some paint had got onto the insides of the front windscreen - It had. So the screen had to come off and was sanded and polished. Phew, no harm done, but I was glad I realised when I did. It’s glued back on now and I don’t think it’s noticeable so fingers crossed. I wasn’t entirely happy with the wing root weathering/ chipping/ wear, so I had another session with it and I reckon that it now looks a lot better than before? Thanks again, Guy6 points
-

'Grace' type two-seat Spitfire in 1:32
geedubelyer and 4 others reacted to Iain for a topic
OK - I said I'd been beavering away on the canopies again... My client wanted to be able to open and close the canopies - closed to get the beautiful shapes in flight, open to be able to see the cockpit details. This was always going to be tricky with vac canopies and I had several concerns: Would the rear canopy moulding sit tight against the canopy rails - in both open and closed positions? Would there be a good enough fit with the vacuum formed 'tunnel' section where they meet? Well, after hours and hours of fiddling with patterns - I think we're there. Excuse the sanding dust - images taken whilst dry fitting/sanding edges to fit. Oh - and this is a test dummy tunnel - longer than final part at the front. Closed - note perfect alignment of rear canopy with canopy rails - and fit against tunnel (loosely placed - no gap when fitted): Rear canopy open - again - perfect positioning on the canopy rails: And both canopies open: I may trim the rear canopy down just a little more at the rear - but good progress I think... Blue skies, Iain5 points -

F-4 Lightning 1/32 Trumpeter
Alain Gadbois and 3 others reacted to Holdfast for a topic
This is my first aircraft model in 20 years, and have jumped in boots n all on this one. I seen images of the early F-4's, photo recon version of the P-38, painted in the Haze paint schemes, and just wanted to do one. I am doing one of the RAAF F-4s loaned to 75 Sqn RAAF in 1943. the Haze paint schemes did not weather very well an after a short time the paint faded and weathered very quickly making for a great weathering subject. I am using the Trumpeter 1/32 P-38, and got a resign kit which converts it back to an early F-4 version, with a new nose, engine nacelles, new boom radiators and various other smaller bits. I am sure chopping this model up to fit the resign parts is not going to be a straight forward job.4 points -
Bf-109 G-10 'Rita'
themongoose and 3 others reacted to David Mooney for a topic
This is a Hasegawa 1/32 Bf-109 G-10 and it proved a very easy build, no major fit issues at all (a nice change). I have painted it using MrColour paints to represent an aircraft from 2./JG300 Feldwebel Ederhard Gzik based in Germany, October 1944. I added some photo etch seat belt from Eduard to set the cockpit off, I hope you like 'Rita', I am quite happy with the results.4 points -
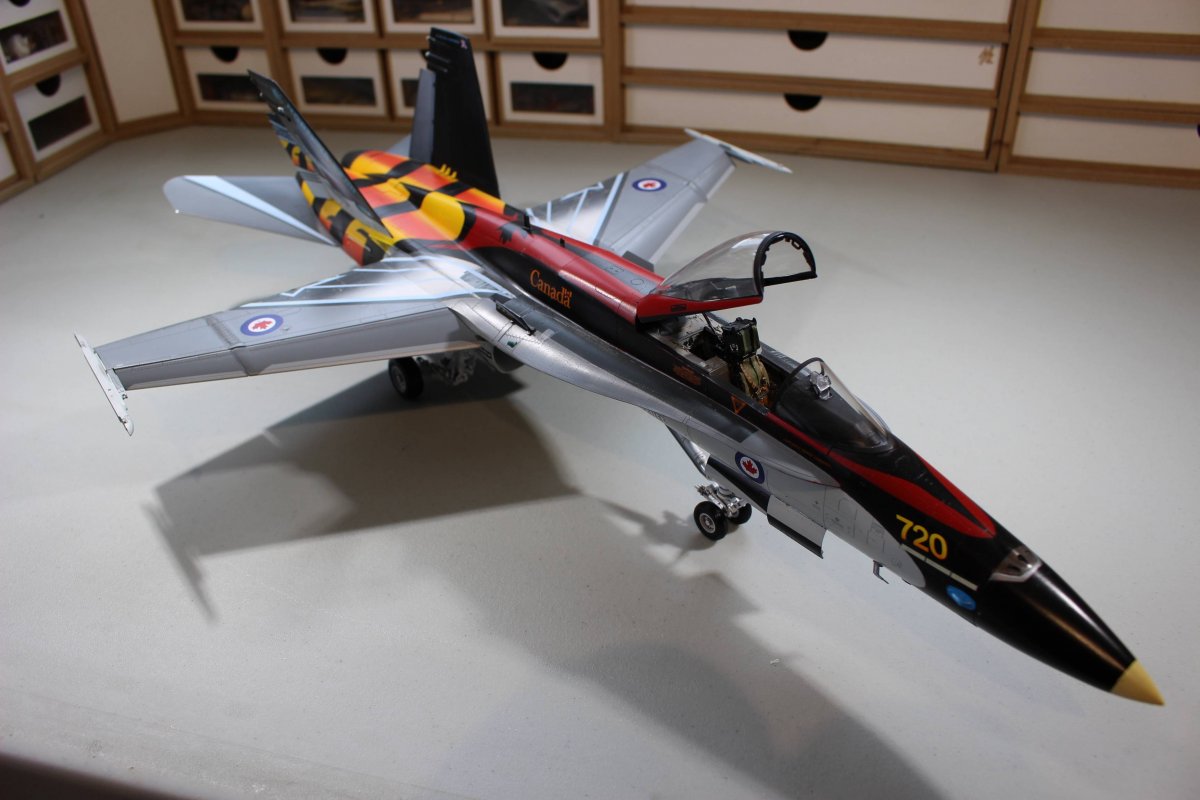
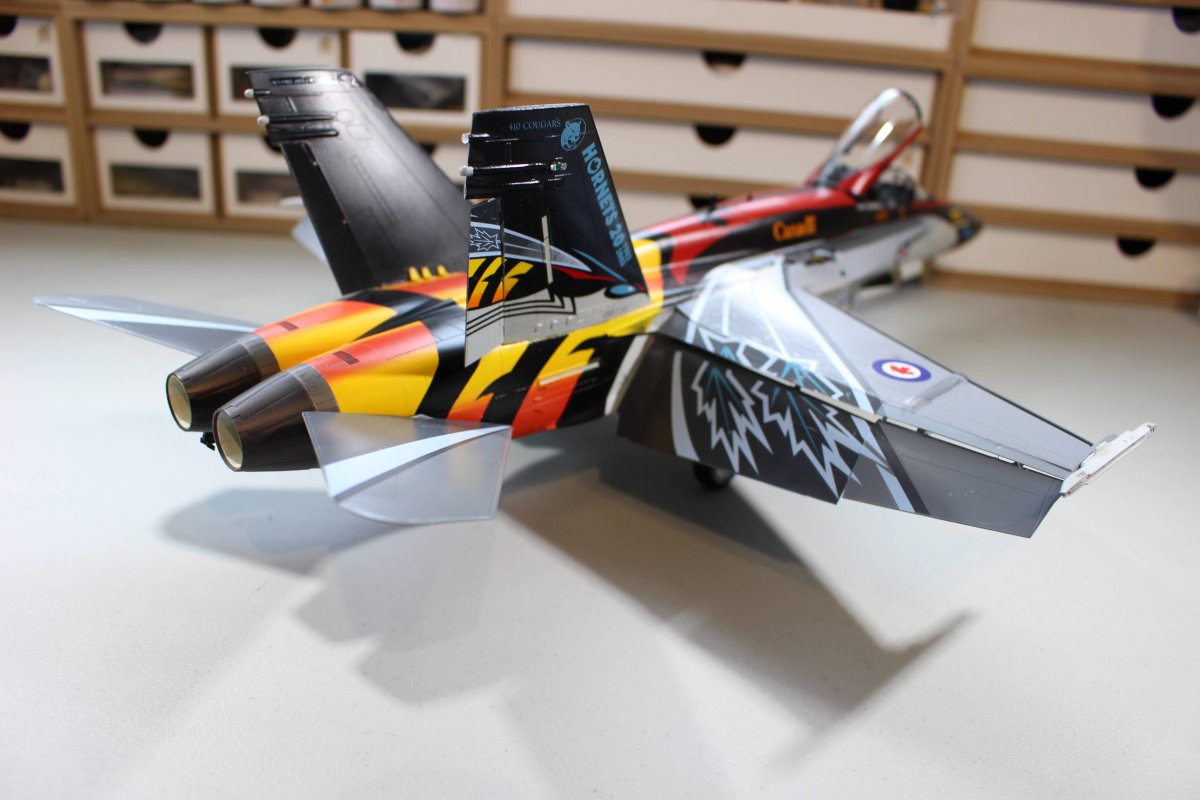
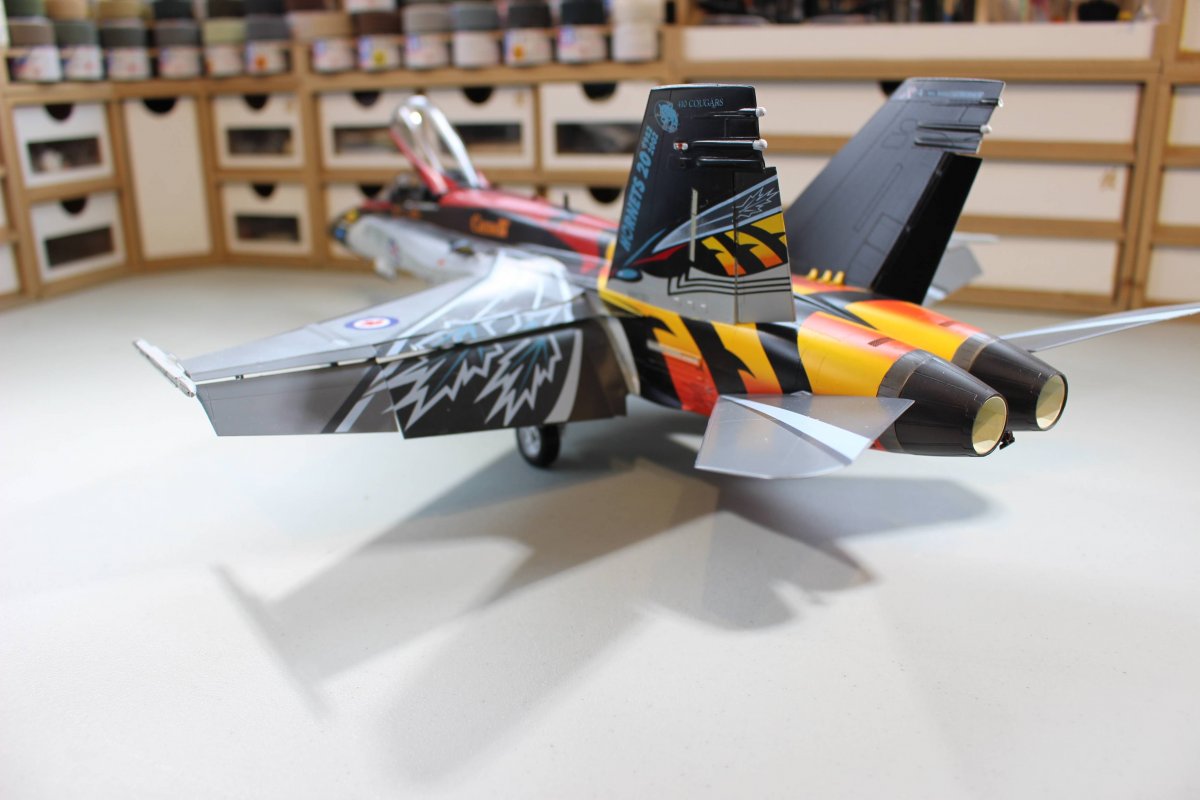
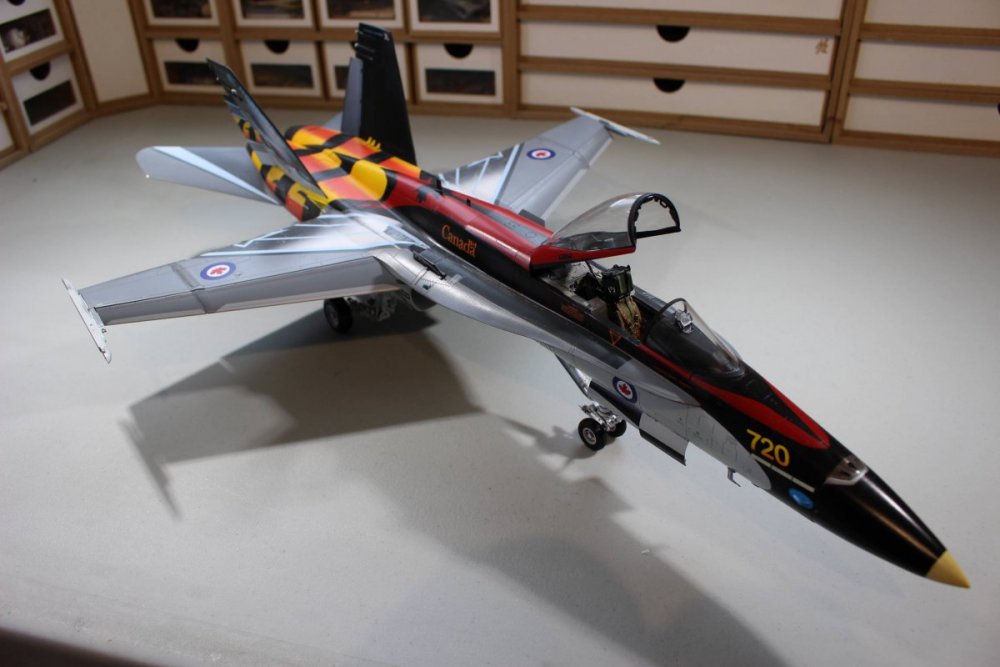
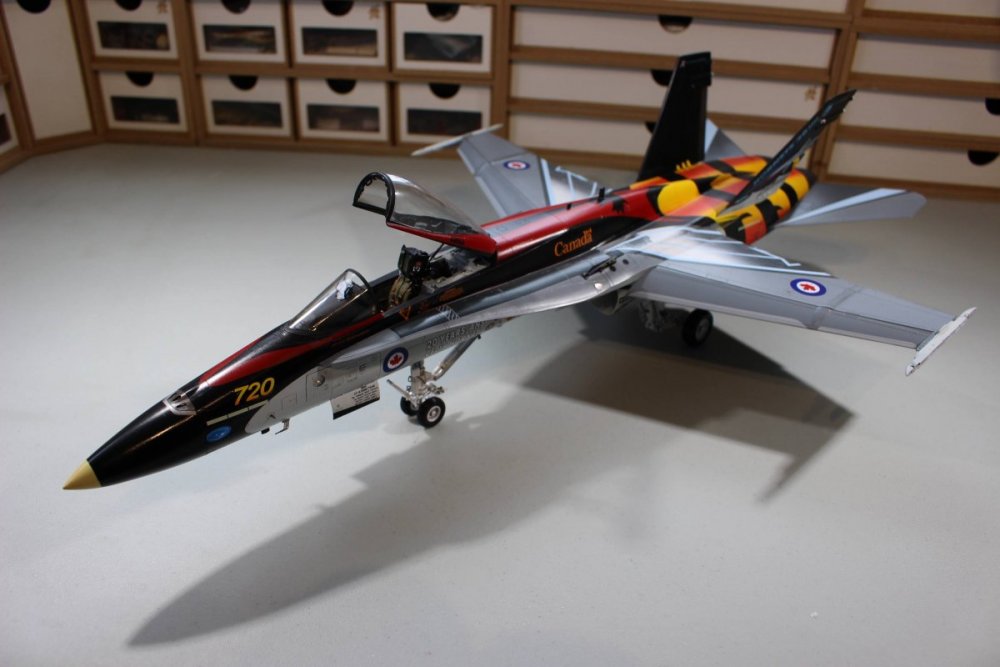
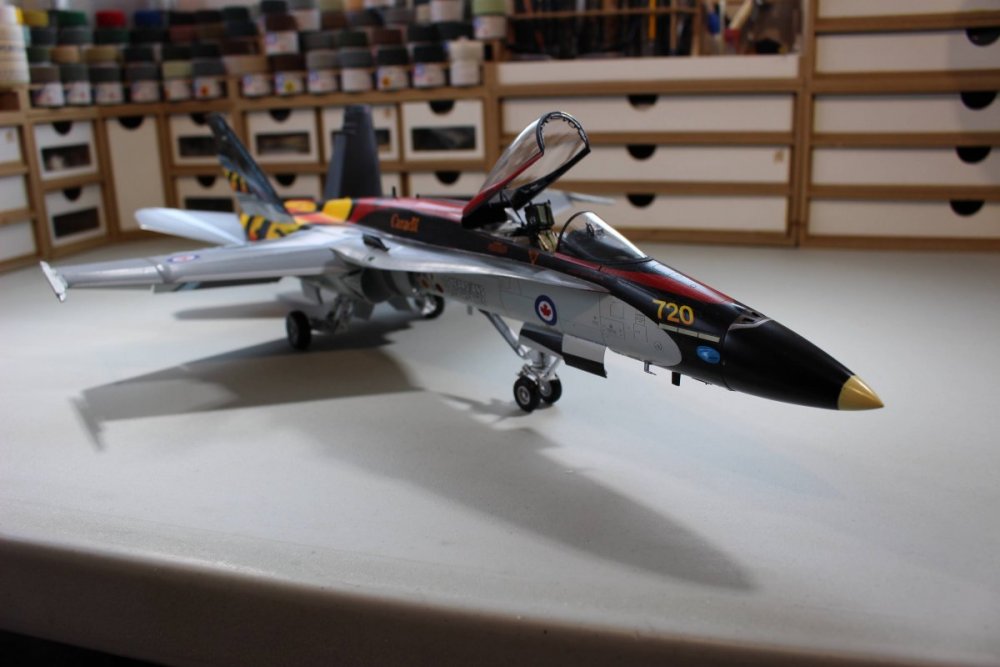
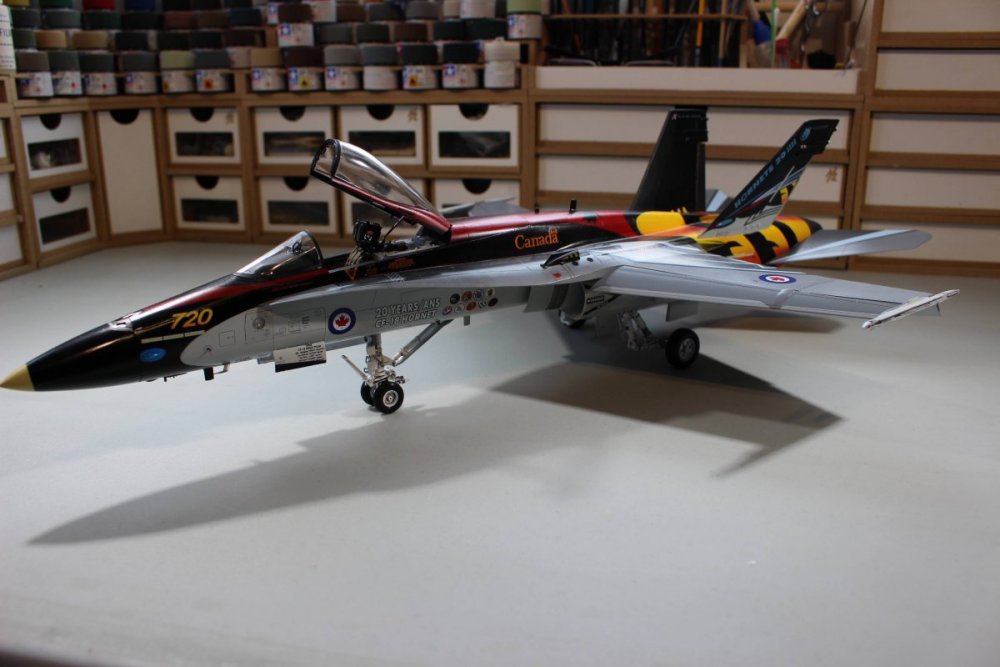
Thanks to everybody who visited and offered suggestions on my CF 18 (F-118) journey. The build wasn't as tough as I initially expected, thanks to a well designed and made kit and great decals from Leading Edge, although I didn't use them all, if not for the decals I'd not have been able to copy as a mask for painting. I'm calling it finished. I have a few bits and pieces left over for another Canadian A which will no doubt get used but, on a gray plane. the finished model with left over resin bits On to the next large scale multi engine model...maybe4 points
-

1/32 Gotha G.I Scratch Build
chukw and 3 others reacted to guitarlute101 for a topic
I was able to finish up the majority of the tail area. As you can see in the period pictures, the tail and fins were plain with no ribbing. I'm assuming They were plywood covered structures from the looks of it. I made the horizontal tail and edged it in half round rod. I find that this gives the edge a nice profile rather than trying to eyeball it and hand sand it half round. I made hinges so that the tail and fins would be articulated. And here is the tail temporarily taped into place. You can see that distinctive tail fin shape the Gotha G.I was known for. The tail area still needs some priming and finishing but I'm pretty happy with it at this point. And here is a shot of the fuselage as of today. A lot of work and a lot of fun. Still some more work in the cockpit areas so more to come later. Thanks for looking in, Mark4 points -
I went fruther working on the torpedo and there are some grooves wich I had to make. I did this on my millingmachine en it worked great. I had it working yesterday so this was a great exercise. The grooves are a bit large but I don't care. I'm very happey my millingmachine is working great. And here an impression for those who are interested. Here Thanks for watching. Ferry4 points
-
Thank you I felt some of the highlighting/ shaded lines looked a bit harsh, so while I’m waiting on the masks arriving I’ve tried to tone down the effect and blend it together a little. I over sprayed some areas and worked on others with oils. It may be subtle differences but I think it looks a lot better... hopefully it will tie together even more with a filter, panel lines wash and under a layer of clear. Its really inspired me to get back to Luftwaffe builds.. I’d be interested if anyone would care to state their opinions of the the very best Luftwaffe kits out there? I’ve been looking at the kit of the Zoukei Mura Ta152-0? Looks great? Although I can’t seem to find any outlet in the UK? Anyone know where these kits can be bought from? Nothing on eBay... I know the market is awash with 109s etc but I still think we’re lacking a latest Tamiya standard kit. Thanks again, Guy4 points
-
I am going to continue with the instrument panel. Here is the punch set that I am using. I also have RP Toolz larger punch set if I need bigger circles. The outer plate of the punch set is clear, so you can use the view outside of the punch hole you are using as well trying to look down the barrel of the punch to center it. Once the target is fixed into place, I usually flip the punch set around and take a look from another perspective to ensure that my punch is centered. Since the decal adhesive is on the detail side of the decal, the decal paper and decal weren't connected that solidly. In fact, during this punch and others, the decal came off of its backing paper. Not a big deal as long as the free floating dry decal is treated carefully. No sneezing! Using a small drop of water in each dial, the punched instruments were placed into each dial and positioned before dabbing into permanent position using a cotton-tipped swab. Once positioned, Solvaset was used to seal the deal. One by one, the instrument panel is fully populated with instruments. The other markings are from the kit decal sheet and the Barracuda cockpit stencil sheet. I'm going to cover this with a semi-gloss coat and let it dry for the next step.4 points
-
Hope not... Been building at a mate’s place most of the day and have made some good progress on the interior. Lots to do still but I am delighted with the outcome of the pilot’s seat. Never been so happy with a hand painted seat as I am with this one.4 points
-
Not wanting to make you wait, I will post the progress made over last week. Once I finished my F-15i Ra'am for the desert GB, I jumped right into the Su-25 and with all this AM, there is a lot of sub projects. In no particular order, I worked on the load-out, assembling Harold FAB-100. Delicate assembly but I think they look great and should look even better under a coat of paint. I did some preparatory work for the resin wheel bay, yikes! Cleaned all the resin, primed the major components for the cockpit and front bay and started preparing the inside of the fuselage halves as well as the resin components to fit The quality of the Aires casting is simply awesome: and after some careful prepping work but nothing approaching the work required in my Me-410 project, I am happy to report that the fit of the front bay and the cockpit is excellent, the two halves of fuselage holds all this resin without any tension or gaps. There will be need for some clean-up but overall I am super happy with the fit: Now I can go put some color on the primer. Cheers, David4 points
-

Spotted Ass Ape HobbyBoss B-24 Assembly Ship
Rick Griewski and 3 others reacted to Wackyracer for a topic
Couple of hours spent building the interior structure And test fitting And both halves. No fit problems She's a beast when next to not such a little friend4 points -

Libyan Mig-23MF, 0200 Tripoli August 2005
Martinnfb and 3 others reacted to Daniel Leduc for a topic
Hey guys, Sorry for not being there till the end, but kind of lost my Mojo big time after my buddy André's departure.... So just got back on the horse and I'm intend to go true with it and gonna ask Kevin to moove it to WIP. A little something I did yesterday a the Club. If you remember earlyer I had a fit problem (shrink) with Aires exhaust, a nice fit with the kit part but not so so with Aires.... Decided to used a slice of the kit exhaust... Easyest way I came up to fill up the gaping with less hassle Even with a little extra 1/8, the end result is very much to my liking... And did some work on the spill doors (Quickboost), still planning to finnish this baby with a pilot.. but got to remember to do that part before I glue the intake on the fuselage on my next one. Thanks for watching and will put some more soon. Have fun, Dan.4 points -
thanks for looking jan4 points
-
MiG-15 BIS 1/32HPH
chuck540z3 and 2 others reacted to CZPetrP for a topic
Hello everbody I'm new here. My friend Miloslav persuaded me to register ... MiG-15 BIS 1/32 HPH First Fighter Regiment, Planá Air Force Base, Lt. Kotrsal, First Squadron, 1954 Photos: Miloslav (thank you) More photos here: https://www.leteckemuzeumliborezy.cz/mig-15/3 points -
Hi guys, let me present my recently finished Toryu. I didn't go any extra mile with it and having build it mostly OOB. Except some parts from sprue N (missing in my package) which I have scratchbuild and insignia painting masks. Overall it's superb kit and pure joy and fun to build it! When I compare it to Do-335 and Ho-229 kits, I think it's better and more friendly to build, just because they have included grey plastic together with the clear one. The undercarriage doen't need any replacmenet because the way how the main legs are moulded together with spars provides enough strength. Fit was generally great, there were some minor issues with fit of wind shield, front part of fuselage and engine covers, but this could be caused by myself What I didn't like was that there are no masks for inner side of canopy and that top center fuselage piece has small windows molded separately which makes no sense to me. Im already looking forward to next releases of Toryu, I will build another one in future for sure And hopefully we will get some AM for it soon. Resin wheels, instrument panel and fabric seatbelts should be enough IMHO Works in progress thread here Thanks for looking jan3 points
-

AV-8B Harrier II Trumpeter 1:32
Loach Driver and 2 others reacted to Koralik for a topic
AV-8B Harrier II Model quite easy to build, made as always straight from the box.3 points -
FINISHED: Eduard 1/32 P47D Thunderbolt “Dottie Mae”
Woody V and 2 others reacted to Sir Spendalot for a topic
Thanks Woody - please be as bold as you like Yep - it's been a steep learning curve with regard to the metal finishes. As it happens, the finish turned out pretty much as I was aiming for - not too shiny and with the panel variations. It is a tad grainier than I'd hoped - I'll definitely use the gloss next time. With regard to the AK Xtremes - I did use these on the undercarriage doors and, to be honest, there doesn't appear to be much difference between these and the Alclads (albeit I only used the AKs on small areas so not really a fair comparison). Anyway, quick update - bar a few small tweaks, she's finished: More pics to follow. Paul3 points -
Well it's been nearly a month since I posted any progress. It's been slow these days, because of a whole lot of life, which is preventing any big pushes. Instead it's a little at a time. Frustrating. Anyway, a major milestone has been reached, which is hanging of the completed flaps (both of them). I will show this on the airplane, as complete as it is right now. RH flap, fully deployed: LH flap fully deployed: Pan back some: I don't know if the pictures convey this - we have here a gigantic model. It's hard to pick it up without bumping it into something. The wings are not permanently installed yet - I want to wait at least until the inboard LG doors are complete and installed onto the wing undersides. That way I am dealing with a smaller assembly. A couple more pics: The flaps added another degree of completeness to my eye, occupying some space under the wings. Now it is on to the inboard LG doors which once complete will add more to the completed look, and occupy more of that space. After the doors, I get to tackle the bomb pylons - yikes! The LG door layout is tricky and difficult to get right. The parts will be scratch built, and will hang by two goose-neck hinge fittings per side. Also the hydraulic actuator in the gear bay will be attached. Visible parts that have to be right. Stay tuned for that!3 points
-

Cessna 172, Nichimo, 1/20
williamj and 2 others reacted to John Everett for a topic
Painted the Skyhawk logo using a mask from the Silhouette Cameo cutter as well as added the MRP light blue to the trim stripes. Cowling removable via magnets.3 points -

CF-18 color bird
guitarlute101 and 2 others reacted to chrish for a topic
Thanks again for looking! and the kind comments! I've been working fairly consistently a couple of hours a night all week putting on decals and touching up paint goofs. I lowered my arm at one point and hit a steel ruler that was sticking out over the edge of the desk that I was using as a guide for my blade to cut out decals , the ruler snapped down on the one end, up on the other and snapped a tail fin right off the model, the fin broke off the tail, flew straight up and I caught it...I got lucky that time! I did break the rudder off but it was just the glue that let go. A couple of shots tonight of where it sits at the end of the day. Another goof, I painted the stripe wrong way round. It's back in primer now masking the arrestor hook for the black decalling in progress Thanks for looking3 points -
Painting. I’ve got the basic colours down now. I’m using MRP paints. I love these. They spray like silk and they have a degree of transparency. Some might call that a failing, but if you’ve pre shaded they allow you to finely control the finish. They just need a few coats, but they touch dry very quickly so it’s all done in one painting session. The only drawback being it takes more paint and, on this hunk of plastic, I used the WHOLE bottle of RLM 76 (light blue) literally every drop from new. I’ll have to order another one now having only bought one last week. I started the process with the standard procedure of silver (Alclad aluminium) at the wing root to be followed by hairspray, then chipping but then realised I’m not using acrylics . I went for just leaving the root areas bare and using acrylic just for that area, you can just see the slight colour mismatch but looks like weathering! I brushed on AK chipping medium. Although I’m beginning to think that standard hairspray works better (think I may go back to that on future builds. It chipped ok, but not as well as I’d hoped). Everything was sprayed freehand - a little rough but I think that probably matches the aircraft. As my painting mask set was totally useless, I’ve ordered a new set from Maketar Masks. Alek there was super helpful and they are knocking up a 1/18th version of their Fw190 set ST21. This happens to match one of the versions supplied in the kit, so I’m going for that one as I can use the kit decals for the small staffel/ personal insignia. It’s the Hans Dortenmann Red ‘1’ version. So I’m now waiting on those coming through then many processes of weathering to come - although I’m planning on keeping this subtle. Stay tuned. Guy3 points
-

SWMBO demands hexagons. WNW AEG G.IV Early because the wife says so
scvrobeson and one other reacted to seiran01 for a topic
For the first time ever, wifey has insisted I build a particular model. Don't know why this is, but who am I to complain? So here we go off the deep end with Wingnut Wings' AEG G.IV (Early). I had some time tonight to gloss coat the lower wings and decal the top of one. The massive full-wing decal was cut into thirds, making it much easier to work with. Even in thirds, they're still massive and care is definitely needed. I used a hair dryer to get these to settle down with only a few drops of setting solution over three small areas. The colours of the hand-painted hexagons depicted in the decal are very nicely done and will look even better when the hexagons (excluding the black ones) are stippled with grey-green. This ugly beauty will have two 300kg bombs slung underneath. The 300s are made by Copper State, shown below with a 100kg bomb from the kit for size comparison. A word of caution re the decals with the AEG kits - I believe there must have been a lapse in quality control at Cartograf at the time the decal sheets for both AEG releases and the Hansa-Brandenburg W.12 were released so check over yours if you haven't yet. I've previously been sent replacements for printing problems with the lozenge decal sheets for both my late AEG and W12, and tonight I noticed that one of the four sheets of lozenge decals in this AEG is noticeably lighter in all colors than the other three sheets. See what I mean in the second photo below... TimW has graciously offered up his lozenge decals as he won't be using them so that I can do the full airframe without mismatched colours.2 points -
Looking for some guidance - I've always been interested in the Rabaul air campaign during WW2. It seemed to be one of the few times during the war that the US and Japan were evenly matched with regards to aircraft and quality of pilots. I also liked those overpainted IJN Zero's like these: Questions - I'm not really up on Zeros that much. Does Tamiya offer this version (not even sure what model it is) or of the clipped wing "Hamp"? Any aftermarket decals around? I did a quick Google search, really didn't seem much. On a paint related issue - any ideas what green was used to overpaint these? Was it brushed or sprayed on? I really can't tell from the pics i've seen. Any advice is appreciated.2 points
-
CF-18 or 118 if you like
Model_Monkey and one other reacted to chrish for a topic
Just finished, Demo plane CF 1182 points -
Howdy folks, Brian Leitch takes a look an interesting book re-release from Mike Ashey: Mike Ashey Publishing Detailing Scale Model Aircraft, Second Edition Thanks, Brian! And thanks, too, to Mike Ashey for the review sample. Kev2 points
-
chrish brings us something special, his very colourful CF-18A Hornet. Very sharp. Link to build thread;


 2 points
 -
You are correct, it is an A6M3 Model 22. This aircraft was flown by NPO Nishizawa (IJN Ace). This aircraft was delivered in overall olive-grey and field camouflaged using a shade of green (which shade of green is subject to speculation as far as I'm aware but may very well be the standard-run-of-the-mill, IJN green). Looking closely at the photograph it appears as though the green paint (at least in part) was applied using a brush and not sprayed. Note the lack of the radio antenna mast behind the rollover bar (common item removed along with the radio equipment). In order to get a conversion kit made (for the A6M3 Model 22) would require some forethought by the conversion designer to either produce two, separate kits for either zero or supply the requisite parts missing from either kit...it would end up being a very expensive conversion either way. The conversion kit for the A6M2 kit would require a replacement forward fuselage (forward of the windscreen) to add the increased frontal area for the Sakae 21 engine, a new engine (Sakae 21), oil tank, cowl, cowl flaps, oil cooler, oil cooler scoop and various cockpit changes between the A6M2 and A6M3. The conversion kit for the Tamiya A6M5 would require a new cowl, cowl flaps, exhaust collector ring, and entirely new wings. If you want the A6M3 Model 32, you'll need the A6M2 to A6M3 conversion kit plus brand new wings (or cleverly designed portions as replacements for the differences between the A6M2 and A6M3 Model 32 wing) for the clipped wing "Hamp". Someone here (awhile ago) kitbashed the Tamiya zero's to create the A6M3 Model 22. If you search you can possibly find the build thread. It isn't a perfect conversion (the cowl air intake is different between the A6M3 Model 22 and the A6M5 series) but it's close enough so that only zero nerds like myself would know the difference. Needless to say, a very expensive way to get to the A6M3 Model 22 but in 1/32, it's the only way. A6M5 Model 52's did serve as part of the Rabaul air force but wore the green over grey camouflage typical of the type. The Tamiya kit of the A6M5 does offer a set of markings for an aircraft stationed on New Britain (REF: Tamiya A6M5 instruction booklet). Rabaul is on the Island of New Britain (thanks Wikipedia). I've forgotten which group it was from but someone may know more before I get to my references to check.2 points
-
What better way to spend my time on a rainy Sunday. I have a crazy idea in my head to build this as "demo- model "2 points
-

Tips for working with resin
paul fisher and one other reacted to Fanes for a topic
Razor saw it is and some drops of water prevent the dust issue.2 points -

Tips for working with resin
JerseyChris and one other reacted to phasephantomphixer for a topic
Yup, any razor saw is good. Another cutting tip is to reverse cut- score with an X-Acto blade used backwards. Like with scribing, do first few passes lightly, then add pressure as needed.2 points -

Tips for working with resin
JerseyChris and one other reacted to Out2gtcha for a topic
I have a full set of Radu's razor saws that fit into an exacto handle. I find that the thinnest/finest saw out if the bunch makes quick work of resin pour blocks without making too much of a mess. Just wear eye and nose protection, as you never know about being allergic to resin dust.2 points -
Yep, apparently they didn't paint much of the interior parts at all.2 points
-
Thanks guys! Another little thing that I wanted to take a look at was the instrument panel. Tamiya does something a little bit different here. They provide a clear backing piece to the solid plastic instrument panel face. The gauges are supplied as decals that you apply to the BACK of the clear parts. So the you have a clear lens in front of the gauges without having to mask. Neat eh? The clear plastic is domed for each gauge, giving a weird magnifying effect to whatever is behind it. Since there would be so much clear plastic between the decal and the front of the panel, I didn't think it would look good. So I decided to apply the decals to the FRONT of the clear parts and do the clear glass in a different way. I flattened the domed surfaces on the clear parts. Since I didn't need the clear parts to be clear anymore, I glued the backing to the instrument panel and painted it black. Starting with the smaller side panel, I punched out the instruments one by one and started applying them to the side panel. If you remember, the decal is printed reversed so I can't see any of the gauge details. I noticed that my punched gauges were not centered. Not wanting to mess up the main instrument panel, I wet the decal, removed it and put it back on the wet backing reversed so that I could see the gauge details. You can see that the white gauges are not perfectly centered within their black backgrounds. I'm going to let this dry and punch them out properly tomorrow.2 points
-
The Gods of modeling have sent a savior for all who own the Hobby Boss B-24. I am assured by a member of the group, that a set of turrets will be on their way to me. watch for replacement turrets soon. Within days of my getting the donor turrets in.2 points
-
And some overall photos with parts dry fitted...I can say that the cockpit is done!!! Hope you like it.... John2 points
-
Toryu is finished! thank's a lot for following this build thread and thanks for all your comments. I really appreciate it! final pics in RFI HERE some last WIP photos props done engine covers are a little tricky to align antenna MRP exhaust soot added thanks for looking jan2 points
-
FINISHED: Eduard 1/32 P47D Thunderbolt “Dottie Mae”
JefH and one other reacted to Sir Spendalot for a topic
Thanks Gents - couldn't agree more about the decals. And now it’s on to the mucky stuff! I finished off the decals, most of which settled down nicely – just a few that needed a slice with a sharp blade and a small bucket of Micro Sol. I then sprayed on another layer of the Vallejo metal varnish and started a bit of weathering with Flory’s dark wash. A couple of pics showing the after on a couple of smaller pieces And a comparison between a wing that hasn’t been floried… …with a wing that has (hope you can see the difference - it's pretty subtle but it does bring out the panel lines) And a final pic of Dottie from the side Just have to finish of the weathering and it’s on to the final assembly! Paul2 points -

1/32 Tamiya F4U-1a Corsair - Boyington's 17740
Pastor John and one other reacted to Thunnus for a topic
Instead of showing all of the sprues, maybe I'll just cover the extras since I took the time to take photos of them in my light box. The Vector cowl flaps are the biggest addition. The set comes with a crankcase assembly but it might be too much of a bother to incorporate since it is a solid piece and some precise surgery would be needed to center the prop shaft hole, which is not something I am particularly good at. I'll compare it with the kit parts before I make a final decision. Photos of 740 indicate that it had smooth tires so I've picked up a set of Barracuda resin wheels as replacements for the kit's vinyl tires, which are treaded. The cockpit will feature fabric belts from HGW. Not as many buckles as a typical Luftwaffe set so this should be easy. I'm also going to be using the Barracuda cockpit stencils. Lots of tiny decals, many of them color-separated, which should make for lots of fiddly placement, I imagine. Montex masks will be used for the large markings. Masks are ideal for US markings since they cover so much real estate. And here's the True Details parachute that lots of people have used on their Corsair builds. There was one little thing that I wanted to take a look at before the build begins in earnest... the exhaust stubs. They are semi-hollowed out but are on the thickish side. Using a dremel and some metal bits, I thinned the exhausts a bit and deepened the openings. Something that caught my eye when reviewing the kit parts. I'll probably be doing little odds and ends like this for a few weeks as I clear off my work bench of recently finished builds.2 points -
"The Star of Africa" - Hans-Joachim Marseille's Do-335 A-2/Trop - Yellow 14 - FINISHED!
Paul in Napier and one other reacted to Out2gtcha for a topic
Thanks Shawn, in the end, well get there. The fringe and flowers should go well with the desert camo..................2 points -
Same for me Brian, My happiest memories are getting a model kit on a Saturday morning and all finished by tea time! A big Airfix beast at Christmas was heaven! Ah, that explains the logic then. I’m always a sucker for a NMF but this one is going to be a good old fashioned Luftwaffe camouflage job. It’s the reason I wanted the kit. I haven’t done one for ages and it’s overdue. Anyway, onwards and upwards... I’ve pre-shaded the beast in a very pleasant afternoon of airbrushing! I like this bit hopefully it will subtly show through and be worth the effort. Apologies for the lighting but the only place I can get pictures of her is on my large kitchen island. Cheers Guy2 points
-

Tips for working with resin
Out2gtcha reacted to JerseyChris for a topic
Hi chaps, I’m about to start working on a beautiful Pacific Coast 1/32 Macchi C202. As it’s a multimedia kit there is a fair amount of resin parts and some have some fairly thick attachment stubs on them. In the case where there’s a thick attachment with a delicate part attached, what’s the best approach to removing it without incurring damage? Hope someone can advise! Many thanks, Chris1 point -
Thunnus exceptional build. Isn’t it the same one posted on ww2aircraft.net which i have bookmarked for reference? regards, Karim1 point
-

3D Printing
Out2gtcha reacted to Model_Monkey for a topic
jumpjack is quite right. For metals other than aluminum and steel, Shapeways will first print the model in casting wax. The metal spinner would then be created using the "lost wax" technique. A mold is created by pouring liquid plaster around the wax 3D-printed spinner. Once the plaster mold hardens, the wax is melted out of the mold in an oven. Molten metal is then poured into the mold cavity where it hardens. The plaster mold is then broken away exposing the spinner. The metal spinner is then polished. For steel, the metal is actually a steel-bronze alloy, 60% steel, 40% bronze. Shapeways describes their process this way: "To build steel models, special 3D printers deposit small drops of glue onto layers of stainless steel powder, one layer at a time, until the print is complete. We carefully remove these models from the printer. At this stage of the process, the objects are very fragile, similar to wet sand. The models then go through an infusion process that replaces the glue with bronze, creating a full metal product. Models are then processed to achieve your desired finish, sprayed with a sealant, and shipped to you." For aluminum, Shapeways describes their process this way: "The 3D printing process is called selective laser melting. Fabrication takes place on a build platform with supports to anchor the part. A bed of aluminum powder sits above a build platform. One layer at a time, the powder is melted by a high powered laser. The melted powder is quickly cooled to solidify the metal. To form the next layer, the build platform is lowered and a new layer of powder is distributed with a coater. This process is repeated layer by layer until the part is complete. Horizontal areas and edges print with an automatically generated support structure to prevent the feature from sagging into loose powder. The support is then removed and polished away from the part during post-processing. Selective laser melting is unique because the high power laser provides enough energy to heat the aluminum powder above the melting point. This process fully melts the powder rather than just sintering it, creating a solid, homogeneous aluminum alloy."1 point -
There's a really useful build of the B1a trainer here, the images contained are the same as the 4+ book.1 point