Leaderboard


Popular Content
Showing content with the highest reputation on 04/08/2021 in all areas
-
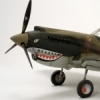
Here are some of others of the same aircraft I took back in 2012, if need be they can complement the ones from Panzerrob for that walkaround.16 points
-

Wedell Williams type 45 1935 from scratch scale 1/32
Greg W and 8 others reacted to Marcin_Matejko for a topic
Chassis:9 points -
That's the spring...8 points
-
And we have resin! Cheers, John8 points
-

Tamiya F4U-1 Corsair as a FAA Corsair I, 5F JT 150.......FINISHED
MikeC and 6 others reacted to monthebiff for a topic
Busy week so far but managed to complete the basic camouflage scheme which is a bit different as 5F had from what I understand an experimental scheme quite different from a typical RAF scheme. Pretty happy with how its turned out so far and will definitely be a slightly different looking Birdcage Corsair that's for sure! Regards. Andy7 points -

1/48th Boeing B-52H Stratofortress
A-10LOADER and 5 others reacted to tomprobert for a topic
Evening guys and gals, More progress on the mammoth B-52 project to update you on. I've been beavering away on the cockpit and flight deck of late and have built a basic interior using the Sanger seats with a few mods. I've also used the Sanger control columns even though they were, in my humble opinion, a little oversized: There's scope to add more detail here but life is too short to waste time on making things that'll never be seen! I've made and added the escape hatches for the ejector seats above the pilots: And then the canopy was protected whilst some filler was added to blend everything in: With the filler dry everything was sanded and blended in: I'm quite pleased with that - the blackout curtains made from kitchen foil look the part, too! As I'm making this as a late 1990's to early 2000's machine, I've also made and added the ALQ-155 fairing on the nose from Milliput - these have since been removed on current BUFFS due to various avionics upgrades. There's a little more sanding and some scribing to be done around this area, but I'm almost there with the forward fuselage now. Happy days. Tom6 points -
Finished this off this evening. I had some fun weathering her.6 points
-
As it was in 2013, when I saw it. The paint was kind of fresh then, it is not the original painting and colors. Eight years of natural weathering seems to have given it a better looks, as the dark green is now more natural, but the light green and the tan need maybe another decade or so to come close the real thing6 points
-

JetMads 1/32 Viggen
Eagle Driver and 4 others reacted to JMcD for a topic
The cad drawings on their website show the brakes openable but looking at the aft fuselage part, Jetmads too seem to have changed their mind.5 points -
JetMads 1/32 Viggen
Violator1991 and 4 others reacted to Anders_Isaksson for a topic
I could sure do with the SF version...5 points -
Starting in on the aluminum coat. Before: First phase: The "fabric" effect on the ailerons is pretty subtle. A little bit easier to see from a different angle. The ailerons are still a bit too shiny for me. I may mask them off and give them a shot of clear flat. But then I'm going to weather the whole surface to some extent, so maybe that's superfluous. We'll see.5 points
-
5 points
-

A Second Fuji FA-200 AeroSubaru
USMC Herc and 4 others reacted to John Everett for a topic
I've been busy at work the last three weeks. But there has been small progress. Panel paint beginning. "Carpeting" in the baggage hold. Fuel injection lines and "spark plugs".5 points -
Photos are great, Rob! These photos are ones you took, right? If so, can I grab them and create an entry on the website? We have a walkaround section. That way they would be easier to find then searching for them within the forums.5 points
-
Well, the Barracuda wheel set doesn't include a resin tail wheel and I decided I would prefer that. The Reskit wheels and the 'donor' (TBM-3) for the extra wing tanks arrived. So I guess I don't have any excuse for not starting.5 points
-

JetMads 1/32 Viggen
Rockie Yarwood and 4 others reacted to panzerrob for a topic
Hi all, I hope it is okay if I post several Viggen photo's here! The quality isn't great, but maybe they can be of help for the Jetmads Viggen builders. Moderators, is this is considered a solution of this thread, please remove the photos! The photos were taken at Aviodroom in the Netherlands, were this aircraft is stored outside in the open. And finally 2 cockpit shots: As I said, the quality isn't great, but I hope you enjoyed them anyway! With regards, Rob5 points -
I finished this build today a bit before noon. It is one of the "Brown Box" WNW kits that they sold near the end of their existence last year. The aircraft represents the Albatros DVa flown by Hans Böhning, a 17 victory ace assigned to Bavarian Squadron 76b. I thought the color scheme was eye catching and wanted to try out the wood decals from Proper Plane, so decided to build the aircraft in those colors. I also used a Proper Plane "Prop and Pipe" set, as well as some Taurus spark plugs, Gas Patch turnbuckles and Spandaus and HGW seatbelt. The figures are by Model Cellar and were fun to build and paint. Ernest The first of a few "in progress" photos. The engine has not been weathered yet. I scratched the ignition wires and control cables. Close up of the engine, still in factory fresh condition.4 points
-

HH-60G Pavehawk Kitty Hawk 1/35 DONE!!
D.B. Andrus and 3 others reacted to Woody V for a topic
I know I'm a little late to the JB Weld party, but I've known people that fixed cracked engine blocks with that stuff. I haven't gone that far but I've used it to fix broken pot handles, cat littler scoops, toilet flush handles and other things essential to survival in the modern world. One of the few things that actually lives up to its claims.4 points -
When the WWII RN is rejecting a carrier plane, you know it's got some serious issues...4 points
-

HH-60G Pavehawk Kitty Hawk 1/35 DONE!!
scvrobeson and 3 others reacted to Pete Fleischmann for a topic
For the blades I did airbrush it on- I thinned the snot out of it, but it worked really well! cheers Pete4 points -
JetMads 1/32 Viggen
Rainer Hoffmann and 3 others reacted to JMcD for a topic
The thing about the arming lever on the seat is that it has a strong spring and may cause injuries if untrained people, like museum workers or visitors, somehow try to close it. That's why it is always kept closed.4 points -
HH-60G Pavehawk Kitty Hawk 1/35 DONE!!
Harold and 3 others reacted to Pete Fleischmann for a topic
Hey all- almost ready to hang the blades. A shot of AK Dust & Dirt thinned with mineral spirits got that dusty look I was aiming for. You can see the blade on the far right is showing its bottom side- no evidence of The brass rod(s)showing- JB Weld to the rescue! cheers Pete4 points -
Personally, I always find it somewhat rewarding to see a biplane fuselage at a stage where it can sit on its own legs - it feels like a defining moment! Great work on the side intakes Peter - more challenges overcome! I assume that the panel cut out (which appears to be equal-distant on photographs) is simply to allow easy panel removal and installation? I hope that your exhaust repair goes smoothly and without too much difficulty. Your work is amazing in its ingenuity and I hope that your techniques and experiences are captured somewhere and are highlighted in huge letters so that we will always be able to readily find and refer to them! (not just for me, but also for all current and future model makers as well). Thank you for sharing your inspirational work. Cheers Derek4 points
-

1/32 Copper State Nieuport XXIII
Alex and 3 others reacted to scvrobeson for a topic
Thank you everyone for your feedback on my build. I'm glad you're all enjoying it so far. I've gotten the first paint stages done now. Started with the normal pre-shading of the fabric sections, then laid down a base coat of "silver dope." I used MRP Super Silver and MiG Traffic Grey for the dope paint. Then it was mottled with straight Traffic Grey, and blended back with one more coat of the dope. The mottling is very subtle, but it's there, and changes via light and the direction you see it at See, slight shift in the viewing angle, and it disappears into the background That's all for now. I'll try to get the metal panels done during the week, then probably the topside green next weekend. Let me know what you think. Matt4 points -
Hi Guys welcome to my new project ! In the spirit of always trying 1 new thing per build (aka self torture) here is what ive decided to try for the first time, A Dual build! I first went over the top with this idea by building a Academy and a Hasegawa 1/32 F-18, then realizing that just 1 of those boxes is biger then my bench i placed them back in the stach and pick out these 2 build details : 1 X HobbyCraft F4U-1D OOB 1 X Trumpeter F4U-1D HGW VF-17 Decals 1x vector cowling paints will be a mix of humbrol and AK real colors I had in mind to try to find some leftovers from Tamiya kits (engines and cockpit ) as ive seen many modelers replace them with the brassing, but i was rellly motivated to stat these now. But if anyone has spares ... Wink wink Hope you enjoy! here is a tease of the second night at the bench3 points
-
I hate to say it but this was kind of brought upon themselves by the poor business decisions they made (IMHO). I WAS a customer for some time before going to other options who could better fill my needs. Still sad. Mark Proulx3 points
-
 Thanks, Jeff and Chuck. I was just expecting the crisp demarcation, and will work on how to do this, but will weather these and see how it looks. Speaking of landing gear, I got my little package from Hiroboy.com, which is a model car website. I was kind of blind ordering, looking mostly for parts I can use on the brake lines of this and other upcoming planes, so I did order a variety. I figured that if the parts, which are labeled as suitable for larger scale cars, were too big, I can just use them on engines. Here's what I got. First up is a resin 90 degree .8 mm hose joints, HD03-0237, that I thought would be perfect for the hard line to rubber line joint at the oleo scissors, Tough to judge it here on my office desk, but I think these are around the right size, that's a large paper clip for scale I will put a landing gear leg next to one this evening if I get the chance. I think these might work. Next up, These hose fittings, "Top studio 1.1 mm Hex Fitting, Tapered" Tough to show the detail and give any size perspective, so I took another one with that paper clip opened to show the diameter. They look like they would do well as the terminus of the rubber lower hose to 90 degree elbow at the oleo, but I need to see them on teh legs to make sure. I think these will work nicely at the transitions. Next we have "Non plated hose joint set", this is an assortment of shapes and sizes of straight and angled connectors, including Ts Here's a shot showing the assortment Lastly, I got some electrical connectors, sort of greeblies for adding detail, but with no specific use planned I had sort of forgotten that I was waiting for these, now I can select which parts look the part and confirm that they are the correct size for what I want, but I am pretty excited.3 points
 -

1/24 Airfix RCAF Mustang IV…finally done
Martinnfb and 2 others reacted to R Palimaka for a topic
The most frustrating part of the whole build was the sliding portion of the canopy. I've rebuilt it several times now. I wanted to eliminate the step at the bottom of the kit clear part, which fit into the skirt around the bottom. The front frame on the kit part also didn't sit properly against the opening of the bubble, leaving small gaps on the side and top. I sanded the entire step off the bubble, which required adding a strip on the inside of the skirt to hold it. Once I was happy with that the bubble had to be polished and dipped in Future. Once the bubble was attached I had to build the framing at the front, once again out of plastic card shaped to the opening. The rivet pattern was redone using a riveting tool. It's not perfect, but it's better. I wish there was a replacement aftermarket canopy available... Reskinned: Primed and rivets applied...one more light sanding to level things out. Better, good enough...don't want to jinx things by doing anything else. Also had to create a set of rails to replace the "working" versions in the kit. Evergreen "I" beams sanded and drilled.3 points -
How are these decals printed? From the picture, the colour of the sample doesn't even appear to be consistent across the entire area, so that makes me think the colour on the sheet - and therefore the logo - may be off anyway. The sample certainly doesn't appear to match the photo of the real aircraft as it looks "stonewashed". The logos are small, so any colour difference is likely to be not very noticeable, so I would go with a colour that matches your perception of what you can see across a wide range of photos. Having said that, if the all the aircraft Compass had were placed side by side, they might not even match eachother:) Comparing the three colours you have sprayed, I think MrColor 328 looks the closest to the photo, and isn't too far off the decal sample in terms of brightness (i.e it's not too dark or light) although the hue is more washed out on the sample.3 points
-
Would have thought the explosive charges for the seat would have been taken out for museum aircraft, so it doesn't matter which position the arm/disarm lever is in. Oh, and I certainly wouldn't use that aircraft as a reference for matching colours...3 points
-

AGGRESSOR F-5E in Afghan Camo - Finished!
johncrow and 2 others reacted to themongoose for a topic
Putting some color to my adversary today! This is a custom mix of a yellow from an ‘81 Ford truck and gloss white. 3 to 4 light coats is covering nicely. In the close up photos the 1:1 scale bird has some serious fading of the yellow, plus some corrosion type patches and strips that I’ll add before i do the other camo colors i think. The strips of primer showing are where the green and brown will go to try and get some of the variation i see in those colors.3 points -
3 points
-
I think that's code for she wants one.3 points
-
Superb pics - my wife looking over my shoulder just mumbled something about "Bloody Idiot".. Hmmm, she may have a point3 points
-
Tired of looking at this one on the SOD. Got a hand full of paper towels, cup full of Mr. Color Leveling Thinner and sat out on the rear porch. Half hour later, i got this. Stuff took off the paint, clearcoat and decals quickly and with no damage anywhere. Will have to refill a couple of spots, but this is close to repaint as is. Now i have to think what i will do for decals. Really want the Norm 72 scheme, i'm pretty certain i have the needed decals, but after the trouble with silvering, may rethink this...anyway, i will restart this build. Don3 points
-
Tamiya F4U-1 Corsair as a FAA Corsair I, 5F JT 150.......FINISHED
MikeC and 2 others reacted to monthebiff for a topic
Airframe under a coat of primer and pre shaded. looking at colour pictures of these birds the lower surfaces do seem to have a greeny hue to them on many images, these were painted with US mixed paint as close to FAA spec as possible so I decided to go with a lightened mix of Tamiya Sky. Hoping to get the rest of the colours on over the Bank Holiday weekend. Regards.Andy3 points -
Perhaps, but I'm grabbing hardbound versions whenever I can now. I agree 100%, Mark. Almost the moment the new team took over, things started going downhill. While for many years I ordered from them almost exclusively, that soon gave way to intermittent purchases, then finally almost no purchase at all toward the end. No stock, sales that weren't really sales at all, silly shipping costs, you name it, they all killed the joy for me. Perhaps the big shot management team, can now move on to trash another business.2 points
-
I stumbled onto this tonight and thought I should share. Even though it's ship building (which I do also) I thought it was well done and hit a note.2 points
-
AGGRESSOR F-5E in Afghan Camo - Finished!
Starfighter and one other reacted to themongoose for a topic
Once more into the breach...all the kids were still sleeping at lunch so I ended up with a day off to myself, great modeling time! Finished up the light ghost grey and the gloss black. Now on hiatus until next week as the wife and I are off for our anniversary trip starting tomorrow.2 points -

HH-60G Pavehawk Kitty Hawk 1/35 DONE!!
scvrobeson and one other reacted to Out2gtcha for a topic
Awesome! That looks killer Pete.2 points -

HH-60G Pavehawk Kitty Hawk 1/35 DONE!!
Derek B and one other reacted to Stokey Pete for a topic
Pete, do you airbrush the AK dust on? I only ask, as I’ve only just discovered the revelation of spraying their filters onto paint jobs to alter hues and tones.2 points -
https://www.ebay.com/itm/114758757392 http://lemkits.com/.../1-32-messerschmitt-me-p-1100-1.../ By 1943, the situation on the fronts of the Second World War was developing rapidly. Along with this, technological developments have also intensified. The Me-262 fighter was finally put into service. And although this aircraft could not give a decisive advantage, in general it became a completely new stage in the development of German aviation. German aircraft designers, realizing that resources are limited, tried to use the units and assemblies of the Me-262 to create a project of a kind of universal platform for solving various problems. The family of projects of the Messerschmitt Me p.1099-Me p.1100 series has become just such a platform. In very close line-ups, a heavy fighter (Me P.1099A), a heavy armed variant (Me P.1099B), a high-speed bomber (Me P.1100), a night fighter (Me P.1099D (Project XVIII/ 84/1)) were conceived and other. This 1:32 model represents a variant of the high-speed bomber introduced in early 1944 and known as the Messerschmitt Me P.1100 /1. With an asymmetric cockpit layout, he carried weapons inside the bomb bays and did not have defensive weapons systems. It was speed that was supposed to be his advantage ...2 points
-

Finally!
scvrobeson and one other reacted to Hacker for a topic
One of my major wants was the Hobbycraft 1/32 A-36 Apache. l got the P-51 and the 51A models but trying to get the A-36 was a long time coming. On the weekend l was checking my Ebay lists when the kit popped up at a reasonable price and with buy it now button. Of course yours truly jump right on it and it is now making its way to the stash which is in boxes right now for the big move to bigger digs. Maybe l can sneak it into one of the boxes before the wife sees it lol Hacker2 points -
Vast majority of F-4s had the round wheel wells, G-2 reverted to the earlier style common to F-2, and E series.2 points
-

Tamiya F4U-1 Corsair as a FAA Corsair I, 5F JT 150.......FINISHED
monthebiff and one other reacted to LSP_Kevin for a topic
Looks great, Andy! Unusual colours for a Corsair. Kev2 points -
Yet another kit from my ongoing deal(s) with LSP_Ray. While I have this same vehicle as a Tamiya version, that kit suffered from a severely short shot front fender, almost impossible for me to fix. Since I have sort of a "thing" for SPAA weapons, this kit, weighing roughly two pounds, sure fits the bill, and I'm thrilled to have it. Thanks a bunch, Ray.2 points
-
A good read, and some great photos
Ayovan and one other reacted to Pete Fleischmann for a topic
I used to love it when spectators would wave at me on a low level. It’s not anything you are actively looking for- you just happen to notice it if you are looking in the right spot for that brief nano-second at 9 miles per minute trying not to hit the ground or anything attached to it. Low level over the water was an easier environment to spot spectators..cause they’re on boats. cool story! cheers Pete2 points -
Hi guys, The engine parts got some paint: According to their paint instructions, Revell makes you think that the spider part on the right resemble the exhaust pipes. Well, they are not. They are inlet pipes and were painted accordingly. There is no outlet manifold in the kit, nor will I make one! After that, both wing outer panels were glued solid to the wing roots: They needed a bit of persuation at the leading edges to ensure a smooth transition. And the engine parts needed a bit of clamping also. The tailplanes were added and the engine cowl was dryfitted: Its starting to look like a Corsair! The kit lived up to its reputation. It goes together well and needed suprisingly little filler. Last weekend, I shot a coat of primer, my usual mix of Revell 75 enamel, thinned with laquer thinner, turpentine and white spirit: Initial impression is rather good. I do not need to give extra attention to seams. I can start rebuilding the lost detailing at the sanded seams with stretched sprue and rivet decals to match the rest of the model. To be continued. Cheers, Peter2 points
-

32nd Mirage IIID2Z (with ScaleWorx conversion set)
blackbetty and one other reacted to Mistral for a topic
Comparison with hanger friends - IIIRZ : With IIICZ - D2Z will be in a similar colour scheme - hard edge, semi gloss. Single seater looks so much chubbier :2 points -

EA-6B Prowler (02 April: Done!)
Greg W and one other reacted to easixpedro for a topic
Thanks for the paint recommendations folks. In the end, I just shot it with Tamiya primer. I think with a bit of weathering, it'll look the part. Here's the slow March. First layers of paint...need to weather it and blend some more. And some washes. -Peter2 points


.thumb.jpg.cd22b958c9e88a898a21e18b862c523e.jpg)

