Leaderboard

Popular Content
Showing content with the highest reputation on 03/04/2021 in all areas
-
Revell 1:32 Tornado GR1 Foxy Killer I have a squadron print of this aircraft signed by Flt Lt John Peters who was shot down in the first Gulf War, so when this kit came out I had to get one... I preshaded the panel lines in black then sprayed the model with Vallejo desert yellow, followed by a black Vallejo wash and a little bit of dry brushing on some areas. The tail fin area was given a bit of extra weathering for the exhaust gasses. Exhaust nozzles were done in Alclad 2 shades. A metal pitot probe was added to finish off and it is sitting on a Coastal Kits display base.11 points
-

D558 Skystreak Jetmads
Violator1991 and 9 others reacted to X15 for a topic
Beginning of the paint with 2 coats, I think again one or two coats and polishing !! X1510 points -
Just to show that I've not given up on the Barracuda cowling just yet. I've been hacking away at the thick resin on the inside of the cowling to allow the resin engine to fit. Gouging out the resin like this is a sloppy and inexact operation and I am not enjoying it.8 points
-
And we're off! Not much to show, other than I have actually set scalpel to plastic... I'm waiting for various paints to arrive - the first one I'll need is RLM02 and, of course, it seems it'll be the last to turn up so I've started out of sequence. Again. The kit's Argus engine is quite nice, but is missing all sorts of components. For the most part, this is not a problem as it will all be hidden when mounted in the fuselage, but some - such as the HT lead that should run between the Bosch units that sit each side of the front of the engine (on the left of this pic) and the inlet air balance pipe which should run between the middle cyclinders each side (hence why the cylinder banks are arranged as two pairs with a larger gap in the middle) - are visible through the various orifices and need to be added. Poor little thing has no idea what's about to happen to it HT horseshoe lead added, along with the lifting rings, both made with solder of various diameters. It's highly likely that I'll have to tear the rings off to get the engine to fit in the fuselage, but it's all good practice! Gap between ignition frames and Bosch units fixed both sides. Stubs removed and replaced with holes to receive the leads - unfortunately, they are still too high, so I'll convert them into slots. The leads you see below the engine have to be mounted on the ignition frame and will cover the gaffe... hopefully! Another thing the kit has not reproduced well, is the shape of the rocker covers. They're depicted (and I've painted them) as simple caps, but they should be wedge shaped and extend almost to the exhaust/inlet ports. I'll repaint them later. All for now, Sepp, out.7 points
-

Swiss F/A-18C J-5011 2012 FINISHED
Alain Gadbois and 6 others reacted to Dukie99 for a topic
Maru and Gazzas thank you for leaving a comment. A quick update but an exciting one for me. The centerpiece of this build and its make or break moment is the tailart: two different photo-realistic tigers on the outside face of the tails and a detail close-up of a tiger eye in the inside face of the tails. Decals are from Syhart and they are are huge, covering the entire tail, with thankfully a separate decal for the moving part. Given the shape of the tails and the number of details molded there, I was very concerned about the decals conforming well to the plastic. As soon as I finished the general painting and gloss coat on the bird, I decided to apply these decals first. Although it was a nerve racking process over several nights, the Syhart decals (printed by Cartograf) reacted beautifully to micro Sol and gentle persuasion (and a lot of patience) and I am very pleased with the result. It is not perfect but in real life it looks amazing. See for yourself (the moving part of the tail is just dry fitted and will be glued with PVA later on). Only one of the tails, the other tail is also done, but the moving part would not remain in place when dry fitted, so no picture yet) More update soon. Cheers, David7 points -

A-6E VA-65 Desert Storm "500"
phasephantomphixer and 6 others reacted to Marcel111 for a topic
Jari, scroll down a little to see a nice pic of a VA-65 jet loaded with 12x Mk.20's: http://rickmorganbooks.com/intruders.html Here are some quick and dirty iPhone pics of progress. Intakes are fully on with engine installed also. This time around I used two-component epoxy to glue the weights to the nose, every time I use super glue the weight seems to come unstuck after a while which would be bad in the large A-6 nose-cone. A look down the intake... note the BIG J-52 :-). The step before the engine is actually there, just hard to see in this nasty pic. Everything packed into the fuselage. Note the additional supports for the exhausts, don't want those to break off as I push the rearmost sections on at the end of the build. And here she is, right side up. Very little work to do here other than that seam on the nose... but that is also very sraight-forward. Here's what the IP looks like, under a lot of magnification. I also modified the instrument coaming pretty substantially. There's still a lot of work to do here but I won't be spending more time on the cockpit until right at the end of the build... as it is it will be a miracle if the cockpit remains intact throughout the rest of the build, it's incredible how high up and hence exposed the A-6 cockpit was... thereby giving the pilot an outstanding view. Also note that I scratchbuilt the B/N lightbox... pics such as the one below show that this was installed on "500" during Desert Storm. (Pic is marked as free to use): Cheers, Marcel7 points -
So I am back into this project after a small break. I lost a lot of momentum when it came to doing the instrument panel. For some reason, I always get stuck with projects that there are no aftermarket parts for, and I wanted to do this model justice by getting it as close as I could. I just lost interest in doing the panel and felt that I needed a break from all of the conversion work. I was prepared to make the panel the fashioned way but when I started to research resin 3D printers and was looking into aquiring one, I decided to retire those hard won skills in favour of learning a new art, being CAD. I set about designing a new panel to fit into the Eduard coaming using Fusion 360, with much reference to the A-7 A/B NATOPS Flight manual and some pics. The learning curve was fairly steep but I got there in the end. By using a good front on drawing, I was able to size up each individual element onto the base instrument panel, which was sized to fit into the modified Eduard coaming. I was then left with each individual shape which was then manipulated as required. Here is the final render of the CAD file, ready to be printed. Here is the panel, in resin in all of its 4K glory, printed at .01 layer height. some of the elements are hard to see due to the lighting. Painted using SMS Dark Gull Grey and ready for further detail painting and a handful of Airscale instruments. I decided to go with Toms idea of the two Bullpup AGM-12C missile mission. I was a bit reluctant at first as it will leave lots of empty pylons on the model but the temptation of having something completely different and not available was too much. I set about designing the missile with those new found skills. Here is a render of the CAD file with a fair bit of work to go. I was lucky enough to get hold of factory plans for the missile from a friend. Some further refinement and hopefully print soon7 points
-

New Tiger Moth Wheels
D.B. Andrus and 5 others reacted to LSP_Kevin for a topic
Just saw this posted on Facebook: https://www.facebook.com/marek.hlusek/posts/1552650834935412 Kev6 points -

41sqn Tornado - One Giant leap!
HerculesPA_2 and 5 others reacted to Mark M for a topic
so after 2 whole days of decaling ive finally done the top!! (not that you can tell as the grey stencils blend in with the paint) got to varnish her, and flip her over and 'do' her bottom6 points -
I was going to leave the engine covers closed and do nothing with the engine, not even paint. As I was assembling the engine I could not help admiring the engineering, fit, and detail of it. Ideas came and clear photos were available, so I decided to add ignition wires and fuel line to make it even better. I will leave the left hand cover open on the model so the shown side stays visible. Here’s the completed assembly, I will seal it and then and weather it some. I will also attempt to make exhausts from hollow brass rod. I found a Quickboost door set in my stash that I had not used on the Dutch one. The Quickboost doors at first look like straight copies of the kit doors, but there are more detailed raised hinges on the Quickboost ones so I will use them. Kit part on the left. Cheers!6 points
-
Swiss F/A-18C J-5011 2012 FINISHED
Starfighter and 4 others reacted to Dukie99 for a topic
Here is the other side5 points -
Now the serious stuff, I'm being lazy and will be using paint masks for the camouflage, and no I am not getting into the real thing paint mats debate. I used to spend a couple of modelling sessions cutting out paper paint masks, then applying them to the model with Blu Tac sausages to give that very fine feathered edge look, I really like the effect but not the effort required, hence I will be using these. And off we go, these are designed for the SH kit so I had to use Tamiya tape in a couple of places though that may have been me being fumble fingered. Looks the part now, just with the masks on. Next paint Cheers Dennis5 points
-

JetMads 1/32 Viggen
Stevepd and 4 others reacted to Phartycr0c for a topic
The Purple Tail version will be in the majority then! , I found this little video to whet the appetite.. How very 80's5 points -
Thanks guys! I received a new toy (photography-related) today so I spent most of my time playing with it instead of modeling. But I worked on the wing to bottom fuselage joint, which was filled with black CA glue and re-scribed. The area received the rivet treatment and now I can move on to the wing roots.5 points
-

Revell 1:32 F4 Phantom Wild Weasel
Johnny Cloud and 3 others reacted to Rascal for a topic
Hi guys - this is my attempt at Revell's 1:32 Phantom. After assembly, panel lines were preshaded in black then the model was painted with Alclad 2 in the European colour scheme. The metal areas of the tail were also painted with Alclad. The model then got a coat of Alclad Klear prior to applying a wash which turned out to be a bit of a mistake. The Klear coat just didn’t cure properly and was still slightly tacky after more than a week so it was really difficult avoiding finger prints. The wash was eventually applied and removed with a cotton bud and a little thinner. Finally decals and a coat of matt Vallejo varnish to finish it off. The only accessory added was the metal pitot probe. Don't think I'll ever use the Alclad Klear again... Finally I’ve sat it on a base from Coastal Kits.4 points -

Many new Quinta sets announced for this Spring, most are 1/32...Phantom lovers rejoice!
Anthony in NZ and 3 others reacted to 1to1scale for a topic
I’m excited! Many new Quinta sets announced for this Spring, most are 1/32...Phantom lovers rejoice! I will be taking pre-orders and stocking these as soon as I can. www.hobbynutmodels.com4 points -
Can we please keep the discussion politics free.4 points
-

New Tiger Moth Wheels
geedubelyer and 3 others reacted to mozart for a topic
This is Marek's nearly finished Silver Wings Tiger Moth, pretty damned good! but has he got the dihedrals??4 points -
Like it!4 points
-
I made a small start last night. I did look into some aftermarket for the cockpit, but the real thing was pretty basic anyway. Seatbelts will look nice though if I can find some. I have some instrument decals that I'll use on the panel, sanded off the very light raised detail here.4 points
-
In my last update, I said I needed to install the bilge-mounted fuel pump in order to better visualize and plan for the hydraulic lines and fuel hoses coming off the hand pump and fuel selector valve on the LH sidewall of the cockpit. And that is true. But installing the fuel pump would block access to installation of the rudder pedals. So I had to fabricate and install the rudder pedals (at least the LH side one) first. Either that or don't yet install the fuel pump. I elected for the former option, probably a mistake - the rudder pedal is just dying to be broken off now that it's there. I get ahead of myself.... Before the rudder pedals and the fuel pump installations, I got more or less fed up with all the cables (fishing line) sprouting out all over the place, hindering my work. So I decided to organize them better by fabricating and installing what I will call the "master" cable pulley bracket. In real life this large complex bracket is located on the lower LH sidewall forward of the rudder pedals (so will be largely or maybe totally unseen). Importantly though, it gathers and routes cable runs for aileron trim tab (two), bomb release (two), bomb arm (two), wing hinge pin lock indication (two), and landing gear position indication (two). All these cables emanate either from the LH console or the LH aux instrument panel. And like a fool, I have represented nearly all these control cables - and they are in bad need of being organized. I make pulley wheels using thin plastic and the Waldron punch, in this case 0.120 inch diameter and 0.081 inch diameter. Here are five (five!!) pulley wheels stacked on top of one another (you don't see that very often!): Another stack of pulley wheels (three) ads to that one above. And the bracket itself, installed: Can you see the three pulley wheels stacked? The five-stack is totally invisible in between the bracket halves. So no longer do I have fishing line getting in the way (yay!). But to my disappointment but not particularly to my surprise, the cable run has a kink in it where it passes through the foot trough bracket (see above). Crap - I wanted a good clean untangled run.... Chalk this up to the thick gage of the fuselage sides, and some less-than-excellent layout on my part. A full digital layout would probably have shown this before I made stuff. It is what it is though, and it's my hope that the error gets lost in the shadows and the sea of detail that is a Corsair cockpit. Panning back with the fuselage halves in place: Add the foot trough, and that "ugly cable run" won't be that visible, methinks. That done and it was on to the rudder pedals. I am not sure how visible (or invisible) the rudder pedals will be. On my other 1/18 efforts, where I worked hard on rudder pedals, they are just about invisible. I have some reason to believe they are a little more visible on the Corsair (??). Well here we go. Here is the assembly drawing of the pedal: Note the typical reach adjustment sector (looks like an ice axe). And the pedal angle pull handle adjustor. And midway along with fabrication: See that spring on the LH pedal (and not on the RH pedal)? What alot of painstaking work with 0.008 music wire wrapped around a 0.032 drill bit! Not to mention the microscopic lugs needed to attach it. All for a detail that absolutely CANNOT be seen once installed into the cockpit. I learned that prior to making the RH pedal, so you do not see it there. This will become a recurring theme - increasingly skipping painful details because they cannot be seen. The unpainted thing in the middle is one of the hydraulic brake cylinders (another detail that is practically invisible). So I skipped some of its finer detail like the hydraulic line connection. Otherwise it's made of simple plastic shapes like usual. You also see the beginnings of the pedal details with side plates, a pivoting brass tube, and a curved web. I wish I knew how to make the grooved surfaces for the pilot's boot.... And installed: You can see the mounting fittings glued to the lower longerons (done months ago). You also see the fuel pump which I'll get to in a minute. And, you see one of the rudder cables flailing around in the air. This model WILL have rudder pedal cables come hell or high water. So what's wrong with this picture? Well the rudder pedal sticks up like an antenna! And I still have to do dozens (maybe hundreds) of hours of work on the inner wing (like the LG bays). How am I going to prevent the pedal from being broken off (smacks forehead)? Well I guess I will have to come up with some crude fairly robust cage to fix around it - I did something like that for the Thunderbolt's flap mechanisms a couple years ago. Wish I had thought of that before I installed them - but in my defense sequencing the installation of the cockpit parts going forward is becoming more and more complicated. And once the rudder pedal mechanism was installed, I could get to the big fuel pump in the bottom of the cockpit: I made this out of something like a hundred little plastic and metal pieces - another micro-surgery project: This variety has a valve piggy-backed onto the pump housing that allows the externally mounted 160 gallon fuel tank to be drained (or filled?) without removing it from the airplane. The "bird cage" Corsairs and earlier -1A's didn't get this valve because they didn't have that big drop tank. Mine does though. It has that red turn handle and the two brass rods sticking out to accept fuel hoses later. It was designed to barely fit underneath the foot trough. Uh oh.... Here, sure enough, is the clash: The foot trough of course is temp installed just to study the fit. I think this occurred because the foot trough mounting bracket is a tad low. So what to do.... First I cut off a couple hundredths from the red handle and the elbow fitting on top of the valve. Then I scraped a couple hundredths off the bottom of the foot trough. Later, I will shim the curved mounting interface between the trough and the bracket about 0.02 inch. That should do the trick. Do you get the impression this is a busy place? You would be absolutely correct. And I don't even have the intrusive fuel hoses for the fuel pump in place yet. You may also sense a tinge of frustration in my descriptions? Well I am trying to remind myself that model making is supposed to be fun. But I must say, these details are HARD! Labor intensive. And I'm beginning to experience the downsides of my sequencing plan, with unanticipated inaccessible clearances to complete system runs, etc. Clashes are starting to show up too. So I have a bit of a mine field here, with so very much already invested in the cockpit build. Trying to attach a rudder cable after the fuselage join has occurred - OMG. Or attach the fuel hose to the top of the fuel pump valve. I don't even want to think about it right now. Next post I will add to the business with the engine control quadrant. Then it's the flap control unit to close out the LH side!!! Milestone. Stay tuned!4 points
-
Hello, the painting phase is going on. The under surface were sprayed with a very Light Grey. I used the Tamiya XF-80 reference. Then I sprayed the matt Black anti-glare panel in front of the windshield. Patches of Light Blu Grey, Tamiya XF-23, were sprayed over the Czech's insegna under the wings and around the front section of the jet air intakes. The real "challenge" was masking and painting the White band around the rear fuselage section... meters of Tamiya's masking tape following such different shapes and details... but in the end I was happy with the result. Still a lot of panels and details to be painted... but for me this is the best part of building a model. CIAO! Piero4 points
-

1:32nd scale Fokker D.II
Bobs Buckles and 2 others reacted to sandbagger for a topic
Hi all, I'm still waiting for the figures to arrive for the Roland D.VI so I can complete that model. In the meantime I'm starting on the 'Special Hobby' 1:32nd scale Fokker D.II. This model will represent a Fokker D.II, serial number not known, that was attached to ‘Kampfeinsitzer Stafflen’ (Kesta) 4b sometime between April 1917 - October 1918 at Royal Bavarian AF, Freiburg. Should be fun, Mike3 points -
Airfix 1:24 Ju87B-2 Stuka
Nikola Topalov and 2 others reacted to Sir Spendalot for a topic
Having moved to the dark side (1;48 scale!) for a while, I finally returned to the fold with a blast from my past – the venerable Airfix 1:24 Ju87B-2 Stuka. I built one of these way back in the 70s and it was the last kit I built as a kid. My original version was painted in the European theatre colours, so I thought I’d try out a desert scheme this time around. I really like the AK Real Colours so thought I’d check out their colour guide for WWII – and this is where it got a bit confusing. The colours that I’ve seen on other desert scheme builds all appear to have the RLM 79 from 1942, whereas the aircraft in the instructions is dated 1941 and would, according to the colour guide, have used the lighter earlier version of RLM 79. So, I was brave and went for the distinctly lighter, more yellow early version (my ‘bravery’ was assisted by various members of LSP in my call for help – thanks gents). The interior was upgraded with an Airscale IP (awesome detail!) and HGW seatbelts (also awesome). Anyway, here she is:3 points -
Trumpeter 1/32 English Electric Lightning
TimHepplestone and 2 others reacted to Rascal for a topic
My all time favourite jet aircraft. It was hard to find this now discontinued kit so when I saw one come up on ebay I swooped on it. The build was really straightforward as this kit has very few parts, I added a quickboost ejection seat and a metal pitot tube, but an out the box build apart from that. This was my first time using any resin accessories, certainly impressive detail on the seat even if my painting skills don’t quite match them. This was also my first attempt at a metal finished aircraft so a bit of a challenge. I used Alclad 2 black primer as a basecoat then Alclad lacquer paints. The majority was painted in Aluminium, with polished aluminium, steel, dark aluminium and magnesium used to pick out some areas and give a bit of shade variation. Alclad Signal red was used for the red areas. The paint scheme was for the Firebirds display team – what a sight and sound that must have been… A gloss Vallejo varnish was applied followed by a black wash. Decals next to be followed by the canopy…. And then it went wrong, I turned by back for 5 minutes on my dog, and to my horror when I came back in the room discovered a canopy completely chewed to bits. One hard lesson learnt. In desperation I emailed trumpeter and scoured the internet to see if I could source a replacement but knowing that this model went out of production over 10 years ago I knew I was clutching at straws. I also dropped a message on the large scale planes forum, hoping that someone could point me in the right direction. Huge thanks are due to Max aka Mozart from LSP who came to my rescue and offered me a spare canopy, which he duly sent me and rescued my build. I tried to pay for it but Max wouldn’t hear of it. I can’t thank you enough Max, I would have been gutted if my Lightning had been of the open top variety. Hopefully I can repay the favour some day. The base is from Coastal Kits.3 points -
Here is the latest things that I have been working on. Pilot figure. I have extended his arms, they will be resting on the cockpit sill. F-106 pilots wore an Orange suit with green Anti-G suit. I suck at figure painting, go figure. Elevons. I have added a metal tab which extends into both the elevon and the wing. Bend to the correct angle and slide it in. Adding some details to the main wheel well. Working on the aerial refueling door on the spine. Elevon actuator fairings. Say that 3 times fast. Dan3 points
-
Back again. Not much work done this week due to my schedule but made some progress. Thanks to the much appreciated heads up about the cockpit tolerances I was able to get the fuselage and wings individually assembled. I've talked to my Father in Law in the past and heard him say how "Tamiya needs to make a new big scale 109E." and I'd always reply "Isn't the Eduard one pretty good?". Turns out Tamiya needs to make a big scale 109E. To start the radiator covers were extremely pronounced on the wing surface. I sanded them within an inch of their life, took this picture and further sanded them to the point where they're at least a little more presentable. The nose as advertised is the biggest mess. I believe I should be able to fix the area below the oil cooler, but fixing the nose is going to lose a lot of detail. There's a bit of a shortage on locating pins. On the cowl they ask that you glue this small piece along a .75 to 1mm mating surface. I added a scrap piece of plastic as a locating tab after scouring the later instruction steps to watch out for obstructions. The locating pins the kit does have aren't the best. I could not get the upper and lower wings to come together anywhere resembling flush until I snipped of the pins in the wing tips. After that it fell into place. I painted the interior of the radiators and attached the covers. Granted at this point its just a dry fit but the gap where the fuselage and wings meet will be an issue as well. With all the lower fuselage issues it's feeling like a coin toss if this will be built as Beeck's 109 post crash. One positive is that in the past I've been hesitant to try building a short run kit because of the assembly difficulties. If I can get this looking half way decent I should finally feel confident enough to pull the trigger on some Azur and Special Hobby subjects. Thanks for looking. Jeff3 points
-

JetMads 1/32 Viggen
Christoffer Lindelav and 2 others reacted to Out2gtcha for a topic
Same, no way I could go for grey with that lovely tri-color splinter scheme out there! However, for me having seen SO many Felistowes at competitions in the past, some well done, some not so much, the Felix really doesnt have that much of a presence for me at shows any more, rare or not. The Viggen for me will have way, WAY more presence on the tables.3 points -
"Loyal Wingman" by Boeing & RAAF made its maiden flight. That is a game changer in the future of air warfare concept, for sure.3 points
-
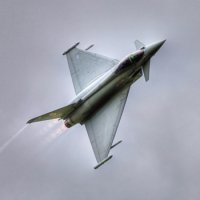
I always think of this video when I think of the Viggen and its brutal looks, power and astonishing agility3 points
-

1/32 Avro 504 scratchbuild
Alain Gadbois and 2 others reacted to kensar for a topic
A couple of shots of the in-progress prop. Prop made by laminating layers of paper (report cover stock) with CA glue, then sanded to shape. prop hub (not weathered)3 points -
The cockpit is ready. I did not have the appropriate diameter hollow brass tubing, so I drilled out the exhaust stack. Some minor cleanup to do I see in this magnification. Those are half-millimeter holes The engine was sealed, received a few washes, and sealed again in semi-gloss. It looks quite neat. The data plate came from the spares box and is not accurate, but looks good on the block. There are not many photos of this plane in this livery. The well known one: One other: But there were more painted similarly. It looks like a brush job and the pattern varies quite a lot:3 points
-
Many new Quinta sets announced for this Spring, most are 1/32...Phantom lovers rejoice!
phasephantomphixer and 2 others reacted to Dukie99 for a topic
I don't know about Quinta doing a E but Red Fox Studio has two sets for an E (one with MFD on and one with MFD off), but I don't know how this company compares to Quinta as I have not yet purchased from them but the quality looks comparable. They also do several sets for Phantoms. https://www.rfstudio.hu/termekek?kategoria=quick-set-termekek&szuro=&kereses=3 points -

Many new Quinta sets announced for this Spring, most are 1/32...Phantom lovers rejoice!
Anthony in NZ and 2 others reacted to ScoobyDoo for a topic
I asked on their Facebook page if they were doing 1/32 Tamiya Phantom sets yesterday and minutes later they responded with this info.3 points -
Thanks! Me too, as I really like Manfred's ride with the green streaking and all red tail and upper wing. I was even considering grabbing one of the Roden sheets, but if they are planning a Richthofen Meng edition of their decals Ill definitely wait then. I did find a single sink mark in the upper metal section of the middle wing saddle that had to be filled, and also have to mask off the green sections for paint as well. While the filler on the sink mark dries, as well as the now glued on elevator, I have been doing some paint experiments. 7 greens and one blue (that just happened to be as close as I needed!) And the winners are, MRP-67/RLM 78, and MRP-35/Olive Green! Ive got some more sanding and then masking to do, as I have to shoot the white under color for the green, as I need to apply Voss's face on the cowl front before painting the green. OR, I may just mask things off, shoot the green, then shoot the white face over that. We shall see! Cheers for now.3 points
-
 The name of this website is ‘Large Scale Planes’. The clue is in the title Jennings. Saying this is ridiculous is like going to Hemming’s Motor News and claiming a car for sale is ridiculous because it’s an old car. This is ‘Large Scale Planes and I applaud anyone for producing large scale planes. This is a truly golden age of modelling and I am thrilled to see the choice we have.3 points
 -

HH-60G Pavehawk Kitty Hawk 1/35 DONE!!
Greg W and 2 others reacted to Pete Fleischmann for a topic
Hey all- started surgery on the blades/ hub- cheers P3 points -
Some more photos:3 points
-

1:32 Scale RAF 'H' Bomb Trolley Now Available [ Iconicair ]
themongoose and one other reacted to GrahamF for a topic
We now have the RAF 'H' Trolley available to order with or without the Tallboy to cater for those who have already purchased the bomb for their HK Lancaster. The Tallboy comes with the usual decals. Graham2 points -
Ahoy! My Colonial Viper isn't yet finished, but I'm waiting for decal paper and I think I need to keep the mojo going. This post is really just to set out my stall for my next intended build, and will hopefully prod me into getting a move on with it before the ground attack group build starts; I'd really like to get involved with that, and don't want two on the go at the same time. This will be another what-if subject; those not inclined to entertain such heresy should look away now Obligatory box shot: Aiming point: captured Fi156-C in service with 390 Sqn RAF late 1944. This squadron, in the alt. history to which my earlier P-51 belongs, goes on to become 7e Escadrille (later Escadron), Forces Armées Bretonnes. I still have several decisions to make, including whether or not to include the serial number, whether to show the squadron codes in grey (which I like) or dull red, whether to extend the yellow all the way back to the tail (although I like the half-and-half-look) and most importantly whether to do the build clean, as a warbird, or dirty it up a bit as if in service. I'm not sure I'm "there" yet, we'll see. Back soon...ish. Sepp2 points
-

New Tiger Moth Wheels
mozart and one other reacted to geedubelyer for a topic
Nice spot keV. Thanks for sharing2 points -
You could say "Draco" (currently being rebuilt after a 2019 crash) could be the Viggen of the civi sector..............2 points
-

JetMads 1/32 Viggen
Landrotten Highlander and one other reacted to Scotsman for a topic
That Black scheme with Gold trim is rather fetching ....2 points -

ATA girl
Landrotten Highlander and one other reacted to xcnickcn for a topic
I couple of things just will not leave my mind. One: the offer to paint me one is so generous I just don't know how to respond. Two: “flirtatious” Understand, my wife is older than mozart and I am younger than both. Therefor I engage in: you are a baby boomer, I'm not! Flirtatious implies she is looking for man. I see this as the look when a female athlete scores a goal or sticks the landing. I am thinking: “smokin' hot”.2 points -

LSP'er Rejoice! ResKit to the Rescue!
Piero and one other reacted to Dennis7423 for a topic
Folks- Looks like ResKit is grooving in our direction, as they have lots of new 1/32 wheel sets and ordinance coming our way, according to Hannants: https://www.hannants.co.uk/manufacturer/reskit?search_direction=asc&product_category_id=103 Some highlights I saw were more resin wheel options for the P-38, TBM/TBF Avenger, and P-61. They really are releasing stuff super fast. I've gathered a few of their sets recently, and they are quite nice! - Dennis S. Thornton, CO USA2 points -

Why oh why do some of the best products around have to disappear?
D.B. Andrus and one other reacted to LSP_Ron for a topic
Can someone post the actually announcement rather than a link to FB? many of us are not Facebook fans so we can't read the announcement. Thanks2 points -
Many new Quinta sets announced for this Spring, most are 1/32...Phantom lovers rejoice!
Daniel Leduc and one other reacted to Dukie99 for a topic
I am really hoping that Quinta gets us a set for the two seater Super Bug. I just got their set for thee Mig-29 SMT and it is spectacular.2 points -

Many new Quinta sets announced for this Spring, most are 1/32...Phantom lovers rejoice!
Isar 30/07 and one other reacted to Uncarina for a topic
Wouldn’t say no to an F-4EJ Kai! Cheers, Tom2 points -
Update. A bit more to do before I close it up.2 points
-
Wings and tail glued on. First go round with putty and primer. Lots still to do. Thats it, Dan2 points