Leaderboard
Popular Content
Showing content with the highest reputation on 10/08/2020 in Posts
-

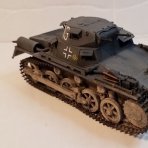
B-24D Liberator Hobby Boss 1:32
Rockie Yarwood and 17 others reacted to Koralik for a topic
This time a plane with propellers. The model, as usual, is made straight from the box. B-24D Liberator from Hobby Boss in 1:32 scale, very weak model. And the idea of making plastic landing gear legs is an absolute mistake!!!. It doesn't make sense to write any more because I have nothing good to write about this kit.18 points -

1/32 HKM Avro Lancaster Mk.I Finished!
HL-10 and 11 others reacted to b757captain for a topic
More pics: Gotta touch up the gun barrels Cockpit with mood lighting on! Kit detail in the wheel wells is pretty nice. I hid the battery pack for the lights here in the bomb bay so I can access the switch and can change batteries when needed. I do need to find some black tape though! Cheers, Mark12 points -
1/32 HKM Avro Lancaster Mk.I Finished!
Loach Driver and 9 others reacted to b757captain for a topic
Hi guys, The Lancaster is finished - sort of - more on that later. So, in the quest to reduce the large pile of kit boxes in my stash, I decided to open the largest of the boxes and out popped a Lancaster! Built mostly from the box except for the Eduard Zoom instrument panel and some LED lights from Amazon. I figured that though I wasn't going to do any super-detailing in the interior, a little mood lighting would help show off what is there. The kit mostly fell together, good engineering from HKM except for a weird fit issue sliding the inner nacelles into the wing. In retrospect I did deviate from the instructions slightly during wing construction so that was probably the cause. Dang that old operator error thing! Painting this massive beast was a chore and challenge (see me recent thread on MRP clear coats). I ran out of British Interior Green in my fave MM so I mixed up a substitute from a test order from True North. I will not be ordering any more paint from them - nuff said. Exterior colors are MRP, first time using them and I like the base colors. I did have an issue with the clear coating where it has been theorized I had an episode of blushing due to high temps/humidity when I sprayed the final flat coat. Managed to fix that (mostly) and except for a few areas it actually enhanced the weathering effects (to my eyes anyway). I do have a few spots to touch up but I'm putting this in the done column until I can muster the courage to do the fixes. Here she is: The sheer size of this thing makes photographing difficult! You can see a little of the blushing below the cockpit that I wasn't quite able to rescue. More pics coming. Thanks for looking! Cheers, Mark10 points -
update posted on Lukgraph FB page7 points
-

1:32 Douglas A-26 Invader from Trumpeter/Hobbyboss?
D.B. Andrus and 6 others reacted to iaf-man for a topic
Interesting info about the K,if anyone is going at it7 points -
Here's a build which has been going for a long time and is now complete - Special Hobby's Yak-3. I really liked this model. Yes, some challenging fit issues but nothing that good old elbow grease cannot sort out. The kit detail is really nice. I added the Yahu instrument panel (which is superb) and some seat belts. Otherwise all OOB :6 points
-

1/32 Eduard (Hasegawa) P-40N-5 Warhawk
daveculp and 5 others reacted to Tolga ULGUR for a topic
This is 1/32 Eduard (Hasegawa) P-40N Warhawk finished with the markings of 89th FS 80th FG in India during 1944. Paints: Gunze Sangyo acrylics Decals: Nose art (Skull & shark eye) and numbers (61) are made by customhobbydecals.com Happy modelling6 points -
.thumb.jpg.f23b2dc356f90ead35d25aa5e3609a95.jpg)
RFI ICM 1/48 Ju-88 A-4(14) Torp.
nmayhew and 4 others reacted to Dart_Schatten for a topic
Good day friends! I've built this model just for relax and some fun That was OOTB constructing. I just added some belts by scratch and wires and PE gun sights. I used empty ("refueling") markers to paint "snakes" over original camo. All paint are from Gunze. Thank you! Regards, Sergey Budyansky5 points -

DH 82A Tiger Moth S Rhodesia 1943
VW Chris 1969 and 4 others reacted to mozart for a topic
Hmmm, the lower wings are going to be challenging, the more so since their correct alignment and dihedral will directly affect the upper wing and hence the overall "look" of the aeroplane. The instructions are simplistically vague: The problem starts with the small spigot on the wing which is supposed to align with a boss on the fuselage: but I think the boss is too thick for the wing to mate with the fuselage, and the spigot inadequate in depth: The leading edge of the lower wing has to have a sweep back of 9 deg (which it isn't in this pic!) and the link between the bracket on the fuselage and the mating part on the wing needs a spacer. So the wing only interfaces directly with the fuselage on the front half (roughly), the lower half gradually dropping below fuselage level: Should be an interesting hour or two coming up!5 points -
Some images of the new kit ..5 points
-
Odd start to the working day... Rocked up at the office at 08:35 to find a strange man sat outside in his car. Some bloke by the name of Redcap1960, apparently of this parish... Anyhow, he was bearing some rather special boxes, really not sure how that happened! <shrugs shoulders> Birthdays and Christmas all at once... Thanks @Redcap1960 - you're a star - and great to meet you! Iain5 points
-
Just a very quick update to prove that (some) progress is being made! Gary at GT Resin kindly supplied me a replacement set for the exhausts as my originals had a flaw in them. New set looks great and is a leap above the detail provided by the Revell kit (far right). As this is an early bird, they still have the turkey feathers on. Each exhaust comes in three pieces and includes a separate flame holder (not shown), for ease of painting. After a bit of tidying up and spot of primer on them I'm just about ready to paint them up. This is the fun but slightly daunting part where you can bring a part to life .. or kill it stone dead! Not sure which method to use to weather them up as the images I've seen show quite a distinctive but complicated pattern. Much pondering to be done!5 points
-

1/24 Trumpeter: Hurricane IIc
Creeperboy and 3 others reacted to Erwin for a topic
Hi all, Finished this as "museum-quality".Representing a restored Hurricane IIc. Painted by brush using Revell satin enamels.4 points -
Hi all Is anyone aware of a good documentation on armed versions of classic Stearman mod 75. According to Wikipedia : Argentine received 16 model 76D1s in 1936 (some on floats). Philippines 10 model 73L3 (powered by R-680-4 or R-680C1 engines). Brazilian air force model A75L3 and 76, of which a plane survive today at the Museum of Aviation in brazil. Cuban air force and Venezuela also used them. I wonder if a conversion of the last ICM is possible? A Filipino model used during the 1942 campaign would be tempting but I only know this bad photo A Brazilian model is also very tempting4 points
-
DH 82A Tiger Moth S Rhodesia 1943
VW Chris 1969 and 3 others reacted to mozart for a topic
Slightly worrying Alain isn't it, that's the reason why I'm taking a lot of trial and error fitting not to mention cogitation to get this as right and as robust as possible! So I've drilled out the wing and fuselage and inserted a piece of rod into the wing. The aft brackets now line up well, I may well pin these for extra strength:4 points -

32nd Special Hobby Yak-3
Landrotten Highlander and 3 others reacted to Mistral for a topic
I'm amazed at how small the Yak-3 was compared to the Bf 109 and Fw 190. Apparently it gave both types a run for their money ! I've started to use these - the best thing since sliced bread - they provide the modeller with the ability to impart a really random blotchy appearance to the paint finish. Well worth the investment : And my first use of AK acrylics - I'm not a big fan of acrylics but saw this set at one of our model meets and bought it as they were the correct colours for the Yak-3 - I think the colours are spot on :4 points -
Forgot, I did add resin exhausts - from Quick Boost if I recall. Kit decals went down like paint with MiG two part decals set/sol.4 points
-
DH 82A Tiger Moth S Rhodesia 1943
VW Chris 1969 and 3 others reacted to mozart for a topic
Not my best piece of work ever, but it will do for the support bars with added nuts!! That wraps up the tail end, on to the wings next.4 points -

Revell 1/32 Tempest... new?
Phantom2 and 3 others reacted to thierry laurent for a topic
Hi guys, Actually a very large majority of the releases of the companies that used to produce short-run kits are very close to the mainstream companies standards of some years ago. For instance, the quality of the Tempest has nothing in common with the one of the P-39. The kits currently coming from Eastern Europe are quite often cheaper, more accurate and not more difficult to build than Chinese kits. They are actually becoming very close to the Japanese quality.4 points -

A6M5c Model 52 Hei Takeo Tanimizu 1/32 Hasegawa
AlbertD and 3 others reacted to Miloslav1956 for a topic
4 points -
Well hell, I'm excited that Richard has finally announced the sheet! Wingnut's sold-out decal sheet has been selling on ebay for higher prices than some wingnut kits. Available for sale directly from https://www.aviattic.co.uk/132-fokker-dvii-markings-sets.html3 points
-
I added some decals last night and this kit’s decals are the best I have ever used! So thin and strong, I’m impressed.3 points
-
I'm sometimes puzzled by the 'No Push' stencils on the leading edges of Phantoms. And the you see photos of herds of sailors manhanding the beasts into place all lined up along the front of the wings. I don't think they're pulling.3 points
-

Matchbox Tiger Moth
KiwiZac and 2 others reacted to Alain Gadbois for a topic
Hi all! Didn't make too much progress last week on the Tiger Moth , apart from some trimming of the plug for the front seat. As I have a second kit I want to build, and before all the measures and references are put away, I decided to correct and detail the parts of that kit before getting too far in the present build. Notably the Apoxy Sculpt in the end of the fuselage and the rectangle openings in the bulkheads. Easy to compare and measure before the kit is closed up! This is the lower fuselage panel that holds the bottom wings too. The molded on detail was removed on both and correct ones will be added on after the tabs have the correct dihedral. Bye for now! Alain3 points -
RFI ICM 1/48 Ju-88 A-4(14) Torp.
Kagemusha and 2 others reacted to Dart_Schatten for a topic
Yes, here he is: I used "ultra fine" 0,8mm.3 points -
A great article and superb profiles by Massimo Tessitori here.3 points
-

Zvezda Star Destroyer - a new detailing project
Uncarina and 2 others reacted to The Madhatter for a topic
While I wait for my new 3D printed tile to arrive, I have been quietly working away on the ship and have finally finished one side. Now I just need to start the other side.... Trying to get a shuffle on this one as I want it done for Expo next year (providing its on of course) Well, that's it for now, but as always, thanks for looking! Cheers Si3 points -
This big boy (large format, 700+ pages!) arrived on my porch yesterday.3 points
-

Make the others jealous
Phartycr0c and 2 others reacted to LSP_K2 for a topic
A very cool kit here, and one that I'd been after for quite a while, so I'm a happy guy.3 points -
.thumb.jpg.cd22b958c9e88a898a21e18b862c523e.jpg)
Lemkits 1:32 IL-10 "Beast" the first details of the new project
Anthony in NZ and one other reacted to upor for a topic
the first details of the new project Lemkits at 1:32 in front of you. And soon the "beast" will come out of the shadows).2 points -
B-24D Liberator Hobby Boss 1:32
aircommando130 and one other reacted to CATCplSlade for a topic
For something you have nothing good to write about, it certainly looks pretty good.2 points -
I think they do it to train the sailors to use spray paint. I can’t think of another reason.2 points
-
Holy smokes, that has to be the silliest thing I've ever seen in any form of modeling. $25.00 for a full sized model kit of a noodle cup from a grocery store? really? What's else is there out there, $40 dollar 1:1 scale models of pine cones that are in your yard?2 points
-

Hawker Tempest V Fuel Tank Fairings
chuck540z3 and one other reacted to Kagemusha for a topic
This should answer quite a few of your questions, Paul Budzik scratch built a superb rendition, Paul did post the build on here, but sadly he checked out and the photos are no longer available, there's also this photo.2 points -
the fuselage is ready2 points
-
Just a quick proof of life picture. For the last couple of weeks it's pretty much been just doing stencil decals. The bottom is done and I just started the topside today. Been having some family stuff lately so not as much time as I would like but it's at least going in the right direction.2 points
-

1/32 Trumpeter SBD-5 Dauntless in New Zealand markings w/ full Archer rivet replacement - DONE
GROWLER 96 and one other reacted to Brett M for a topic
A bit more progress to report. Starboard fuselage is riveted, minus one section I have a question out to Woody on. I had big plans to have this and a wing done Sunday.....that didn't happen!2 points -

1:32nd scale - Bristol M1.c
D.B. Andrus and one other reacted to sandbagger for a topic
Hi all, I'm working my way through the cockpit assembly. Most is assembled ready for painting. There are other parts to add after they've been painted. I've drill 0.3 mm diameter holes and added 'GasPatch' 1:48th 'one end' turnbuckles to the rudder bar. Added a 0.3 mm rod to the control column to add strength to its attachment to the floor (hole drilled to receive the rod). I've also drilled 0.3 mm diameter holes across the control column for the elevator control wires. The instrument panel of the cockpit right side frame is orientated incorrectly in the instructions. The photograph shows how it was mounted, so I've gone with that, Mike2 points -

1:32 Douglas A-26 Invader from Trumpeter/Hobbyboss?
Harold and one other reacted to John Everett for a topic
Can confirm the wholesomeness of Resin2Detail. He makes good stuff. I’ve used their “quick fix” engines and upgraded control columns in my version of the kit.2 points -
Apparently so! Kev1 point
-
Mine are on their way! I'll report back when they've arrived1 point
-
OK, I'm back with the promised update, and I'm happy to report that I've now finished the canopy parts. At least, I think I have! But, I can't say I'm completely happy with the result. My attempt to match up the inside and outside masking was passable, but certainly not perfect. I've managed to touch up a few problem areas, but the biggest issue is one I didn't see coming: in some areas (most notably the windscreen), the styrene strip I used to form the framing on the inside is still visible as thin white strips beneath the paint. This is because they're glued into the grooves in the vac part that produce the external frames, and the two paint layers that should have covered them completely from within and without, are actually separated by the thickness of the clear plastic. This area obviously isn't covered by paint, but is still transparent, and exposes the unpainted white plastic sitting in the groove. Here's what I mean: The problem is especially evident in the top frame over the windscreen, but is present on the two side frames as well. The only solution I can think of is to make the external frames unreasonably wide in an attempt to cover the white. Otherwise, I'm telling people it's sealant! Anyway, here are some more flattering photos: Since taking these photos, I've given the clear panels a polish with some WD40 sprayed on a cotton bud. This cleans up any grunge and tape residue on the clear plastic, and leaves them clean and sparkling. Just don't rub it over enamel paints, as it takes them off nicely. I also spraying the fuselage area under the windscreen, ready for the fixed section to be installed: It'll need a little blending in on the starboard side when the time comes, but before I do that, I must get some seat belts in there. At first, I was scratching my head about how to tackle them. I knew they were a style of Sutton harness, but all the aftermarket ones I'd come across had the Y-shaped strap configuration seen on Spitfires, etc. I had resigned myself to having to scratch-build them when I decided to trawl through my aftermarket stash, just in case. And then I found these: Anyone remember Model Technologies? I reckon I must have had these for 20+ years, and don't even really remember why I bought them. You're meant to assemble them into a Y configuration, but as they're simple straight straps, they'll be perfect for the Tiger Moth. Or at least will be once I can figure out how to replicate their prominent grommets... Kev1 point
-
Tamiya 1/32 Bf-109G rumours and anything else
D.B. Andrus reacted to Bob MDC for a topic
You Guys do a great job "thanks" On the original thread Tamiya did a full digital scan of the two "G's" in the Finnish air museum and I think they are the best un restored examples in captivity Bob1 point -
Thanks very much gents. Yeah, I'm pretty impressed by T's approach to the canopy. It should look pretty nice once everything is completed. Here's a great picture of the real deal. Note the light colored cord running from top of canopy to behind the pilot's seat. This was a bungee that was used to assist with raising the seat. Typical Mossie feature, simple, lightweight and it works. I'll be adding this later. Note the very scruffy finish. Not sure if those dark patches on the wing root are worn Dark Green paint or possibly red dope that was used pretty routinely for repairs, sealing weapon ports, etc. If anyone out there has detailed pictures of wartime Mossies that show how they weathered (especially the undersides), please feel free to share. Speaking of weathering, I've begun the painting process. Like all wartime FB.VI's, this aircraft rolled out of the factory in overall Medium Sea Grey with Dark Green disruptive camo on the upper surfaces. I've started to paint the undersides. Prior to shooting the grey, I pre-shaded a bit using some old Testor's Panzer Chocolate Brown. Seems a bit less stark than regular black. I highlighted access panels, the wing spars and various nooks and crannys. I then lightly added coats of Medium Sea Grey to get the desired effect. I'm using Colorcoates paint. This stuff is the bomb! Sprays fantastic, is very durable and by all accounts, the accuracy is second to none. Here is where we are at, still very much a work in progress. Here's another shot. Since then, I filled a couple of seams on the fuselage that I didn't catch until painting and lightly toned down a couple of areas previously painted. I also completed the starboard wing and horizontal stab. It's quite difficult to paint large single-color models. The paint is either way to uniform and looks fake or you go to heavy on the weathering and end up with the dreaded "plaid" effect. Gotta walk a fine line here. That's it for now, thanks for looking!1 point
-

Ki-45 Toryu - Kai-Ko - 53rd Sentai, Matsudo AB, 1944 - DONE!
Christoffer Lindelav reacted to MikeMaben for a topic
Eck skweezeet !!1 point -
NATO code "beast")))- IL-101 point
-
Whilst contemplating the front fuselage I decided to have a go at the intakes. These are notoriously challenging to remove the join seam and the revell ones are no different. To assist, I decided to glue them together then cut them in half. This achieved two things, firstly it made the job of creating a demarcation line between the main paint scheme (which extends into the intake) easier and secondly it meant I could access each bit of the join better. It pays to take care when cutting as the two halves have to 'seamlessly' fit back together again eventually. The back end was also shortened a little as I needed to use the bulkhead they normally fit into, to fix the acrylic rods for the in-flight stand instead. The back and front ends needed lots of TLC to fill the seams and I reinforced the join from the outside at strategic points to avoid cracking during sanding. Once primed the multitude of filling and sanding efforts are nicely blended. Finally I used the GT Resin engine face instead of the stock Revell item as the detail is much better. Just need to paint and weather them up a bit now as they didn't stay clean for very long!1 point
-

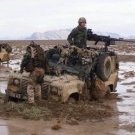
Marine F-4J Phantom - Decal time!
blackbetty reacted to Durangokid for a topic
Thanks for all the great comments everyone! I haven't been able to take very good photo since my good camera is having problems, at least my phone camera is decent. I may have said this already but I'm using tamiya masking sheets to make the masks. I don't know if that is the best medium since I have yet to try vinyl. I think the tamyia type tape is better for sharp curves and seals the edges really well, in fact, I haven't had a bit of edge bleed. The biggest issue I had is placing the mask itself. You have to get it perfect the first time because you won't be able to lift it and reset it. I had to re-cut a few mask because I didn't place it where I wanted it. I don't know if vinyl has the same problem, maybe some of they guys more familiar with vinyl can comment. Anyway on the to build photos. I masked and painted the metal areas. I've never done this before so I did a lot of research and did some experimenting of my own. It went like this: - Overall first coat of Alclad Aluminum. - A few panels with Alclad Dark Aluminum. - Some more panels with MRP Anodizes Aluminum - Some lower panels with MRP Exhaust Metal - AK Pale Burnt Metal mostly on the rear areas - Spot painted areas with AK Metal Smoke - Mr. Color Smoke I tried to do some panels with chipping fluid but it didn't work out so well. The metal paint over the chipping fluid chipped so easily that it almost all rubbed off. I ended up using 8000 grit sandpaper to give it the used look. It didn't come out like I planned but I think it good enough to move on. Let me know what you guys think... I still have a few areas to touch up but I'm calling the metals areas done for the most part. P.S. The tail isn't glued on, it just there for the photo Bryan1 point


.thumb.jpg.5da8bff9741de420eb2e87addd8f2cf6.jpg)

