Leaderboard

Popular Content
Showing content with the highest reputation on 07/12/2019 in all areas
-

P-51D-25 "Blondie" Tamiya
Jan_G and 7 others reacted to Miloslav1956 for a topic
P-51D-25 "Blondie" Build Miroslav Knížek Painting Miloslav Hrabaň 1/32 Tamiya HGW wet tansfer set Colours HGW & Gunze8 points -
Greetings folks! Well here is one of my latest project in my rotation of builds, the WnW salmson 2. I started this this past Sunday and actually had a lot of time to work on it this week. So far I have about 18 hours into it. the fit is very good so far... as I said before I am set up to build and not fancy photography. Just plain ole laziness on my part lol. I usually have several builds going at once so this WIP thread may have some gaps between updates. I also started my 1/32 Lanc at the same time, so...6 points
-

IAF AH-64A Peten
Loach Driver and 4 others reacted to Dukie99 for a topic
Hot on the heels of the two Cobra builds, I have just finished the old Revell AH-64A in 1/32. I built it as an IAF AH-64A Peten. Let's say it is my approximation of a Peten, I certainly do not claim exact accuracy, but I tried to include the main features of the Peten: the larger sponsons with the flares dispensers, the chaff dispensers under the winglets and the droptanks which you see all the times on the IAF Helos. I used an old Verlinden detail set (where the PE was missing, bummer), the flightpath AH-64A detail set and the antenna, pitot and chain gun are from Masters. The dcals are from Sky's decals. The flightpath set is very good and worth the effort: the wheels, the hellfire and all the wire cutters (nose, wheels, underside, topside) are from the set and do make a huge difference on a kit which is a bit barren but which fits well and has great raised rivets. I am very happy with it, not perfect by any means but I hope you will enjoy it. Cheers, David5 points -

1/48th Boeing B-52H Stratofortress
Starfighter and 4 others reacted to tomprobert for a topic
Here's a few quick phone pictures of the engines now they've been installed: IMG_1247 by Thomas Probert, on Flickr I'm in the process of making the upper part of the pylons that extend over the wing as these are not provided in the kit - plastic card and Millput is the order of the day. These are yet to be sanded to their final shape: IMG_1248 by Thomas Probert, on Flickr Larger working area needed: IMG_1246 by Thomas Probert, on Flickr I'm in the process of preparing the wing fuel tanks at the moment so hopefully another update soon. Tom5 points -

RAAF special occasion Mirage buggy FINISHED.
R Palimaka and 4 others reacted to ericg for a topic
Thanks guys. I was sent this pic by my good mate Dave Coupe, who was a gunnie with the RAAF during the eighties. This is an excellent pic for a number of reasons. It shows the font number plate, with the small `RAAF' lettering on it. This pic will enable me to better position the front tow hitch as well as the middle seat. Still not sure how this attaches to the tug. It also shows the front of the rear lights, so I will modify the ones that I made as I had these solid. Other details like the small grab handle on the hood and the fuel filler cap will be things that I will incorporate into the build. Still trying to find pics of the trailer! Some more work. I made 3 copies of the seat from the original tug that I purchased and they happen to be the correct style needed as per dave's pic above, so it wasn't a wasted purchase after all. I have added a small safety bar from brass rod to the right hand side seat and will refine this later. I made a copy of the rear lights and fitted both of them. I will tweak these a bit now that I have a good picture of the front of them. The rear tow hitch has been tacked on for sizing and I will make a copy of that as well. The tow pin is brass rod with the pull ring soldered on to it. I added the small exhaust pipe from brass tube. I have started the cargo box on the back of the tug with lengths of square rod. Cant wait to paint this yellow! Starting to come together. Should look pretty cool when its complete.5 points -
I finally found and built one after all these years of waiting! OOB except for GT Resin intake; the intake looks seamless to the inlet fan. I used Microscale liquid Decal Film since I didn't want any unexpected incidents with the kit decal. Fuselage is painted in Testors Extreme Lacquer "White Lightning" and "Wet Look Clear"; the "WL" has a pearl effect, really makes the TB shine. I was worried about the stand keeping her flying, but it works perfectly.4 points
-

1/24 Luftwaffe Pilot WW2 from Elan13 Miniatures
Kagemusha and 3 others reacted to elanlane13 for a topic
Below are some snaps of Elan13 Miniatures new release. 'Are you going to throw that?' Luftwaffe pilot and dog WW2. 1/24th scale (75mm). Sculpted by Robert Lane, Prie £20.00 Box art by Edward Sage. Available from the website now.4 points -

Will anyone bring out post WW1 subjects?
Rick Griewski and 3 others reacted to mozart for a topic
Still hoping for an accurate Tiger Moth, shouldn’t be that difficult with so many still around.4 points -

WINGNUT WINGS LANCASTER!!!!!!!!!
Pete Fleischmann and 3 others reacted to Radub for a topic
There are hundreds of photos showing that the skin was uneven! That was the reality, the kit is replicating it. What is there to talk about? Radu4 points -
RAAF special occasion Mirage buggy FINISHED.
R Palimaka and 3 others reacted to ericg for a topic
Excellent pic Sean. I should do the figure in that pose. I am sure Brick will be around soon to answer you! Here is another picture of a friend of mine celebrating his 1000 hours. This is Noel Furber, with whom I used to work with when I was his F/O on the Q400 before he retired. He was the inspiration for me getting into modelling with a subject pilot in mind and for that I am ever thankful. I did build his Mirage a few years back. A bit more work on the buggy. I hit a bit of a stumbling block with the Tug. The one I purchased wasn't the correct one and I was quite prepared to convert it into something that was more suitable. I got it to get an idea of sizing and parts layout etc to aid in the conversion. The big problem was that I couldn't actually work out which type of tug it was! I thought that the tug in Sean and Bricks pic was a Clarktor, as there were a few decent photos of the RAAF using them at the correct time and place for them to be that model of tug. The issue was the very flat rear end of the tug in the pics, the tail lights and what looked like a number plate, which was all I had to work with. I searched for many hours looking for even the smallest hint or detail to assist, all to no avail. I was then told it could have been a Domino Industries Group TT53 tug, an Australian made machine which the RAAF used in Butterworth at around the same time. There were a few nice pics of machines currently for sale online that would have greatly helped me to scratch build the necessary detail but I still wasn't happy. There was something not right, and I certainly would not have felt right doing an `almost right' job on the tug as it will add so much to the completed scene. My first glimpse of the correct tug was this photo, with it just peeking out from behind a Mirage shown to me after a query on a RAAF Facebook page. The box shape front wheel arch and the 4 x slots in the front was enough to convince me it wasn't a Clarktor, or a Domino. Another detail I was looking at was the bonnets angled sides, sloping to the rear. Not much to go off but it was a start. An extensive search online turned up another photo of the machine with a lot more detail visible, including the tail lights, rear wheel arches and cargo box on the back, exactly as per Sean's pics. The box type front wheel arch and bonnet was something that I was able to match up to the first photo as above. I was still unable to work out what type of tug it was. Extremely frustrating, as I was supposed to be studying for my 6 monthly sim sessions in the next couple of days!! I needed more. After going through every photo that I could find of RAAF Mirages was able to find the best picture yet, a real eureka moment. Lots of excellent and useful detail. I then went and searched google for as many different tugs (no, not those types of tugs) that I could find, and finally nailed it down to the tug being a Universal tractor GC40 or very similiar. Externally it was very similar to their `Shop Mule' brand of tractor. From there, I was able to find plenty of pictures of current machines for sale or restored which would enable me to get it right. Aerobonus actually do a GC-40 tractor, so I was disappointed to know that I could have purchased this one originally and saved $50 or so Aussie dollars but I didn't know then what I knew now. An order was placed to my online dealer just before I jumped in the simulator and the next day (today) I received it. The first thing that required modification was the bonnet. I am not sure if this is a different model or whether Aerobonus (Aires) missed the angled bonnet. This is the tug straight from the box. I marked out where I wanted to shape the bonnet. Using a Number 11 blade, I scraped away the angle. I added some plastic card around the edges to simulate the flip forward hood. I sprayed the hood with SMS primer filler and sanded it smooth. You will also notice that I have replaced the steering wheel column with brass rod. Next up was the number plate. I went out and measured my own number plate on my car and scaled it down to 1/32. I then cut this out of plastic card and attached it to the tug. I also scratch built one of the tail light assemblies and will duplicate it in resin for the other side. I made up the front tow hitch out of plastic card and brass rod. I will also make copies of these parts to enable those that want to do something similiar to build one for themselves. Here's where I am at with it. The new tug came with only one seat, so I have used the two others from the older tug that I purchased. These two are actually closer in style to the real one, so I will copy those as needed.4 points -

Mech resin garage kit
ShelbyGT500 and 2 others reacted to Vynce804 for a topic
Ok 1 last small distraction before I start the airfix hellcat! I’m building this small resin kit as a painting and weathering exercise and maybe try out some techniques from the armour modelling folks. The scale is roughly 1/35. And should make up into an interesting little model when finished. Cheers. Matt3 points -

1/32 REVELL GR4 TORNADO
Mel and 2 others reacted to miketippingmodels for a topic
Hi guys I used aires resin cockpit and ejector seats, and engines for this build, with majority of my new favourite paint MRP, the figures are Reed oak of corse. Just a bit about the build represents IN FEBRUARY 2015 NUMBER 12 SQUADRON CELEBRATED ITS CENTENARY AND THE MARKINGS APPLIED TO GR.4ZA405 INCLUDING A PANEL LISTING THE UNITS BATTLE HONOURS. ALSO SEEN HERE IS THE SQUADRON BADGE WHICH FEATURES OF FOXES HEAD FAMOUSLY ADOPTED WHEN THE UNIT BECAME THE ONLY RAF OPERATOR OF THE FAIRY FOX IN 1926.3 points -
Hi, guys! After some time in posting the updates of the kits, besides that I had made progress in the kits, I failed in update the jobs. So let's go: I was unhappy with the Wheel bays, so I decided to made some scratch to get a better results. I sanded the original tubing. and created the tubing of the bays using brass tubes. The results: This work gave me so many troubles, tat I decided to made the scratch in only one kit, leaving the other one OOB. Here the two planes completely assembled: Here a modification (I can't resist). The position lights of the kit are quite ugly, and not create a good shape in the wingtip pod. So I discarded them and made new ones, with colored plastic. Much better, I believe: Here, finally I received the Archer rivets set. One part absent in the kit, as the Kittyhawk kit are not an F-5E, but an F-5N, is the windshield cleaning pod. I copied in resin from the pod included in the hasegawa kit. Here applied: So after the correction of some issues, finally I started to paint them. First color in the two(Brown in the 4870 and grey in the 4857) Soon, more updates. Cheers, Paulo.3 points
-

1/24 Luftwaffe Pilot WW2 from Elan13 Miniatures
elanlane13 and 2 others reacted to williamj for a topic
nothing here.3 points -
I see this beast has just completed its initial post-restoration flight testing: https://www.silverspitfire.com/ It will make an interesting subject to model - will certainly test our NMF skills!3 points
-

Makes a change from camouflage!
Christoffer Lindelav and 2 others reacted to Out2gtcha for a topic
Wow! I've only done 1 even remotely like that and it was pretty labor intensive, but worth it!3 points -
57 pages of going round in circles!3 points
-

HobbyBoss 1/32 B-24D available
wunwinglow and 2 others reacted to ringleheim for a topic
Wiser words have never been written at this forum. Great advice!3 points -
There are lots of resin kits out there already, from the likes of Silver Wings and Lukgraph. Presumably you're referring strictly to mainstream injection-moulded kits, but I'm not sure we'll see much from that particular market sector. The odd kit, maybe, but certainly not more than that. Kev3 points
-
Hello Hello Started the base, ordered some figures, dust pigments arrived, 2 cartons of beer in the fridge, England beat Australia in the cricket, happy modelling this weekend German Shepard ate my emu3 points
-

Hughes 500, Nichimo, 1/20
Out2gtcha and 2 others reacted to John Everett for a topic
GeeWhiz. Has it been two months already? Paint is on and much of the heavy work is complete. I'll finish up the details and get it photographed in the next week or so. Window to hull fit here...not so much. I think the fuselage side may have warped a little during its four decades of storage. But this side fit very well. I started work on the base this morning. I'm not sure how much effort I want to make there. But I'm thinking yachtboard helipad.3 points -
I would really like Mike to do more figures of Romanian pilots, but I doubt that it will be that pose. If you want to do a diorama, the aircraft itself was photographed from a few angles on that day. It was "Blue 1". Ion Dobran is a true living legend. Last year he flew during the parade honouring the 100th anniversary of the Union of Romania on 1 December. HTH Radu3 points
-
I have a few projects on the go at the moment, but I needed to get started on a decent large scale jet as I have felt a little rushed come Model Expo in June for the last few years when I have been caught napping and haven't got my act together and almost not had an entry ready for the Large scale jets category. This will be a long term project so there wont be any rushing here and it will fit in nicely with the other stuff currently on my bench. I have wanted to do an F-100D for a long time and have felt that it would be a great addition to my collection, considering that I am well on my way to completing my collection of the Forward Air Control trifecta of the O-1, O-2 and the OV-10A as flown by RAAF pilots during Vietnam. It would be important to be able to display the aircraft that they called upon to deliver the ordnance and give some context to the mostly unarmed aircraft that were the FAC's. During my build of Mac Cottrells O-1, he supplied me with a combat report written by two F-100 pilots that he called upon to provide a strike assisting troops in contact. They recommended him for a Distinguished Flying Cross for which he was awarded. Here is the Combat report that Mac supplied me with. I decided to see if I could find either of the two pilots mentioned. With a bit of persistence, I was able to track down Ronald Swanson (Blade 02) via a photo of him that I found on facebook. He has agreed to be my subject pilot for this build and we have been having conversations over the last week via email and social media (we are on opposite sides of the earth after all). I am very happy to be able to make a model with such a unique connection to another in my collection and thank Ron for being the inspiration to do so. Ron flew 268 combat missions during the Vietnam war, between April 1968 and April 1969. He flew for the 615th Tactical Fighter Squadron, part of the 35th Tactical Fighter Wing based at Phan Rang Air Base. This picture is Ron immediately after his final mission in Vietnam. This picture is of Ron's Squadron, with Ron being the 5th from the left in the back row. Major Davidson, the flight leader mentioned in the combat report is second from the right in the front row. Ron will have access to much more information in October, so please stay tuned! The build. I am using the Trumpeter F-100D, with as much aftermarket as I could find for it. I started in the cockpit. The Aires resin pit is quite nice and looks to be reasonably accurate. I painted it all over black I then painted it MRP FS36231 grey. From there I masked the side consoles and painted them with an extremely dark grey custom mix of SMS Camo black and white. I followed the same paint process as above with the instrument panel. I then hand painted each instrument bezel with Vallejo black, and used the excellent Airscale Allied Jets decals for the instruments. I used a few 1/48 scale decals for the smaller instruments. Each instrument has a drop of clear glue to simulate the glass. The cockpit sides and rudder pedals painted using the above process. The kit pedals have been used with the Aires photo etch North American logo on the top of each pedal applied. For some of the harder to paint parts, I attach a piece of masking tape to a pop stick to enable me to stick parts to it. Part way through the cockpit. I have painted some of the button labels with white paint and started picking out some of the details with other various colours. I have applied a wash to build up a level of grime and have chipped the floor in front of the rudder pedals to simulate a well worn machine. There was almost a mini disaster here when I went and got a coffee inside and returned to the shed to a strong smell of Mr Levelling thinner. My son (almost 8) was looking a little suspect and quickly caved in under questioning and owned up to accidentally tipping over the bottle, filling up the tub with thinner! luckily, it dried OK with no harm. Visible here is a new undercarriage lever which I have fabricated from brass and plastic card. The silver chipping in front of the rudder pedals is visible here. I have painted the outline of the worn areas with a thin line of zinc chromate primer to simulate the various layers of paint down to the bare metal. Whilst stuff was drying in the cockpit I dry fitted the fuselage halves together and sawed off the really inaccurate intake from the kit. this will allow me to fit the Zactomodels correct intake, an essential upgrade to the kit. Once the intake duct was together, I fitted the Aires front wheel bay. This took a bit of work to get right but it is also another important upgrade.2 points
-

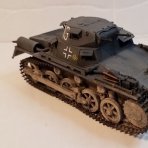
Dornier DO-335 Destroyer.
TenSeven and one other reacted to Mr scale32 for a topic
Hi fellow forum members, im back with a new model to show. Im truly sorry that im not have been active. I have not stopped building tough, infact since my last update here, there has been a few more models finished.. This model is the famous Do-335 Peil and in my opinion the coolest prop-driven aircraft ever made. The model is Hong Kong models Do-335 Destroyer, with plenty of aftermarked stuff like brassin wheels and exhausts, Eduard Photo etch, Model master pitot tubes and barrels and HGW belts. I also added extra details to the engines like wires and other plumings. The Loop antenna was very overscaled in the box, so the antenna was scratched completely I hope you like the model. Cheers to you all!2 points -

WINGNUT WINGS LANCASTER!!!!!!!!!
alanash1963 and one other reacted to vince14 for a topic
Y'see, now we have to pick a punishment for you if WNW do manage to get it out for under $399...2 points -
Bachem Ba 349A-1 'Natter' in 1/18th and 1/16th scale
Rick Griewski and one other reacted to CATCplSlade for a topic
I am a member of that site as well and they do good work. But they don't touch 1/32, unfortunately. The Hind was great, and was usable with figures. Very much like 21st Century Toys but not as toy-like.2 points -

Hong Kong Models B-25J bomber 'Peggy Lou'
nmayhew and one other reacted to Thomas Lund for a topic
Ok... I'm a mechanical engineer and whenever the bosses realize we have a problem... we don't... we have a challenge I have a challenge He he, but I guess I knew that, but kept repressing the fact :-) Anyway, I've been sorting out a lot of stuff - working on the nose section, gear legs etc etc2 points -

1:18 Hobbyboss AV-8B Harrier
A-10LOADER and one other reacted to Starfighter for a topic
Couldn't agree more. This will be spectacular once finished!2 points -

Spitfire MkVb to MkIX conversion 1/24 349 sqn
Starfighter and one other reacted to red Dog for a topic
Rather than keeping the huge block or resin for the inner radiator I cut the front and rear face away from the resin part and glued them on the kit's part for the original radiator. The extra radiator was assembled in the same manner but I used 0.75mm plasticard to "copy" the kit's part that I am obviously missing. It's a bit messy but Nothing is visible from the oustide. The wheel wells received a little bit of detailling with platic strips and the radiator are puttied in place.2 points -

Will anyone bring out post WW1 subjects?
Rick Griewski and one other reacted to Kagemusha for a topic
ICM's 1/32 releases are all interwar subjects, Gloster Gladiator next.2 points -
With the discussion about so called “oil canning” on aircraft structures and whether it should or should not be visible on model aircraft a little light bulb went on and harked back to an aeronautical engineering degree participated in, sometime during the last century. What we are talking about here is called a Wagner Tension Field .... Tension field theory describes the highly buckled (wrinkled) state of membranes or very thin plates whose boundaries are subjected to certain planar displacements well in excess of those necessary to initiate buckling. The present interest in tension field theory is because lightweight structures with stretched membrane components have potential applications in space. In addition, membrane structures which are pretensioned by internal pressure have application to lightweight portable bridges, protective coverings and various air cushion devices. The theory was conceived by Wagner (1929) [1] whose primary concern was to explain the behaviour of thin metal webs in beams and spars carrying a shear load well in excess of the initial buckling value. Such webs offer little resistance to the compressive strain component of the shear and the spar flanges must be held apart by struts to prevent collapse. In the simple case of rigid spar flanges and rigid perpendicular struts the stress field in the web in the highly buckled state is primarily that of tension at 45°. As the shear load increases so does the magnitude of this tensile stress field and, just as a taut string resists a kinking action, so too does this tensile stress field resist the out-of-plane displacements engendered by the buckling action of the compressive stresses; these opposing actions result in a decreasing wavelength along the compressive buckles which form at right angles to the tension field. Strictly speaking such problems are non-linear and their exact analysis presents formidable difficulties. However, within the framework of large-deflexion plate theory it may be shown that for large values of the ratio (applied shear strain)/(shear strain at initial buckling) the relation between applied loads and planar displacements and stresses again approaches linearity, and it is this asymptotic regime for which tension field theory is applicable. In this regime the flexural stresses and the planar compressive (post-buckling) stresses are negligible compared with the tensile stresses; the assumption that their magnitude is zero is physically equivalent to the assumption of zero flexural membrane stiffness, and it is this which characterises tension field theory: the membrane is envisaged as being finely wrinkled at right angles to the lines of tension. In general these “tension rays” are not necessarily parallel and the boundary conditions need not be those of pure shear, as in our previous example, but shear must play a dominant role in the boundary deformation because of the requirement that the principal strains at any point are of opposite sign. This requirement will be considered in greater detail later but it is clear that if the principal strains are both positive so too are the principal stresses, and if the principal strains are both negative the membrane is ineffective in carrying load. Having been around aircraft all of my professional life, I have seen enough to commend any kit manufacturer to simulate this effect on a model. Bring it on. Any WW2 large aircraft in service for a short while would begin to show these effects. Standing by for incoming rounds.2 points
-
WINGNUT WINGS LANCASTER!!!!!!!!!
alanash1963 and one other reacted to The Dude for a topic
I'll find out when the WnW kit comes out. My HK lanc should be done by then.2 points -

MIG-25 FOXBAT 1:48th
Troy Molitor and one other reacted to marauderdriver for a topic
Love the weathering on this beast. I remember when the USAF was terrified of this thing back in the early 70's Good thing it was fast because "checking- six" would be impossible. Beautiful job jack2 points -
Can you imagine if all of these guys who build 1/32 4-engined bombers bring their creations into competition at the same time... You might fit only 3 on a standard 8-foot table. You wouldn't want any overhang lest a clumsy person drift too near and catch a wingtip with a shirttail and bring them all crashing to the floor.2 points
-
Suggestion for sleeping (del German) Romanian Pilot in 1/32
D.B. Andrus and one other reacted to Radub for a topic
That is Lt.Av. Ion Dobran and he is Romanian. Incidentally, he is still alive. The only German items are the cap based on the Einheitmutze and the pilot boots. The uniform is Romanian, with "riding breeches" and uniform jacket. If you look here, you can see some photos of pilots wearing that type of uniform http://www.radubstore.com/index.php?main_page=product_info&cPath=113&products_id=415 HTH Radu2 points -
Like this? Kev2 points
-
Hi guys, I‘ve started with some assembly and initial layers of detail. The following photos are the left side of the nose landing gear well. This detail is primarily the hydraulic tubing, and insulated environmental system tubing. As a proof of concept idea I chose to try to print sections of tubing. The aft most lines are laterally offset and have connectors that needed to be rendered. Doubting my ability to bend and fashion identical parallel line by hand as well as keeping future production in mind a printing attempt was justified. So the tube sections were modeled in CAD with portions tubing clamps at each end and sent off to my Photon. I did print three copies of each section, as it turned out, all printed successfully but one of the three was perfect. The remainder of the tubing was fashioned from lead wire. Printed fittings and CNC milled tubing clamps were placed on the side wall using a paper template made from a 2d drawing exported from my CAD software. Hours of studying photographs and tracing one line at a time, I managed to get all the pipes in what I think is the right place. That is to say, every tube end landed on a connection point, no loose ends. I know they are not 100% correct but, without a maintenance pub that shows a trace of each line....I’ve achieved a, let’s say, 98% accurate result. Here are a few more printed parts. I finally invested in a proper macro lens with a ring flash. I think the photos are much better...two problems though. 1. You can see every microscopic flaw, even though I build with layers of magnification from my cheaters down to 10x jewelers loop. ....and.... 2. I’m working on my f stops for depth of field. So far my shots are hand held, maybe a little less laziness on my part and I should use a tripod and focus merge multiple shots. Irregardess y’all ort git the gist of my progress. Thanks for checking in! Timmy!2 points
-
Hughes 500, Nichimo, 1/20
rafju and one other reacted to John Everett for a topic
Just realized I've not updated in a long time. There's progress: There's been even more added to the engine bay. But I don't have pictures of it yet. Thanks for watching! John2 points -

HobbyBoss 1/32 B-24D available
Darren Howie reacted to chrish for a topic
I really wanted a 1/72 ATR kit nothing in mainstream, nothing in resin...vacuform only, so I got one and I'm making the best of it. I'll grab up that D model and count my blessings!1 point -

1/32 REVELL GR4 TORNADO
Michael931080 reacted to thierry laurent for a topic
Very nice!!! Where do your pilots come from?1 point -
Not sure about what stores are over there, but if you have a hunting/fishing store they may carry what the US stores sometimes do, which is what I purchased, a 6 pack of varying wire with .010, .015, .020, .025, .030 and .035, mine was purchased from Bass Pro):1 point
-
Yeah, WOW!!! Truly amazing. Now where did I put my knitting needles?1 point
-
1 point
-

My Raffle Prize: Final Update 21/Aug/19
Martinnfb reacted to Troy Molitor for a topic
Gaz, Most impressive endeavor. Love all the efforts going on so far. The picture from Alain above is awesome. We live in great times when a vintage power plant can be shown to represent an actual engine and forward cowling and louvers. Wow. Great picture for sure. Looking back into this build, I can’t see if you ever decided on the markings you will you will eventually choose on your build? Just curious. Thanks again for sharing your your journey with us. Troy1 point -
Make the others jealous
Michael931080 reacted to Kagemusha for a topic
Amongst some recent goodies from Harold I received these F-5E wheels and a counterweight for the RF-5E and F-5F, sadly missing from the kits, as is an ACMI pod which he also makes, which I've bought previously.1 point -

Airfix News Just in from Telford: 1/24 Hellcat!
Darren Howie reacted to Randy for a topic
Although I was in agreement with you in the beginning and remained so after inspecting my kit’s wings and fuselage myself, I’m now convinced that depending on the particular aircraft being depicted, distressed skin is appropriate on the Hellcat. However, I noticed that Airfix put the recesses over the panel lines (where the ribs and spars would be) not between them. Now every time I look at those large plastic parts, it really bugs me.1 point -
1/48th Boeing B-52H Stratofortress
Starfighter reacted to tomprobert for a topic
Thanks, Shawn. I'm not a stickler for accuracy, but even I couldn't live with the kit's tail turret - it was awful! Indeed. You can work for hours and hours on a kit like this and barely tell where you've been. Eventually, it all starts to come together and suddenly you have a model resembling the real thing... Speaking of which, I've been having a play with the engines today. I didn't realise that the engines on the real H-models have such a 'nose-up' attitude on the wing: (pictures used for illustrative purposes only) IMG_1236 by Thomas Probert, on Flickr IMG_1237 by Thomas Probert, on Flickr So I've been doing some careful trimming of the kit-supplied pylons in order to get both a decent fit to the wing as well as replicating the angle at which they sit: IMG_E1234 by Thomas Probert, on Flickr So far, so good... IMG_1233 by Thomas Probert, on Flickr Sanger have also molded the four pylons as identical pieces - in fact on the real aircraft the inboard/outboard pylons have a different shape due to the change in profile of the wing as you move towards the tip so I've been doing quite a bit of head-scratching today. I'll have some more pictures of my progress soon. Until next time, Tom1 point -
Another update. The instrument cowl test fit, and it doesn't interfere with the windshield fitment. What a relief... The kit brake chute cone diameter is too big, and I almost have it reduced to the correct diameter. Received replacement rocket pod cone for the JL-100 from a friend's spares box Brief overview of the additional and modified parts so far. Cheers1 point
-

Anyone built the new WNW Gotha G1 or UWD?
Rick Griewski reacted to monthebiff for a topic
Mine arrived this morning and what a great kit it is, I'll put my TFI pics up tomorrow as I've finished it tonight rigging and all Regards. Andy1 point -

Anyone built the new WNW Gotha G1 or UWD?
Rick Griewski reacted to Darren Howie for a topic
Got my three the other day. What a cracking model kit. i love WW!1 point


