Leaderboard
Popular Content
Showing content with the highest reputation on 11/19/2021 in all areas
-
.thumb.png.84c5d3a464f2dd83f0ac37a5aac81ec8.png)
1/15 Bf109 " my first fully scratch build"
dodgem37 and 12 others reacted to Antonio Argudo for a topic
Here is an update, filled both halves of the rear fuselage with balsa wood, building the cockpit layout now and figuring out how will attach the wings system, till next cheers13 points -
Eugh.... but it has to be done! Wohooo, Friday and updatey-time! The worst part of modelling in my mind is taking care of seams and body work. We hatesss it!....Hssssssssss! Well onto the work... I needed tho scrape off about a milimeter to make the rear fuselage and the tailcone even. I must say I love this tool though, instead of sanding like forever I quickliy dispatch with offending plastic or resin. Then some filling with Tamiya putty. After sanding with 120 grit, 320 grit and assorted sanding pads I got it to this... Checked with primer... well a little more to do. Again on with Tamiya putty but this time I scrape it on with an old X-acto blade as to just fill the pits. As the putty cured I puttied up around the wheel well in the fuselage. And glued on a couple of hot air outlets. I won´t glue the other pair until I put the fuselage together. And there the putty was sandable. I used 320 grit very very carefully and then used my pads all the way to 2000grit After checking with primer I was pleased. Then I glued the droptank real quick....not the best of fit here :/ Oh well putty and sanding to do later on then Well time to restore lost details, rivets and panellines. There is a panelline right in the seam between the tailcone and the rear fuselage.. a tricky are to scribe... The trick is to make really soft pulls with the scriber as not to break through the putty! To do that hold the scriber at the end like this. Then do many dosens of light light pulls over the seam. And you get this straight and evenly depthed panelline in the putty of the seam. With the panellines done it was time to put in the lost rivets..... I marked where with a pencil. And premier for my riveter! I´ve always done rivets with an awl before but finally I got one of these. yeah I know basic modelling equipent....just took a while for me to get around to getting one And with that I´m done for today Cheers!10 points
-

EA-6B Prowler (02 April: Done!)
Starfighter and 7 others reacted to easixpedro for a topic
Here's some quick pics. Been working on the front seat crew--Pilot and ECMO-1. Have 'em built out, and glued to their seats. Now need to add the belts/restraints and do the detail painting. Here you can see ECMO-1 will be leaning over to view the IP. Even though there was only 1 set of controls, the Prowler was considered a "Dual Piloted a/c" by ICAO standards. That's becase the guy up front could see every display of the pilots and back him up on the approach. Made it easier in the goo cause we could shoot lower approaches than a single seat a/c (mins for them are usually 500' on a non-precision approach). During a carrier landing the ECMO up front was leaning over and giving a steady cadence of the VSI (Vertical Speed Indicator) gauge. A good approach was usually around 600-700 foot per minute descent. No HUD in the old girl, so while the pilot was flying the approach and generally fighting snakes, having a calm, cool, collected person with good co-piloting skills often made all the difference. Here's the view from the Pilot's side. Will need to cut off his arm and reposition it, as it now hits the framing around the canopy. I think when I took (ripped) everything out to fix the center section, it got glued back in a smidge different. He fit before and is just an RCH off. ECMO-1 was a tight fit before and now his seat slides in... No dramas to fix, but need to get it sorted so I can get everything glued in. Getting closer to wrapping up the cockpits and getting the canopies sorted. Been a long time coming, so am excited about getting it all buttoned up and moving on to something else in this build. Will probably go with the landing gear or building out the stores. Either one will be a ton of work, but not nearly as bad as the cockpit... Thanks for following along and entertaining my ramblings. -Peter8 points -
assembly and fitting in the fuselage8 points
-
Thanks again all for the kind words. I set the AH-1G aside for a few days, and last night was the first time Id been at the bench since last week when I peeled the window masking off. I sat down and got started with the new replacement NOVA polishing set I had purchased last month. All of the boo-boos on the clear parts were all my doing with Future, so the clear parts themselves were not actually any issue. Im still not sure what happened with the Future application, but it did not go the way I planned. I removed the pilots O2 hose, and his armor plating on both sides as to be able to get to the non-opening side on the pilots pit. After removing the masking on the gunners non-opening canopy side, I must not have put enough glue on it, as it came off when I pulled the tape off. This was actually a good thing, as it allowed me to more easily polish that canopy section without damaging the gun-site. I started applying the NOVA fine scratch remover with a soft polishing cloth and some Q-tips (cotton buds). Nothing came out exactly like I wanted and most of the glass still has some less than perfect smudges on it, but fortunately a lot of the worst of the mess on the clear parts polished out. This is far from what I would have liked, but still much better than it was right after removing the masking I still have some finishing work to do on the clear parts before re-installing the armor plate and the pilots O2 hose, but the parts are substantially better than they were. Apologies about all the fine hairs still lurking on everything........the polishing process creates some static cling that attracts a lot of that, but is easily knocked down with some of the NOVA cleaner. Looks like I still have some more cleaning to do after my final polishing round The opening sections are complete, and have just a bit of minor work left to be done. I also finished up the two ReedOak SPH-4 helmets as well. International coins for size reference: More.............8 points
-
(375x281).thumb.jpg.cbca39f4f29708084cf68c373eae2011.jpg)
Make the others jealous
dutik and 6 others reacted to Leaning_Dog for a topic
I've been looking for an "affordable" one of these old Hobby Craft Sea Fury kits for quite a while - this one popped up on Ebay for $80 which seemed a little expensive, until I noticed that it included Paul Fisher's Cockpit Up-grade set, brand new, in the box, never even opened. Just had to jump on it! And yes, that Fisher cockpit up-grade set (with correct canopy) is spectacular. Now I need to find Paul's up-grade sets for the spinner/prop and wheels... Cheers! John.7 points -
I also finished up the main rotor and got it glued together, blended and finished weathering it. Not too bad me thinks on that front.... I couldn't resist a quick test fit on the air frame. Looks pretty sweet IMHO! More work to do, but we are heading toward wrapping this one up with the exception of the final weapons to be added, the XM-158s that Mikkel is working on. The main blade is quite large once glued up, and Im very glad I made it 100% removable for transport: Next up are attaching the XM-157s, the mini gun and grenade launcher. Then its on to finishing the opening mechanisms for the canopy parts that will be posed open. Lastly it I will be finishing the rest of the parts that I broke on the interior, then finally placing/hanging the helmets. Cheers, and thanks for looking in on me!6 points
-

1/24 Airfix F6F-5 Hellcat "Kicked Up A Notch": New eBook Now Available!
Brett M and 5 others reacted to chuck540z3 for a topic
Answer below Wolf! November 18/21 I’ve been away a bit and real busy at work, so not much modeling lately. I did, however, get much of the landing gear figured out. I’m using the Aerocraft brass landing gear and Barracuda tires and wheels and it’s a good thing for the latter, as you will soon see! I have used brass landing gear before on my Academy CF-18B and while it’s very strong, it can be tricky to clean up. Here is the left brass leg compared to the kit part, which shows some significant imperfections that need to be removed. To be fair, the right leg was much cleaner. Kit parts aren’t without their challenges either, which is usually a long seam line that crosses a lot of fine detail, which makes it hard to remove completely. To fix these brass imperfections, I have the perfect power tool, which is a David Union “Router” as they call it, which is really just a smaller high precision Dremel Tool. This tool is very well made, perfectly balanced and you can adjust the speeds easily from almost not moving to extremely fast. Coupled with a variety of cheap diamond bits I bought on-line, fixing the major imperfections was easy. I bought this tool from our own Troy Molitor who sells them, along with a David Union 400 mini-sander several months ago, but I haven’t had much of a chance to use it- until now. After using the router to get the big stuff smoothed out, the brass parts were further smoothed and polished using ordinary sanding sticks. This takes a lot of time, but the smooth finish is worth it. Here is the kit leg dry fit to the gear bay, which appears to be super strong with a wide rectangular anchor, so I wouldn’t necessarily say that you need the brass legs due to weight so far. The brass legs do, however, just look a lot better and are more accurate, including the proper location of the hydraulic brake line. With the super dark landing gear bays, where it is quite hard to see anything within without a flashlight, this is all the plumbing detail I’m going to add- which is nothing more than the brass parts. Lazy or smart? Probably a bit of both. The rear wheel, which is solid rubber on the real deal, fits on an axle on the kit parts in the upper right. The brass part has no axle of any kind, so you have to make one out of brass tubing and a pin, which I would have done on the kit parts anyway, for ease of painting. Dry fitted wheel I'm not sure if this is common, but my rear assembly was bent quite a bit and needed to be straightened in order to fit in the rear gear bay properly. Since it’s so strong, I had to heat it with a lighter and bend it with pliers, which left some scuff marks that I had to remove later. I bet I spent at least an hour to get it right, before I even thought of cleaning it up. After a lot of fiddling, it dry fits quite good now. With the gear door on, you can really only see the sides. Note that the black wash I used earlier confirmed that the fuselage seam line was filled with CA glue and left no obvious flaws. All that shows now is some blue paint trapped behind the glue- or at least I hope so! Overall, I’m pretty happy with this result, which is quite strong. So I decided to start working on the front wheels and tires and show how the Barracuda versions compared. Well guess what, more “Short-Shot” molding from Airfix, again on Sprue F! Tell me I'm the very first and only guy to experience this? Thankfully with Barracuda resin wheels as replacements, I don’t care this time, but it’s still annoying that I’m paying for the delivery of flawed parts, which have yet to arrive. The Barracuda wheels are a bit narrower and taller- and I’m really glad I won’t have to fix that kit seam line on a diamond tread. The back view, which is much more detailed on the Barracuda resin. With the narrower wheels, both the kit and brass axles are a little bit too long and interfere with the outer wheel, which is not mentioned in the Barracuda instructions. This is an easy fix with the kit plastic, but also the brass with the David Union Router. With the “hubcap” dry fitted, to show the excellent depth to the wheel. This wheel is different than the kit wheel and after digging around, I found photographs of both types, and both on F6F-5’s, so I’m not sure which wheel is newer or more “accurate” for a late Hellcat. Anybody know? In any case, this resin wheel blows away the kit wheel for detail. Dry fit on the front, without the rear supports. Very nice! Checking the wheel alignment which has enough play in it to make it perfectly straight with CA glue later, a light bulb turned on in my head. On my Kitty Hawk Harvard build, I got the front landing gear perfectly straight with the model placed on its back, but when I flipped it over, one of the gear legs sagged a bit at the axle, putting the wheel slightly out of alignment. Very disappointing, especially at the end of a build, but with brass landing gear like this, this will never happen, so I now highly recommend these Aerocraft brass parts as replacements for kit (sometimes flawed!) parts. Did you read that Wolf!? Another look at the inside of the wheel. No more hydraulic lines necessary in my mind. One last memory I had of using brass landing gear parts, is that I had a hard time getting paint to stick to it properly and I was always touching up chipped paint whenever it got banged around a bit. This stuff is supposed to do the trick, so I will report on how successful I am a bit later. That’s it for now Gents and thanks for your continued interest in this sloooww build. Cheers, Chuck6 points -

1/72 DHC Dash 8-300
scvrobeson and 4 others reacted to chrish for a topic
I tore into this, well I tore the wrapper off, last night and began my way down the rabbit hole of converting it from a 100 to a 300, I was going to try for a 400 but way too much changes there. This is an old Hobycraft Canada kit, I'm aware of (hopefully all of them) the kits shortcomings and will try to address as many as I can...we'll see how that goes. Here's the fuselage out of the box above the planned cuts "blueprint"; first cut and laid out where I need to add plugs; both cuts and test fit together to make sure I'm not out a lot; Currently working on adding longer span to the wings... Thanks for looking5 points -
I'm waiting for a PE razor saw to do some delicate surgery, so progress in other areas: Not a good picture, good enough to show I'm doing something! Richard5 points
-
Hello The rudder is painted : Blue Hu 48 White Xtracolor Red Hu 195 points
-
Thanks folks! don't go patting me on the back just yet, a pat on the back is only 18 inches from a kick in the butt! I've gone ahead and added (going by my math) the needed span for a 300, to one wing (still in progress but encouraging) The wings are lined up on the 37th parallel vertical line The windshields are shaped... strangely, I'm trying to get a little closet to prototypical with the openings, the right side, untouched; The left side, in progress; and a comparison of the two sides: Thanks for looking5 points
-

F-5F Tiger II Taiwan AF ( 1/32 KH)
Paul in Napier and 4 others reacted to Seversky for a topic
painting now paint with a brush5 points -

WNW SE5a
Greg W and 3 others reacted to europapete for a topic
I will take some more current shots of the tank tonight. I also added the firewall from a laminate of P.E. parts from Eduard and HGW, made the upper cross pieces from strip and added P.E. wires. The basic engine block had been made from the kit parts, and given a basic black primer. This pretty much brings us up to where I am now with the kit, so updates will slow down a bit, but as I have started this WIP, I have to keep up the pace. Which is a good thing. Please, chime in with suggestions, advice, and destructive comments.4 points -
EA-6B Prowler (02 April: Done!)
A-10LOADER and 3 others reacted to easixpedro for a topic
Which leads to another funny story... Prowler's max airspeed was "LBA," or Limited By Airframe. There were limits to the pods and drop tanks, but if the jet was slick we could in theory go break the sound barrier. Depending on the Maintenance Check Flight profile, sometimes they'd take the stores off and we'd have to climb as high as we could get to check cabin pressurization and engine trim etc. That's where everyone jumped at the chance to say they'd gone supersonic. Dump the nose from 40K+ and dive for the next altitude in the checklist which was around 5K. Well a couple of guys in my squadron did this, but over Bagram. Bagram kind of sits in a bowl, surrounded on three sides by 18K foot mountains. So these guys come downhill like a scalded ape and the resulting sonic boom hit the base and the shock waves kept reverberating through the valley and the base. Triggered all the sensors that the Army had set up to detect incoming rounds. This crew of three guys sent the entire base running for shelter with incoming sirens blaring etc. Funny part about the story is that once all the dust had settled and everyone was allowed to come out of their bunkers, NOBODY believed that a Prowler could go supersonic and was capable of doing that. The crew ended up being called on the carpet and seeing the Army Division commander to explain. Didn't get in trouble, but essentially had to explain to the 3-Star, that yes, they had gone supersonic pointing directly at the base... Comical.4 points -
hi all, here a "Kappone" (big K) built on request of a colleauge of mine, itself being the son of a pilot serving in the Aeronautica Militare Italiana, 51° stormo, in the 60ties. strange enough, being an aircraft built by Fiat on license from North American, there is not so much references about it. so, I mantained a low profile attitude, trying to hold off my rivet counter attitude and finish it in a reasonable time to present it to the unaware final recipient. I just added an Eduard set, very useful in the cockpit area, and made some stencils for the italian codes to emulate the 51-32, serial 54858, aircraft of the "pluto" group with the red tail, to wich was attached my colleauge's father. the only thing I modified was the angle of the opened speed brakes, totally mistaken by KH. painted with Alclad II and fitted with beautiful HGW RBF flags. a simple wooden base with lightly painted sandpaper was made to accomodate it safely. actually I haven't a big feeling with modern era airplanes, but build this one was relaxing and interesting, opening a new mental window toward the post WWII era in my mind. enjoy!3 points
-
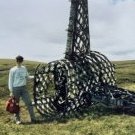
"Werner Voss was a World War I German flying ace credited with 48 aerial victories. A dyer’s son from Krefeld, he was a patriotic young man even while still in school. He began his military career in November 1914 as a 17‑year‑old Hussar. After turning to aviation, he proved to be a natural pilot. After flight school and six months in a bomber unit, he joined a newly formed fighter squadron, Jagdstaffel 2 on 21 November 1916. There he befriended Manfred von Richthofen. By 6 April 1917, Voss had scored 24 victories and awarded Germany’s highest award, the Pour le Mérite. The medal’s mandatory month’s leave removed Voss from the battlefield during Bloody April; in his absence, Richthofen scored 13 victories. Nevertheless, Richthofen regarded Voss as his only possible rival as top scoring ace of the war. Soon after Voss returned from leave, he was at odds with his squadron commander. He was detailed from his squadron to evaluate new fighter aircraft and became enthusiastic about the Fokker Triplane. After transferring through three temporary squadron commands in two months, Voss was given command of Jagdstaffel 10 on 30 July 1917 at Richthofen’s request. By now, his victory total was 34. His last stand came on 23 September 1917, just hours after his 48th victory. After he fell in solo opposition to eight British aces, he was described by his preeminent foe, James McCudden, as “the bravest German airman” (Wikipedia) The main purpose of this build was to experiment with the fabrication of custom made wooden decal's. The build developed from there, and soon became an exercise to add as much detail to the Albatros D.III Roden kit. (Ltn. Werner Voss Marking Decals - Pheon Decals No. 32074 1:32) Printed 'plywood' decals and preshading. Experiments with 'nail's' Aluminium tape as rib tape... It was awarded the 1. Prize at the AROS Open contest, in the category 'Planes 1/35 and larger'. The finished vignette at AROS Open 2021 - 12. September 2021. (Little did I know...) Cheers: Kent3 points
-

Many Messerschmitts!
mc65 and 2 others reacted to Bruce_Crosby for a topic
Hi Guys, Finally got most of the K-4 together and started painting. colours all through are Mission Models. First off, I used a mix of Grey and Black primers to approximate RLM 66 and threw it on the window frames to look like the interior is painted. Then on with normal Grey primer. Then I airbrushed the undersides and fuselage flanks with MMP's version of RAF Sky to get RLM76 but an indeterminate late war grungy blue-grey-green tone to the model. Now MMP's take on RLM75 Grau Violet. Here's Trumpeter's starboard side colour scheme. And my take on it. Trumpeter Port side. My version so far. And from the top......... That's it so far. Regards, Bruce Crosby3 points -

Kotare Models - a New Venture from Former Wingnut Wings Staff
KiwiZac and 2 others reacted to Dennis7423 for a topic
Well, at least he'll be really pleased! - Dennis S. Thornton, CO USA3 points -
Neat, I've flown on those so many times it can't be counted. Scare Canada markings planned?3 points
-
I had to build exhaust covers/flame dampers for my C-6 conversion I finished recently. The C-6 had the standard exhaust stacks covered with a flame damper/hider. I made mine out of rolled brass sheet. The Ju87 stacks won't work on the C-6 variant, they're totally different IMO.3 points
-

Tigger L-39 Conversion
themongoose and 2 others reacted to daveculp for a topic
My first attempts at making a mask on the Silhouette machine failed, so I went ahead and started applying the third color to the airplane. This is the "almost black" color, and I'm using Vallejo Panzer Dark Grey for it. So far it's been a chore with overspray, paint lifting, and brush touch-ups here and there. Eventually it will get done no matter how many iterations I need. After the gloss coat is well cured I'll apply the "almost black" color to the wings and tip tanks.3 points -
Another wishlist.......3 points
-
EA-6B Prowler (02 April: Done!)
Shawn M and 2 others reacted to easixpedro for a topic
Got the aft canopy glued down, and slowly plugging along in the front cockpit. Here's the pilot, complete with aviator shades. Those were a PITA. The macro lens is brutal, but helpful too, as I've already gone back and done some touchup to this guy. Still need to paint all the attachment points silver and get him situated to the GRUEA-7. That being said, as I learned with the aft cockpit, not a lot of the details will be visible once the canopy is on. Trumpeter's control stick is pretty accurate out of the box. I only added 1 sytrene rod along the base, even though it'll likely not be visible. As I was painting it up, I was chuckling at some memories: 1) Taxiing on the flight deck was always a test of the pilots skill, as the nose wheel steering required mashing the button with his right pinky. On newer airplanes, it can be a paddle switch, or it 'just' engages as the pilot uses the brakes. But always funny to watch the pilot sweating bullets as we taxied up to the bow and he's working the brakes and trying to engage the NWS to turn in a really tight space. To cap it off, if you got into too tight of a turn, the nose gear would come out of toggle and then it was essentially a free-wheeling/castering nose gear (which only added to the stress). Nothing like doing the bow dance and wondering if you would loose steering... 2) Had a pretty miserable mission in Afghanistan once. We were about the only a/c airborne as it was winter in the Hindu Kush. We'd taken off before the snow hit and were headed to support a TIC (troops in contact) up around Abbottabad. The weather was so bad that no other aviation assets were available, but we could still provide support. Checked off station to get some fuel. As we sat in the 'pre-contact' position (stabilized just behind the basket, before you're cleared to engage it), a bolt of lightning hit the Tanker. It hit up on the tail, traveled through the boom, out the basket to our refueling probe and out the tail of our plane. You could have heard a F...ing pin drop. No chatter from us or the tanker. I just looked at CKnot (the pilot) and told him to get fuel as the guys on the ground needed our help. We got our gas and went back on station. Did it a couple more times and ended up logging nearly 7 hours. When we landed (at minimums, in a driving snowstorm), we proceeded to maintenance control to fill out the post flight paperwork, Cknot told the Maintenance Chief he was going to write a gripe on the control stick. The poor chief looked stricken (any maintenance on that would essentially require airframers to re-rig the flight controls and then a post maintenance check-flight). Cknot then told him they'd need to paint the handle black again, as he'd squeezed all the black out of the stick during the lighting strike... I guess you had to be there, but it was pretty funny all things considered. (It's not often you'll hear a steely eyed aviator admit to any fear...) Anyway, as I was painting the stick, that memory came flooding back and I had to share. Hoping to finish up the front cockpit and get it all sealed up in the next week or so. Thanks for following along and putting up with my rambling! -Peter3 points -
1/15 Bf109 " my first fully scratch build"
TAG and 2 others reacted to Antonio Argudo for a topic
a bit of progress, more balsa wood work, oh no there is another halve to go cheers3 points -
1/15 Bf109 " my first fully scratch build"
KUROK and one other reacted to Antonio Argudo for a topic
Hello Gents, Finally I decided to start this project, totally inspired by Master Airscale Peter,to who I thank for sharing his amazing work which makes it look easier than it is, I jumped in this new field with my total ignorance and many things to learn on the process So I will be building a 109, a F-4 or a G2, still have not decided but since both models share many similarities I have some time still to decide but will be representing a JG 5 scheme for sure, I took Jumpei fantastic drawings and scale them up, and cut the 2mm acrylic and ended up with the main outline, first step accomplished, next is adding the former sections, cheers Comparison with a 1/32 model now needs some sanding and refine curves cheers2 points -

Fw 190A-8/R2 Wilhelm Moritz
Alain Gadbois and one other reacted to Miloslav1956 for a topic
1/32 Revell kit, Eduard cockpit, bronze legs & Look, Barracuda wheels, Eagle cals, painting mask homemade, all colours MRP, HGW rivet set2 points -
Fw 190F-9 Luftflotte 4 1945
catbloke and one other reacted to Miloslav1956 for a topic
1/32 Revell kit, Eduard cockpit, Look & bronze legs, Barracuda wheels, painting mask homemade, Eagle Cals #91, all colours MRP, HGW rivet set2 points -
Don't remember that, I just remember Richard Attenborough and Frankie getting back to England at the end of Dunkirk.2 points
-
An F-111 (not an E version) would certainly make my day, that's for darned sure.2 points
-
EA-6B Prowler (02 April: Done!)
Anthony in NZ and one other reacted to easixpedro for a topic
I'm not 100% certain that 'everyone' was Kung Foo fighting2 points -
The propeller mount looks the same sort as used on the full size replica Ferrier set fire to at the end of the film Dunkirk. -the replica with no engine.2 points
-

Kotare Models - a New Venture from Former Wingnut Wings Staff
scvrobeson and one other reacted to adameliclem for a topic
That is the mightiest propeller mount I have ever seen. Adam2 points -
Received my two sets yesterday, absolutely outstanding, the vac canopies really are superb.2 points
-

KopeckyScaleModels
geedubelyer and one other reacted to CruZz for a topic
One more new item for November : 32019 Rafael Python 4/5. I will finally receive decals in start of next week. It´s last piece to puzzle. So first Pythons can be send in the middle of next week. Set including 2 pcs of Rafael Python 4/5 AA missile. 3D printed front end cover, clear lens and decals printed by Eduard. Plase welcome to www.kopeckyscalemodels.com Thank you!2 points -

Kotare Models - a New Venture from Former Wingnut Wings Staff
Tolga ULGUR and one other reacted to MikeMaben for a topic
Fokker DXXI (Wasp) , if they like early versions Bf109D, Koolhoven F.K. 58, FW187, ... hmmm ...2 points -

Kotare Models - a New Venture from Former Wingnut Wings Staff
Tolga ULGUR and one other reacted to MikeC for a topic
I'll add to the wishlist something that (as far as I know) could be done as a development, namely some early PR variants: A-G, IV, VII (ie PR.G); and while they're at it, how about going the whole hog with a X,XI and 19? PR Heaven!2 points -
thinking along those lines yes, Jazz decals from V12 points
-

ICM AH-1G 68-15012 "#1 Du Me Mi" - F Troop, 4th Cav, Phu Bai, 1972 (mostly) Finished!
Out2gtcha and one other reacted to Hawkwrench for a topic
It's a shame that judges look at a non polished or non dipped canopy as a ding at a contest when in real life, they are dirty, fogged up, scratched, etc. Tim2 points -
WNW SE5a
Greg W and one other reacted to europapete for a topic
Evening all. next up is work on the fuel tank. I took the end cap, part A45, and the two tank halves that were cut off the fuselage halves and glued those together. the moulded on side panels were cut off the lower tank sides and a rear end cap made from styrene sheet. The real tank had a curved bottom, as seen on The Memorial Flight web page and in various contempory photos. The end caps were shaped to replicate this and a styrene base added. The flange around the front cap was added from thin strip and the three grooves more defined. This view shows before I removed the side panels and curved the lower edge of the end cap.2 points -
Hi, Hope you all had a nice day In addition to the Tomcat pilots of the 81 à 89s time frame, here are the versions for the next years : 89 to 98 approximatively, new HGU-55 helmet, which is still equiped with the old style cast bayonet receiver 98 to 2004 approximatively, the HGU-55 has now the lightweight bayonet receiver Yes, it is not a big difference... cheers Norbert2 points
-
It was inevitable really MIG-15 Richard2 points
-

Kotare Models - a New Venture from Former Wingnut Wings Staff
Tolga ULGUR and one other reacted to Ryan for a topic
Is that the Trumpeter factory at the bottom? The B and C squad barracks are to the left.2 points -
Some photos of Plywood of different grain types, has been 'processed' through Photoshop. This means paying attention to variations of color and scaling. I just wanted to experiment with how I'm used to what plywood looks like. (I'm originally a trained carpenter) As I mentioned, it was an experiment and there is still room for improvement. All was then printet on a sheet of clear decal paper. Cheers: Kent2 points
-

RCAF Liberator GR Mk VI
GMK and one other reacted to BloorwestSiR for a topic
Prior to installing the interior, you have to assemble and attach the nose gear. I purchased the brass replacements made by Aerocraft for the kit. These were cleaned up and I drilled out the tie down loops. I then starts gluing the kit exterior bits to the brass. The scissor links for the oleo were solid si drilled and filed those out too The finished nose gear keg prior to paint. As I did things a bit backwards assembly-wise, I had to leave off the retract struts and attach those to the gear bay first. Then the gear leg2 points -
The front wheel bay after alteration. Front wheel bay doors.2 points
-
Let's continue. Here are the details of front strut that have had to be slightly improved. it turned out like this2 points
-
1/15 Bf109 " my first fully scratch build"
Uncarina and one other reacted to Antonio Argudo for a topic
Thank you guys for the kind support words guys, very appreciated! testing some balsa wood for filling, slowly building up... cheers2 points -
1/15 Bf109 " my first fully scratch build"
109 and one other reacted to Antonio Argudo for a topic
thank you guys, first former sections, cheers2 points