Leaderboard

Popular Content
Showing content with the highest reputation on 10/13/2020 in all areas
-

Hobby Boss A-26, Why Not ? Lets Make a A-26K Nimrod
Youngtiger1 and 15 others reacted to patricksparks for a topic
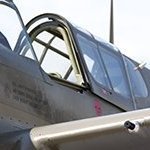
One thing I found with the Hobby Boss kit out of the box is the cowlings and front of the engine nacelles are slightly "skewed" towards the wing tips(see the first photo) I found if you trim the locating tabs on the back of the nacelle fronts(second photos) you can get everything back up and vertical. The next photos show the kit's nacelle front, the tabs on the back of the part can be trimmed or removed to let it be rotated to get the cowling and engine oriented beck to vertical. I have started making the modifications on the cowlings and the nacelle fronts for the A-26K, I have removed the front cowling carb intake, I cut off the front of the kit cowling and replaced it with the Tamiya front cowling ring that came with the sprues that I bought with the Corsair props, it seemed to help to get more "ark" into the cowling. The Taniya ring is slightly smaller in it's outside diameter so I added a strip of styrene in front of it as filler to sand away. I have my first blush of the A-26K final design carburetor intake on the cowling, I still have to do some filling but I think based on photos, it's pretty close to what it's supposed to be.16 points -

QF-4S Phantom "VX-30" - Tamiya/Cutting Edge, 1/32
MGySgt0372 and 10 others reacted to Starfighter for a topic
Cheers everyone! Kevin was kind enough to separate the Phantom posts from the Tomcat thread. As I am planning to finish this one, it makes more sense to open a separate thread for it. I wasn't in the mood to work on the Tomcat landing gear, so I decided to resurrect another project from the Shelf of Doom - a QF-4S. Painting is fun! Cutting Edge conversion kit, cockpit converted to QF-4S standard. As there are no decals, all markings are painted...11 points -
Mine's arrived - mixed feelings - but a far better starting point than the old ID Models vac I was playing with 25 years ago IMHO. Minded to do a review if there's any interest - I think we know most of the issues at present - but I think there are a few more that need to be addressed. Iain8 points
-
After the engine, I breathed a big sigh of relief, and then just couldn't figure out what to do next. I know what needs to be done next - the cockpit. And I guess that is what I will do. But one thing leads to another. The side walls need to be done first, especially important for the Corsair which has no floor, exposing the fuselage frames on the sides and bottom. Right now it all looks awful and unrealistic. So while doodling around wondering how to attack it, I started on the wing center section front spar. Just....because. OK the center section wing front spar, or main beam in Vought language. It is very visible in the engine compartment with cowl panels open: And of course there is an engineering drawing VS-10072 - here is one frame of it: Two tubes (one left, one right) of the engine mount truss attach to the front spar common to its lower chord. Due to the heavy gage of the gull wings on the model (.08 inch scales to 1.44 inches!), the spar is narrower than it should be, which affects the location of those two tubes, which will cause interferences. So I had to modify the shape of my spar, flattening the bottom. This 4x scale layout (that is to say 4 x 1/18) shows what I am talking about: That layout looks simple, but it is not! I did alot of hours of layout work trying to get a spar that was the right shape, and located fore/aft in teh right place. Here she is - just alot of plastic sheet, strip, and angle section: Making it was alot easier than laying it out! The two little pads with holes are where the motor mount truss attaches. These pictures show what it will look like when installed (the trained eye will notice I got the dihedral wrong - but fear not. It's gonna be OK): That last shot is from the bottom. Note I have created "shoulders" for the big lower hinged door to nest up against (it's aft edge). I am going to have to rely on this spar section to maintain wing dihedral as I continue to dremmel away material from the part, making it more limber and flexible. So I will install it permanently here real soon. Take care - next post I'll show you some progress in the cockpit area.8 points
-

RAF FG.1 XV571 WILD HARE Phantom Conversion
Chris Wimmer and 6 others reacted to Anthony in NZ for a topic
Last week or so have been slow, but I am back on her again now. Trying to finish off the horizontal stabs before the part from Albert turns up so I can complete the heat shield area. Here you can see me adding in all the teeny tiny bolt heads into the rear spar. They are all little pieces of 0.25mm rod (I think, as the 0.5 is much bigger and I have lost the original packaging) inserted into drilled holes. Man this is taking forever! I should have just used Archer rivets on reflection...I dont know why I didnt? One upper left side is done and I am about 1/4 the way down the right side. Then I need to do the underside. They still need to be filed down to the appropriate and even height What was I thinking7 points -

Most elegant WW-2 design ? The Spitfire !
Gazzas and 6 others reacted to Alain Gadbois for a topic
Obscure no doubt, but certainly one of the most elegant! Ki-777 points -
It's been a while since i've been able to finish anything. Hopefully this should be a straightforward build. These were some of the first aircraft in the post war Luftwaffe, basic trainers. This will use the kit scheme of a bird from....Fluganwarterregiment, Uetersen, Germany, August 1958. Will be yellow overall!! Another scheme included is for AG 51 Immelmann Luftwaffe Sport Flying Group, mainly used for a tow aircraft for glider training. Kit has been reviewed favourably, and does look good in the box.6 points
-
Tamiya - F4u1a
Loach Driver and 5 others reacted to simon417 for a topic
Finally got this one finished and also tried my hand at building a base. AK Real Colours Eagle Cals Barracuda Wheels Barracuda Cockpit stencils Ultracast Pappy Boyington AK Terrains Palm Tree - from Ebay seller in Thailand It's a great kit. I have another in the pile for a later date. Thanks for looking. Simon6 points -
As promised (not food), here are some pictures off the DSLR. Didn't have time to setup a light box, so apologies if they're not super. I did see a few spots to clean up though, that's one benefit! Huh, didn't notice I had the cowling on wrong. Whoops.6 points
-
YAAAASSSSSS!! Consider me a happy little camper. For $18 USD each plus postage, these are a hoot! I think they definitely fall into the "if I have to explain, you wouldn't understand" category And because we live in 2020: I'll post more pics tonight if anyone's hungry for them. Denzil6 points
-

Make the others jealous
JerseyChris and 5 others reacted to Iain for a topic
Probably won't make anyone 'jealous', but this arrived this morning from Andy @Antics here in the UK... Fully aware of the errors spotted so far - and some others I've picked up - but I've wanted to do a B-26K for as long as I can remember - and, warts and all, this has to be a better starting point than the old ID Vac I was working on more than a quarter of a century ago! I'll probably rue the day I ordered this (that'll be yesterday), but I couldn't not get one - I doubt any other manufacturer will have a crack at this subject now... Anyone interested in a warts and all review for the LSP website? Iain6 points -
There. That'll do for that. I started playing around with the wing moldings and their fit to each other and the fuselage. This is going to be a long journey. I think I need to start looking at this as more of an "approximate P-36A shape" that I'm going to need to refine and then wholesale re-do the surface detail on. Anyone have good suggestions for motor tool buffing bits? Eventually I see needing to do a lot of surface polishing on this one... I shouldn't complain too much though. We should appreciate Special Hobby because they make the effort to create 1/32 kits of aircraft that are too "obscure" for the major firms to bother with.6 points
-
Hobby Boss A-26, Why Not ? Lets Make a A-26K Nimrod
Youngtiger1 and 4 others reacted to patricksparks for a topic
Well I decided to take the plunge into the abyss of the Hobby Boss B-26 kit, yes its a bit of a mess, surprisingly thought it all seems to fit together pretty good ??? Yes the fuselage cross section mid town is wrong, I think though most scratch builders can make it look a little bit more "normal" the cowlings are also wrong, but it seems to be mostly in their profile, they don't seem to have enough "arc" in them , back to front, they have too much of a flat angle, I think you could glue a strip of styrene around the front third of the cowling and fill and sand and get the shape corrected. So Far I bought some Tamiya Corsair sprues with the propellers, I cut the blades back about 9/32" each in length, they might not be quite wide enough in cord but I think that they look pretty good. I ordered a 1:48 Monogram F-84, I'm going to use the drop tanks to make the wing tip tanks for this project, I was going to get the F-105 kit but they are a lot more expensive, doing some measuring it seems that these tanks in 1:48 scale can be cut down in length and suit the shape of the tip tanks, we'll see ??? The gun nose in the kit seems to be pretty close to the right shape in profile according to drawings that I have looked at. I'm looking forward to see others take the plunge into this end of the pool !!!5 points -

Marlin carrier launch
Landrotten Highlander and 4 others reacted to Finn for a topic
Not really, just a close fly by with the camera in the right position: Jari5 points -
Thank you Alain, but I'm not there yet. I still have the windshield to modify and this will rather be the deciding factor if this one makes it. In the meantime I unmasked the wings, it's always a great moment to discover the effect. There's a huge contrast between flat grey and bright red, this will be toned down with the next gloss coat. I still need to further work on some panel lines.5 points
-
4 points
-

Italeri Tornado GR.4 sprue pics
wunwinglow and 3 others reacted to Scotsman for a topic
From what I can see , the original GR4 upgrade process left the rear IP looking much like it does in the kit , however around 2004/5 came the TARDIS , (Tornado advanced radar display and information system).upgrade which replaces the original IP with this.. So it looks that anyone doing a Op Telic aircraft , the kit IP is probably ok, however anything later you'll be looking at some scratch building Tornado reading4 points -
Thanks again boys, feels good to be at full modeling MoJo! All parts now covered in Mr Surfacer 1500 black, as it was getting very hard to tell what was what, and where any flubs were. This is right out of the spray booth with 0 touch ups or sanding yet. She looks quite fetching in her pseudo night-fighter scheme! I cut off the OOB pitot tube right ahead of the square-ish base. I then inserted the brass Master Model replacement. It pressure fit well enough that I just pushed it in for paint, and took it out after the primer was dry. Ill be re-scribing/riveting next, then another round of sanding followed by possibly another round of primer. We shall see! Paint is not too far away4 points
-

Gloster stable?
nmayhew and 3 others reacted to Silver Wings for a topic
That's right Guys, our next release will be 1:32 Gloster Gauntlet. More details to come soon. Expected release date: December 2020. Meanwhile, please enjoy a stunning build of our Gloster Gladiator. 4 points
 -

1/32 Revell-Hasegawa Spitfire Mk.1a "K9906"..... Finished.!!
dodgem37 and 3 others reacted to Tolga ULGUR for a topic
Some progress.... Wings , horizontal tails and the fuselage went together.4 points -

1:32 Douglas A-26 Invader from Trumpeter/Hobbyboss?
mkd1966 and 3 others reacted to Dennis7423 for a topic
Iain, as you are one of the most respected and trusted members of this website, I always appreciate your thorough and thoughtful reviews of kits. To boot, if you notice something that none of us did, we can all be the wiser. I'd say fire away. - Dennis S. Thornton, CO USA4 points -
Yep, my old man went in and flew Tiger Moths, Wirraways, Oxfords in Oz and Wellingtons in England. He was still training in England when the shooting stopped (lucky for me). Funny story, when they had their passing out parade they were all lined up when the C.O. asked the gathering all those that want to fly fighters take one step back. They all stepped back except for one lonely soul and he went on to fly Spitfires on ops and Dad and the rest ended up on Wellingtons which would have translated in to Lancasters if the war had gone on any longer. TRF4 points
-
Not a paid endorsement (although I'm always open to bribery), i ordered some stuff from Hobby Link Japan (YES, some of the Bandai Pot Noodles kits ). Shipping notification came from them on the 10/09 and the shipment arrived today 10/12. Japan to Washington state over the weekend. Covid-shmovid!4 points
-
Most elegant WW-2 design ? The Spitfire !
Gazzas and 3 others reacted to patricksparks for a topic
Not sure if it qualifies, always thought it was nice...4 points -

Boulton Paul Mk.1
Derek B and 3 others reacted to Rick Griewski for a topic
Next up for some first round of corrections. First the out of box cockpit. It looks to be the correct width and length. I fits quite well in the fuselage at the correct front to back position. The floor is too high and there is a bit of the area behind the bulkhead that can be seen when looking into the cockpit on the real airplane. The bulkhead will be rebuilt. The detail is quite soft. The corrugation is too rough. The model train supplies come to the rescue. This platform was made from corrugated metal. The control piston for the front turret faring is located here. The box is a question. The canopy opening in the fuselage is a bit too wide and will be adjusted to fit the vac canopy The ID Models canopy is too large for this kit. I will have play it safe and make a master of the kit part so I can make new kit canopy if I need it. The plaster pattern will come in handy. The ID vac canopy is too large. I does not look "slab sided" enough for me.4 points -
Tight fit for the interior parts in the cargo area.4 points
-
I decided to start this one with the engine. The detail on the P&W R-1830 Twin Wasp is pretty soft, and there are mold seams running down the sides of the cylinders which are very hard to remove without wrecking the cooling fins. Fortunately, since this engine will only be visible from the front through the cowling, I can focus on just tying to make that one angle look decent (like the false-front buildings on a Western stage set). The main parts, sort of cleaned up: Rather than trying to do any drilling, I went with the quick/dirty solution of gluing plug wires (0.3 mm lead) to the backs of the ignition distribution ring stubs. Started with some semigloss black Then Mr Color Super Iron II for the steel cylinder sleeves Then Alclad II White Aluminum for the cylinder heads Some contemporary photos showed noticeable rust on the cylinder sleeves, so after a black acrylic wash I added some rusty pastel (I'm now using Vallejo acrylic washes over metallic lacquers because the Tamiya enamel washes tend to re-wet the lacquer, which interestingly does not happen with non-metallic lacquers). Then painted the crankcase light gray-blue I decided at that point that the rust was too pronounced and hit it with another dose of black wash to tone it down The pushrod tubes don't line up at all perfectly, so it's going to be a bit of a chore getting them all solidly in place. But overall for a pretty lackluster kit engine (at least by 1/32 standards) it is coming together OK. From here I need to get plug wires in place, find a stencil decal for the reduction gear housing, add some oil paint grime, flat coat it, and that should be OK.4 points
-
new company to me from Hungary they have opening weekend with Buy 1 Get 1 free offer 3D instrument panels https://www.rfstudio.hu/# https://www.facebook.com/pg/Red-Fox-Studio-112301346967714/posts/?ref=page_internal F-117 F/A-18E Mirage III E/RD/O A-10 P-38 Bf-109G Fw-190A-8 Me-262 P-513 points
-
Here is my recently completed Hasegawa Bf109K-4. I started it in April, took a long break during the summer and finally finished it eight months later. I added a bit of aftermarket stuff to this build including: 1. Eagle Editions 109K-4 Resin Cockpit Set 2. Henri Daehne 109G/K Resin Prop Set 3. RB Productions 109K-4 Wheel Well Detail Set 4. RB Productions 109G/K Erla Canopy 5. Barracuda Studios 109G/K Resin Wheels 6. AIMS Late War 109s Decal Sheet 7. Eagle Cals 109K-4 #32-74 Decal Sheet 8. Airscale Luftwaffe Instrument and Placard Decal Sheets 9. MDC resin ammo chutes 10. Eduard masks 11. Resin/metal landing gear replacements For the exterior colors, I used a combination of Mr Hobby Aqueous and AK Real Colors paints. The build thread can be found at:3 points
-
Just published on Silver Wings' Facebook page. Could this be a big hint........could it possibly be a Gauntlet! They already do a Gamecock, Gladiator and Sea Gladiator. A Gauntlet would fill in a gap!3 points
-

First tank build. Tamiya 1/35 T-34 (build updated page 2)
Rick Griewski and 2 others reacted to mpk for a topic
Build updated 1st tank and winter scheme.3 points -

Tallboy detonation
LSP_Matt and 2 others reacted to Dave Williams for a topic
https://us.yahoo.com/news/biggest-world-war-two-bomb-164240969.html They were trying to burn an unexploded Tallboy in Poland when it went off. Fortunately they were doing it with a remote control device, and no one was hurt. Video: “The object can be considered neutralized”. I guess so!3 points -
The fuselage halves are just out of square enough that I had to tape them all the way along the joins to more or less get them lined up. Good news is that it will be possible to glue them like this with patience. Some of the panel line detail will require work... When I taped up the wing assembly and (with some preliminary filing and sanding) mated it up with the fuselage, the anticipated wing root misalignment appeared (albeit no where near what the Nate had): Port side was worse Fortunately the simple expedient of assembling the sides of the landing gear bays into the wings completely took care of that There's still a bit of a gap horizontally on both sides, but at least the section of the wing agrees nicely with the section of the wing root as molded into the fuselage. I'm now starting to mess with the various bulkheads (engine "mount", firewall, bulkhead behind seat). All are oversized and have to be filed/sanded down before the fuselage will close around them. I guess if it had to be one way or the other, this is easier to work with than if they were too small...3 points
-
This is a bit of an oddity. Fellow staffer, Andy (Kagemusha), sent me these two sets of Baracuda 1:24 Hellcat wheels way back in August, but I had never seen them yet. It turns out that my roommate, who is a mail-ordering maniac, had been expecting a similar sized package within the same general time-frame, so had just went ahead and added it to his stuff, assuming it was his, which he just discovered and brought to my attention last night. So, I have no idea how long they've actually been here (and neither does he), but they are certainly in my possession now, so a big shout of thanks to Andy for getting me these, I really appreciate it.3 points
-

Italeri Tornado GR.4 sprue pics
nmayhew and 2 others reacted to wunwinglow for a topic
So, no Brimstone, no standard bombs, no 1000lb LGBs, no ALARM, no RAPTOR pod, no TERMA..... It is barely a GR4 then, is it!?3 points -
Italeri Tornado GR.4 sprue pics
Royboy and 2 others reacted to wunwinglow for a topic
Sorry to hear that, there is going to be a lot of this happening from now on. I hope you find something else soon. I'm fine with it actually, pretty much early retirement, and I have a few ideas to keep me occupied.3 points -

Something for our Aussie friends...
mpk and 2 others reacted to D.B. Andrus for a topic
3 points -
 Hope you're talking about the food!3 points
 -
An update: I've finished adding the extra armor to the hull top and moved on to the forward interior. I roughed up the seats with a Dremel tool and toned down the dials with a blend of clear yellow and Future. Overall I've been adding Flory dark washes to bring out some of the details, and I am currently planning on having the crew hatch panel removable so we can see some of the details after the build's complete. So far the only scratchbuilding I added to the interior is the suspension shield for the radio operator's position. I will also be adding some of the more visible cables a little later in the build. Cheers, Tom3 points
-
Hi All, small update. So, after seeing the pictures of the fire extinguisher control box mounting arrangement, I was doomed to having a crack at representing it! I decided to try and fashion the lower mounting frame simply by drilling and carving out the platform on the kit part which had been sawn off from its previous location on the side wall frame. The upper mounting bracket is a spare PE part. The bungee bearers on the side of the box were made from sections of 0.5 mm rod and the bungee cord represented with 0.2 mm copper wire. The kit control box is slightly oversize so I couldn't easily fit the same arrangement on the other side so I just left it off as it won't be easily visible anway - a convenient excuse as doing just this side nearly sent me barmy! Should make some progress with assembly of the rest of the cockpit parts next time. Thanks for stopping by!3 points
-
Boulton Paul Mk.1
Derek B and 2 others reacted to Rick Griewski for a topic
The exhaust openings were adjusted to the correct length, height and position when viewed from the front of the model. More precise sanding will sweeten this up when I am re-scribing the model.3 points -
Matchbox Tiger Moth
KiwiZac and 2 others reacted to Alain Gadbois for a topic
Thanks Peter! I think the original issue is a bit better than the Revell offering as I find the fit of the fuselage halves in the reissue not as good. I have found a reference online where there are many detail pictures: http://www.tigermothparts.com/categories.php?category=Tiger-Moth-Parts The front seat: Tail skid assembly: Alain3 points -
 Today's goal.......3 points
 -
Hello, a new update on this model. The IP cover was panted and weathered. I replaced the HUD's glasses with thin clear plasticard sheet. Then I removed the molding line from the front canopy section. After a good polishing session the part was glued into the fuselage. A thin stripe was applied in front of the windshield to simulate the defog vent. Here some details added to the speed-bake vane. Now my Legacy Hornet is ready for the painting stage... CIAO! Piero3 points
-

HH-60G Pavehawk Kitty Hawk 1/35 DONE!!
Michael931080 and 2 others reacted to Woody V for a topic
Pete, Actually you shouldn't lose any and a primer coat will have a negligible, if any affect on adhesion. The way you are doing it now is fine and you should not lose any rivets by handling the model. When I did my Wildcat build I glued a part in the wrong place and in the process of fixing it I had to do some sanding around the rivets. As you can see in this photo, the rivets took sanding without coming off. Try it yourself on a scrap part. There's only two ways to remove the rivets once they're on and dy; pop them off with your hobby knife or sand them off.3 points -

A6M5c Model 52 Hei Takeo Tanimizu 1/32 Hasegawa
AlbertD and 2 others reacted to Miloslav1956 for a topic
Today update. Now Landing gear and Engine.3 points -
Italeri Tornado GR.4 sprue pics
LSP_K2 and one other reacted to Rick Griewski for a topic
Really? IMHO the person(s) that built this sample did not check their Rapid-O-Graph pens at the door. The black and dark grey panel lines are not subtle at all. This is a weathering style still embraced by some. Or... the Marketers wanted to emphasize “details”. Certainly anyone on this LSP site would never draw all the panel lines! We are artists with subtle methods and personalities.2 points -
Even the small carriers made hard turns, although it didn't seem to interrupt the game of catch: Jari2 points
-
I've spent most of the day looking at the those pics, and it just looks right to me , Example A On the ground the Tornado looks like a heavy beast , squatting down even when not under load, and that pic seems to replicate that sit perfectly , , So bring it on ..2 points


.thumb.jpg.5da8bff9741de420eb2e87addd8f2cf6.jpg)


