Leaderboard

Popular Content
Showing content with the highest reputation on 03/18/2019 in all areas
-
.thumb.jpg.f0920d798d5d8600fb58b1d8a906ddff.jpg)
Spitfire MK Vc "Joker" 1:32
Model_Monkey and 9 others reacted to shadowmare for a topic
Revells Spitfire MK II Conversion plus Hasegawa V Canopy and filter. Many things added. I've added new photos10 points -
Not sure I get that line of thinking really. Is every model maker capable, just not willing to have a go at what you describe? No, of course not. Every modeler has his reasons for doing or not doing something model making wise. Making assumptions about others and why they do or dont do something is a slippery slope. I am one of those "bemoaning" the turrets. Not every modeler can be stuffed into one single definition of what and how they model. Not knowing any other individuals situation and reasoning for NOT doing these things can lead to a lot of assumptions................. Can I make them myself? Yes. I have vac experience, as well as milliput and master making experience. Im not an expert, but I do have the knowledge. Do I have the equipment? No. I made my own vac machine a year or more ago for another project, but it has since been torn apart to use the parts elsewhere. Do I have the desire? HARD NO. After pulling my own vacs I have ZERO interest in messing around trying to pull my own vac clear parts. Other parts of the turrets, easier but not the clear parts. Do I have the time? HARD NO. Between work and life I get a scant amount of bench time, and Ill be damned if Im going to spend it doing something I hate. I have way too many other models in my stash, and other things to do to spend it doing something that is not only unnecessary, but not fun in any way shape or form for me. You must be an expert at pulling clear vac parts, or can accept less than perfect parts..............either that or Hubert and I must have been doing something wrong. Between the two of us, we pulled more than 20 copies, and the discard rate was about 10 - 1 as far as bad to good pulls went. I got there in the end but pulling acceptably clear vac parts is not an easy proposition for most. Id say you might want to give a thought or two to others reasoning for not messing with this kind of thing. It may have absolutely nothing to do with lack of effort or laziness. Sincerely, A painter / assembler7 points
-
well hello folks can't believe a month has passed since I last posted an update... I have not been idle though - I have done a lot of 3D modelling for the tailwheel, main wheels (for which I am getting help!) and the spinner (of which more later..), in between I have also released an airscale instrument panel set for the Hobbyboss 1/32 B24 Liberator and also worked with Airfix to master this airscale cockpit set for the new and mind blowing Airfix 1/24 F6F Hellcat - the decals for all the instruments & placards are in production, but the PE is done.. ..as for the P51, when I had the Hellcat PE test shot done, I also added a load of extra P51 stuff to the fret so I make the most of one-shot production, Part of that was the stainless steel side panels that surround the exhaust ports, and I also made a fold up box structure that is the structure that surrrounds and supports the exhausts themselves.. ..Also seen here are the 3D printed exhausts from Model Monkey - huge shout out for these as they are exceptional quality and amazingly are hollow so are ultra realistic.. ..these were folded and the details added before the boxes were added to the outer panels - the exhausts are not yet fitted so they can be painted & added at the end.. ..and so onto the spinner - this is one of those things that has sat in the back of my mind as a niggle since I started this build - it is unfortunately unpainted on the real aircraft so had to be made in metal - a bit like skinning a tennis ball in sheet aluminium - very tricky.. ..I actually bought the HpH 1/18 Merlin engine model hoping to cheat and get a good basis for the prop & spinner from that, but it is very crude - the spinner is a solid with four peg holes in it to take the blades - there is no reference to the cutouts on the real thing, so that was a 70 euro write off (though I think I can use the blades so may not be dead money...) I restarted my Rhino 3D programme trial and got to work modelling the Spinner... ..when I went to get it printed at Shapeways, I noticed you could choose polished Aluminium so I thought well that would be brilliant as it would save lots of messing around with skinning as I could just polish the part - so at great expense (150 euros) I ordered it with the hub done in plastic.. ..two disappointments... one - it's not polished at all, it is more like a carbide burr in texture, and two, somehow I got the hole cutouts wrong as two were in the right pitch for the blades and two were in the opposite pitch.. ..that said - it is aluminium, and after filing & polishing is just like a cast part - don't know how they do it, but it's bloody clever.. ..as the cutouts were wrong, I knew I had to skin it, so I made a tape mask and started with the lower section... ..with this skin added, I taped it to the top part to mark another tape template with where the cut-out holes were on the next bit of skinning (there are 3 - bottom, lower of the top cone, and the tip) ..this skin needed rows of 3 rivets adding so I made up a jig I could do this accurately with.. ..I was hoping after adding this I could get away with the spinner tip being the base aluminium part, but there is a lip that can just be seen.. ..in doing the tip, I nearly gave up as turning one sheet into a fully compound curve sheath without a visible seam proved very difficult - I don't have any in progress pics, but at this point the bulk of the shaping has been done and the skin runs up over the lower part - I was hoping I could just sand & file this away for a nice close fit (I should have started with the tip & made the lower panel fit it, not the other way around..) ..once it was all sanded away, I was really happy with the result.. ..the prop hub was painted and added to the base.. ..and it is a perfect fit.. ..it feels great having got that done - everything else is easy by comparison I also have the right sheet aluminium that Brian (Out2gtcha) kindly shipped from the US on my behalf so can now start skinning the airframe.. ..a milestone I think, and hopefully the start of more regular updates.. TTFN Peter7 points
-

1/32 MH-53E Sea Dragon - 3D printed / scratchbuilt
F-4Phanwell and 5 others reacted to Starfighter for a topic
Just a small life sign... my bench time is very limited at the moment, but I decided to start the CAD drawings of the instrument panel to get used to working with Inventor again. The panel is in a very early stage, most details have yet to be added. I am planning to prepare as many interior components as possible in 3D and to 3D print them or to have them CNC machined once ready.6 points -

First test shot's of DACO's new Fouga Magister.
David66 and 5 others reacted to One-Oh-Four for a topic
Cheers, Erik.6 points -

"The Star of Africa" - Hans-Joachim Marseille's Do-335 A-2/Trop - Yellow 14 - FINISHED!
Paul in Napier and 5 others reacted to Out2gtcha for a topic
Thanks boys! To tell you the truth, my original plan was to put larger more symmetrical splotches on the fuse, and have smaller and larger more random splotches with more random shapes on the wings.......but I initially forgot about the elevators in that plan, so they ended up with the same effect as the fuselage had. Iv actually remedied that, as I think you are right, they should be alike....... I thought I'd like the larger more symmetrical splotching, but in the end I liked the more varied sized camo on the wings and elevators with the larger camo on the fuselage and vertical stab, so I fixed the elevators to match the wings. At the same time, I utilized the Maketar Do-335 mask set along with my own designs to get the white down. This includes Marseille's "200" and the crossed swords in his oak leaf & crossed swords victory crest: I'm off to let the white harden off and eat some corned beef and cabbage w/potatoes. Cheers, and happy St. Patrick's day!6 points -
Hello, friends! My hat is in the ring. The kit of the choice is Special Hobby's T-2C Buckeye, camouflaged version. I've earmarked this some time ago for the Venezuelanian livery. Not so much because there is a crisis in Venezuela, but because I like multicolor camouflage. There is not a lot of AM parts around. You see the full selection on top of the box - canopy masks. That's it. The kit itself holds all the resin and PE needed for a decent build. On the other hand the kit has a few problems of it's own. Overall fit is good, shape is OK, but the floor of the rear cockpit is located too deep inside the fuselage. The rear IP has an antiglare cover like the front IP, but Special Hobby missed that; and there are lacking some other more or less visible cockpit details. The Buckeye also featured a good number of raised rivets in different locations, which the kit is lacking too. We are talking about boiler sized riveds here! Maybe North American accidentally invented there the vortex generators? Who nows... Before cutting styrene I have to to check the references. There are two or three detailed online builds at hand, that tell you how to fix the kits problems, and some walkarounds. I will read them carefully. Also want to try to get a copy of WWPs In detail book about the Buckeye at the Euro Model Expo two weeks ahead. It is sold out, but maybe I am lucky to get a second hand one. Thats the plan for now. Stay tuned. Regards - dutik5 points
-

BF 109 G6 in italian service
tucohoward and 4 others reacted to red baron for a topic
my last built, enjoy :5 points -
Last set for today IMG_1093 by Ernest Roth Close up showing the throttle, trim controls and I think the fuel mixture knobs as well as a couple of gauges and panels IMG_1095 by Ernest Roth Medium distance shot showing scratched wire bundles, you can just make out the far bundle. Probably won't see much of them in the finished pit.5 points
-
Cheers guys. More on the exhaust bung later. The kit features some interesting engineering from Italeri, pretty standard stuff from them considering their previous Mirage kits. Rather than consign the kit shelf of doom as being ‘unbuildable’, I like to use these things to challenge myself to come up with interesting ways to fix them. The bottom of the wing features some geometric shapes, I guess these are covering the hard points. Italeri placed the large one right next to the join, making the wig join hard to fix. If the kit was more precise, it would be too much of a problem but it is a little poor in this area and needs some work even if the shape wasnt there in there in the first place. There is also a small shape that should be inboard of the larger shape which has been missed. Here is the bottom of the wing with the larger shape removed, and the join has been filled and smoothed. I have marked with a pencil where the old shape was. Here is a screenshot of a high res photo of the area concerned (thanks Mark) imported to Sillhouette studio with the shapes that I wanted to cut traced in red. Some .2mm plastic card was used In my cutter to form the new shapes. I didn’t cut all the way through, rather snapping these shapes out. Applied to the model with Tamiya extra fine. Primed.5 points
-

Libyan Mig-23MF, 0200 Tripoli August 2005
johncrow and 4 others reacted to Daniel Leduc for a topic
Here's my little week-end update for the Flogger... Wing glued in full open position A little piece to fill the gap of the wing glove based on Ivan pictures. everything fixed on the fuselage.. Rudder not glued yet, just for the picture purpose... very different from what I'm used to built, but I like it. Found more goodies to help me move on futher... Thanks for watching and have fun. Dan.5 points -

1/32 Me 262 A-1a/U4 Kanonenvogel Conversion
daHeld and 4 others reacted to alaninaustria for a topic
Short update of sorts - not really sure how I managed to squeeze two Me-262 builds into one thread - but, the good news is that the Me-262 nightfighter is now almost done. Just the aerial wire and the canopy sway cables to go... I will now be able to concentrate on the U4 conversion. Cheers Alan5 points -
The exhausts are a hybrid of the HAD etched parts and the kit's outer shells. The chaff/flare dispensers got some attention, particularly the fairings. Cockpits are the focal point of many models, and this one is no exception! The MiG-29 is an iconic fighter, with many unique design features. I have really enjoyed building this!5 points
-
Want--------------------------Tamiya release-----------------------verdict Griffon Spitfire............Bf 109 G-6...............................pass Mosquito NF.XIX.........Mosquito B.IV..........................yes, if PR parts Beaufighter VI.f...........nada........................................oh well F-14A new tool............not before death.....................scheiße! Tony5 points
-

Scratchbuilt Grumman Tiger, 1/20
Starfighter and 4 others reacted to John Everett for a topic
With the Cessna finally finished I've been able to turn more attention back to the long languishing Grumman Tiger (1/20). I've been making good use of the Silhouette Cameo cutter for wings and control surfaces. .015" styrene in the Cameo Repeating shapes are laminated into a solid whole.5 points -
Trumpeter's MiG-29A is a great model to build, and I'm sure the C will be too. Unfortunately it suffers from some shape issues, and in this build I set out to correct them. It took a while. Here is the build thread should you be interested: This is MiG-29G 29+04 in NATO colours, serving with "Erprobungsgeschwader MiG 29". I was drawn to the subject by the wonderful conflict of ideals it represents. The aircraft is a symbol of how the re-unification must have been in a way, wearing a cloak of Norm 90 J grey, but peeking out from underneath, the original radome colours, the green wheel hubs, and the uniquely Soviet shapes of the antennae. Some things can't be changed overnight. Most of the work went into correcting the shape of the forward LERX, and the bulges above the engines as well as the spine. The nose cone was slightly modified, as were the top and sides of the intakes. A lot of effort went into capturing the feel of panels and fasteners, which appear to make up a lot of this fighter. Some of the kit detail is superb as is. Although the underside is well represented in the kit, the wheel wells, gear legs and weapons pylons benefitted from a bit of extra detail, as did the airbrake/dragchute housing.4 points
-
Hello, This is my Canadair CL-13 Sabre Mk.4 in the AMI “Aeronautica Militare Italiana” markings of the 4° Squadron “Aerobrigata” based at Pratica di Mare (Rome) around 1960. HISTORY Originally produced by North American, the italian Sabre were produced by Canadair and sold to the Royal Air Force. When the Hawker Hunter arrived in the RAF, around 180 Sabre, designed F-86E(M), where transferred to the AMI. Within the AMI the Sabre was the first ever jet with swept wings and was used only in the air defence role. THE KIT The Sabre kit in 1/32nd was originally produced from Kinetic and reboxed by Italeri. I don’t have the Hasegawa kit, but many modellers say that the Kinetic Sabre is a “copy” of the Hasegawa’s one with recessed panel lines… Overall details are good, there is a nicve stressed skin effetc all around the fuselage and wings. Panel lines are a little bit too deep. As extra parts I’ve used Eduard PE sets for interior and exterior and a resin ejection seat from Avionix. I’ve added some details as hydraulic pipes to the undecarriage bays and legs. Paints are acrylics by Gunze and Tamiya range. Squadron markings, serial numbers and stencils are from Tauro Models decal sheets. A couple od RBF tags were added to finish the model. And now the pictures! CIAO! Piero4 points
-

Tamiya F-16C conversion to F-16A
florin13 and 3 others reacted to Durangokid for a topic
I had to cobble decals from 4 sets to match what I needed. Some of them were too light but a super thin coat of grey brought them all together. Still to light but better then before. This one is from Fightertown F/A-18 sheet. Yes I broke off the tail probe like I have done with every other F-16 I've built. I forgot to post photos of the exhaust. I think it's a bit too gold looking so I still have some work to do. Do you guys think the color is off? The kit comes with an extra pedal part and of coarse I glue the wrong one on (the one without decals). I had to pry it off and glue the correct one on but luckily it didn't mess anything up.4 points -

Hobbyboss B-24: no turret fix in sight
D.B. Andrus and 3 others reacted to thierry laurent for a topic
Hi folks, if everything is going right we will get another aftermarket option as somebody is working on full resin turrets with dimension corrections. The set is still at the prototype and technical feasibility step, so we will need to be patient if we do not want to take the vacform route. However, at least this is good news for people looking for another alternative. Hopefully, we will get some news in the future. Hope this helps Thierry4 points -

Polikarpov UTI-4
corsairlada and 3 others reacted to Alain Gadbois for a topic
Thank you very much! I worked on the instrument panels this week end, but things did not go as smoothly as planned! First, I managed to lose the upper part of the front instrument panel. I was tracing the position of the various instruments on the panel sections and suddenly that part was nowhere to be seen and was never found after searching all over the place! No big problem, as it is a simple shape, but not fun. Then after I finished punching the openings in the rear panel and starting on the lower front one, I realized did not like the overall look. I felt the openings were a bit too large compared to references. So I redid these sections also and used the next smaller size punch for the holes and the overall look was much better. I added various knobs and details also. Now I have to figure out what color to use for the panels. The Finish aircraft has light green panels, but the interior was repainted so this may not be accurate for a Soviet aircraft. All I-16 panels are black so it is logical that these would be black also. There are no photos of UTI-4 cockpits I know of. I started looking at the front cowl and prop parts, and found the spinner to be quite ill fitting. As you can see, there is way too much space in between the spinner and the cowl so some work will be needed there. Also the lower intake (left of cowl in photo) sticks out so much that the prop would hit so I shaved off the excess and I will have to hollow the opening. That's it for tonight! Alain4 points -

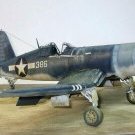
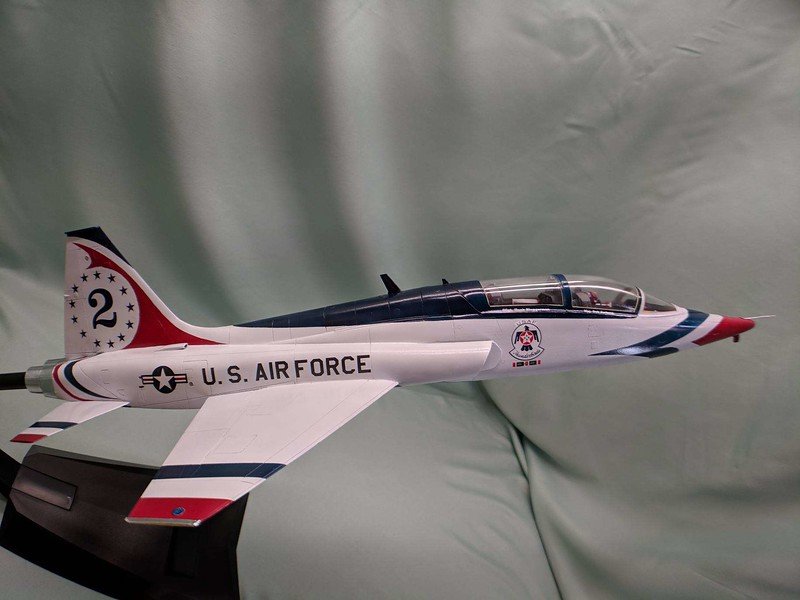
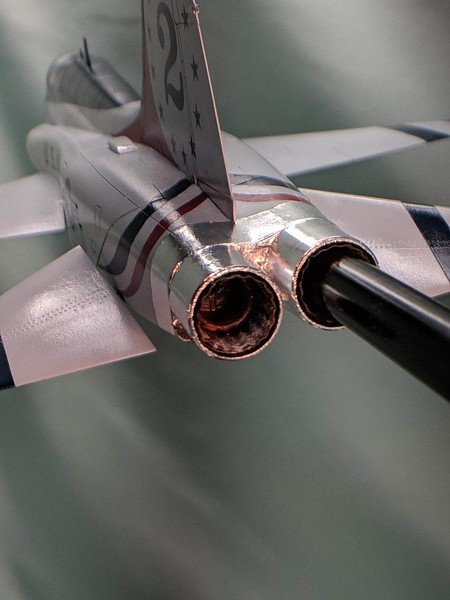
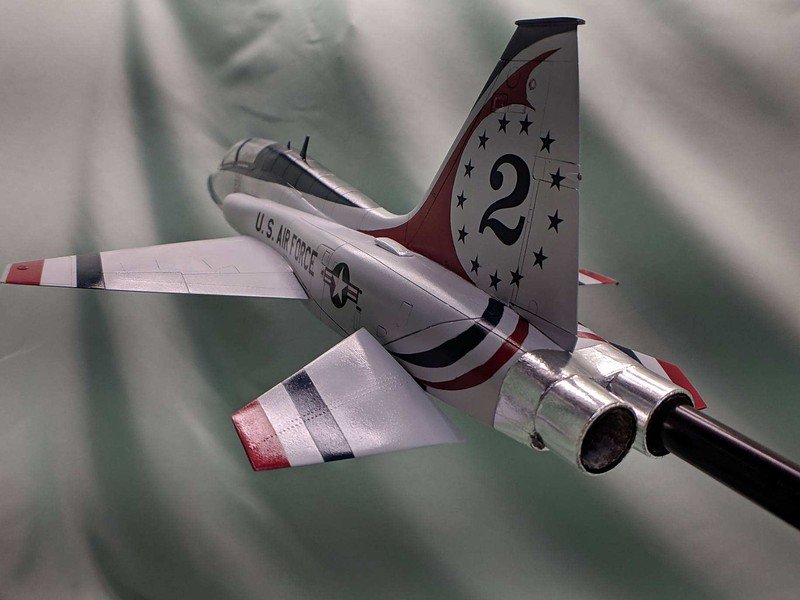
1/32 T-38A Thunderbird Completed
Trak-Tor and 3 others reacted to themongoose for a topic
Time for the air show to start. I know many of you waited in line for some time to see it To date this is my best effort for a paint job. There's one photo over the wing where you can see the reflection of the US Air Force lettering in the wing! All the little parts came together without me dropping 1 spot of glue on the finished paint. I've only got one problem and that's the front canopy. I think it's got dust on the inside of the canopy. At some point I may have to strip it and redo it completely. I tried to future it again and that hasn't worked. 2 out of 3 aint bad. It was fine after the primer so I'm lost as to what happened but it's recoverable. The rivets and panels look crisp I think. The decals are a mix of Kitty Hawk F-5F and the Tamiya F-4 Phantom from CamPro. They all went on sweet with no silvering. The paint is wet sanded to 12000 grit with a sponge. It's all MCW lacquer paint 60/40 with MrColor Leveling Thinner. I used BMF Chrome for the pitot, wing tips, and exhaust. I sprayed some clear blue and red in the exhaust to try and get some afterburner type exhaust look for the inflight pose. Here's a few teasers as an intro to the RFI page. Many thanks to all of you who followed along and to everyone who posted suggestions, ideas, and guidance and support along the way. I've definitely made an improvement in my modeling skills throughout this whole build with everyone's help!4 points -
I wish they'd do something with some style and grace ...4 points
-

Hobby Boss P-61 1/32 built as an "A" model finished
Hartmann52 and 2 others reacted to bcordes for a topic
Hello, it took me one year to finish this kit and I tried to build it as correct as I could. I used quite a lot of after market stuff, such as the Eduard BIGED, the Avionix sets for the Cockpit, the wheels are Eduard Brassin for the B-25, the engines Brassin for the Corsair. The oxygen bottles in the wheel wells are 3D printed. The markings are painted and the nose art decals are custom made. I hope you like it! Cheers, Bodo3 points -
P40b trumpeter 1/32
Durangokid and 2 others reacted to pascal JMW for a topic
hello guy's my last one just finish ..... P40b trumpeter (my second one and the last one ) cockpit resin cutting edge , wheels resin , photo etched Eduard , model master gun's , Eagle strike decal for the shark mouth and roundels , all numbers as well as the green circle are painted because the decals fell into pieces in the water..... painting cocktail humbrol gunze and tamiya divers wash pigments , and watercolor pencils for the weathering the 75 white squadron leader Bill Reed for fun with the comic book and dedication of the author best regard Pascal .3 points -
Ok ladys and gent's, Now that i have to wait to finish the swordfish it's time to start another animal, a kingfisher this time. When i saw this one for the first time I immediatly fell in love. What a beautiful airplane. It is my first Kitty Hawk kit so I don't really know what to expect. Off course I have read some WIP's so I know there are some things that require some extra attention. Bottomline is that it is just some plastic with a little PE so wat can go wrong? Of course i have some PE for this bird. In fact I have the Big Ed set and that is al the PE there is. I really like the PE but sometimes I wonder what Eduard is thinking. Flat ignitionwires?? In my opinion they can leave this behind. I have rather no ignitionwires than flat ones. I will use leadwire instead or copperwire. The color scheme I like the most is the one below. Instead of the yellow wings I will intend to paint blue wings, like the boxart. One thing that I don't know is what brand of paint Kitty Hawk uses for there kits. I will use Mr Hobby Aqueous but i would like to know if I have the correct numbers. Those anyone of you guys know what paint they use? I will keep you posted with weekly updates and hope to make this my best model (as I hope for each model ) Thanks for watching Ferry3 points
-

F4U-1 VMF-124 2nd Lt. Keneth A. Walsh
Loach Driver and 2 others reacted to Miloslav1956 for a topic
Hi all, 10. Hog finished 1/32 Tamiya HGW wet transfers & seat belts Barracuda wheels Eagle cals only Number 13 Painting mask home made All colours Mr.Paint/MRP3 points -
F4U-1 Birdcage, Lt.J.A. Adam Halford 1/32 Tamiya
Eenyweeny and 2 others reacted to Miloslav1956 for a topic
9th Hog finished. HGW wet transfers & seat belts Barracuda wheels Maketar mask All colours Mr.Paint/MRP3 points -
Tamiya F-16C conversion to F-16A
florin13 and 2 others reacted to Durangokid for a topic
3 points -

Make the others jealous
Anthony in NZ and 2 others reacted to dutik for a topic
Nice haul! They asked me to provide some photos for their next book and I could not resist to send them a bucketload of images... Stay tuned! Regards - dutik3 points -
A few more photos of the progress: IMG_1080 by Ernest Roth Close ups of the radio/radar equipment and the one of the MDC seats. I took the small handle from the kit seats and glued it on the MDC one, the pilot's seat was also done that way. IMG_1081 by Ernest Roth Nose wheel bay after a base coat of RLM 02 IMG_1082 by Ernest Roth And after some detail painting is complete. IMG_1085 by Ernest Roth Radio/radar equipment. I added a rough third scope to the FuG 212 receiver, I still need to scratchbuild the hood. I did not have any decals to replicate the Peil G 6 (located at the bottom center of the rack) so I used an old piece of PE to somewhat simulate the dial face and dry brushed it. Not perfect but does look a bit like the real thing. More to follow:3 points
-
BIG Stuka - Airfix 1/24 finished
Gisbod and 2 others reacted to Sir Spendalot for a topic
Beautiful job Guy! Not wanting to hijack your post but seeing the engine and cockpit photos reminded me that I have pictures taken from an article written by the pattern maker (Pat Tranfield) for this kit. These first two show the patterns built at 1/12 scale: And this last one is Pat's own final kit build. His son still has this actual built kit. If you're interested, the full article is here: https://www.largescaleplanes.com/articles/article.php?aid=3276 Cheers Paul3 points -
themongoose is nxet over the line with his coverted T-38A Talon. Great wokrk.'' Link to build thread; https://forum.largescaleplanes.com/index.php?/topic/78269-132-t-38a-thunderbird-completed/


 3 points
 -
well seen ! the rectification is made3 points
-

WNW Handley Page 0/400
Rick Griewski and 2 others reacted to LSP_Ray for a topic
Could always go with the Floh:3 points -

Cold War Studio
Smokey and 2 others reacted to ShelbyGT500 for a topic
Well here is a "beta" or "demo" version of photo-etched parts for interior/exterior of Mig-29 A/UB 1/32 scale for trumpeter kit: When the final etched product is ready I will upload more pics P.S.: Many Thanks Luca for your support but for now this project is under "freezzz" because new trump kits are much better than revell one . . .3 points -
PCM 1/32 Tempest Build
Seversky and 2 others reacted to alaninaustria for a topic
Well, made some headway today - gear and gear doors attached, plus droptanks. The wheels are all mounted as well. Getting there - slowly but surely! Had some fogging of sorts on the inside of the main windscreen - not really sure how that all happened, but it did. I’ll be leaving it as is. Cheers Alan3 points -
Got all the fiddly bits on and did all the masking so she’s almost ready to paint. Not sure if people still use this method but I used the old school, wet facial tissue (Kleenex) method for masking. Quite simple and works well. Just gently stuff the facial tissue in and use water to soften it so it conforms to the edges. A couple dabs of masking fluid will keep any edges from lifting when you spray. Cockpit required some masking tape (Tamiya) with masking fluid to close up any holes. Landing gear assembly wrapped. I knew there was no way I could drill a hole in the kit antenna mast so I first drilled the hole in some .015 card stock and then cut the mast out around it. A tad bigger than the kit part but it looks good. Next, I’m going to do some paint tests to determine if I’m going to use acrylics or enamels. I’m not fond of acrylics but what little experimenting I’ve done with hair spray chipping it’s easier than my old way of chipping enamels which amounted to nothing more than putting down a coat of aluminum first and then scraping the enamel with a knife. I plan to post pictures of my paint tests and have the model painted and ready to decal by the first week of April.3 points
-

Make the others jealous
Anthony in NZ and 2 others reacted to misha71 for a topic
it's time for update my new tools 20190313_215816 by mikheil Rochikashvili, on Flickr 20190313_215730 by mikheil Rochikashvili, on Flickr3 points -

Tamiya 1/32 F-16CJ
Mel and one other reacted to miketippingmodels for a topic
Hi Guys let me introduce you to the Tamiya F-16 CJ, the kit was dream to build no issues what so ever, this was also my first Time using MRP paints, and I have to say they are a dream to use, just brilliant. the kit has the Aires cockpit and undercarriage, and I used a reed oak fire along with a PG productions figure, the decals are from fox 1 vipers on guard. enjoy Mike2 points -

WNW Handley Page 0/400
wunwinglow and one other reacted to ringleheim for a topic
Part of the fascination with WWI aviation, for me at least, is the fact that no one really knew what a winning airplane design looked like at that time. Everyone was making all kinds of designs all over the map, and evolution had yet to weed out the bad designs and home in on the good ones. It gives us a world of rich diversity to model. It reminds me of earlier times in Formula One racing, where the regulations weren't nearly as strict as they are now, and you could easily identify the different cars even if they were in silhouette form, b/c they all looked quite a bit different to one another. Each maker was going down a different experimental development path, and no one was quite sure what the winning formula was. The early '90s were a good era for that, for example. Good luck doing that with the current F1 cars; paint them all black, take off the sponsorship, and tell me which is which!2 points -

LEM Mig -9 FINISHED
coogrfan and one other reacted to blackbetty for a topic
the quality is pretty good, no bubbles i see. i expect the same as with their Su-22 that i built. i always start with pinning the main assemblies: 02 by karl holubar, auf Flickr on the fuselage i used resin pourblocks cut to shape and pinned to get something to mount the wings on 03 by karl holubar, auf Flickr stay tuned...2 points -
Did a test and Bondic can be tinted with Tamiya clear colors. It does harden but when I rubbed my finger over it it lost it's shine but a tiny but of clear gloss or Future took care of that.2 points
-
First test shot's of DACO's new Fouga Magister.
David66 and one other reacted to thierry laurent for a topic
The test shot kit is a tail sitter as it has no nose nor canopy parts. You have the Marbore engines in the rear section but except that most of the parts are intended for the front fuselage area. So, this should not be an issue. ... and in the worst case, you can still put some leads in the front end of the wing tip tanks!2 points -

Hobbyboss B-24: no turret fix in sight
D.B. Andrus and one other reacted to LSP_Ron for a topic
You may want to consider opening a thread on the Vendors board to promote your turrets also? Just a thought. Ron2 points -
Revell 1/32 F4U Corsair - DONE!
Out2gtcha and one other reacted to themongoose for a topic
Getting the office organized. No PE was lost in the making of this cockpit. I know you are all concerned LOL I made the frame to hang the seat on from some 0.8mm rod. The Revell seat and headrest were molded on so they got cut off with the trusty razor knife. Got everything primed by lunch. Off to do some work at the parents now. I leave you with this thought...Is Pappy a Russian Nesting Doll?2 points -

75 Sqn RNZAF Mosquito Detailed Build
Greg W and one other reacted to Anthony in NZ for a topic
Setting up the correct location (this isnt the correct location, just placed in the gap for test fitting etc)for the oil tank and made new lower tank mounts and added some Eduard etch. Progress is painfully slow I know....2 points -

Frank, George's Brother
Pfuf and one other reacted to Bruce_Crosby for a topic
Hi Guys, Some more progress on the Frank. I couldn't make my mind up about the colour of the spinner and tried red first, looked beautiful but not right. So its been repainted in a few shades of metal, once again all Mission Models. The reference photos show the guns in place for load and trim I suppose, but the gun sight isn't fitted, so that's how I'll finish the model eventually. The Prop in red: Untitled by Bruce Crosby, on Flickr And all metal: Untitled by Bruce Crosby, on Flickr The canopy popped in place for now: Untitled by Bruce Crosby, on Flickr Trying the engine and prop: Untitled by Bruce Crosby, on Flickr Still lots to do! Untitled by Bruce Crosby, on Flickr Untitled by Bruce Crosby, on Flickr Untitled by Bruce Crosby, on Flickr Regards, Bruce Crosby2 points -
Thanks Brian, Ray and er.. the mongoose I’m on a roll at the moment and can’t leave the kit alone. It’s just too much fun! Airfix does give the option of showing off the gun bays and I’m doing just that on one side. I’ve added a little detail and I’ve used a Master Barrel MG as a 21st century twist. It really is a huge leap over the kit part. Cheers, Guy2 points
-
1/32 T-38A Thunderbird Completed
blackbetty and one other reacted to themongoose for a topic
After looking at the gallery of pics I thought it might be neat to see the progression of the major modification to get the profile to really look like a T-38. Here's how the fuselage came together. Also, I did make a mold of the nose before I finished it up so for those of you who expressed some interest let me know if you'd like a copy in the future.2 points -
I plan to paint this model in the newer all over grey scheme with Three Squadron markings. It will make for a reasonably boring jet as I don’t plan on having anything hanging off it yet in the way of ordnance. My good mate Peter sent me some excellent clear photos that he took of an F-35 parked at the Australian International Airshow held recently. This jet had really cool exhaust and intake bungs installed with colourful 3 SQN logos painted on them and they will add a great splash of colour to the jet. Now, I dont usually like putting these things on my models as any good jet modeller will go the hard yards to sort out intakes and exhausts which are usually amongst the hardest part of a jet model. I reckon it is a way of chickening out of that part of the build but in this case I will make an exception. Here are the pics (with permission from Peter, thanks mate!) I am am not aware of the existence of the bungs in this scale so have set about creating my own. Due to my experience gained with the nose art on my Boomerang build, I will be creating spray masks for the logos painted on them. I cut out a circle of thick plastic card that fit into the exhaust pipe. A suitable quantity of Tamiya epoxy putty was mixed to form the area which I would be sculpting The putty was stuck to the plastic circle and shaped to fit it, then smoothed over with Mr thinner painted on with a brush. Not sure why the scissors are making an appearance here. I used various tools to sculpt the ripples in the surface of the bung and scribed a line around its edge as per the pics. Primed, smoothed, primed again...... Should look great painted. I will add the pull handles after this process.2 points


