Leaderboard

Popular Content
Showing content with the highest reputation on 03/21/2022 in all areas
-
Here is my last built, long and not easy. It took me many years to complete it with long no works periods. Only changed the kit main landing gear legs with G-Factor ones. Main markings are painted with home made masks.10 points
-

Sopwith Camel US Air Service
Durangokid and 8 others reacted to scvrobeson for a topic
Even though I had finished this build back right before the New Year, I had completely forgotten to take photos of it until this weekend. It's the wonderful WnW kit, completed with HGW seatbelts, Barracuda resin seat, and the HGW PE propellers for the Cooper bombs. Painted with a mix of Tamiya, Gunze, and MRP colors. Rigging done with a mix of Gaspatch terminals, Prym thread, and Model-kasten elastic thread. Let me know what you think. That rigging bullet took years off of my life Matt9 points -

1:18 21st Century P-51D Conversion to "B" Model With Metal Finish
JeepsGunsTanks and 6 others reacted to patricksparks for a topic
Almost have the entire fuselage covered, still have to cover the forward part or the radiator scoop and put on the filets for the wings and stabs.... Pretty funny, I noticed right away that the second side of the fuselage aluminum looked much better than the first side, learning curve.. for sure !!!7 points -
She has legs! Still a bunch of little things to do and it needs a flat coat.6 points
-
Anyone out there like pin-ups?
Michael931080 and 4 others reacted to Timmy! for a topic
As always I have a side project in the wings. This one is part of a new side hustle I'm working on. This pin-up, a simplified and recolored painting by Art Frahm, will be painted on one of my HPV's. The "Miss Dropped" is fictional title but it means a lot to me, the story attached I'll only share when we share a beer to twelve. Anywho, I'd thought a few of you might enjoy this. Disclaimer, this artwork will be used to make physical masks for painting so I didn't do any digital paint work. Thanks for looking, hope you enjoyed the view. Timmy!5 points -
.thumb.jpg.8c06f26b72413f225c9d0a29e5748f69.jpg)
FM-2 Wildcat 1/32
TAG and 4 others reacted to Vince Blackburn for a topic
Evening all With the paint work completed it was time to use the masks my mate had made for me (You know who you are thank very much for the speedy job) where upon disaster struck not once but twice the vinyl masks were originally too sticky pulling off sheets of the carefully laid on paint scheme. After de tacking the vinyl masks I now faced the almost impossible task of laying a flat mask on a surface that curves in two directions at once, this then destroyed two of the masks before getting one on which still didn't fit correctly. It just made sense to use some decals from the spares box, even here it took several passes with Sol to make sure it settled down properly on the fuselage side. Not deterred by my earlier experience it was time to de tack the number 20's until they had almost no stick at all this was then sprayed with Tamiya LP-60 Nato Black. The three number 20s on the cowling were chosen 1st as if it went wrong this would have been an easier option to re spray, all went well and flushed with success it was straight on to the fuselage numbers then followed by the tail codes So that the Star and Bar matched the fuselage both wings had decals put on the top and bottom instead of using the masks supplied To finish this session the Grey was sprayed towards the fuselage Star and Bar giving a much neater final look5 points -

Kotare 1/32 Spitfire Mk.Ia (Mid), with Mk.I (Early) and Mk.Va announced
KiwiZac and 4 others reacted to Smokeyforgothispassword for a topic
A Strikemaster would be right up my alley, but I’m happy enough to see the Spit sell like hotcakes so they can fund whatever they develop next.5 points -

F4-F Joe Foss- Top Score Ace
mywifehatesmodels and 4 others reacted to Daniel Iscold for a topic
Revised F4-F from Trumpeter, not a shake and bake project. To improve the model I take the EDUARD PE fret, some scracht build for the interior and home made resin copies of the rubber tires. Hope you like it!5 points -

****Finished**** 1/32 Great Wall Hobby - P-40 Curtiss Hawk "Flying Tigers"
Starfighter Jock and 3 others reacted to Tolga ULGUR for a topic
Hello everyone, In the end decided to start this, here we go... First beginnings shots from work in progress..4 points -

KopeckyScaleModels
Youngtiger1 and 3 others reacted to CruZz for a topic
Hello all. I´m thinkink about upgrade set of my 1/32 F-15E upgrade cockpit set. :-D . What you think about this Idea? I dont thought that IP panels will be needed when I made the Cockpit set but now, when I´m slowly building my own F-15E I´m realized, then they are needed... In set can be front and aft IP panels, 2 variants of UFC and separate buttons and knobs. I think this set can be used with or without my cockpit set. And note about packages.... I´m casting and printing thru days and nights... 17 orders were sent last Thursday. Another more that 10 will be send tomorrow... and rest to end of the week. Thank you for your patience. Cheers, JAN4 points -

Tamiya 1/32 P-51D/K "Mrs. Bonnie"
Greg W and 3 others reacted to Phil Smith for a topic
Moving on to the guns. The kit parts were modified with some details, including brass bits from Japan-based Super Wings Options that provide excellent three-dimensional detail for the barrels in particular. I also added assorted details from my scrounge box, as well as wiring and cables, with attention given to connections to the solenoids used to enable actuation of the guns. The kit comes with the trays and feed cartridges for the bullets, which were a bear to paint but I’m generally satisfied with the results. The bays were painted zinc chromate, the guns primed with Tamiya Surface Primer and painted with Alclad II Gunmetal. Bullets were painted with Testors gold, a bottle I’ve had for ages and finally got a chance to use4 points -
Hi at all here the progress of the cockpit I painted it, I paint the dashboard realistic so I can with the specific metal effect here some pics regards Marcel4 points
-
TFC's Bearcat
Greg W and 3 others reacted to Nighthawk Calling 1 for a topic
So a long over due update, the main airframe is built up, the main concentration has been the engine but progress has been slow over the winter.The engine photo shows the front bank getting the ignition harness the rest will be added in due course. Once the engine is done the undercarriage will get hydraulic lines and paint as well as wheels. Sorry photo are not the best and hopefully more to come as work moves along now spring and the warmer weather is soon upon us.4 points -

RAF FG.1 XV571 WILD HARE Phantom Conversion
vvwse4 and 3 others reacted to Anthony in NZ for a topic
So now what are we dealing with as regards cockpits, converting them and where to start?? Top to bottom Black Box/Avionix rear cockpit tub Aires F-4J/S cockpit set Kit parts in basic form My first issue is the Aires and Kit parts on the left side as the right and rear are practically the same. The wall/shelf that all of this equipment sit on is far too high, look how much lower the B Box one is (by the way, the detail on this is superb), this is correct essentially for a 'J' but not a Brit Toom, there is a whole panel in the 'J' here that is non existent in the FG.1 So I cut the forward shelf piece down by about 1/3 to what seems the correct height and found a piece out of my spares box that will make a good start for my Accumulator (or whatever it is) box You can just see at the top of this pic that I have removed another control panel that was on the sidewall and blended it in to look like the lining. A couple of wires yet to add. Finally the right side is pretty much as per the kit and resin sets Phew.... Now I just thought I should post my findings as I go so I dont look back and wonder what I did. Cheers Anthony4 points -
SBD-3 From Coral Sea Batle
BrentE and 2 others reacted to Daniel Iscold for a topic
No aftermarkets at all, they are discontinued or too expensive to buy. To improve interior detail I used, evergreen styrene, spare parts and lead foil for seat belts. The internal area of the dive brake was detailed using styrene strips cut to the shape. My references comes from Squadron´s Walk Around series book . Hope you like it.3 points -
Gentlemen, This sheet will be sent to Microscale for a quote within the next few days. Retail will be $20 and we hope to have it ready to ship within the next several weeks.3 points
-
Revell 1/32 Hawker Hunter + KMC Interior
Greg W and 2 others reacted to Daniel Iscold for a topic
This is a sweet model. Take me a year to finhish since I had to wait for the resin parts to finish it. Thanks Amy (sister in law who brought me these parts from US) Hope you like it3 points -
Finally, the Special Hobby 1/32 P-400 is complete! This kit is pretty rough and is more or less and upscaled version of the Eduard 1/48th scale P-39. As such, it doesn't fit together all that well, and the details are pretty chunky. To make matters worse, both the build and the paint processes fought me at pretty much every turn. This is the second time I started a SH P-39 of some variety... the first attempt yielded me nothing more than a paint mule because the kit fit is so lousy. In any case, I'm really happy with how it ultimately turned out, though it took ~6 months to get here. I added the Eduard PE seatbelt and interior set and used a set of Montex masks for the goofy-but-historically-accurate shark's mouth. Is it perfect? No, but I'm pretty stoked. This is meant to represent an aircraft of the 67th Fighter Squadron as it fought desperately to hold the line against the Japanese on Guadalcanal. The P-400 is the British export version of the P-39 and featured a 20mm Hispano Suiza cannon in place of the more traditional 37mm refrigerator thrower. Rejected by the British, they were transferred to the USAAF who dubbed them (no doubt tongue-in-cheek) P-400's because that's supposedly the top speed the aircraft was supposed to be able to reach. P-39s and P-400s were handled roughly by the Japanese in the Guadalcanal campaign, and without a supercharger, they couldn't climb high enough to hit the bombers they were built to intercept. Nevertheless, their pilots fought valiantly despite their fighters' inferiority and were pivotal in stopping the Japanese advance in the SW Pacific. I have a thing for underdogs and the P-39/P-400 is pretty much defines "underdog." There's a saying that goes, "the P-40 and P-39 didn't win the war, but they sure as hell made sure we didn't lose it."3 points
-
Greetings friends and colleagues, due to russia's invasion of Ukraine, our creativity and production has been temporarily suspended. Also, for unclear reasons, my account Andriy Lemkitscom has been blocked. This is my new account https://www.facebook.com/profile.php?id=100078835746984 and for now I will try to maintain the page through it. https://www.facebook.com/LemKits-484686405198939 https://www.facebook.com/LemKits Many thanks to everyone who offered me support, from the bottom of my heart. Truth is on our side and with Faith in God and our Army we will fight. Sincerely, Andriy Zimenko.3 points
-
Hello my fellow LSP members, its back to this little guy after being pushed to the back burner for a while. The new Eagle Cal yellow 1 and group marking decals have been successfully reapplied along with the two large score board decals on the rudder (from the same Eagle Cal sheet), all bedded down nicely and look great. The crosses for the upper wings however performed just like the ones from my original E.C. decal sheet. After three failed attemps to get a good result, I decided to order a Montex mask set for those. For some strange reason, all of the other markings behaved but the wing crosses on two different sheets would not settle down properly and the clear film over the top dissolved producing deep craters. Never had this happen before. One would think that all of the decals on a sheet would behave in a similar fashion... odd. It was high time I used a vinyl mask set in anger anyway. Here are the results of my first attempt: Paint used: Tamiya XF-1 Flat Black and XF-2 Flat White thinned 1:1 with 70% Isopropyl Alcohol. Some over taping means a minor touch up on the left wing but I definitely benefited from beginners luck! Very happy with the outcome.3 points
-
A 1/32 Betty would be sweet.3 points
-
Maybe HKM will throw out a Betty?! ... They are the go-to manufacturer for BIG birds. I'm just glad we'll finally have a full line up of early war IJN Carrier birds Rog3 points
-
Thank you so much for your support. Thanks to all the Countries and People who support us. We have always believed in universal human values and now we are fighting for them. Believe in us...3 points
-

EA-6B Prowler (02 April: Done!)
John1 and 2 others reacted to easixpedro for a topic
Quick update. Here’s how I make the cross deck pendant, aka arresting gear. Take a couple of wires and chuck ‘em in a drill to wrap/twist them up. And a couple of teaser shots. Think she’s done. Need to give it a good once over for final bits, but it’s only 1 or 2 if that. RFI pics when I get the chance. Thanks for following along folks, always appreciate the comments and encouragement. Definite motivation and what I love about this joint. Now to figure out if I get after the Huey, Crusader or Liberator. Honestly might be the F-8 just as it requires the least effort after a 2 year build. More soon! -Peter3 points -
I started work on a 3D printed Wasp Junior engine, and this topic will give me space to write about the challenges involved. I've seen a lot of nicely done radial engines here, usually involving added wiring detail, so I started this project out of curiosity. Could I 3D print the whole engine, including the wiring? This engine project isn't designed to fit a particular airplane, which means the mounting system and exhaust system will need to be adjusted to fit. My goal is to build the engine with "short stack" exhausts and no mounting ring. Here are some repeat photos from the original Wasp Jr. thread. First, a CAD rendering of the forward engine block. I'm using AC3D for the CAD. Next, a print of the block and one cylinder. This was the first attempt. I fixed a couple things and printed again. Here is a screenshot of the slicing step, using Chitubox 1.91 for slicing. I only had to design the cylinder once and after adding supports I cloned it eight more times. Here is the support system I'm using for the ignition ring and wires. This is by far the most fragile shape I've printed. I ruined the first one while trying to remove the supports, so for this attempt I moved the supports a bit to make them easier to remove later. Here is one of the ignition ring parts after printing. I removed most of the supports while the part was still pliable, then I put them in the curing box for the final curing step. Here's a recap of the equipment I'm using: CAD: AC3D Slicer: Chitubox 1.91 Printer: Elegoo Mars 2 Pro Resin: Elegoo standard grey -- Dave2 points
-

AS 532 AL Cougar CSAR Bulgarian Air Force
Aluxe and one other reacted to ShelbyGT500 for a topic
Hello friends Here is my next project. The inspiration is this beauty: The model is 1/32 scale old Matchbox since 1981, repacked from Revell with new decals and e few new parts. In the box we find a Puma SA 330, which is a good base to build a Cougar or Super Puma. There is no AM for that model, so for the build I've used a lot of polistyrol sheets, tamiya epoxy putty, plastic, resin, photo-etched parts for the scratch. So I reworked the all exterior/interior - almost every part was re-worked or replaced with new one. For painting I've used tamiya acrylics and alclads as always. For the minimal weathering - oils, filters and washes. And here is the beauty, hope you will like it: Thank you guys for stopping by, as always and Cheers2 points -
1:18 21st Century P-51D Conversion to "B" Model With Metal Finish
patricksparks and one other reacted to Vince Blackburn for a topic
Love it2 points -
Canvas cover was khaki. One can see the wheel wells underneath in zinc chromate… or Curtiss light green. HTH, Quang2 points
-
I hadn't considered them producing a Strikemaster, but I'd love to see one, including parts to build a Jet Provost T.5.2 points
-
RAF FG.1 XV571 WILD HARE Phantom Conversion
Anthony in NZ and one other reacted to easixpedro for a topic
Oh, this is going to be great! Off to a wonderful start in the pit! Always fascinating to the the changes amongst the variants. The O2 panel looks just like the one from the B version... -Peter2 points -
EA-6B Prowler (02 April: Done!)
mc65 and one other reacted to easixpedro for a topic
Thanks for all the comments folks! Was going to take pics this weekend, but got hit with a stomach bug and was laid up for most of it. Will see if I can find time this week. Might even try to use (if she agrees) the Missus' fancy camera vice the ol' cell phone. For OBG, the RAT (Ram Air Turbine) on each pod starts spinning at roughly 80 knots. Fascinating thing about them is that they spin at a constant RPM, no matter the airspeed. Amazing feat of engineering, when you consider they were designed in the mid-60s using slide rules and old school engineering techniques. One of the issues with the new Next Generation Jammers (NGJ) that's supposed to replace them, is that it took them forever to figure out how to power the pods and do it as efficiently as the RAT on these pods. Won't go into further detail, but suffice to say they've been talking about them since I was flying the plane this model depicts... Kind of amazing to think that the original 1960s--middle of Vietnam War weapons system is still flying and being used operationally. -Peter2 points -
Thanks Maru. Appreciate the comment. Well, the front end has been emotional. Every print is 11-12 days in duration. Fourth times a charm, apparently. This is the result after the learning curve. After cleanup, here’s the rear of the front end of the various versions. Those squares are 1” by 1”, being squares and all. This shows the revised front end. Now dry mated to the rear end & on the build board. Rear view. Can finally move on after printing since the end of last year! Thanks for stopping by.2 points
-
I just want to say all of you are amazing at this craft—each of you creating models within the model. I feel fortunate to actually see what I’m learning to do. Thanks!2 points
-
That's my hope - a range of P-40s (with RNZAF markings) would be amazing.2 points
-
Excellent stuff Ants, I'm excited to see you work your magic!2 points
-
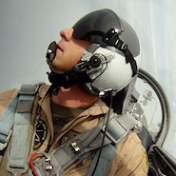
During wartime NBC conditions, the aircrew would use an AR5 respirator, which included an integral oxygen mask, was worn under the helmet as part of his flying clothing (AEA), and was powered by a portable battery powered respirator (the large round hand-held cannister in the images below) to provide ventilation and clean air. The pilot would board the aircraft with this equipment prior to taxi and take off. What I am not certain of, is if the aircraft cockpit was modified to accept the AR5 respirator equipment, which, as can be seen, is not exactly small! Derek2 points
-
Bravo Matt, she is gorgeous! Of all the models I have built over the years, a few have parts or assemblies I will never forget. That rigging bullet is near the top of that list! Just clipping it off of the spruce and cleaning up the spruce attachment point gave me so much anxiety!2 points
-

1/18 Scale Blue Box F4U-1A Corsair Modification
daHeld and one other reacted to Oldbaldguy for a topic
Wow. Vought engineering strikes again. It’s like the designers were being paid by the parts count. Thanks for clearing that up.2 points -

Kotare 1/32 Spitfire Mk.Ia (Mid), with Mk.I (Early) and Mk.Va announced
Royboy and one other reacted to adameliclem for a topic
Yep, and they stated that they want to make kits appealing to a wide age-range of builders, including very young ones. Allowing that there are prodigies out there, building and painting highly detailed engine assemblies is usually not kids stuff, and it can be a mojo-killer for the experienced even when everything works. Can’t wait to see the test shots for this one. Cheers, Adam2 points -

Border Models Lancaster is just a day away
scvrobeson and one other reacted to cbk57 for a topic
I watched some of this video and this model is perfect for a group build, however what I mean is a group buys it and splits the models sub assemblies up among 5 or 10 people and combine it all then weather it into an integrated whole. Thanks for showing the instructions that is always the part I want to see when looking at new release kits.2 points -
thanks Maru, nice footage! for some reason I never think of looking for movies too, when documentary material accumulates on my workbench... and thank you too, Ernest! I didn't know about the Aires gun bays set, looking at it I guess it also has a problem of weapons wrong placement and anyway it's too late to eventually install it, I gluded the upper and lower wing part. this thing about the weapons in the wrong position disappointed me not a little, how the hell is it possible to make a mistake like this on a plane so well documented? Anyway. I spent a nice evening tidying up as much as possible to this item. in the end not too much effort, just a little bit complicated, due to the wing already closed. here the new positioning of the outboard gun, with the kit's one filled with evergreen round stock on the right. I don't pretend to have done a perfect job, actually I should reposition also the inner one toward the fuselage, so to have both centered within the adjacent ribs. but since I'll go to putty up the forward 40% of the wing, I hope to disguise the problem. you know, the best fish is caught in the murky waters! here a vintage photo that clearly shows the weapons correct location. then I returned to the ammo bays, locating and opening the square holes for the discharge of the ammo links and spent cartridges. I added some ribs (yet to be completed). ca va sans dire, also the ammo box are wrong, being too short. I'll fix it in the next session. cheers, Paolo.2 points
-

Su-25M1 Digital Camo Trumpeter 1:32
Nikola Topalov and one other reacted to Koralik for a topic
This is my first post in the LSP forum. I will start by greeting all forum members. Pleas find Below the very first models that I would like to present in the forum. They are made without any additional elements straight out the box. Set: Su-25 Frogfoot Trumpeter 1:32 Plane: Su-25M1 from Ukraine Air Force Painting: Sikkens Decal: Foxbot FBOT32001 Pitot Tubes: Master2 points -
F4UA-1 Coirsair Tamiya 1/32
Loach Driver and one other reacted to Daniel Iscold for a topic
What can I say about this model? Nothing... Just used masks to paint the stars ann bars. Enjoy the pictures. Hope you like it!!!2 points -
I just watched your unpacking, you're so cool and calm, I'd have been giggling laughing and crying Sorry cant talk...unpacking plastic2 points
-
RAF FG.1 XV571 WILD HARE Phantom Conversion
easixpedro and one other reacted to Anthony in NZ for a topic
Thanks Maru! Ok a bit of an update as the cockpits on Brit Tooms are simple yet different/complicated! I will explain. I have read on many forums the similarities to the Brit Toom cockpits being a mix of F-4B, J and C. I have spent most of the week studying this (as well as previous weeks) and I am only going to focus on the FG.1 as the FGR.2 is a whole other beast in the cockpit department. Rear cockpit first: I have to say a huge thank you to the BAPG and Tony Gigg on BM for their recent photo's. PBAG took some awesome pics of the back of XV582 (Black Mike FG.1), coupled with manuals available for free download on their FB page. These guys are awesome, along with the people on there, please support them and their bids to preserve several ex RAF Phantoms! Essentially the rear cockpit best matches a 'J' see some pics here courtesy of PBAG inside XV582 Right rear sidewall, with quilting removed, practically identical to 'J' Left rear sidewall, this is where things get different So the back end is pretty much 'J' from all the studies I have done (I am in no way purposing to be an expert, these are just my simple findings for us modellers) Now look at the front half I will do my best to explain in my simple terms.... Yellow circle is where a TESS Periscope goes through (more on that another day) Green circle is some sort of Accumulator box not seen on 'J's Blue circle is what is an AN/AJB7 & GVR10 Ground test switch/panel (whatever that all means LOL) Red circle is Oxygen controls, cabin altimeter, TACAN &V/UHF control panel (missing) So these seem to be the major differences for an RAF operated FG.1 post Mod's 408a &b. A RN operated one was very slightly different. As I say, I am no Phantom expert but am sharing what I am learning as I go in the hope it will be useful to future modellers On to the kit next update....2 points -
It is truly heartbreaking what is happening to your country Andriy, I've had the BBC news channel on almost constantly since the invasion started, keep expecting an announcement to say it's all a very, very, bad dream, but tragically it isn't, it is without doubt the worst thing I've witnessed in my life. I have no doubt also that Ukraine will come back stronger economically and culturally. Take care, every decent human being on the planet is behind you, Andy2 points
-
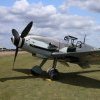
Ilmari Juutilainen´s Mersu. BF 109-G2
TenSeven and one other reacted to Daniel Iscold for a topic
Interesting subject to build and research. This model came from a close friend of mine as a gift. The parts, to reproduce the machine flew in the Libian desert was missing. Looking for other paint scheme I found the plane flown by the Finnish top ace Ilmari Juutilainen. During my research I learned that his plane, came from Germany wearing the stencis in german, later the Finnish air force translated them to they own language. Another friend desingned and cut the masks to paint the Finnland national markings. Hope you like it!!!2 points -
1:18 21st Century P-51D Conversion to "B" Model With Metal Finish
JayW and one other reacted to patricksparks for a topic
Starting to get more comfortable with the aluminum, the compound shapes of the cowling top and bottom were a bit of a learning curve, getting used to when to get the annealed aluminum verses the hardened... a lot of burnishing and sanding, then 0000 steel wool and embossing all the fasteners in... In retrospect I should have left the model as a "D" model instead of converting it as I would have only had to rebuild the cockpit area to more detail instead of spending all the time making a new spine and modifiying the wings, etc, etc, I only feel this way because I could have spent more of my time upfront on learning how to apply the aluminum skin instead of all the other mountains !!! Lessons learned.... not...2 points -
FIN. I hope you enjoy. Tomorrow I clean the workshop and get everything organized to kick off my entry into the Multi-Engine Group Build: A 1/32 rendition of the aircraft that came to be known as "Swamp Ghost."2 points
-
Exhausts were painted Vallejo Burnt Umber and weathered with black pastels and pencil graphite for a final sheen.2 points


.thumb.jpg.cd22b958c9e88a898a21e18b862c523e.jpg)


