Leaderboard
Popular Content
Showing content with the highest reputation on 01/03/2020 in all areas
-

ICM Gloster Gladiator —— new pictures !
Loach Driver and 15 others reacted to reconspit for a topic
Hello, happy new year to everyone... This is my first 2020 build..., well, I finished it today... ICM Gloster Gladiator, out of the box, with PJ Productions Pilot and rigging from EZ Line.... I‘ll post some more pictures in daylight tomorrow...—— DONE I was so surprised by this kit, now real flaws, very easy to build.... Hope you like it...16 points -
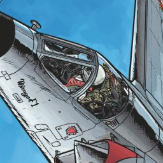
Hi Jason, so true, those Soviet twins in "our" scale would be great, as well as an Il-4. Thanks a lot! Christmas holiday means modeling time Sooner or later, the day will come when the fuselage halves get glued together. Before that, most interiors have to be done. One big challenge is the Martin 250 CE turret. I collected all photos I found, as well some handbooks and manuals. But I couldn't find one single scale drawing. The circumstance, that there were apparently variours versions of the turret with detail differneces doesn't make things easier. So, the end-result will contain some artistic licence and simplification. That's the current status of the 3d-model: I also took a closer look on the rear gunner station and realized that the end opening is way to narrow, so the rear section had to be redone. To make it fit to the rest of the fuselage, some comprises were still necassary. It's far from perfect, but hopefully better than the old part: The silver one is the old part Cheers Alex11 points
-
.thumb.jpg.f23b2dc356f90ead35d25aa5e3609a95.jpg)
1/48 Heinkel 111 H-3 ICM kit
chrish and 6 others reacted to Dart_Schatten for a topic
Happy New Year, friends! It's my first model in 2020. Heinkel is mostly OOTB. Paints are from Gunze.7 points -
Slowly goes it. Ok, fuselage looks pretty good on the upper surface. ...and not so good on the lower. Not sure how this happened, will require a larger hammer I think. Well I'll let that sit for a minute and put the wings together. Need to shim the inner part of the radiator flaps to clean up the gap. A little sanding here after the glue dries should do the trick.7 points
-
Today I made significant progress ok the 87, I gloss varnished it and applied the decals as soon as the varnish was dry. The right hand cross broke, but I was able to repair it with some care and a toothpick.6 points
-
This kit was talking to me throughout the CF 18 build, calling louder to me through the EA 18 G build, yelling at me through the 109 G10 build! I couldn't take it anymore I had to get a start on it. If I progress to the end (it'll be OOB) it'll be in the splinter scheme included in the instructions and markings.5 points
-

AIMS 1/32 Gloster Gladiator sets
Uncarina and 4 others reacted to Pastor John for a topic
Hi everyone just to wish you a Happy new year and to let you know that both the 1/32nd Gloster Gladiator decal sheets are available for sale now, each priced at £10.50. The upper aileron correction is also available at £5.00 and the engine set will be ready in a week or so (ran out of silicone for the Mk I engine cowl over the Christmas holidays) The engine/cowl set is £18.00. Photo etch bracing wires and landing flap sets should be a few weeks away. Enjoy and thanks for looking. Email me at aimsmodels1@gmail.com if interested in anything5 points -

Ki-45 Kai Hei Toryu: Completed
Dennis7423 and 4 others reacted to Uncarina for a topic
Something I forgot to mention, in case you don't do this already: the tail wheel strut comes in two halves, sandwiching the wheel. This means that the wheel must be trapped to remove the seam, making masking more complicated. I removed the axle completely, drilled holes where the axle fits, and retrofitted the wheel after joining the halves and painting the assembly: Cheers, Tom5 points -

Aviatik 'Berg' D.I
Trak-Tor and 4 others reacted to sandbagger for a topic
Hi all, The lower wings are fitted now. Given the wings are pinned into the fuselage at the trailing edge, but only supported at the leading edge by the front spar bracing bar 'resting' on the underside of the fuselage, it leaves the wings liable (with handling) to break free at the front and pivot down on the rear support pins. There didn't appear to be any additional bracing bar support fitted to the actual aircraft, so with 'poetic license' I've added 'U' tube supports over the bar (at the outer ends) and secured them into the fuselage underside. They should provide extra support for the wings and prevent 'break away' until the upper wing is finally fitted, Mike5 points -
Swordfish Mk.I Photos Restored
monthebiff and 4 others reacted to Uncarina for a topic
It has been an extremely long time since I worked on this build, which was shelved because I needed a replacement sprue from Trumpeter. Well, I just received the sprue, so maybe I will actually be finishing this! Cheers, Tom5 points -

Gloster Gladiator.....finished :)
Paul in Napier and 4 others reacted to mozart for a topic
Looking better! I'm working still on the firebird: This arrived in the post this morning: for a future conversion based on the Gladiator: Should be fun!!!5 points -

Fw190 V21 prototype
Kagemusha and 4 others reacted to Alain Gadbois for a topic
Hi all! Here is the work I have done on the top cowling parts. I have sanded the top section to obtain the correct slope. As you can see, this resulted in going completely through the plastic part where the bulges were located. The forward cowl section was extended by laminating many strips of thin styrene sheet. And from the side, we now have a straight line from the windscreen to the front of the cowl. There is still a small amount of material to remove where both parts touch, as the rear cowl section doesn't completely sit in its place. Now that the top profile is defined, the sides need to be shaped to get the shape of the the small bulge mainly visible in the first photo of V21 on page 1. Thanks all! Alain5 points -
Happy Holidays Everyone. I have finished up the major assembly, now getting ready for paint. The build was pretty smooth overall, but my biggest challenge was fitting the engine and nacelles to the wings. Naturally I deviated from the instructions when I probably shouldn't have: 1) I fitted each firewall to the wing/landing gear bays. Four struts need to be mated, and the upper two slot into holes which are buried from view, so this was tricky; I wiggled them into place. The lower two struts were much easier, and actually attach to the upper part of the landing gear. 2) I thought I was being smart by completely assembling the nacelles separately to ensure the best fit. Turns out this meant that three cooler vents on the inside of the top nacelle panel would not clear the engine; these had to be removed. Not a big deal since they cannot be seen, but I know they're not there! 3) I dry-fitted the engines to the firewall, then the nacelles over these. This meant the engines protruded to far forward, and the nacelles would not fully meet the cowl flaps and wing/landing gear bays. I finally cut back the centers of the firewalls (E-1 and E-16), and this solved the issue. I am excited to start on the camouflage! Cheers, Tom5 points
-
Aviatik 'Berg' D.I
LSP_Kevin and 3 others reacted to sandbagger for a topic
Hi all, I spotted that the upper surfaces of the lower wings, at the forward wing root area, had protective ‘walkways’ fitted, presumably to protect the wing surfaces from being damaged whilst the engine area was being worked on by ground crew (too far forward for pilot’s access). As no details of this could be found, I’ve assumed this was possibly reinforced plywood fitted under the lozenge linen wing covering or a thin metal design and fitted over the lozenge linen covering of the wings. I decided, more for aesthetics, that I'd use metal mesh from 'RB Productions', which was cut to share and secured in position using thin CA adhesive. They were then weathered using 'Flory Models' Dark Dirt and Grime clay washes and then dusted with pigments. Mike4 points -
Id agree with that! I have some of the Mig winter camo paint Ive been wanting to try to............and with the gorgeous set of REXx exhausts I have for it............. I just may have to go shopping for one next I have some coin!4 points
-
You used too much hair spray. Hair spray dissolves in water and then breaks the bond between the layers. If the hair spray is thick you wind up with what you're experiencing. You might want to do some experiments using different amounts of HS to see what works best.4 points
-
Nick, we were in our early twenties, and just wanted to rush off to the closest drinking and dancing dens! I dug up my reconnaissance file and now recall that: Scale = f (focal length)/ H (altitude). If I use a 100mm lens, I would have to be 3200mm away from the instrument panel to make a 1:32 scale representation. Seems too close. What do your Pilot Attack Instructor notes say? Servus Uwe, I will be mixing my own version of the colour, and I'm sure there will be some discussion around this point... Thanks Ryan, those are cool little extra's. You are right about the join at the inertia starter handle, and I will remove the moulded handle, then sand the join and only then add a handle. I am still busy putting some character into the skin, and will get to the rest soon. Wonderful to have your input Matsu, thanks! Kev, that Doyusha kit does look like it will be fun to build! As far as references, my personally owned Zero specific ones are these: I also refer to books such as John Dibbs' "Warbird Legends", and the relevant Osprey publications. The internet has some interesting avenues to disappear down, and I have found some very useful material on Japanese Instagram links to museums in Japan. The problem I find is that I spend more time staring at my computer screen than building the model . The Zero is challenging from a research point of view. There is so little untampered evidence left, that the (incorrectly) restored aircraft become the benchmark. Fortunately much has been done to subsequently correct this, and researchers like Ryan are busy changing our understanding of the subject. Enjoy it, Sean4 points
-
.thumb.png.84c5d3a464f2dd83f0ac37a5aac81ec8.png)
Forgotten War Mustang
Biggles87 and 3 others reacted to Antonio Argudo for a topic
Hi John, some pictures related to your last posts, some interesting gun stains on the wings, cheers and a Korean markings warbird4 points -

Yet Another Arcane Mustang Question - Korean War Upper Wing Stripes
Anthony in NZ and 3 others reacted to Finn for a topic
John this pic shows how far back the bottom stripe was: Jari4 points -
Sean, here are a few little details that might be added to the two fuselage halves. 1. Inertial Starter For the most part the kit has the starter crank hole and inertial starter release handle molded into the right side of lower wing part with only the recess for the handle molded into the right fuselage half. The seam split might make things a little awkward here but if you want to add to these detail… Incidentally, the start crank is usually stored clipped in behind the seat but in at least one photo (which of course I can’t find right now) the crank is in the landing gear lock / tie-down ring waiting to be used in a few minutes. 2. MG Sighting Access These indents on both sides of the fuselage could be drilled out. They were holes to allow a long screwdriver to be inserted to adjust the gun mounts for proper sighting. They did come with little clip on covers that were fitted on the inside of the fuselage but in most photos the covers are missing. My suspicion is they were discarded to allow some outside airflow into the cockpit. 3. Air Pressure Fill Valve The kit has a small circle scribed into the plastic on the left fuselage side to represent the air pressure filler valve location. An air line could be used to pressurize the wing cannon cocking and firing system. Again this hole was supposed to be given a small cover but again it was usually missing. The kit has a small rectangular bump molded into the plastic. This is where a small metal placard was attached to explain what this hole was for. 4. Gun Camera Lead The lower right fuselage had a small hole to accommodate the lead for the wing mounted gun camera. This camera was only used for training purposes so the hole very often was provided with a riveted cover. Whether it is left open or closed off it should be present in the right fuselage paneling. 5. Lifting Sling Mount Each side of the fuselage had four slotted screws in line with the Station 10 rib. A mount for a lifting sling could be attached into these screw holes but normally all that would be seen are the flat heads of the screws. 6. Tail Cone Panel The edge of the tail wheel well should be given a slight curvature. Both the Mitsubishi and Nakajima A6M2 21 had such a curved tail cone. The Mitsubishi A6M3 had a more straightened configuration. Next I’ll look at the wheel wells and especially the canvas cover found on the tail wheel well. Uwe, I’ll save the external paint colour details for later. And I’ll try not to go into a RLM 81, 82, 83 discussion mode, but I can see there are similarities - in the discussion; not in the colour. LOL Ryan4 points
-
Hello Trying to catch up with some late 2019 built I did not shared yet with you guys. Here is the magnificent Tamyia mosquito. Pretty much everything as been said about this kit. I think it is close to perfection. I added some Barracuda decals in the cockpit, Master's metallic guns and rockets from Special Hobby with MDC mountings. Edit: it was also the opportunity to test the Tamyia customer support as the nose fairing was missing from the sprue when I opened the box. I contacted Tamyia europ and they were quite efficient in answering my request quickly and ordering the new part in Japan. I wish you all the best for 2020.3 points
-
P40F trumpeter 1/32
KUROK and 2 others reacted to pascal JMW for a topic
hello the last one for this year just finish , P40 F trump + photo etched Eduard for the cockpit and resin wheels , Berna decal , painting Mig ,AK,Gunze and Tamiya 8 white p'ti Quinquin escadrille Lafayette 1943 unknown serial best regard Pascal and happy new year !3 points -
Aviatik 'Berg' D.I
LSP_Kevin and 2 others reacted to sandbagger for a topic
Hi all, The brace bar retaining hoops, Mike3 points -
Good evening, hope you had a great start into 2020! Besides family stuff (my mom suffered a stroke ... ) I actually found some time for modeling. I started the landing gear using resin replacements for the wheels ... I forgot which brand ... I somewhere read that in late war the quality of tires were really bad which made them to last for about 10 landings and take-offs. Well, the same could be said about the pilots and a/c, too. So they look a bit beaten up in my example of a tire set. Best wishes, 109er.3 points
-
I have finished the engine. The below shots show it in "like new" condition as I still have to put a couple of decals on and weather it. The engine looks very similar to the destroyed build's engine. The only things I did differently was wiring the distributers at a different (hopefully correct) location and I will not add the red stripe decals. I have looked at a lot of builds and not very many have the red stripe decals do I decided to leave them off this time around. I have also made a fair amount of progress on the fuselage, but nothing photo worthy yet. Ernest3 points
-
Thanks for your encouragement gentlemen! In the meantime I have also put the decals on the weapons, this was at least as much work as the aircraft decalling itself! For this I used the Revell decals, as well as some of the F/A-18C Hornet from Academy. Because there is no decals supplied whatsoever for any of the bombs. Colour indication for Navy bombs is completely inaccurate too Ther are more decals for the missiles, however here are the brown stripes missing from the decal sheet. Strangely enough there are green stripes supplied...someone at Revell or Cartograph has been asleep: this is also the case with the sidewinders AIM-7X and AIM-7M: Is sharp contrast of this all is the big amount of very detailed decals on the pylons.... That is if there was enough of them! decals supplied are only half the amount that is needed! now I have to leave one side of all pylons devoid of details, sigh... Next step is to seal everything with a layer of clear and then start washing and weathering!3 points
-

My 2019 builds
USMC Herc and 2 others reacted to Tolga ULGUR for a topic
Here are my completed models in 2019 1- 1/32 Hasegawa Junkers Ju-87D5 2- 1/48 ProModeler A-26B Invader 3- 1/48 ProModeler F-102A 4- 1/32 Hasegawa Focke Wulf Fw190 A9 5- 1/32 Hasegawa P-40K Warhawk 6- 1/32 Hasegawa Spitfire Mk.1 7- 1/32 Tamiya P-51D Mustang 8- 1/32 Hasegawa Bf 109G10 9- 1/32 Hasegawa Fw-190 F8 10- 1/32 Hasegawa Bf-109K4 11- 1/32 Hasegawa P-40E Warhawk 12- 1/32 Tamiya Spitfire Mk.XVIe 13- 1/48 Hasegawa J-35D Draken 14- 1/32 PCM Hawker Hurricane Mk.1 Early 15- 1/32 Hasegawa Bf-109G14 AS 16- 1/32 Hasegawa/Montex FW -190A43 points -
Gloster Gladiator.....finished :)
Landrotten Highlander and 2 others reacted to mozart for a topic
You’re as mad as I am quang! No, he’s trying to cultivate the “dashing hero” look including growing a moustache, but without much success!3 points -
I'll get back to this one at some point in time. Hopefully soon. Until then it can be moved to the wip area. Håkan3 points
-

1/32 Marauder
Learstang and 2 others reacted to mgbgtv8steve for a topic
I agree with Lothar and all the others - this is fantastic work Alex and a joy to follow!! Have you considered 'selling' this to someone like Tamiya or HKM then we could all have a brilliant B.26!!? Best regards, Steve S.3 points -

Why Doesn't Eduard Make LSPs?
D.B. Andrus and 2 others reacted to MikeMaben for a topic
Agreed Kevin, like a 110G-2/4 .3 points -
Hi, Small metal placard said (圧縮空気補給口)= Compressed air refill port Regards, Matsu3 points
-

Fa330 Fock Achgelis
themongoose and 2 others reacted to Rick K for a topic
Let the rigging begin. INFINI Medium 110 (.121mm) Black Lycra thread will be used for Rotor Blade rigging. Begin with the Outrigger to Rotor. Secure with tape. This is stretchy so tug just a little so its taught. Radu P32023 Rigging Turnbuckles are used for each line. In lieu of tying at each eyelet thread the string through. This will allow position adjustment of turnbuckle later on. The rigging from rotor blade to another is one line fed through the eyelets on the rotor wings. be sure to install Radu's turnbuckle before securing the next rotor rigging. Last outrigger done. Secure with drop of CA then carefully trim with fresh blade. Rotor blade rigging complete. At this point you can carefully slide the turnbuckles to desired position. Test fit of rotor assembly on mast. Color me happy. INFINI Medium is used for rudder, joystick cables and skid brace. EZ Line Medium is used for joystick pulley cable EZ Line is flat and works well on the wheels at joystick base and mast base.3 points -

Forgotten War Mustang
Landrotten Highlander and 2 others reacted to John1 for a topic
So based on a post in the Aviation Forum where I inquired about those black wing stripes, I got some very useful information. I'm going to apply them the entire width of the wing's under surface and only approx 12" scale inches on the upper surface. Still no idea if this was some sort of theater marking, my best guess is that it was nothing more than a means to hide the general filth that was generated by these weapons. Need to keep in mind that unlike the escort Mustangs of WW2 which at best, might fire their weapons 1-2/week and then fly back and be meticulously cleaned by the crew chiefs, the Korean War Mustangs fired their MG's 3-4 times (sometimes more), per day, every day (unless they were grounded due to bad weather). There seemed to be very little effort made to clean up the gun soot and dripping weapons lube between missions. Not that I blame these guys, pretty hard to worry about stuff like this when it's 20 degrees below zero! Here is a great illustration of how nasty these aircraft got. I have no idea how I'm going to replicate all this grunge!! On a modeling note - I'm just working on some sub-assemblies right now. My ancient Badger 200 airbrush, that I have had for probably 20 years finally died on me. Waiting on a replacement but until, not a lot of stuff to show. Thanks for all the great comments and as always, thanks for looking!3 points -

Why Doesn't Eduard Make LSPs?
tucohoward and 2 others reacted to LSP_K2 for a topic
Personally, I'd like to see Dragon pop off a few more. Their Bf 110 and Bf 109E kits are outstanding.3 points -
This also arrived today, the latest "Building the" book from Ray at Albatros Productions. While I generally never buy this sort of publication, I have no problem at all receiving them as freebies, and am slowly amassing quite a stack now, so all is good. I'll be popping off a review shortly.3 points
-
The me 410 may have more paint/markings options than the Tigercat.3 points
-

Heinkel 111 interior bomber aimer part2 vacuumform
USMC Herc and 2 others reacted to lievenwynants for a topic
to all, a happy new year with good vibes on largescaleplanes forum i post some photo's from my bomber aimer figure i did scratch a lofte7 and almost finished my aimerbed i hope like it3 points -
I added an ignition harness to the engine. I know the BMW 801 has two spark plug leads per cylinder but since I will build mine with the cowling closed ,not much will be seen behind the fan anyway. Just a bit more to add a bit of interest. The engine is pretty good out of the box and possibly the best radial I have seen. The Tamiya Corsair is probably better but I have not had eyes on one. And painted Cheers Nick3 points
-

ICM I-16 Type 24: COMPLETED 3/12/2020
Jan_G and 2 others reacted to Dennis7423 for a topic
Small update today, as I finally got some bench time! I have begun adding the Eduard fiddly bits to the cockpit, and they provide some nice additional details to the cockpit: 82044929_525523074712520_2860453982982111232_n by Dennis SAuter, on Flickr 80765755_828669014250781_7871106995367968768_n by Dennis SAuter, on Flickr 81134294_602381133914924_110509834943594496_n by Dennis SAuter, on Flickr the bulkheads have been added to one fuselage half so that I can start adding some additional scratch detail. Nothing too crazy, but I do want to dress up the cockpit just a little bit. Eduard's pre-painted instrument panels are pretty nice, when they get the colors correct. I like to build them, apply a brushed flat coat, and then use clear gloss enamel to add the instrument glass. I'll add a wash to break up some of the variation, and then it'll be ready for install: 80657103_578786012945890_2811578320305520640_n by Dennis SAuter, on Flickr That's all for now! Happy New Years everyone! - Dennis S. Thornton, CO USA3 points -
Aviatik 'Berg' D.I
Azgaron and 2 others reacted to sandbagger for a topic
Hi all, The tail unit is now rigged with cross bracing cables and rudder and elevator control lines. A combination of 0.12 mm and 0.08 mm mono-filament with either 0.4 mm or 0.5 mm diameter Nickel-Silver tube and 'Gaspatch' metal 1:48th scale turnbuckles (Types A and C). Mike3 points -

1/32 ZM Henschel Hs-129 B-2......FINISHED
Gazzas and 2 others reacted to monthebiff for a topic
Next thing to concentrate on was getting the rear fuselage bulkhead complete so this was painted followed by adding a couple of belt anchors as well as a couple of Bob's Buckles eyelets in readiness for the armoured headrest restraints With this sorted I fitted the cockpit tub in to place Now this is where things are getting a bit interesting in the fit side of things as the tub is connected to the fuselage by not a lot and very springy. Next I added the canopy rails and the lower fuselage tub sections Lots of room for play here including lots of room to make a mess of things, need to have a think about it now as the upper nose section fits perfectly at the moment So my thinking is to add the upper nose section and then close the gaps slowly around. Regards Andy3 points -
Hasegawa Bf 109F Completed 20/02/20
MikeMaben and one other reacted to Alain Gadbois for a topic
Keep your original scheme, as your radiator is already glued on, it isn't worth it to modify the kit now, I think. Just a thought. Alain2 points -
Wow that’s moving! Read it a few times, he was great at relating the events of the times! particularly liked the part where he dove too far/ fast and pulled out in a stand of trees, making it back to base with a tree top stuck through the leading edge of one wing2 points
-
Thanks for the input guys. I think I’ll do some test runs and get back to you with the results. Please stand by.2 points
-
Thank you both of you. That was exactly the motivation I needed to get back on the bench to try to progress on the project Much appreciated More work on the starboard flaps: The 2 part moveable flaps have been assembled. These are initially designed for the trumpeter kits but modification to fit the airfix kit is minimal. Most of the mods are needed around the area where the flap go through the wing and opens a small door when they are down. Here are the flaps assembled The rods are still too long and the hinges aren't glued yet And a dry fit on the wing, the inner small flap doesn't fit perfectly but this is very easy to fix. The inner flap has no wall and it's normal to see inside the fuselage, but it seems I didn't plan for that when I scratchbuilt the cockpit walls and I'll need to make them fit better before attaching the flaps. Happy to see some real progress rather than rivetting and panel line. Still have to do the port flaps and rivets on the fuselage. Thank for looking2 points
-
It was added for that purpose but didn't have anything to do with a model upgrade. They apparently found that there 'was' exhaust entering the intake, apparently something they hadn't discovered before. That's why it was a feature of all subsequent models. The Revell and Hasegawa spinners look quite similar. For reference : Notice there are different cannon openings one longer than the other. For that reason the radius shape would be sooo slightly different on each. (almost imperceptible). hth2 points
-
Thanks for keeping me company mates! I'm calling this one finished. Please excuse the poor pictures. Thanks for looking in Going through the stash looking for another project now...2 points
-
Hello guys, I bring more progress on the Ju 87G. Flaps glued (this would come to hunt mw several times down the road). RLM 70 painted: RLM 71 painted: And, today's update, RLM 65 and RLM 04 painted on the wingtips and fuselage band.2 points
-
Figured it's time to post some pics of plastic instead of yet more questions! I've got the fuselage mostly buttoned up. Just a tad of filler here and there but aside from that, everything fits nice and tight! I simply glued the rudder and elevators in place. One major dislike I have with this kit is all the work that Tamiya wants you to go through to make the kit into a toy with retractable landing gear, movable flaps, control surfaces, etc. I have no need for any of those "features". Moving on, I've done some additional work on the landing gear wheel wheels. Lots of fun color options here. For some reason, later Mustangs often had one bay with unfinished aluminum roofs (actually, the underside of the upper wing) while the other was GZC. In addition, the rear bulkhead (which was actually the wing spard), was usually YZC. That's the scheme I went with, I think it adds some nice color. Not a lot of corrective work is needed in this area, Tamiya did a good job. Only thing I did was drill out the holes in the oleo calipers and also removed the solid plastic backing for the hydraulic cylinders mounted to the aft bulkhead. Couple of notes - I just received the Fundekals P-51 stencil set. Very nice, as is all of Jenning's stuff. It even includes the stamped markings that were applied to sheet aluminum at the mills! In retrospect, I should have applied these decals before I added the ribs, etc but of course, I was in a rush and as a result, it took twice as long to shoe-horn these small decals into place. IMO, they really add quite a bit to the look. I also added some decals to the landing gear but since my photo skills are awful and today was a pretty cloudy day, it's tough to see these. Also note - I haven't added any additional details to this area. I'm going to add some hydraulic and electrical lines to busy things up but unlike the Corsair I did last, where I slavishly added every line, this area on the Mustang is packed with tiny lines and fittings. I'll add some but there is no way I can add everything. Would have been nice to have an aftermarket outfit take a shot at this area. I obviously will be weathering this once I'm complete. That's it for now, thanks for looking!2 points