Leaderboard
Popular Content
Showing content with the highest reputation on 07/18/2019 in all areas
-

Tempest Mk.V Special Hobby 1:32
chuck540z3 and 6 others reacted to Koralik for a topic
After a few models of heavily tired aircraft. This time the model of the aircraft without strong weathering. Tempest Mk.V Special Hobby 1:32 Scale The model is not very easy to build, so I don't recommend it to less experienced modelers.7 points -
Weekend trip to a tank museum "around the corner". lucky me that I also like Tanks. more pictures Link: King Tiger museum site Swiss Tank Museum6 points
-

Salute to Peter Castle (Airscale)
D.B. Andrus and 5 others reacted to dodgem37 for a topic
Although miscaptioned as a P-51, you'll recognize it as Peters' Mk XIVe. https://www.modelmotorcars.com/peter-castle-uk-1-18-scale-p51-mustang/ Sincerely, Mark6 points -
Latest completion is the Trumpeter 1/32 P-47N Thunderbolt "2 Big and To Heavy/Short Snorter" of 333rd FS/318th FG, April 1945, Le Shima, Ryukyu Islands. Used Zotz Decals, AMS Resin wheels, Master Model gun barrels and Eduard seat belts. Otherwise OOB. Jerry6 points
-

Spitfire MkVb to MkIX conversion 1/24 349 sqn
Starfighter and 4 others reacted to red Dog for a topic
Cockpit is very sparse from the box, so a bit of scratching is required... I'm not going into crazy detailling but just basic stuff Default offer: Some bits added And being painted .... More work required and i'll revert to the original radio channel selector (top right) which is too large. The Airfix kit part will be better. The airscale placards decals will come in handy5 points -

Maverick
Uncarina and 3 others reacted to Michael931080 for a topic
I Feel The Need, The Need For...………………………………….4 points -
Miniart has new kit in development 1/35 AVRO 671 ROTA MK.I RAF jan https://miniart-models.com/products/41008-avro-671-rota-mk-i-raf/4 points
-
DAYs 4-7 I have completed the interior and am now ready to close up the fuselage. As one would expect fit was excellent!! The seat was painted in artists oil paint to replicate the leather on the real item, Wingnuts belts were used. I have always used Wingnut belts on wingnut builds, I really like them and don't feel the need to use aftermarket items in this area. Next time I should be able to show you guys an airframe!! Thanks for stopping by.4 points
-
After 7 months of work, the Albatros D.Va (OAW) is finally complete...The build is based on the Wingnut Wings kit and finished as Hans Von Gössel's flying skull, circa mid 1918. The kit was extensively modified in order to make the small details more accurate. Additions were Bo Monroe's 3D printed wing radiator and Fuel tank, HGW Models textile harnesses and Yahu photoetch instruments. I completely scratchbuilt the air valve assembly behind the starboard instrument panel and linked the piping based on the NASM plans for the restored Albatros (the restoration book was of tremendous help with the plans and detail photos). The kit received a new windcreen made from thermoformed clear acetate to thin it to scale, and the coaming was modified to add wrinkles and retaining washers for the leather. Master brass jackets were used for the Spandaus. For the engine, i had run out of Taurus resin overhead cam so i just scratchbuilt the valve springs, the induction manifold was wrapped with teflon tape and the heat shields were made from lead sheet and MENG styrene bolts. Taurus resin spark plugs were used and everything wired using Modelkasten rubber thread. Rexx metal exhaust attached. The Niendorf propeller was my first hand carved propeller and i used different veneer sheets and then coated it with MR. Paint clear. The wooden fuselage is finished with Knotless decals from Uschi van der Rosten and a few filters. The decals are just flawless in their application and in the result you get. I initially had the rigging attachment points 3D designed and printed by my friend and ALM Studios team mate Imad Bouantoun, but they turned out too big due to their hollow nature and limitations on SLA printing so i ended up scratchbuilding those using styrene and thermoforming the domes with styrene sheet to be able to use the Gaspatch Models albatros specific turnbuckles. Rigging tubing is from Bob's Buckles and rigging is done with EZ-Line thin. The lozenge linen is Aviattic and is superb as are all the linen decal series from that manufacturer... Alot of additions and scratchbuilt items which would be too long for me to itemize here, or which i might have forgotten over the period of time since. The figure is to give a sense of scale and was painted by my friend and ALM Studios team mate Bernard Bassous. You can find all the juicy details in the build log . Id like to thank everyone who encouraged me to push the envelope so to speak. As i mentioned on the wip log, it looks like the stars were aligned for this one! Thanks again, Stay safe and happy modeling! Karim3 points
-
Hey Chris...I certainly will let you know if I need any information etc.....thank you very much! Just to let you know that my B17G was featured as a small back page article in the 447th BG Newsletter by Steve Heeb (Ol'scrapiron) Fozzy3 points
-

Proper Plane wooden propellers
LSP_Kevin and 2 others reacted to Proper Plane for a topic
Hi there! We are glad to show you our big Wolff. This propeller and hub set as a suitable replacement for the Wingnut Wings model of the LVG C.VI (32002 options B C E), DFW C.V (32040 A B D E), DFW C.V (32057 E) and any other aircraft installed with the Benz Bz.IV aeroengine. This propeller is now available for purchase in our web store.3 points -

AIMS 1/32 Pressurised 109 conversions
Fanes and 2 others reacted to Pastor John for a topic
Hi everyone, the extra Pe arrived a few days ago so sets are ready to sell. email me at aimsmodels1@gmail.com if interested. Thanks3 points -
AIMS W.Gr 21 rockets
Lud13 and 2 others reacted to Pastor John for a topic
Hi everyone, the PE has arrived and so I now have my own 1/32 W.Gr 21 rocket set - like I said before - wish I had done this from the start instead of using other peoples products. Anyway email me at aimsmodels1@gmail.com if interested. Price is £6.00 and they will also from now on be included in the 'Graf Special' conversion. Many thanks3 points -

Bf 109 G-10 Erla/type 110, Hasegawa 1/32
109 and 2 others reacted to French frog models for a topic
Here it is finally finished ... the paintings ak real are great to use ... a little rest and zou it will be necessary that I finish the other 109! A huge thank you to Vincent Kermorgan and jean-claude Mermet for their invaluable help! See more on my FB's page: https://www.facebook.com/125768474675320/posts/431152264136938/3 points -

SB2C
scvrobeson and 2 others reacted to vince14 for a topic
Maybe you all got unlucky, then, but I found building the HPH Hornet no more difficult than any other resin or multi-media kit ¯\_(ツ)_/¯3 points -

SB2C
EvilCarrot and 2 others reacted to nmayhew for a topic
and yet Graham at Iconicair says exactly the opposite ie it doesn't necessarily *have* to be like this with resin kits.... I have read enough on here to know that irrespective of the subject, I would never touch a HPH resin kit; I'm not that good a modeller, and my life is too short and I have too many kits that I really want to build. I am open minded about HPH's foray into the injection moulded world, but am hoping for something better than Fly's Hurricane for instance (again, life too short etc etc).3 points -
1/32 Kittyhawk F-84F Thunderstreak & RF-84F Thunderflash !
scvrobeson and 2 others reacted to KAGNEW for a topic
WE are back, later Kitty Hawk3 points -

1/48th Boeing B-52H Stratofortress
JesniF-16 and 2 others reacted to tomprobert for a topic
The BUFF has had some more work done on the engines - I've sanded and shaped the home-made upper, over-wing parts of the pylons and all look good under some primer: DSC_0186 by Thomas Probert, on Flickr DSC_0187 by Thomas Probert, on Flickr DSC_0190 by Thomas Probert, on Flickr Shaping the pylons on the underside was a lot more tricky as they are all molded identical, but of course the inner pylons have a very different shape due to the change in shape as you travel down the length of the wing: DSC_0201 by Thomas Probert, on Flickr I've also finished detailing the rear of the bypass sections: DSC_0195 by Thomas Probert, on Flickr DSC_0199 by Thomas Probert, on Flickr It was a bit of a faff opening these up but worth the effort. And we now have something really taking on the form of the venerable BUFF: DSC_0205 by Thomas Probert, on Flickr DSC_0192 by Thomas Probert, on Flickr As you can see, however, the tail feathers are conspicuous by their absence... better get sanding! Until next time, Tom3 points -
Spitfire MkVb to MkIX conversion 1/24 349 sqn
Starfighter and 2 others reacted to red Dog for a topic
I though the above cartoon is pretty representative of what is to come The MkVb boxing provides the clipped wingtips and although Spit IX from the 349 had all sorts of different configurations during their activity, the one I am building has the clipped wings. So out with the saw and the default wingtips were cut. Fitting of the clipped wingtip is far from being a no putty operation, and curiously the parts fit better when I switched the parts number from the instructions. I also had to adapt the cut according to the aileron to ensure the wingtips were properly aligned with the trailing edge of the ailerons. The early clipped wings were done in wood and had no position lights - but PT723 clearly sports the light. Luckily, Airfix provided transparent parts for them. Fitting is not perfect either, but that can be very easily overcome. I'll attach them later on. The wing is now complete & ready for priming. Most of the panels were puttied, as were the clipped wingtips. The rivets were toned down by light sanding. Now I can really start this model by working on the cockpit3 points -
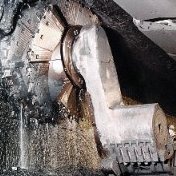
I've always been fascinated by the Korean War. It was a bloody conflict that in many ways was a precursor to Vietnam, where the majority of the folks in the US (unless they had a father, husband or son serving) paid little attention to it. This was in stark contrast to WW2 where the entire nation was involved and engaged in the war effort. Another interesting thing was that the equipment used was mix of cutting edge technology and WW2 leftovers. Specifically regarding WW2 leftovers, we have the F-51D Mustang. 5 years before, the Mustang was the F-22 Raptor of WW2. Arguably the best fighter of that war (especially when you factor it's amazing range into the equation), in Korea this thoroughbred was simply an expendable bomb truck. Many aircraft lost their puttied wings, which provided a few extra MPH due to laminar flow, many others lost even more performance when the USAF opted to lock it's tailwheel in the down position to reduce maintenance issues from mud and ice building up in the tail gear bay. In the end, performance no longer mattered and these once cutting-edge aircraft were simply fed into the operational squadrons, used until lost or scrapped and then replaced by others. The aircraft were no longer waxed and polished for maximum performance, instead, they were left outdoors in truly horrible weather conditions and apparently, little effort being made to clean them. Part of this was probably due to the tempo of missions. Instead of flying long range escort missions maybe once per week as they did in WW2, weather permitting, these Mustangs often flew 3-4 times per day. This tempo also took it's toll, Mustangs (and their pilots) were lost at a horrific rate. Many have argued that the Mustang had no place in this conflict as a close air support aircraft, due to it's light construction and especially it's liquid cooled engine. The underside of the Mustang was a maze of coolant piping and a single rifle round in this area would result in the Mustang being lost as it's critical engine coolant rapidly leaked out. The P-47 would have been a much better fit but in the cold logic of warfare, it was determined that there were more Mustangs available, so these aircraft were pulled from state-side ANG units and sent to war again. That being said, these aircraft and their pilots performed heroically under extremely challenging conditions. The F-51 was basically just a re-designated P-51 with a few changes. There are some threads in the General Discussion Forum that go into much greater detail but a few things differentiated these aircraft from their WW2 counterparts - All F-51D's had mounting points for 6 x 5" HVAR rockets. Many (possibly all) had the battery relocated from behind the pilot to the engine compartment and in these cases, a cooling air scoops as added to the side of the fuselage. Many (but certainly not all) had "cuff-less" propeller blades. Many (but certainly not all) had additional radios and IFF gear mounted behind the pilot, on top of the fuselage fuel tank. Many (but not all) had the putty removed from their wings during rebuilding at USAF maintenance depots prior to being sent overseas. Lastly some also had cooling louvers retrofitted on the fuselage sides, behind the wing root. I think those changes pretty much cover it. I'll provide more details and some illustrations once I get into the build. Moving onto the model, at this stage I think I'll be replicating Little Beast II, a hard-serving F-51D assigned to the 12th Fighter Bomber Squadron in mid-1952. Not 100% sure on this, got plenty of time to figure this out. Here she is taxing out for yet another combat mission. She's armed with a standard load of 2 500 lb bombs and 6 HVARS (the other standard loadout consisted of two napalm tanks and 6 HVARs) and appears to have her tailwheel locked down. For this kit, I'll be using the Tamiya Pacific Version P-51D kit, along with AIMS Korean War Mustang decals (sadly, I believe these are the only decals of Korean War markings out there, another indication that Korea is still the "forgotten war") and a bunch of Barracuda resin upgrades. I'll provide details on all the AM bits later. My biggest concern is going to be the NMF finish on these aircraft. I've always struggled with this and in the case of these Korean War birds, it's going to be compounded by trying to replicate the extreme weathering they were subjected to. Here is a great example: Note the high degree of filth and also note how dull and weathered the metal finish is. Looks more like dull, grimy grey instead of the shiny, immaculate finish seen on most WW2 Mustangs. The pic above also does a nice job of showing those cooling louvers retrofitted behind the wing root and the additional radio gear behind the pilots seat. If anyone has tips for replicating this type of finish, please let me know!! Anyway, that's pretty much it for now. One last note - this is going to be a looong build. I'm inherently lazy and my modeling time is always limited. I'll post updates when I can. Thanks for looking!2 points
-

B-17G + all detail sets from Eduard
Martinnfb and one other reacted to Miloslav1956 for a topic
Last update.2 points -

Salute to Peter Castle (Airscale)
Phartycr0c and one other reacted to monthebiff for a topic
Peter's work is amazing and seeing No.80 at Telford was truly inspiring. His work has certainly made me think and stretch myself at times and try doing a few scratch built bits and pieces but he makes it look just so easy. The other aspect of his work that I love is when all of us mere mortals are posting replies to one of his updates saying how very fine it is and next thing we know he has ripped it all apart and done it all again as he was not quite 100% happy with his work. Long may he continue with the wonderful work he shows to us all. Regards. Andy2 points -
Short Sunderland MkII
kkarlsen and one other reacted to tomprobert for a topic
I know, I know... I’ve been sidetracked by my 1/48th B-52 project, and at the moment that is having to take priority due to the fact I’ve got a deadline to meet for a book. When the Buff is complete, the Sunderland will be back on the bench. Tom2 points -
My issue really isnt with the resin parts, and/or having to sand them down, that comes with the territory on all resin kits. Its the build methodology and the horrible, horrible mistakes that should have been taken care of at the factory, of the two (so far) HpH kits Ive built. That and the resin pool method that is unlike any other resin kit I've built. I'm not sure how many if any other HpH kits have similar issues, but if you have ever attempted the HpH Tiger cat at the very least it has big problems. And they aren't the type of problems that should come with any kit, resin or otherwise. Just plain stupid mistakes made in tooling and molding that should never have been there in the first place. Just take a gander through my F7F build thread, and you will see the many issues encountered, and anyone who has built resin kits in the past will know those are NOT the kind of things one finds in the average (or any) resin kit I know of. I can only hope their Me-410, La-7 dont have the same issues, but from what I have seen here, it appears the Tigercat may be the only one to have the major issues I speak of. I have the La-7 too, and will be building it. I would most certainly give any HpH IM kit a chance. It makes way, way more sense of financially workable for the company, and the likelihood of having to remove parts from a resin pool goes down substantially I would think with an IM kit (if resin parts are in fact included)2 points
-
Thanks John! Well, I plan on doing an armada of Spitfires and two or three will be built from the Tamiya kit which is too expensive for all Spits I'm planning to do. I really fear to tackle the Rvell Mk.II kit which will need raised rivets on the rear fuselage instead of simply filling those huge holes.2 points
-
A little work on landing gear last night. MRP medium sea grey, Molotov liquid chrome, with a little weathering from brown and black colors, followed by panel line wash. The tires are the kit parts, seam lines scraped and weathering completed with fine sanding stick. I think the tires look quite good, although hard to give a weighted appearance. A final dullcoat was given after these pictures were taken.2 points
-
its up on the ZM website jan and new base for Ki-452 points
-
Thanks gentlemen Made a resin copy of the main wheel with the tread and increased diameter. Aslo a picture to show the difference compared to the original size of the standard kit wheel. Cheers2 points
-
Is there a U.S. owner of the Trumpeter kit willing to "loan" me a set of forward pallets? Please send me a PM. TIA Update below... !2 points
-
The main problems are matching elements. This model is made straight from the box without resin parts.2 points
-
Thanks! I'm humbled. No one's ever used masterpiece in the same sentence as my models. Thank you very much. :) Paint is done. Now it's on to weathering proper. Once she's done, I'll take proper pictures, but for now, my phone will have to do.2 points
-

Wedding pics!
monthebiff and one other reacted to Out2gtcha for a topic
Thanks all! So far, as with our relationship pre wedding, we always seem to have fun, and the "team" aspect of the marriage so far is prevalent for sure, and I really enjoy it.2 points -
I started this one a few weeks ago alongside a Tamiya 1/32 MkXVI thinking I could use the tamiya model as a source of minor detailling for the 1/24 model. The conversion to MkIX will be done with the help (...) of the old heritage set Other goodies will be used such as resin seat, some trumpeter parts I could gather, Airscale instrument panel, Master cannons and custom mask made by DN models Hopefully I will be able to make a Mk IX from 349 sqn : GE - L serial PT723 clipped wing as illustrated in the next picture1 point
-

Westland Wessex HC2 - Northern Ireland
Loach Driver reacted to Stevepd for a topic
Here is my latest build the 1/32 FLY Wessex. I've done this as an 80's bird that I had a few flights around the province back in the day. It's a good kit but lots of PE and the instructions are a bit vague. I added the bullet proof shields on the side of the cockpit and added wiring for the Nightsun lamp. I think it's crying out for the bird nest wiring for the underbelly hook but I chickened out. Ideally it should have the larger 72Sqn emblem on the tail but it's too new a kit yet for AM. I've got to add some EZ line on The starboard antennas but will wait for the Salisbury model show in June. Steve.1 point -

1/24 Airfix F6F-5 Hellcat
sandokan reacted to justplanecrazy for a topic
looks great so far. the seat cushion you're referring to was actually the pilot's life raft or "dingy" as referred to in the U.K.1 point -
1 point
-
Nice! I always get the feeling that initially sitting in some of these leather WWI seats, it would be like reading the paper and smoking a pipe in front of a fireplace.................... Until you started it up and took off! Great work!1 point
-

1/32 REVELL GR4 TORNADO
Mel reacted to miketippingmodels for a topic
Hi guys I used aires resin cockpit and ejector seats, and engines for this build, with majority of my new favourite paint MRP, the figures are Reed oak of corse. Just a bit about the build represents IN FEBRUARY 2015 NUMBER 12 SQUADRON CELEBRATED ITS CENTENARY AND THE MARKINGS APPLIED TO GR.4ZA405 INCLUDING A PANEL LISTING THE UNITS BATTLE HONOURS. ALSO SEEN HERE IS THE SQUADRON BADGE WHICH FEATURES OF FOXES HEAD FAMOUSLY ADOPTED WHEN THE UNIT BECAME THE ONLY RAF OPERATOR OF THE FAIRY FOX IN 1926.1 point -
Merci Biggles Some more goodies received in the mail for the Spit The flaps are meant for the trumpeter kit but should work reasonably enough for the airfix kit … Well we'll find out soon enough1 point
-
Great news on the F-84's! Still waiting on the 1/32 Sepecat Jaguar (due 2019) which was promised some time back though. Has it been shoved sideways for these particular projects to come to fruition? Let's hope it's on it's way at some point?1 point
-
Yeah look for the v2 needles. According to the guy I bought mine from they're significantly more resilient, per his own experience as well as reports from cus61 point
-
Neat! Yes indeed, Id like to see a breakout of the parts. Not a kit you see every day.1 point
-
Alrighty then! Sprues arrived via Trumpeter--there was a delay, but they arrived. I can start finishing up the fuselage and prepping to "put it together." Still trying to figure out how the ammo belts that run to the tail turret are supposed to fit into that track--one goes on top? One goes on inside? Except you can't really fit it inside. I may just attack the bottom belt to the point where it's blocked. Run the other one in its entirety. There are a few things the plans are weak on! Stay tuned for updated pics... Tim W.1 point
-
Modelling time is limited to the weekends and some short periods after work right now, so this is just a small start. For unknown reasons Revell incorpororated two bulges on the wing right over the wheel wells. Well as far as I know there's no picture of any wartime Spit with such bulges. They must have looked on a restored airplane with bigger tyres, but that mistake was already in their Mk.II kit with another bulge shape... Thankfully the plastic is quite thick and with some sanding and a lot of patience the removal of said bulges is no hassle. It seems to me that Revell gave the design of the surface details to Trumpeter's mad riveter. Those rivets aren't small impressions but more crater sized. My plan is to shoot the fuselage and wings with Alclad primer, followed by some sanding to reduce depth. The rivets on the wing in front of the main spar were puttied over on the real thin and so I filled them in using the Archer method (putty-lacquer thinner-pigments) followed by a brushed coat of Alclad primer - just to be safe. I will shoot a coat of primer and will then try to restore the lost rivets over the wheel well - yay first time riveting!1 point
-

1/48th Boeing B-52H Stratofortress
LSP_Paul reacted to marauderdriver for a topic
You have to remember the travel of the wing when she is in flight. Some pics I took during touch & goes when I first got my camera. Again please excuse the "Buff eating tree".1 point -
David Parker is also editor of Air Modeller some of the LSP builds are outstanding Bob1 point
-
Some random pics of our wedding and the absolutely STUNNING surroundings we were in........ The wife near the mouth of the lake, with skies so utterly vivid blue it almost looked fake at the time The view outside the courthouse we got our marriage licence in The wife and I right after the ceremony at nature's altar Wife and I at the actual spot we held the ceramony at For some reason I felt the need for a forest version of Captain Morgan On the way home from said ceramony Heading up to the summit of Mt Massive@ 15,000+ Mt Massive Summit Back at the Lake after the ceremony.... The weather was absolutely perfect, as is Colorado every time we visit. Cheers!1 point
-

1:200 USS Missouri Build Log - Trumpeter w/ Pontos Detail Sets
Greg W reacted to steinerman for a topic
Howdy Ladies and Gents, It's been a while since I posted pictures of my battleship. I thought I'd update you on where it stands now so I got out my tripod, cranked up the f-stop on my camera, and took some decent pictures for once. NO, I didn't do all this since my last post! This series of pictures (26 in all) will bring you up to date to where I currently am. From now on however, my posts will be a lot less frequent because a) it took me 2-1/2 years to get this far, and b) I AM working on my Monogram 1:48 B-17 at the same time. I just don't have anything interesting to post yet. So, here is my "Plastic Toy Boat" as it stands today. Hope you find it worthy: Here it is - 4-1/2 feet of pure enjoyment. At least for me. I love doing this. My big thrill is building models. Once they're finished, yeah, I take pride in them, but sitting there looking at them isn't like the work of building them, right! There are (2) 20mm antiaircraft guns and a flagstaff that are supposed to be at the very bow of the ship. Because I keep the ship covered with plastic for dust purposes, I haven't mounted these yet for fear of knocking them off. Note the railings along the hull are also missing. They won't be added until the ship is almost complete. In this next photo You can see where I made a big mistake. There is supposed to be a ladder made up of individual grab-irons up the hull at the stern. With the handling and messing around, half of them have been knocked off, reglued, and knocked off again. I'll fix this, but I'm going to wait until near the end so it doesn't get damaged again. The screws are real brass and the silver rectangles are anti-corrosion plates. On the Iowa Class battleships, the inboard screws were 5 bladed and the outboard screws had 4 blades. Also, the starboard screws turned clockwise while the port screws turned counterclockwise. You always thought a battleship was gray, right? These are the actual colors of the USS Missouri in September 1944, when Japan surrendered on the deck of this ship The chain hanging down from the bow is called a "Paravane" chain. Paravanes are towed from the ship and are used to bring floating mines to the surface where they can be detonated by gunfire. A view of the foredeck up to gun turret #1. The deck in front of the capstans is steel and the remainder of the decking on the ship are teak boards. OK, that's 10 pictures for this post. More coming on post #2 of this set.1 point -

Wedding pics!
Phartycr0c reacted to mozart for a topic
Congratulations Brian!! I’m coming up to my second anniversary (I’m 71) so it’s never too late!1 point


.thumb.jpg.745e9c32fdfafef712dcea77f75e8a27.jpg)