Leaderboard


Popular Content
Showing content with the highest reputation on 03/19/2024 in all areas
-

HPH / Infinity Blohm-Voss BV-138 in works
Brock and 15 others reacted to patricksparks for a topic
This is one that I printed a couple years ago, it's sitting next to a HK Lancaster for size reference... Pat16 points -
Got some more markings on, Serial on tail is a stencil, others are Alps printed. Some ugly silvering , waiting for something in the mail. These pix look more green than IRL.. This one has better color ... Thanks for lookin' . p.s. the squadron badge (rooster) and the numeral 5 are from an Eaglecals decal (excellent decals)15 points
-

1/48 B-24J "Dinah Might" 761st BS
RBrown and 8 others reacted to Warbird Kid for a topic
I was contracted by a gentlemen to make a custom B-24 model for his fiancé, in honor of her grandfather: Claude J. Bouchard Sr - Ball Turret Gunner 761 BS - 460 BG - 15 AF - U.S.A.A.C. Based in Spinazzola, Italy - 1944 - 1945 Claude was a lifelong resident of West Haven, CT, so eventually I will need to build this 24 in 1/72nd for the Hometown Heroes display I curate at the local air museum. Thankfully the client had photos to go along with the project. Which made it alot easier to remake his plane, B-24J - 44-48998 known as: “Dinah Might“. Eagle eyed viewers will notice the inboard cowling was not painted, which is something I wanted to replicate but the client wanted it to look newer / less hodge podge. They decided on the reliable 1/48th scale Monogram kit. Since its a late war Ford built 24, I purchased an aftermarket kit to convert the airframe. I also decided to commit to the process of subassembly, and try and finish as many simple "fun" things to do while I languished and suffered with the more tedious / difficult parts of the build. So I started with the wings... And then the cowlings. Which I had to repaint with a more accurate insignia red color. Ands then the tails... Before I knew it, the wings were basically done. While I slowly started to tackle the most difficult part of the build, the fuselage, I kept up with the subassemblies... Before long the landing gear was finished and installed... Along with the tail... I had originally painted the rear fuselage a yellow zinc chromate, that would have been okay for early D model Liberators, but then I decided to repaint it to bare aluminum. I was in awe of how much weight I had to keep adding in the nose area to get her to sit on her damn nose wheel! Cockpit with custom dividing wall for in-between Flight Engineer / Top Turret gunner area, life raft seat cushions, and masking tape seat belts. Fuselage finally buttoned up, puttied, sanded, and painted. Modifications I had to make were cutting of the original nose and getting this vacuform Ford nose to seat correctly, cut out the side nose navigator / bombardier windows and add vacuform square windows, enlarge / square up the waist gun windows and add vacuform square windows, and remove the waist side wind guard spoilers. I opted to use the kit gun turrets instead of the resin / vacuform ones since I wanted to deliver this model to the client sometime this year. Being a graphic designer, I was able to find enough resource material to accurately recreate Dinah Might's nose art, as well as the two black panthers on either side of the nose, and the red "D" adorned on the rear fuselage. I had to print everything on clear decal paper, and a couple on white. I always skip the primer stage and I always end up paying for it! Once the silver was dry I had to touch up some spots with more putty and sanding, before hitting it with primer, doing it again, and then finally the silver coat to seal it all in. Once the silver was dry and I hit the ground running with my decals. Once I had the first nose art decal in place, I had a second decal of just the girl printed on white. I carefully cut out around her as best I could and then overlaid her on top of the transparent version. Before I knew it I had the painted / touched up the fuselage, weathered it, and clear coated it. Then it was on to final assembly! And the final result! Hope you enjoyed this build! Shouldn't have taken 6 months from start to finish but, as always life and gets in the way!9 points -
I corrected all the small assembly defects on my Yak 9 (micro mesh 800 => 12000) and then repainted with MRP-LPB black/primer. The metal parts (front of the plane, cockpit area, engine cowl, the central part of the wing underneath, vertical and horizontal fixed tail) are treated in the usual way with white. For the rear parts of the fuselage, which are canvas-covered, I applied white paint, but only lengthwise, using paint fillets. For the rest of the wings, I also painted from front to back, using white paint and a brown-green paint to break up the monotony of the BB'ing. Will it show once the camouflage shades are applied to my model? That'll be a surprise for you and me!8 points
-

Revell's 1:32 scale Bf-109 G-6/R-6
Sasha As and 7 others reacted to marcopreto for a topic
A bit closer to completion! I still need to add a few details, some general grime (mainly around the engine) and exhaust residues. Cheers8 points -

HK Models Bristol Beaufighter?
Phartycr0c and 5 others reacted to Finn for a topic
No they aren't doing the Beaufighter, they are just scanning the engines so they can come out with a Lancaster MK. II. Jari6 points -

HK Models Bristol Beaufighter?
Phartycr0c and 5 others reacted to Dennis7423 for a topic
Okay, so let's talk about what we know: The scanner was most definitely scanning the Beaufighter. Having used FARO scanners often in my previous job as a crime scene investigator, I can tell you that the scanner is effective in about a 15-25 foot radius around the unit. It takes somewhere in the realm of 30,000 photos per cycle, and recreates them into a dome of photos that you can then navigate on a computer as if you where were. You move it around what you're scanning to get various angles and all the nooks and crannies, then tie the scans together in a computer program, and viola, a perfect 3D, using photos, depicting of your object. You can also grab measurements directly from your scans. Accuracy is to within .3mm (I'm not joking, it's impressive). I would find it hard to believe that HK, a company in Asia, would fly staff all the way to Hendon in the UK just for $hits and giggles. I'd say this is pretty confident evidence that they are taking a good, long, hard look at giving us a Beaufighter in our beloved 1/32. As for the other aircraft there, unless I see a photo of the scanner actively working directly near a plane, I'm not buying it. They seem to indicate they were scanning several aircraft, but the only one we know for sure is the Beau. I agree with others here, I think the photo near the 109 is just to show the scanner, as it's not actively "at work" scanning the 109. I also agree with others here, and to bridge a few threads that are active (Eduard 1/32 releases) on LSP, I think HK should stick to their wheelhouse of multi-engined WWII stuff. Bring us a Beau. Take a stab at a B-26. Fix Hobby Boss' terrible error and do the A-26. Leave the single-engine stuff to the likes of ICM, Eduard (pretty please), and Hasegawa (probably not happening) and Tamiya (probably definitely not happening). Exciting times ahead! - Dennis S. Mount Juliet, TN USA6 points -
After a winter of bad weather, work has started again on the Lightning. Multiple paint corrections are in the process of being carried out. One problem that occurred after stripping the pitot probe of paint was that it broke in half through fatigue cracking - Trumpeter plastic seems to react in strange ways to glued and thinners. The upshot was that it was unrepairable due to its thin cross-section (I tried, and it failed again). I had no option but to make a new one. This I did by cutting a length of 1.6 mm diameter aluminum rod and filing and sanding it to shape (The length of the pilot probe in 1/32 scale is 70.3 mm). Derek6 points
-
Personally I think Eduard would be making a mistake to trod the weary path to yet another 109/190/P-51D. With the kits that are out now or coming, those subjects are so well covered in 1/32 that it's going to be difficult to compete. Perhaps a Mk I Spitfire with a full engine done in the style of Tamiya's superkits might find an audience, in lieu of an actual Tamiya kit, and as a foil for Kotare's simpler extant release. But ZM has that base already covered as far as the late Bf 109s are concerned, and a new-tool kit from Kotare is just around the corner as well. We're sorely in need of a quality, modern P-51B, and it's still uncertain whether ZM is really coming out with one - plus, Eduard is obviously unconcerned about that kind of duplication. The Hellcat is in the same boat - nothing to choose from but a legacy kit or a Trumpeter hash, though obviously it wouldn't be as popular as a subject compared to the P-51B. The MiG-21 is a no-brainer, as is the rest of the early MiG family. All that said, if Eduard creates a new kit in 1/32 scale of a subject I'm interested in, irrespective of what's already out there, I will in all likelihood buy it. Kev6 points
-
Adding the kit IP decals to the unmodified IP was probably unwise, but after numerous coats of Solvaset, it actually looks OK. IP on the real deal is rather bland and colorless anyway, so I think I can live with this.6 points
-
damn how long! the wait for the colors was long, and honestly I don't know how worth it it was: I wanted to try the MRPs, which are very airbrushable and already diluted, but not very opaque, with a thousand thousand shades that are difficult to manage, for me who have the eye denied with colors. furthermore, once given they are absolutely not "revisable" like acrylics... with the latter if you are really not satisfied you arm yourself with Chante Clair and a toothbrush and start from scratch. with these NO. they cling to the styrene of the model (or to the primer, it's the same) with the same obstinacy as the old Humbrols. However, they have a very high fineness of pigments, so even by applying several passes, thickness is not created. okay, enough chatter, let's see what I've done? before seeing the colors in action, a small "technical" parenthesis: to connect the lights to the ground I found this solution. I stripped a wire from a phone charger cable and soldered it to a 1mm brass tube. the tube crosses the wheel from side to side, so that at the bottom I will have a hole in which a powered pin can provide the electrical contact, as well as stopping the aircraft at its base, while at the top I will have the flexible cable and in a position which will allow me - I hope - to be able to play on its length simply by rotating the wheel. the width of the landing gear leg will finally allow me to be able - if necessary - to stow the extra cable that I may not have been able to fit back into the fuselage through the lower wing. a lot of talk for little substance, in short. well, we were talking about the colors: the four samples on the left are MRP, the fifth on the right Lifecolor, while on the model there is a first layer of MRP sand. I think you can see clearly how none of the MRP "giallo mimetico" corresponds to the only Lifecolor proposed in the regia aeronautica's color set. here on the right the Lifecolor and on the left the MRP closest to it... in the end I decided to mix two of the MRPs to obtain a more or less credible base, the one now on the model, but not yet saturated. here it is after at least four (!) glazes. For me, used to the building thicknesses of Lifecolor or the covering capacity of Tamiya, Gunze or AK, it was brutal, having to apply so many coats just to get a decent base. given that, in addition to being poor with colors, I am also incapable of managing camouflage like this freehand, so I traced the spots in pencil at least on the upper wing. even the spots turned out to be a PITA a notable source of caltrops: both colors are a mix, and this is the third edition after several retouches, always with the remote help of my helpful friend, the color master. paradoxically I am more satisfied with the stains on the lower wing, done in a haphazard manner without much study. It's true that here the surfaces are tiny and therefore easier to manage. the spots on the fuselage are at least simpler, having a completely different pattern and documented by the photos. here the problem lies in the fineness of these colors: each splash must be passed over at least three times to give it a minimum of consistency, which requires skills that I obviously don't have, unfortunately. the nose is a completely separate matter, in period photos you can see a pattern of more or less horizontal lines, apparently darker than the blotches on the fuselage, which thickly and roughly cover the lower part of the engine cowl. in the upper area there is a color that could be black or dark blue grey, the two colors used by the regia for night fighters. now it's drying well, then white for the band on the fuselage and the cross on the tail, and the transparent gloss in view of the decals, either from the box and custom created ad hoc for this little project. see you soon, I hope! cheers, Paolo6 points
-

Tamiya 1/32 F4U-1 Corsair
Biggles87 and 4 others reacted to Nikola Topalov for a topic
I am using AM open cowl flaps and I found some room for slight improvement by adding flap mechanism cables made from stretched sprue:5 points -

Silver Spitfire 'The Longest Flight'
R Palimaka and 4 others reacted to kkarlsen for a topic
Update on the 'foiling' The majority of the foil is mounted. Still some ways to make the details of the surfaces look right. It's almost 'therapeutic' and it's my first 'foiled' model and it won't be the last... Cheers: Kent5 points -
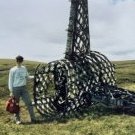
I have scratch built all of the equipment that it would have carried. The model is now completed, but requires painting (I will have to add/make my own markings for it). Hopefully, it will something look like this when completed: Derek5 points
-

1/18 Supermarine S6B - S1595
scvrobeson and 4 others reacted to airscale for a topic
the primer is on! it went flawlessly - which is down to the paint or the prep as it sure isn't down to me highly recomend this stuff for metal, get the thinners though Thank you - I doubt that! but hope to enter it the canopy will be fixed in the open position Close Tom, but no, not this time - I don't think Jay's can be bettered and I want to do something new Smart guesses GW, but no, it's not a P38.. Prop - yes Not enormous - well large for a single engine, but no, not enormous Natural metal - nope, skinned and painted as I was running out of NMF subjects I wanted to do ..they built 864 of them...5 points -

Minicraft 1/144 Iron Maiden 757
Rampenfest and 4 others reacted to LSP_Kevin for a topic
A quick update, as this build finally makes it to the painting stage! SMS Light Grey on the wings and tailplanes: The strong studio lights make it look basically white, but it should have enough contrast with the white on the fuselage when it goes down - which will happen after the silver bits! Kev5 points -

MASTERS is here!
JeepsGunsTanks and 4 others reacted to tomprobert for a topic
The RAF did indeed have it tough - and in some instances tougher. On the notorious Nuremberg raid of March 30/31 1944, 96 aircraft were lost in one night and the total of men MIA was more than the total British pilots lost in the Battle of Britain. Two really good reads/watches are ‘Night Bombers’ (available on You Tube) and Jack Currie’s ‘Lancaster Target’ which is a superb read and chronicles the terrors of night bombing vividly.5 points -

Revell 1/24 N-1 Starfighter
Alain Gadbois and 4 others reacted to The Madhatter for a topic
They are so simple to use yet really handy. I should've bought more of them! I just love the colour of the base layer. I'm not a pink fan by any stretch but this actually looks really good Maybe Revell will make a full panel version and it can be the new Barbie Mobile?5 points -

Looks like Eduard is reassessing 1/32
Mark_C and 4 others reacted to Cycling Guy for a topic
If Eduard did the entire early MiG family I’d cry non stop. However, in all seriousness, it’s a bit silly that there aren’t newer copies of MiG-15, 17, 19, 21, etc. with so many real examples and documentation around the world. I really hope to see this.5 points -
seems that Bv-138 is almost ready Mirek posted some updates over on modelforum.cz and states that first pieces should be available for the Moson Model Show (20th of April)5 points
-

Why Keep Threads On Topic?
Archimedes and 4 others reacted to Iain for a topic
Without the very light moderation we do here - things *would* go down hill - and potentially rapidly, as we've seen at times in the past. We're damned if we do, damned if we don't: but we have seen things get nasty before now so, sometimes a little pre-emptive action is required. Moderation is *never* an exact science - but we're all volunteers and try our best to keep things on an even and friendly keel. And we're human... It does get a little tiring having to deal with what, at times, seems like endless, and petty, sniping - some of us would rather go and build something. Iain5 points -
thank you all, very kind So, the painting stage is looming.... I needed to get some new etch primer as it only has a 12 month shelf life and frustratingly it is still not here yet.. I have worked out the colour (I think) - some of the original paint is still on S1595 in the Science Museum (it was repainted ages ago in the wrong blue, likely roundel blue) so I did some samples and arrived at what i think is a reasonable match given the limitations of eyeballs, digital sampling and light I took all my similar blues and did a tester, photographed in natural and artificial light and ended up mixing a shade from what I had - this is the analysis.. It is what it is, there are no colour pics so sue me if I am wrong... ..while waiting I busied myself and there is absolutely no construction remaining.. Pitot tube done - complex little thing.. ..cockpit canopy done, another complex little thing - i hate doing transparencies as they are just a huuuuuge opportunity to fu#k up.. also all the beaching gear was made of plastic and wood, and the wire wheels finished.. ..again with no colour photos, I painted them what I thought / interpreted - basically battleship grey as it's likely marine paint.. ..added the petrol cans and trolley.. ..and thats it - the next time I post, it will be all painted.. wish me luck ..in other news, I have decided on my next subject - something I have wanted to do for ages but thought it wouldn't fit in my display cabinet - I measured again and I think I can just squeeze it in - any ideas? TTFN Peter5 points
-
Silver Spitfire 'The Longest Flight'
R Palimaka and 4 others reacted to kkarlsen for a topic
First tests with foil... I did some initial testing with chrome paint, but decided to go for the aluminum foil. It's a lot of work, but I think it's going to pay off in the end. The shininess isn't too much, it has scratches and ripples, the rivets are barely visible as on the original aircraft. Overall the Foil adds to the 'illusion' of the aluminum surfaces. There will be some imperfections, but overall I'm satisfied with the result. Cheers: Kent5 points -

P-47D Thunderbolt - Hasegawa 1/32
R Palimaka and 3 others reacted to Azgaron for a topic
The rims, covers and the tank was painted aluminium. Then the covers was turned over and painted zinc-chromate yellow. I almost forgot to put a small decal on the engine, but now it's done! The tires was painted with a mix of tire black and black. I kinda more or less copied what Dugy had done! After trying a few OD colours on the bombs, I found one that I liked. Now they only need a bit of touching up and decals, unless I paint the yellow bands. The prop tips and spinner got some yellow paint. I first glues the cowlings and then the bottom cover with the engine. After that the other covers was glued in place, one by one. A few bits and pieces to sort, like masking the canopy, before I can start priming and painting. Håkan4 points -
Why Keep Threads On Topic?
Archimedes and 3 others reacted to Iain for a topic
Good grief - please take a step back from the keyboard and read the room. You are not going to change how we moderate the forums here. And, actually, we’re just a little sick of the pointless sniping. Bottom line: as Kev has said, if this place doesn’t suit your needs then other fora are available. Iain4 points -

Looks like Eduard is reassessing 1/32
Gazzas and 3 others reacted to CRAZY IVAN5 for a topic
That's a very interesting take on the demographics[age wise]. My club has a bunch of "grey beards' but we also have an increasing number of teens and 20 somethings too which is a good thing. When I went to Japan in 2014 , I got to attend a contest there, a real eye opener. There were just guessing about 4,000 entries [ across all categories] and a huge percentage[~45%] of the participants were in their early 20s with a sizable group of females to boot, there were a lot in their teens [and younger ],and they do/did very nice work. A lot of military type entries in the mix. I got to talk to a lot of people there [ thankfully their English was very good] The hobby is booming there in Japan at least. Oh and this was a "local contest" I might add, not a regional or national.4 points -
This would be a brilliant choice to release.4 points
-

HK Models Bristol Beaufighter?
Archimedes and 3 others reacted to Kaeone57 for a topic
Mmmmmm, Beaufighter, mmmmmm! Alfonso4 points -
Getting closer. The bottom seams, which I had thought to be near flawless, are really not, as the primer reveals. I'm guessing that one or possibly two more treatments will get me where I need to be though.4 points
-
Something old-school - scratch-built 1:32 Dart Kitten - using old and new tech!
Archimedes and 3 others reacted to Iain for a topic
Further progress with Fusion 360 - coming on leaps and bounds now! Bear in mind these designs are simplified - they are small in 1:32 so any smaller detail won't print well, or be seen! All now printed and painted - look really good - but haven't had a chance to photograph yet. Engine is printed as 6 separate components. And this took about 10 mins to draw up - basic, but does the job! A few more parts to draw up - but might, actually, finish this shortly! @wunwinglow - you really have created a monster... Blue skies, Iain4 points -

P-38L-5-LO, s/n 44-26412, "Shady's Lady", August 1945
Pfuf and 2 others reacted to Miloslav1956 for a topic
Trumpeter 1/32 model, Kagero decals, Reskin wheels set, Phoenix cockpit, All colors MRP3 points -
Takom 1/35 AFH-64D Royal Netherlands Air Force. For a long time, in order to keep the variety, I have been urging to make a helicopter. For the most part it is an OOB build with the exception of the cockpit, I used Eduard's update set for that. The FLIR lenses were made from an old DVD. As paint I used US HELO drab from AK real color. I have recently started using AK Real color and I really enjoy airbrushing with it. For the weathering process I mix the main color slightly lighter with the different tones, then I used the wethering sets from AK. The model is quite detailed. apart from the few challenges it was a pleasure to build and I didn't encounter any major issues I used LSP and You Tube for inspiration. the last four photos I used for the weathering process cheers Otto3 points
-

1/32 Kotare conversion; Supermarine Spitfire LF Mk.Vb YO-A 401 Sqn RCAF.
duke_ and 2 others reacted to monthebiff for a topic
Managed to complete the cockpit assembly today, first up was adding the HGW seatbelts and then fit the Barracudacast plastic seat and armoured backrest to the Kotare frame and then the Barracudacast late control column to the footboards as well as adding straps to the pedals And the rest of the sub assemblies prior to assembly And the cockpit tub together Time to get the fuselage together now and then concentrate on finishing the wing conversion. Regards. Andy3 points -
HK Models Bristol Beaufighter?
Rick Griewski and 2 others reacted to Palm-tree for a topic
Neil could have pointed his scanner at anything just to throw everyone off the scent? Even if he set it up in the gift shop the inevitable wishlist would appear.3 points -
The Sunglass Cover, Support Arms and Support assembly is going to be tricky. These parts have zero mount pins/tabs/joints. Make a jig using Legos. Secure Cover and Support Arms. Ready for glue. \ Using 2 part 15 minute epoxy I use a syringe with 14 gauge 1.5" industrial tip and draw a bead along entire inside of the join on both sides of the Support Arms and Cover. The long cure time allows minor adjustments before the glue sets. A nice solid join. All parts washed and ready to glue, prime & paint. After primer applied the outside seams of the Sunglass Cover are wonky. I break out the 3M Glazing and mix with Mr Leveling Thinner to a creamy paste and spread with a piece of plastic card. The Sunglass Support is painted Tamiya German Grey. Four mount pins are created with 1/8" plastic rod. A minimum of 4mm extend for each rod when assembles with the Sunglass holder. This is an exercise of careful and precise measuring. A dab of epoxy is applied to outside end of each pin to achieve a rounded effect. After full cure the pins are painted Alclad 102 Duraluminum. The Sunglass Holder is painted a mix of 1 part Gunze 3 Red and 9 parts Gunze 2 Black. 3:9 Using putty to secure the Sunglass Support I carefully apply 15 minute epoxy to corresponding hole on the Sunglass Support with micro tip applicator then insert the pins. The body is painted Gunze 116 RLM 66. The data plate is Gunze 2 Black. I drilled out the corresponding mounts screws and will add real screws after I whitewash the letters on the data plate. The reflector lens mount is painted Gunze 116 RLM grey then details picked out with Gunze 2 Black. The top ring will also get some Gunze 2 Black love. The whitewash application on the data plate failed and has been repainted black. This process is to bring out the engraved letters. So far it ain't working for me. The alignment ticks whitewash showed up quite nicely. This is a test fit and I'm really stoked on the look. This is far from complete. You can see I hollowed out the body with a 1/4" drill to reduce weight. I reduced body weight by over 3 ounces. The Crash Pad will cover the hole. The Sunglass Cover assembly is secured to the Sunglass Fixing Plate with one sheet metal screw on each side. This will allow final positioning before I glue all components to a "static" position.3 points
-
HK Models Bristol Beaufighter?
Archimedes and 2 others reacted to Dennis7423 for a topic
Couldn't agree more. It takes about an hour or so to scan something as large as a Beaufighter (externally, not counting interior scans), so why not maximize your time while you are there. Would be silly not to, as we're talking mere additional hours vs. more time, plane tickets, etc in the future. Also not sure if HK owns their own FARO scanners, or if they rent them. A few years ago, a brand new FARO scanner cost about $45k. And we had three of them at the PD. It was hell if you broke or dropped one, just ask my old coworker Kyle. He dropped one on a scene, and just to send it back to FARO to look at and diagnose any problems (not repair), was $8k. - Dennis S. Mount Juliet, TN USA3 points -

Looks like Eduard is reassessing 1/32
Mr.T and 2 others reacted to Tolga ULGUR for a topic
When I read this sentence, I see an inconsistency here. They just released the 1/48 P-51B. If best sellers in 1/48 scale will determine future releases in 1/32 they think 1/48 P-51B won't sell enough since they didn't include it in 1/32. It's seriously weird. I'm seriously tired of waiting3 points -

RAF Landrover 1/35 Scale
patricksparks and 2 others reacted to MikeC for a topic
Make the most of this, I don't often do a vehicle! Something that can be found almost anywhere the RAF (other British Services are available) has a presence is the ubiquitous Landrover. It has/had many RAF uses and guises, from swift-response fire truck to general service vehicle. Until the early 1970s airfield vehicles were painted yellow: then came the NATO "tone-down" where everything in sight was painted green. So here's an Italeri Landrover LWB Series 3 soft-top, dated anytime from 1974 onwards, built from the Italeri kit. It does not represent any specific vehicle, simply a generic "Landy", which allowed me to use one of the two sets of numberplates in the kit. I freely admit I don't know the registration system, so it may well be an Army number as that's what the kit option was. The "Royal Air Force" legend came from a spare aircraft decal sheet. What's it used for? Perhaps a general station "hack" vehicle. Unfortunately, right at the last minute, I lost the passenger-side door mirror, so decided that the driver had "wiped it off", and has perhaps yet to confess his sins to SNCO i/c MT. I will also confess to one more heresy: I may well stand it next to an appropriate 1/32 LSP in due course! Anyway, here 'tis. Thanks for looking.3 points -

RAF Landrover 1/35 Scale
Derek B and 2 others reacted to thierry laurent for a topic
Good idea. Unless you use it in a BAOR setting, there may be another heresy! As far as I'm remembering correctly the Italeri kit was a left hand drive vehicle. And for whatever strange reason Italeri put six bolts on the wheels whereas Landies only used 5! Nonetheless the kit looks like a good seventies Series III model.3 points -
Looks like Eduard is reassessing 1/32
BiggTim and 2 others reacted to Cycling Guy for a topic
Here in the United States, at my local shop, I am the youngest by about 20 years (I'm in my 30s) and its always been that way. I haven't been to a show in years, but I suspect I'll be one of the youngest non-juniors to show.3 points -

Malvinas Dagger
themongoose and 2 others reacted to blackbetty for a topic
inbetween drying of the pit parts, i used the petals that Alain sent me with modified innards of the Zipper engine (i used a resin engine there) to get something to remotely render the Atar 9C3 points -

MASTERS is here!
D.B. Andrus and 2 others reacted to R Palimaka for a topic
Those are good recommendations by Tom. "Night Bombers" was filmed in colour at the time, and is a remarkable film to watch, although it's not like a commercially released film like "Twelve O'Clock High" or "Memphis Bell". I can't really think of one for Bomber Command, apart from "The Dambusters" which was about one special mission and wasn't really representative of the main effort. As for books, there are a few that come to mind, other members might suggest more, "Bomber Command" by Max Hastings - some say he was too critical of "Bomber" Harris, but the later revised edition is a good overview "The Right of the Line" by John Terraine - a massive work that covers all of the RAF wartime effort, by a superb historian "The Bombers and the Bombed" by Richard Overy - covers both the American and RAF bombing campaign, so gives you both in parallel "The Hardest Victory: RAF Bomber Command in the Second World War" by Denis Richards, who was involved with the RAF Official History Martin Middlebrook's books dealing with the battles over Berlin, Hamburg or Peenemunde. As for personal accounts, probably the finest is "A Thousand Shall Fall" by Murray Peden. This book is often recommended and cited in other works, and is a very fine piece of writing in itself. Bomber Command's war was very different and difficult. From the early daylight failures, through the switch to night bombing and developing technology to overcome the darkness and the relentless German defences...to finally going back to raids in daylight for some operations late in the war, thanks mostly to the efforts of the USAAF to win air superiority over Europe. Bomber Command was a very international effort. While the majority of crews were from the UK, there were crews and full squadrons from all over the Commonwealth and occupied Europe. The Canadians alone had a separate group within Bomber Command. 6 Group, headquartered in Allerton Park, at peak strength consisted of 14 heavy bomber squadrons. Richard3 points -
Why Keep Threads On Topic?
Archimedes and 2 others reacted to LSP_Kevin for a topic
It sounds like you might be happier somewhere else. Kev3 points -
HK Models Bristol Beaufighter?
Archimedes and 2 others reacted to thierry laurent for a topic
Excellent idea reinforced by the fact the Infinity one is now buried...3 points -

1/18 Supermarine S6B - S1595
airscale and 2 others reacted to Archimedes for a topic
Peter, I ran out of superlatives to describe your work a long time ago. I’d just like to say a heartfelt thank you that you take the time to share your work with us here. You really do show everyone else what is possible. Thank you so much. Kind regards, Paul3 points -

Series 12 Airfix 1/24 Spitfire Mk1 - masks
geedubelyer and 2 others reacted to DavidnotDave for a topic
Found cockpit and camo masks for $30CAD.3 points -

Why Keep Threads On Topic?
Archimedes and 2 others reacted to mozart for a topic
Indeed, let’s just let it rest chaps…..nothing is going to be gained by further “discussion”.3 points -
MASTERS is here!
CRAZY IVAN5 and 2 others reacted to R Palimaka for a topic
I agree with Richard and Tom above. For me it was a satisfying enough overview although it fell short in places as others have pointed out. No, I don't think it met the level of Band of Brothers but gave a sense of the bombing campaign and how it affected the young men involved. The CGI was not as good as I hoped, but there were brilliant little moments like the 78th Fighter Group Mustangs cruising through the formations of B-17s in the final episode. It was interesting to watch it with my partner Ruth, who bless her heart, has been seriously making an effort to understand the air war, the people involved and the aircraft as well. In six years we've been together she's made huge strides in understanding, and asks probing and interesting questions. As a vehicle for learning, Masters of the Air provided a chance for me to explain the issues involved in the American bombing effort, and she quite enjoyed the character development, the atmosphere created on the base. She said it gave her a sense of the intensity of the battles in the air. She actually cheered when the Mustangs intervened during the mission to Berlin! The series introduced her to the POW experience, the forced marches during the winter of 1945, and she had no idea about the food drops during Operation Manna. As members of the Canadian Warplane Heritage Museum, she's familiar with the RCAF contribution and was quite shocked at her reaction to the virtual reality night time bombing raid experience that was presented at the Museum. Masters of the Air provided a chance to see the struggles to make the daylight American effort succeed. It was funny, during the raid in Southern France by the "Red Tails" she also commented on some of the engine sounds..."That's not what a Mustang sounds like!" I guess all the airshows I've taken her to have had an effect. If the series provoked some of the audience to ask questions, to do some research and read more deeply then it succeeded. We found it moving, and Ruth's comment at the very end showed me it worked. She turned to me and said, " After all they saw and endured, and the friends they lost, how did they manage when they got home?" The biographies of the main personalities gave her a bit of an answer. Maybe watching it through someone else's eyes helped, but I took it for what it was and thoroughly enjoyed it. Richard3 points -

HK Models Bristol Beaufighter?
scvrobeson and 2 others reacted to Martinnfb for a topic
3 points -

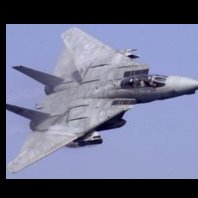
Trumpeter F-14d
spyrosjzmichos and 2 others reacted to chrish for a topic
So the last few bits have been stuck on (except the turned metal pitot which is apparently still in transit Fuel tanks ready for loading up I went with a different painting method on these new pipes over the first set And glued on; fuel tanks glued on; aaannd finished... I'll add the next few images to RFI A great kit, a lot of enjoyment to build although, I thought it would take longer... Thanks to all those who stopped by for a look Extra thanks to those who left a comment and words of encouragement.3 points