Leaderboard


Popular Content
Showing content with the highest reputation since 04/07/2012 in Posts
-

1/32nd scale Short Sunderland MkII - ID Models (Tigger) vacform
Castor and 87 others reacted to tomprobert for a topic
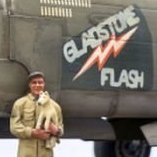
Evening all, I took advantage of my time away from the classroom last week and finally finished this two-and-a-bit year project: Tigger Models' (the old ID Models' vac kit) of the Short Sunderland in 1/32nd scale. This has been a really rewarding project, and despite a setback when I knocked the completed fuselage with its interior off the table, making a rather messy contact with the kitchen floor, it's been great fun and relatively straightforward - despite its size. Kits like this come as a blank canvass for the builder to work his/her magic - 'bumps in plastic' is quite apt, but the shapes are reasonably accurate if not a bit primitive (picture borrowed from Tigger's webpage): The kit provides a the correct hull shape for a MkI or MkII, but with some mods the more adventurous builder could easily convert it to a MkIII/V, etc. All panel lines and surface details need to be added and the parts are devoid of any real detail, but the plastic is lovely to work with and scribes/sands beautifully. Due to the size of the parts, home-made interior bulkheads are needed, and any visible parts of the interior need to be made from scratch: Strong wing spars are also essential to keep the structure of the model sound - thick plastic card spars were made and added: The flightdeck interior, bomb room and nose section were all made from scratch and detailed with some aftermarket seatbelts: All the aerials were made from sprue and thin wire - markings were mix of home-made masks and decals: The engines were made from spare HK Models' B-17 cylinders coupled with Revell Beaufighter parts to make a reasonable representation of the Bristol Pegasus. The early-style exhausts were made from Evergreen tube bent slowly over the toaster! Landing lights were home made from some of my daughter's diamante play/craft jewellery (for the lights) and the covers were clear acetate once again heated over the toaster. Rigging for the floats came for EasyLine and reminded me why I'll never build a biplane! The kit's transparencies were used throughout - all turret interiors were scratch built. Beaching gear was also made from scratch with a friend helping out with some 3D printed wheels: Bomb racks were again made from scratch with some rather lovely depth charges coming from Tim Perry - thanks, Tim! I used Xtracolor enamels throughout the build - 6 tins were used in total! I don't like to go too mad with weathering on my models so kept it relatively clean - however you can't build a Sunderland without the distinctive water marks on the hull: A bit of exhaust staining and some fading with post-shading completed the upper surfaces: And for some generic pictures: I'm often asked how big a 1/32nd Sunderland is. I'm sorry to inflict my ugly mug on you but you can see that it is a massive model with yours truly holding it! My model represents a Sunderland MkII of 201 Squadron during 1942 in the lovely temperate sea scheme. Painting white gives me nightmares (especially something of this size) so I took the easier option. W4001 (ZM-V) was only on strength between February to October 1942, before hitting an underwater rock and being written off, thankfully with no loss of life. Thanks for those who took an interest along the way - I'm off for a long lay down in a darkened room to contemplate the next project! Best wishes to all, Tom88 points -
Hi everyone, This is the first time I’ve posted my work on a forum and it’s also my first diorama. This diorama is supposed to represent an underwater wreck of an F4U-1A Corsair in shallow waters off the coast of New Georgia in the Solomon Islands. It’s not a model of any particular wreck but incorporates much of what I’ve seen on wrecks in the Pacific and, in particular, Corsairs. I was surprised to find that there aren’t many dioramas like this on the internet so, with little to guide me, I spent much of my journey experimenting and trying to find solutions to the myriad of challenges I encountered. The kit is Revell’s 1/32 scale Corsair, which I picked up cheaply at a swap-and-sell. The diorama base is rigid foam insulation covered with a dusting of tile grout and topped off with hardware store epoxy putty that I sculpted into reef. I canted the upper sheet of foam base to simulate the sloping sea bed. Small bits of rail road scenery sponge were applied to the reef to simulate sponges and coral. I researched marine life that lives in the Solomons and settled upon making a couple of Potato Cod, a White-Tip reef shark and a ray, all made with styrene sheet and Milliput. The fish are elevated above the sea bed with very small diameter brass rods placed so the pectoral fins obscure them. The divers were another story. I lashed out and bought three of Royal Models’ 1/35 scale scuba divers, thinking the difference between 1/32 and 1/35 scale wouldn’t be that noticeable. How wrong I was! The Royal Models’ divers are beautifully sculpted and cast but they were far too small for this diorama. I scoured the internet and found a resin kit of two 54mm diver figures from a scene in the James Bond film, Thunderball. I bought two of these kits off AliExpress, only to find that they were very cheap knock-offs of what I think is an Andrea Miniatures kit. I had to re-model the divers’ poses to suit the airframe, fill lots of air holes and re-sculpt many of their details. I scratch-built the scuba equipment using a 6mm knitting needle, copper wire and plastic sheet. The bubble-streams rising from the divers are assemblies of tiny bubble castings I made from ultra-clear Araldite (epoxy glue) that were assembled with superglue. I then took a big risk and painted selected bubbles with Molotow liquid chrome, just to break them up and provide a bit of added ‘reflective’ interest. The colours in the scene may appear somewhat odd but I’ve tried to represent the colours that dominate in the depths of the sea, hence the blue/grey-coloured sand. Additionally, I tried to create a vignetting of the light by darkening the sand at the corners of the base. The base and the aircraft are painted with MRP and SMS lacquers, while the divers are brush-painted with Vallejo acrylics. I toyed with the idea of immersing the whole thing in clear resin but the amount required was cost prohibitive. I hope you like my project. It fought me all the way and I wondered if I’d ever finish it. I had no idea how much work is involved in a making something of this size and I definitely have a new-found respect for diorama builders. You are most welcome to critique my work. Cheers, Wayne87 points
-

HobbyBoss B-24 Liberator
TenSeven and 75 others reacted to RAF Liberators for a topic
Hey folks, I'm normally a lurker here, I don't tend to post outside of my regular sites just read other peoples stuff. But I've been told I should post this over here so here I am, cap in hand showing you my finished bird. It's out the box and yes I'm fully aware of all the shortcomings of the kit, Davis Wing, Turrets yardy yar etc etc I've put Master Model Barrels on it and some RB belts, not that you can see them, but other than that she's El Naturel Finished in Alclad, Gunze and Ushchi metal powders, weathered with Mig products. Thanks for looking and be gentle......... Gary76 points -
Hello all I brought this one across the finish line just before New Years but I only had time to take some pictures now. (For the Photo Geeks amongst us, I used a Canon EOS 5Ds with a 24-105mm L lens and a 80x80x80cm lightbox) The kit was my first full blown resin kit and it was a little intimidating to say the least. Up until now I did not enjoy using large amounts of CA glue but it has been a good experience. The fit is overall very good, especially between the 3D printed parts. It is a big heavy model but the landing gear (3D printed as one piece) is very sturdy and supports the model very well indeed. How great is it to have a 1/32 JA37 Viggen! - now bring on the Draken!! Enjoy /Niels75 points
-

Su-27 "Arctic Flanker" Trumpeter 1/32
Loach Driver and 71 others reacted to Memir for a topic
Trumpeter Su-27 1/32 finally finished... I tried to build heavy weathered Flanker based above polar circle with units called “ Guardians of the North”. I used Zacto intakes, nosecone, missiles and pylons. Aires Cockpit, wheel wells and exhausts. Armory resin wheels. Front windshield is a scratch build as kit part was really bad in shape. Colors - MRP paint including silver primer, transparent paints and metalizers. Tamiya panel liners and weathering Masters used. WIP here:72 points -

ICM CH-54A TARHE
Peter Gregor and 70 others reacted to oppenheimer for a topic
after 3 months bending wires finally finished this little one , hope you like it71 points -
Hi All This is the 1/32 Trumpeter MiG-29C built as a Ukrainian Air Force MiG-29S (9-13). It is loaded for a CAS mission inspired by a photograph I found online. It is impossible not to feel the impact of a war in Europe, in what feels like my own backyard - and like so many on these forums I also felt the urge to show my support. I tried to incorporate as much aftermarket stuff produced in Ukraine as I could. The Rocket Pods and Wheels are from ResKit. The paint masks are both from Foxbot and DN Models. The seat is from Quickboost and the pitot tube to replace the telegraph pole included in the kit is from Master. The exhausts are from Zacto model. The decals are a story of their own - I screwed up the first paintjob using the Foxbot masks I already had so I had to start over While waiting for the brand new released masking set to arrive from DN Models, Foxbot also announced a brand new set of decals for a digital camo MiG-29. I wrote Oleg from Foxbot if I could somehow get a set and he happily sent me one straight from Kyiv in the middle of an active warzone. That kinda makes this model special for me.. I painted the model entirely using paints from MRP - the second time also in the right order . Below in order from Dark to Light: MRP-034 Tank Grey (MRP-405 seems to be too light for the MiG-29) MRP-403 Grey MRP-402 Light Grey MRP-246 Light Arctic Grey The underside is painted with MRP 405 Blue Grey Hope you like it Niels Click the images and they will open in a larger version71 points
-

P-38L-5-LO, s/n 44-26412, "Shady's Lady", August 1945
John1 and 68 others reacted to Miloslav1956 for a topic
Trumpeter 1/32 model, Kagero decals, Reskin wheels set, Phoenix cockpit, All colors MRP69 points -

Mirage 2000-5F & Mirage 2000D - 1/32 Kittyhawk
D.B. Andrus and 67 others reacted to ROM for a topic
Hello The last 2 years, I was busy with this quite demanding project. And now I am pretty happy to finally share the result . I built side by side two Kittyhawk boxings, both in French Markings: a Mirage 2000-5F during Operation Harmattan (Lybia) in 2011, and a 2000D from Operation Chammal (Iraq/Syria) in 2015. The builds were far from "From the box" so to say... Kittyhawk... well is Kittyhawk you know. Interesting subject, quite nice details, but mistakes, lacks, or incomplete intructions. So I had to provide a lot of work to bring the models to a higher standard they deserve. It was maily done with the help of 3D printing. Non exhaustive list of addons: - Exhaust: Reskit - Cockpit -5: Renaissance - Cockpit 2000D: 3D+Quinta - Seats: Grandmodels - Wing Tanks RPL541 542: FFSMC - PE parts: Eduard - Wheels: 3D - RPL522 ventral tank: 3D - Missiles & Pylones: 3D - GUB24: 3D - Decals: Uprise et FFSMC - Figures: Reedoak The Mirage 2000-5F: And the Mirage 2000D: The full WIP is detailed in 80 pages of french Cocardes magazine, with English captions. With Mike's authorization, I share the link if you want to get a copy: Magazine Cocardes 24 Hope you like them! Regards Romain68 points -
Here is my recently completed 1/32 Tamiya F4U-1a Corsair painted in one of Greg "Pappy" Boyington's purported mounts, BuNo. 17740. The Tamiya kit is an extraordinary state-of-the-art kit and doesn't need much to build up into an impressive model but I did take the liberty of adding a few aftermarket items: 1. Vector Resin Cowling 2. Barracuda Resin Wheels and Tires 3. HGW Fabric and Phototech Harness 4. Barracuda Cockpit Stencils 5. Montex Masks 6. True Details Resin Parachute 7. HGW Wet Transfer Stencils The complete build can be found here: The canopy is removable so that I can pose it in the closed or open position. I did not glue the wings into place so that transport would be easier. AK Real Colors acrylic paints were used for the exterior.68 points
-

1/32 Tamiya F4U-1 Birdcage Corsair
ringleheim and 66 others reacted to curiouslysophie for a topic
Here is my rendition of the ‘bent-wing bird’. I used the Eduard cockpit (never again) & propeller, HGW belts & stencils, Barracuda Wheels, and a load of scratchbuilding! I did some super-detailing on the engine, cowl flaps, canopy fittings, and wheel bays. It is a fictional scheme from a Guadalcanal based unit, flown by the fictional Lt M. W. Hendrik. I hope you enjoy my build, I had great fun with the weathering on this one. I have come to love dirty aircraft and learned a good deal of new techniques for this plane (still not so great at them!). On to the pictures!67 points -

*** Finished *** 1/32 Airscale Boulton Paul Defiant Mk.1 "Test build"
red baron and 65 others reacted to Tolga ULGUR for a topic
Here is a new Project Many of you know that Peter (from Airscale) is working on a new project: This is exciting 1/32 Boulton Paul Defiant Mk.1 Peter sent me a draft (pre production) copy of this kit for a test build. First of all, I would like to thank Peter for sending me this excellent project. I am not used to this kind of draft projects, but I will try to do a test build as much as I can and give Peter feedbacks. Peter stated that since this is pre-production, it may not be perfect and the final production will be printed with more precise layer height. First step; here are the parts66 points -
Hello, everyone. If you've been following along the build thread, you're well aware that I was nearing the finish line on Hong Kong Models' new A-20G Havoc kit after starting it the day it arrived in June. If you haven't been following the build thread, but want a painfully verbose treatise on the inner workings of this brand new kit, feel free to dive into it and its ~350 photos. If you'd just like to see the photos, here's the gallery. Anyhoo, as I've stated in a number of other threads, I'm fascinated by the SW Pacific campaigns in the early-mid war years. I'm also a fan of big twins in attack configurations. Thus, when I heard that HKM was coming out with an all new A-20G Havoc in gunship configuration, I was excited to say the least. Unfortunately for me, their boxing was strictly marked and built for the European theater. Not to be deterred, I decided to embark on a bit of a journey. For this build, I'd be doing several firsts. To make a Pacific bird, I'd have to scratch build wing bomb racks and teach myself the art of printing my own decals. I'd also push the idea of masking farther than I had ever done before, so that was fun too. In the end, I'm very happy with the results and they feel pretty close to the original. The photos turned out a little weird, unfortunately; I suspect that's due to my camera trying to compensate for the failing evening light. So, things like the speckling on the nacelles and the dust pigments on the wings are much more pronounced than they are in real life. I found a few close up pictures of A-20s with extensive oil spatter all along their fuselage and nacelles aft of the engine, so that was the inspiration there. Anyway, here's "STINKY" of the 3rd BG, 12th BS in New Guinea. According to Michael Claringbould in Pacific Profiles vol. 3, this aircraft survived hostilities and was scrapped in situ after the war. The photo below is one of two taken of her supposedly while she was in Sydney, Australia. The squadron insignia and serial number were the first decals I ever printed for myself. The nose art was done with a mask. I painted the dark drop shadow, then moved the mask to the 10 o'clock position and painted the yellow. Turned out pretty sharp. For grins, I got my SW Pacific fleet out for a photo op, largely because I wanted to see exactly how the B-25 and A-20 compare in size.66 points
-
My rendition of Major Edward Giller's "The Millie G" is now complete. This was by far my most involved project with extra detailing for the engine, cockpit, landing gear bays and the MG bays. Here's a link to the build thread in the Works in Progress section: https://forum.largescaleplanes.com/index.php?/topic/92956-132-tamiya-p-51d-15-na-mustang-the-millie-g/ Thanks for all the comments and suggestions during the build. In summary, here were the aftermarket additions to the kit: Barracuda cockpit upgrade Barracuda instrument panel Barracuda cockpit sidewalls HGW seatbelts Eduard guy bay kit (late) Barracuda P-51D tires Eduard P-51 exterior detail kit Barracuda decals + placards Eduard canopy masks Eduard engine detail kit The main paints used were Mr. Color lacquers. Now for the final photos. All of the main markings were painted except the stars and bars and tactical lettering, which were decals. The stencils from the Barracuda decals were used instead of the kit stencils. The ailerons and elevators were glued in place. The rudder and flaps are movable and do a pretty good job of staying in place. The Eduard gun bay doors is an excellent upgrade over the kit doors. The ammo belts are from the Tamiya kit. The engine covers are all removable and fit reasonably well with Tamiya's magnet system. The starboard panel just under the exhaust is a little fiddly. The weathering was a combination of oils, airbrushed Tamiya acrylics (heavily thinned) used for local effects and with sponge chipping and spatter templates. Colored pencils and pastels were also used for various effects. Mr. Color GX100 was used for gloss coats and GX114 for flat coats. Great stuff. I used Mr. Color C330 RAF Dark Green for the fuselage. And a slightly darker version for the nose checks and spinner green. The NMF paints are Mr. Color Super Metallics. The checks on the nose were painted. The drop tank fuel and pressure lines were created from 0.5mm wire. I kept the weathering on the drop tanks relatively light since often they were single use items. All of the fastener holes in the engine panel frames were drilled out. Light colored oils were used on the NMF surfaces to depict varying amounts of oxidation on the panels. Eduard's engine upgrade contains PE hose clamps for all of the main hoses and piping in the engine. They are a pain to attach and paint but look pretty snappy when complete. Also, the edges of the gunsight glass were painted Tamiya clear green to simulate the look of the thick glass plate. The aluminum paint on the wings was rendered with a combination of the Mr. Color Silver and light gray. Mr. Surfacer was used to fill the rivets and panel lines on the forward 40% of the wings. Grime and wear was depicted using a combination of Tamiya acrylics, oil paints and colored pencils. Some wear is down to the primer and some is down to the base metal. The primer toward the back of the wing is ZCY and the primer toward the front is dark gray putty colored, based on the construction process. The Eduard gun bay doors really add a lot compared to the kit doors. The Eduard doors come with a hinge at the bottom of the door for gluing it permanently in place. I wanted to be able to remove them, so I made tabs similar to the kit doors and glued them onto the Eduard doors. I also added a support rod made out of 0.3mm wire. I really like the iconic 343 FS, 55th FG markings. Chipping around the panels and doors was done with acrylic paints and colored pencils. The cockpit detail from the Barracuda kit is quite good (details are on the build thread). One note was that I changed the wiring from the radio box behind the pilot seat because the cable harness would interfere with the canopy support bracket. So I converted to a strand of speaker wire and painted it black. Thanks for following along! Comments and critiques are more than welcome. Thanks again.66 points
-
This is my recently completed build of the Revell Me262B-1/U-1 kit in 1/32 scale. I have chosen to depict Red 10 of 10./NJG11, which was one of four Me262B nightfighters captured by the Allies at the end of the war. The aftermarket item list for this build is as follows: 1. Master FuG 218 Neptun brass radar assembly 2. Barracuda Me262 resin wheels 3. HGW Me262B fabric seatbelts 4. Eduard Me262B-1 Exterior set 5. Eduard Me262B-1 Interior set 6. Eduard Me262B-1 Mask set Please note that large portions of the Eduard Exterior and Interior set went unused. Major markings were painted using masks produced with a Silhouette Portrait cutter. Kit decals were used for the remainder of the markings. The start-to-finish build thread can be referenced at the following link:65 points
-
It is easy to get sidetracked when researching the A6M2. It will inevitably lead the enthusiastic reader to Canada, which it did in my case. I didn't know that Mitsubishi's competitor Nakajima built Zero's, or that there were subtle (and obvious) ways of knowing the difference. One of those differences, the white surround to the Hinomaru, was one of the major features I wanted to incorporate in this build, since it highlights the dark shade of the grey with which the Zero was painted. Then I discovered the concept of the Houkoku presentation number, and that became number two on the wish list! How does this research end up in Canada you may ask? In 1968 an enterprising Canadian from Manitoba went in search of wreckage on Ballale Island in the Western Solomon Islands, and he hit the Nakajima built Houkoku A6M2 motherload. Three of them! They were chopped up (along with a Val), and carried out of the jungle by local labour, put onto boats and by the most amazing feat of horse trading ended up on Friendship Field in Carman, Manitoba. Their story is pretty complicated, but ends up in a collection of artefacts owned by the Blayd Corporation, also from Carman. A name that kept surfacing around these aircraft and research about them is Ryan Toews - another Canadian. Ryan's tweak list for building both of the Tamiya Zero's is a must read for anyone attempting these kits, and he has been a veritable gold mine of information for this project. You can see his contributions in the build thread, along with all the other information about the construction and painting that I won't rehash here. Since the tails of these aircraft were not attached to the wrecks, it is pure speculation at this stage to assign any identity other than the construction number. The aircraft is pictured soon after delivery to the island, having been assembled and test flown, awaiting the painting of unit identification. A final salute... Sean63 points
-
1/32 Revell F-4E 50TFW - In-Flight and Lit Up
Anthony in NZ and 61 others reacted to RichieB for a topic
Hi everyone, This is the Revell 1/32 F-4E kit with some aftermarket help from GT Resin in the form of exhausts, belly strap and intakes, new nose from Sierra Hotel, Aim-9Js from Cutting Edge and a cockpit from Legend. The aim was to depict a late 70's USAFE jet from the 50TFW at Hahn AFB using AirDoc decals, put her in-flight and add some lighting to bring her to life. This was sort of a learning project for me, picking up on the excellent tips found in this forum, trying out some new techniques and learning from my mistakes (of which I made a few - see build for details!). In the end it took 2 and a half years to complete so the ratio of builds to acquires is way out of kilter. Anyway, on to the pics... And with lights on... Overall, a challenging but fun build of the impressive Phantom! Build thread is here ... https://forum.largescaleplanes.com/index.php?/topic/58988-132-revell-f-4e-what-could-possibly-go-wrong/&page=1 Many thanks for looking!62 points -
Tbd-1 Devastator - Trumpeter - 1/32
Durangokid and 60 others reacted to jimvit for a topic
Bonjour à tous, je vous présente mon dernier projet, un Devastator. Le kit Trumpeter est très bien réalisé, mais il faut avouer qu'il manque de détails, notamment dans le cockpit ! C'est pourquoi j'ai ajouté un kit Airscale Pro avec cockpit, hélice et mitrailleuse. Et des pièces d'Anyz. Demandez des pochoirs. Et un peu de grattage aussi. Dévastateur n° 1505 VT-6 L'équipage participe à une attaque à la torpille sur l'île de Kwajalein. USS Enterprise . Merci d'avoir regardé61 points -
Pictures only ... WIP LINK61 points
-

1/32 F-16AM "Dannebrog" Viper
The F-16 Freak and 60 others reacted to Zola25 for a topic
Hi All Yes, another F-16 - I cannot help it.. This is the Royal Danish Airforce F-16AM E-191 - otherwise known as "The Mighty Dannebrog Viper". E-191 was painted like the Danish flag "Dannebrog" in 2019 to celebrate the 800th anniversary of the Danish flag. It is the oldest unaltered flag in the world and something that we Danes are mighty proud of. Not every country use their flag for celebrations but in Denmark it is used in abundance to celebrate anything and everything so this paintjob turned out to be rather popular. People who have no interest in aviation at all seemed to all know of the existence of this Viper. Because of its popularity, it was decided to leave her in this livery until it was to be retired or sold as the F-35´s would make their way into service, and it has flown in this paint job ever since. Both as an airshow display Viper and on active duty on QRA. You have to wonder what the Russian pilots think when they are intercepted over the Baltic Sea by this F-16... The model is the Tamiya Thunderbird kit converted to an F-16AM. I used a few other aftermarket items to complete the build: PWMP Tail conversion Cross Delta strengthening plates Reed Oak Pilot Quickboost Old Style stabilators Reskit Sidewinders Phase Hangar Resin JHMCS Sensor Custom Masks in cooperation with DN Models I reached out to DN Models @Eagle Driver to see if they could help me design a paint mask set. I cannot thank them enough for dropping everything else to make this happen. Within a week of emailing back and forth with test designs we had a complete set of masks that worked. How cool is that!! It is not the easiest thing to work with bright colors like Red and White and keep some tonal variation without ending up with that "toy look", but I think it turned out ok in the end. I am super happy to have this iconic Viper on display on the shelf. I hope you like it too.. The Dannebrog Display Team have a facebook site if you want to see more of this aircraft and what they are up to: F16 Solo Display /Niels PS: The canopy is not glued into place which is why it sits a little proud in some photos61 points -

TBD-1 Devastator VT-3 Midway
Castor and 60 others reacted to Rod Bettencourt for a topic
The Douglas TBD-1 Devastator was the US Navy’s premier torpedo bomber when hostilities broke out on December 7th 1941. Six months later it was completely obsolete and removed from combat operations. The subject of my build is from the USS Yorktown VT-3 aircraft (0303) crewed by Harry Corl and ARM3 Lloyd Childers. One the morning of the 4th at approximately 1200hrs Petty Officer Childers spotted smoke 25 miles away to the starboard. Machinist/pilot Harry Corl was able to get the squadron skipper Lt Cdr Massey attention. The skipper made a course correction to head for the nearest carrier (Hiryu). It was reported that at this time the squadron was jumped by approximately 30 Zeros. VT-3 was lucky enough to have 4 F4F Wildcats with them to help fend off the attackers. After what I could only imagine as an agonizing 20-minute slow approach, they were able to release 5 torpedoes. Corl and Childers 0303 had been badly shot up on the approach and the only way to keep airborne was to jettison their torpedo. The following is from Machinist WO/Pilot Harry Corl Mission report date 6-15-42: The free gun had jammed during the fight. Childers, Arm3, my gunner used .45 automatic during the 10 minutes of the attack. Childers was hit in the right ankle causing a compound fracture of the same. He received two hits in his left leg above the knee no broken bones in that leg. I arrived at the Yorktown at 1425 circled it twice and saw that there was no chance of getting aboard. (Yorktown was bombed by Hiryu Vals) So I proceeded over the Enterprise. I attempted to land aboard, but discovered I did not have enough tab control on the elevator to keep the nose up. I landed in the water head and to the starboard of the carrier alongside the destroyer USS Monaghan. The time of the landing was 1510. Ensign Harry Corl was KIA(VT-3 TBF-1) 25 August 1942. Lloyd Childers survived the war and became a Marine Aviator and retired as a Lt Col. This is the Trumpeter 1/32 TBD-1 Devastator from VT-3 USS Yorktown on June 4th 1942 Midway. I added Air Scale products such as the Photo Etch, propeller set, wheels and the single .30cal machine gun. I highly recommend their products. I did bits of scratch building such as adding cockpit wiring, relief tube, two internal windscreen braces (removed the molded on external windscreen braces), wingfold braces and leather pad for the bombardier under the pilots area. I used AK real color for the light grey bottom Model master Blue/grey for the top and AK for the interior green for the crew areas. I have seen some debate on-line about this, what color? But for me seeing the pics of sunken TBD’s aircraft from the discovery of the USS Lexington at the battle of Coral Sea. Interior green is also stated in TBD’s Devastators in action book(The Old One). Another debate is whether what squadrons carried the twin .30’s. It is very obvious that VT-8 for sure had them and I have seen some documentation that VT-6 (USS Enterprise) may have also had them. After many hours of research, I came to the conclusion that VT-3 only had the single.30. I came to this by listening to several recorded interviews With Mr. Lloyd Childers. And in the end, there is just no conclusive proof they carried the twins. I also used Hawaiian Air Depot masks for the A/C numbers and the insignias. I had previously bought the Gold Medal decal but figured painting over the corrugation would be far easier then decals. But I am glad I purchased it because they come with aircraft data. If anyone has seen what Trumpeter did with their data decals….well. Rod WIP Pics61 points -
Hello, Here is my last build, a very long one with a lot of sanding, test fitting and sometimes the help of boiling water to straighten parts.61 points
-
1/32 F-16C (Tamiya) - Venom - Viper Demo Team
Hubert Boillot and 59 others reacted to Zola25 for a topic
Hi All This is the Tamiya 1/32 F-16C in the colors of the VENOM - Viper Demo Team. I don´t often do demo schemes but this one was just too good to pass up I used quite a few extra bits; Aires Wheelbay + additional wiring Aires Exhaust Quinta Studios Cockpit Kopecky LAU 129 wingtip rails Model Maker Decal & Paint Mask set Bandit Resin Factory Travel Pod The Aires Wheelbay is a drop-in fit and essential for any F-16 build in my opinion. Its inexpensive and is almost an exact replica of the real thing. Just amazing! I wanted to try out the Quinta Studios Cockpit resin decals. At first I was a bit underwhelmed as with the colored PE. Looks good in pictures but...mjah. The trick is to give it a layer of flat varnish. It just changes everything and enhances all the details. Makes it look very realistic. Judge for yourselves - I combined it with a few details of my own and some careful brush painting. As the Venom Demo Viper never flies with anything on the wingtips, the new empty LAU-129 Rails from Kopecky Models came out at just the right time - The detail just blew my mind - take a look at his stuff - its just incredible. The Paint Mask set is really nice. I was very concerned that the emblem on the tail would curl up on itself but it turned out to be very rigid and could even be moved around just holding it with a pair of pliers. It just looks really cool painted on. The decals are extremely thin and prone to curling in on themselves though - I had to order a second set to finish the build Take a look - Hope you like it (If you click the images they will open in a bigger version) Thanks for looking Niels60 points -

1/32 Trumpeter SU-27UB
Loach Driver and 59 others reacted to miketippingmodels for a topic
Just finished the Trumpeter 1/32 SU-27UB , its the 2nd time I have built this in this camouflage pattern, it doesn't get any easier. So its an OTB build, the only extras are the static discharge’s, and Quinta studios cockpit decals, I also used Foxbot masking , but as a template then cut mine out of Tamiya masking sheets, and HATAKA acrylic paints enjoy. Mike60 points -
Italeri 1/32 F-104A Starfighter. Between 1958 - 1960 NAVY loaned 3 F-104A Starfighters from USAF to conduct tests of new Sidewinder missiles. Airplanes were based at NAWS China Lake - California. The kit was easy to build but a pain to get ready for natural metal finish I intended to make. Both fuselage halves had panel lines of different width and depth, surface was uneven and lot of sanding and polishing was required. The fuselage was initially sprayed with MR Surfacer 500 from a can and then sanded and polished followed by a layer of gloss white GX1. I used MRP metallic colors for NMF finish. Mostly Silver 128 and White Aluminium tinted with MRP White and MRP transparent paints. Polished by the polishing stick. Rivets were added after the paint job. I left the surface without a top clear coat as it would ruin the sheen of metallic paints. Aires - cockpit and wheel wells Eduard - exhausts, Sidewinders and wheels Model Master - pitot tube Paints - MRP "MR Paint"60 points
-
F-4E Kurnass 2000 1/32 Tamiya
NFR and 59 others reacted to Peter Gregor for a topic
Hi, so another Israeli bird is out. It is an F-4E Kurnass 2000 number 650 from the Bat SQN, Tayeset 119. The F-4E kit from Tamiya is used as a basis. The building was quite comfortable, I did not encounter any major problems. I used the cockpit from Avionix, of course, supplemented with a modification of the Kurnass 2000 version, MFDs, few switches, and a new HUD were added. I also used the seamless intakes from RealModel and thanks to Miro Medzihradsky for the dimensionally accurate engine nozzles. The refueling probe and part of the decals from Isracast are complemented by Hebrew stencils from Skys Decals. The armor plates in the lower part are cut out with a plotter, the central fuel tank is from the F-4J kit modified to the IAF standard. What bothered me the most was the slatted wing, but I think that the result revived the model. The AGM-142 with a pod are from the F-16I kit, but it was necessary to enlarge the pylons because they were specially adapted for these missiles and I also redesigned the guidance part of the missiles. The outer pylon for AN/ASW-55 is from RealModel. The AN/ALQ-184 (short) ECM s from AMS Resin and the adapter for ECM and reduction for the Sidewinder to the AIM-7 shaft are homemade. The whole model is rescribed and riveting according to available materials. The wheels and arresting hook are produced by Eduard. MRP colors and Ammo Of Mig washes were used on the surface. The sources are from Isracast and Double Ugly Books. Thanks for all comments. Added pictures:60 points -
hello everyone No way of dressing it up, but I have changed subject again... I will go back to the Fairey Firefly - this is it's second time of falling out of favour, but when you get the urge what do you do? My new flame is the early longnose P40. I have always thought it would make a good subject for me and very nearly started one after my P51, but didn't fancy another American aircraft in quick succession. It's easy to see why.. ..beautiful lines, natural metal and technically interesting. This is G-CIIO operated by The Fighter Collection who have said I can come and take at look at her once we are into the New Year and assuming there is no covid funny business preventing a visit... I have spent the last month or so researching and finding out about the airframe and the differences with the later short nose P40s and the earlier P36 - of which there are many. I also liked the timing with the GWH 1/32 kit coming out as folks will be talking P40's for a bit I had Jumpeii Temmas plans scaled and corresponded with Witold Jaworski who has digitally modelled the P40C and had done loads of research and analysis of factory drawings One thing I really looked forward to was doing what I did with my P51 and getting stuck into those drawings to replicate everything part by part. This was always something that hindered the Firefly, I just don't like working in a vacuum, I like the research and knowing what I am making is accurate An example like this - here is the tailwheel door in the parts manual.. ..I can find the part number and in Aircorps Library, look up the drawings.. ..then scale and copy the drawings to make up a set of photo-etch parts.. ..I did this hundereds of times and now have the mother of all PE sheets at 28cm by 47cm with everything I thought I could do in PE represented.. i thought I would base the model on the 21st Century Toys 'model' as I did with their Fw190D -this was on the basis that while it is a toy, the 190 was dimensionally pretty accurate.. So a trip to ebay and £160 lighter, one turned up.. Once the 'model' arrived I set about destroying it into it's component parts - this involved sawing some of the nose elements in half so I ended up with effectively two fuselage halves.. cue the first plan comparison and a very deflated feeling... ..it's too short, too narrow, has what looks like the late chin profile and is generally all over the place.. ..the rear fuselage is particularly out.. ..now, I did toy with the idea of just getting on with reworking it, but the more I looked, the more work I found - in the end I was trying to justify it because I had spent the money.. In the end, I bit the bullet and decided to scratch build it - I have no excuse - I have great drawings and having just scratchbuilt a Hawker Fury so feeling pretty confident.. ..first step was to get a sheet of perspex acrylic to trace out a 'keel'... ..I used a scalpel to score the perspex - you may juts be able to see some of the station lines here (on the red line).. ..once I had all the station points and outlines done, I used a jigsaw and a cutting disc to cut out the profile - with a big bit missing for where the cockpit is.. ..this again told me how out of whack the 21st Century Toys model is.. ..using Jumpeii's profiles I cut out all the fuselage station formers.. ..and cemented them in place using a mini set square.. ..then I soldered some square brass stock to get the dihedral right for wings to slide into - there is a little perspex jig holding it upright inbetween them.. ..they were epoxied in place with the smaller sliding box sections in place so the angles and dangles can be seen and the positioning made correct.. ..so there we are - thousands of hours of work to go, but it feels good to have something fresh on the bench and thats what it's all about right? TTFN Peter59 points
-
Hi everyone, 4 years after I started this build, I have only just got around to adding the finishing touches and calling it done.. A bit of background: Lopes Hope is a P51C-5-NT that Aircorps Aviation in Minnesota have put back in the air. I was so blown away by the photographic records they kept and the absolute commitment to accuracy they employ that I wrote to them asking for more info about the airframe. I was stunned when their VP wrote back offering to share info, permission to use their photo's in my build log and any support I needed - starting a relationship that flourishes to this day. They are the same guys that host the Aircorps Library which is an incredible online resource offering for a nominal membership fee access to all the factory drawings and manuals for a range of seminal aircraft. Their notes on this P51 and why they chose it echo my own: "Lope's Hope 3rd was a P-51C flown by Lt. Donald Lopez. Donald and Lope's Hope 3rd served in the China-Burma-India theater with the 14th Air Force, 23rd Fighter Group, 75th Squadron. The 23rd Fighter Group was the descendent of the famous American Volunteer Group or Flying Tigers after the US entered the war. Lt. Lopez had 5 victories in China and went on to become a test pilot in the early years of the jet age. Later he was the deputy director of the Smithsonian National Air and Space museum until his death in 2008. Donald Lopez was instrumental in the construction and opening of the National Air and Space Museum. The original wartime Lope's Hope 3rd was a P51C-5-NT, Army Air Force Serial Number: 42-103585. The serial number information was just acquired through the generous contribution of pages from Lt. Lopez's war time log book by his granddaughter Laura Lopez. Normally a WWII fighter's serial number is easily determined by just looking at the tail number. Squadrons in almost every theater of operations number planes this way, but not in China. In China the 23rd Fighter Group's squadrons were assigned a block of numbers for differentiating their aircraft. The 75th squadron's block was 150- 199 (or to 200 depending on source). Lt. Lopez used 194 on both his P-40N s and on his P-51C , Lope's Hope 3rd. Without his log book it might have been impossible to figure out his Mustang's AAF serial number. Our restoration airframe is a P-51C-10NT Army Air Force Serial Number: 43-24907 , that remained in the continental US during WWII and was used for training purposes during and immediately after the war. The decision to paint her in Lt. Lopez's color scheme is intended to honor him and his service to his country in WWII and to aviation all his life." The model started as a 1/18 HpH Desktop GRP shell.. and 1,230 pictures and a lot of work later, it looks like this.. I really enjoyed this one... it spoilt me though, having every drawing of every part and great references from the restoration meant i could just build everything i saw in front of me - that collection of hundreds, if not thousands of parts resulted in I think my best model. It is certainly a more complex aeroplane than the Spitfire I made, for example the gear bays on this were about 3 - 4 months work, on the Spit a week or two, there is virtually nothing in it's bays I hope you enjoy it and all my thanks to Aircorps and everyone who chipped in with encouragement in my build thread until next time Peter59 points
-

Italeri CF-104 Starfighter "Kicked up a Notch": KLP Publishing eBook now Available!
Starfighter and 58 others reacted to chuck540z3 for a topic
March 30/21 Thanks to Covid and lots of extra time, I have finished the 1/32 Italeri F-104G kit, converted to a Canadian CF-104 in only 4 months, which is a record short time for me. I have a WIP Thread on how I built this model here: 1/32 Italeri CF-104 "Kicked Up A Notch" Kit is one of the latest versions with great decals, #2514. Aftermarket Items are as follows: Black Box Resin Cockpit, 32009, made for the Hasegawa kit Aires Electronics and Ammunition Bay, #2208 ResKit Engine and Exhaust, RSU32-20 ResKit CF-104 Wheels/Tires, RSU-32-9 Master F-104 brass Pitot Tube, AM-32-037 Eduard Exterior PE set, 32427 (only 1 part) Videoaviation SUU-21 Bomb Dispenser (converted to MN-1A), 141632 Airscale Instrument Bezels and Gauge Decals Belcher Bits CF-104 decals, BD-8 Belcher Bits Canadian T-33 decals, BD24-1 (Letters and Numbers only) HGW decal rivets, 322011 (> 9,000 of them!) Paint was mostly Alclad Chrome and Aluminum shades over Tamiya Gloss Black Lacquer (TS-14), followed by a clear coat of Tamiya X-22 to allow for decals and decal solutions on the fragile Chrome. Other shades were mostly MRP synthetic lacquers. Final Quick Thoughts This kit is a real mixed bag of some good features and many challenges, but overall can be made into a pretty accurate looking F-104. The deep and wide panel lines are the weakest part of the fuselage which are very hard to mitigate, so you pretty much have to just live with them. While the Black Box (Avionix) resin cockpit made for the Hasegawa kit fit fairly well with a few modifications, the Aires Avionics and Ammunition Bay was a very tight fit and is not recommended for beginners. The ResKit engine/exhaust and CF-104 wheels are outstanding, while the Videoaviation SUU-21 (converted to MN-1A) bomb dispenser was pretty good with 2 sets of decals. The biggest surprise was the kit decals, which I would also consider outstanding, but I understand that decals in earlier versions of this kit are not very good. The HGW decal rivets worked much better than I thought, but with over 9,000 of them, you really have to put in a lot of extra time and effort to get the desired effect. Overall, a very good modeling experience, but I’m also really glad it’s over with! Oh Canada eh!, for the subject theme. Here is generally the look I was going for (second one in), which was in the mid-60's before the "RCAF" was replaced with "CAF". Note the "modern" roundels, which is a fairly rare pic, because pics of CF-104's with RCAF on them almost always have the older and more complex maple leafs in the roundels, suggesting that this must have been a short lived event. Tonal color variations in the metallic skin, as well as painted areas for corrosion protection, were incorporated. Note: The metallic finish was very hard to photograph with my usual flat white background, which made the paint look dull, so I have added a few more pics with a blue background to show the metallic finish a bit better. I’m really proud of this "no-glue" accomplishment, which allows me to take stuff off that will break when transporting the model or flipping it over for pics. This is the Master brass pitot tube, but it’s not plug and play. I sanded the nose down before painting to ensure that the rear of the tube fit flush and used red decal film for the sharp red stripe, which should be about 5 bands. Lots of stencils and decals underneath as well. A few of the cockpit area. Note the holes where the pins are inserted along the sill on the right. Buried behind the Electronics bay is a fuel tank as found on early CF-104's, replacing the Ammunition Box since there was no gun. The angle of the Avionics door should be more vertical, but once you drill the holes for the pins you are stuck with what you get unless you want the door sloppy. Good enough! And now some walkaround pics. Cheers, Chuck59 points -

1/32 Tamiya F4U-1 Corsair "Birdcage" - Reluctant Dragon - VMF-213
Loach Driver and 58 others reacted to Brett M for a topic
59 points -
Hi everyone I haven't been making models for about a month... but I have been modelmaking It has always been a little dream of mine to use airscale to make my own kit and take a tiny weeny bit of the power of what gets released and when from the big boys.. So, I started making my first kit in 3D - something I toyed with in 1/18 and I think is an interesting subject - the Defiant Mk1. Before I go any further I will justv say that this is a project that I thought might be interesting to share - I have no idea of what I am doing and there are some significant practical challenges to overcome on the way, not least of which are: Transparencies - I want these to be Injection moulded - If I can find clear parts on a toy in the pound shop, I must be able to get something made - if that fails then maybe resin but that is very labour intensive, failing that maybe 3D has advanced enough, and as a last resort vacforms Print dimensional accuracy - I have faces that are within a micron of each other on screen, but when printed have quite a bit of deviation - I expect this is a lot to do with the orientation & support placement, but for detailed surfaces you are kind of pushed into limited options Print time - All the parts for now are printed at the lowest, but fastest quality @ 60 micron layers, I usually print in 22 microns for my AM parts - but this speeds up the prints - even then, on 60 microns it takes about 9 hours to do the wing parts so each kit will take days to print at the proper resolution I think it's worth a shot, but for now can't say if, or when it might be available, or how much it would be.. Anyways, enough of the negative waves man, let's have a look at progress so far - this is the Mk1 but I also have a MkII nose and prop.. ..the kit currently breaks down like this.. ..and the first prototype prints - I primed and painted it because I wanted to see how the surface detail held up - should have painted it a lighter colour though.. So, I am quite pleased with how some of the parts came out, others clearly need work.. thats why it is here as a WIP as I want you to come on the journey with me. I also want to get some feedback along the way and although I will do my best, this won't be a Tamiya quality kit so I hope if it ever does come out you can help me not get it rubbished by the critics next up will be the gear bays, then surface detailing the wings & fillets and unlike every other model I have ever made, last of all will be the cockpit. Oh and by the way and drawings or reference pics are always welcome - just PM me TTFN Peter58 points
-
P-47N-2 Chautauqua
Hrvoje and 57 others reacted to Miloslav1956 for a topic
Project 7/23 1/32 Trumpeter kit, Kits-World decals, Barracuda wheels, HGW wet trasfers stencils & national insignia, All colours MRP58 points -
Model: • 1/32 F-117A Trumpeter Real plane: • F-117A, 88-0843, "Affectionately Christine", April 2008, Holloman AFB. Time before last flight to Palmdale for "retired to storage" = new paint ("Star and Stripes") on underside, lightly cleaned topside. Work time: • 8 month (approx 400 hours) Full detailed build description (step by step + a lot of photos...) you can see there: https://www.modelforum.cz/viewtopic.php?f=57&t=136840 Commercial Accessories : • AIR2187, AIRES resin cockpit, AIR2187 • 632013, Eduard, resin bombs GBU-24 • 632169, Eduard, resin bombs GBU-10 Paveway II • RS32-0290, Reskit, resin bombs GBU-24 A-B • 32754, Eduard, photo etched parts - belts • 32316, Eduard, photo etched parts - exterier • 32315, Eduard, photo etched parts - bomb bay • 32744, Eduard, photo etched parts - interier • 32508, 32942, Eduard, placards • XL520, Eduard paint mask • JX141, Eduard, 2x Canopy mask • 135503, HGW, textile straps • AW32305, Armory, wheels F-117 • 32013, Profimodeller, photo etched parts: undercarriage • TF15, hollografic foil Hasegawa NEW Accesories: • Omask, Masks for insignias and codes, • Omask, Masks for field of stars, • Omask, decals for bombs and bomb covers, • Plastic profilles, wires... Books: • Internet • Squadron/signal, Aircraft no 115 • Aces High Magazine - Gulf War • Haynes Owners´Workshop manual, 1981 – Present Colors: • Gunze C + MRP • Weathering: AK In conclusion, but result: One of the worst model/build ever, but One of the best F-117A ever! NOTE: all photos were made by mobile-phone... https://images2.imgbox.com/e2/38/Buaoh8bR_o.jpg https://images2.imgbox.com/20/36/Lvt7eu7M_o.jpg _________________________________58 points
-
More pics...58 points
-
Hobby Boss 1/32nd B-24D Liberator
Jerry M and 56 others reacted to tomprobert for a topic
I've put the finishing touches to this 1/32nd scale B-24 over the Bank Holiday weekend and took advantage of some spring sunshine to take some pictures of the completed model outside in natural light. I've been working on this on and off for a year or so, and it has been the ideal project to pick up and do a bit to as and when I felt like it. This model doesn't get the best press but I must say I thoroughly enjoyed every minute of it. You can spend a fortune on after-market improvements if you wish, but other than some seat belts, resin wheels and gun barrels, this is how it comes in the box. The interior is crammed with detail and took a long time to complete - excellent value for your money when you compare it to the price of the other 1/32nd 'heavies' on the market. Fit was excellent throughout and the only filler used was to deal with a small gap along the underside of the nose where, I believe, I hadn't got the interior aligned as perfectly as I could. The turrets, however, are a weak point of the kit. It's been well documented that the rear turret (and forward turret on the J-version) have a very visible seam right down the middle. Aftermarket replacements are currently sold out so instead I used the kit rear turret and painted the mating surfaces black before gluing and this has made the unsightly join a little less conspicuous. For some reason Hobby Boss put heavy framing on the upper turret which doesn't exist on any B-24 turret I've seen, so this was sanded off and the dome given a good polish so it now better represents the Martin turret fitted to this model of Liberator. I didn't want to risk putting the colossal amount of nose weight into this as I was using the kit's plastic landing gear (which is perfectly strong enough to cope with the weight of the 'un-weighted' model) so I made a tail strut as was so often put in place when B-24s are parked on the ground. The kit doesn't come with the most inspiring of schemes for an olive drab B-24, so I did a bit of research on 'Satan's Angels' and painted the model to represent this aircraft as it would have looked in the autumn of 1943 with the group insignia on the tail and the short-lived red surround to the stars and bars. This aircraft was actually written off in a landing accident at Lympne in Kent, when the nose wheel collapsed and it ended up in a ditch on 13th November of that year. I used Kits World national insignia as well as the Profimodeller stencil set. All in all a very enjoyable build, and if you want a large 1/32nd bomber that doesn't break the bank but still gives you plenty of detail, I thoroughly recommend this kit. All the best, Tom Consolidated B-24D Liberator, 'Satan's Anglels' of the 328th Squadron of the 93rd Bomb Group, based at Hardwick, Suffolk, Autumn 1943.57 points -
Hello guys, this is my recently finished Kotare Spitfire. While I have no special interest in Spitfires and I have very limited knowledge of the subject I have to say that this is the best kit I have ever build so far! Especially from buildability point of view, with logical build steps, great fit, almost no cleaning required, extensive decals and best in class instructions with detailed color callouts and great profiles, the kit has the highest probability to get finished once started. I did not used any other references except the instructions. Truly OOB build except HGW seatbelts and Artscale double sided masks, which btw fit perfectly. I hope that Kotare will raise enough cash to become major player on 1/32 market. I have no doubts that I will buy anything they will release (and I don't mind that it will be small collection of Spitfires ) Jan57 points
-

Ki-84 "Hayate", 1/32, Hasegawa
Alain Gadbois and 56 others reacted to Chuzam Naj for a topic
Hello all lovers of large models, I'm pretty new here on the forum. I don't want be only passive member. Not only for that reason I would like to present my firs post supplemented by several pics. of my recent project.57 points -

1:32 Tamiya - P-51D-20 44-72218 "Big Beautiful Doll"
Aircav1980 and 56 others reacted to MDuv for a topic
Hi folks, My first RFI on LSP. A build I finished last summer on wich I worked for some times. The subject is the uberknown John Landers's "Big Beautiful Doll". Timeframe of my build set it to before he was appointed full colonel, so no checkers on the wings, and victory board not complete yet. In order to avoid varnish and silvering, all markings are painted, and the stencils are from HGW. AM Used: Amur Flaps Barracuda's cockpit stencils GW external stencils Yahu IP (was given a bit of relief with bezels) Lifelike Decals. Used as ref to make the masks. The only actual decal used is the name on the canopy frame. The subject at the chosen timeframe Finished Pics: Now closing up with the lady Landing light was missing at the photoshoot time, it was since added. And a few Build pics: She's not perfect, but I hope you will like her. Cheers Mathieu57 points -

Lockheed S-3B Viking - scratchbuilt - NEW PHOTOS!
Mel and 56 others reacted to Starfighter for a topic
Happy New Year everybody! It's about time to post the pics of my finished 1/32nd scale Viking. The background is not ideal as the photo booth is too small. No way to take photos of the diorama either - I'll have to wait for better weather to take these photos. Anyway, no need for a lot of text this time - for those interested in the building process, here's the link to the WIP: Comments, critique and questions are welcome as usual!57 points -
Tamiya F-16 "Ghost" Aggressor, Kicked Up a Notch
Castor and 55 others reacted to chuck540z3 for a topic
September 23/24 Here is my latest “Kicked Up A Notch” model of an F-16 Aggressor, which is the first one painted in the “Ghost” camo scheme, to sort of replicate the SU-57 “Felon” Stealth Fighter. Here’s a pic I took in 2019 of 84-1220 at Nellis AFB at their semi-annual airshow. Another pic I took of this same jet flying at the 2022 airshow: Since 2019, at least 3 other Vipers are now painted in this same scheme (84-1236, 84-1301 and 86-0299) and while they all are very similar, there are a number of small differences in the digital paint pattern, so there is a bit of latitude as to what is “correct” or not, and the exact location of certain features can be quite variable. For the most part, pics of these jets show them to be quite clean with their new paint jobs, so I kept weathering to a minimum accordingly. I was fortunate enough to already own the relatively rare Tamiya Thunderbirds kit (60316), which is a Block 32 that can easily be modified to create my subject above, which is a Block 25. I also added a significant amount of aftermarket items as follows: · Aires F-16C Cockpit Set (2066) · Aires F-16C Wheel Bays (2067) · ResKit F-16 (F100-PW) Exhaust Nozzle (RSU32-0018) · ResKit F-16 Block 25-32 Wheel Set (RS32-0024) · Kopecky Scale Models LAU-129 Missile Rails (32016) · Kopecky Scale Models Horizontal Stabilizers (32036) · Master Brass Static Dischargers (came with above) · Zactomodels AIM-9L/M resin missile · Bandit Resin Factory ACMI Pod Type E (BRF-32-005) · Master F-16 AOA Probes (AM-32-032) · Cross Delta F-16C Stiffener Plates (CD32001) · AeroMasks Camo Masks and Decals- Ghost Scheme (AM32-F1643T) · Two Bobs Blizzard Bad Guy Decals (32-063) · Uprise F-16B Fighting Falcon Decals (UR32223) · Airscale Cockpit Instrument and Placard Decals (Various) For details on how I pulled all these parts together, I have a fairly long build thread here: Tamiya F-16 Aggressor, Kicked Up a Notch Although there are a few errors here and there, I’m pretty happy with how it turned out and it will sit right next to my F-15C Aggressor I made about 7 years ago in my new display case. Here are some pics from just about every angle, which might be helpful to others in the future. I hope you like it. Cheers, Chuck56 points -
This is the HPH kit of the Me 410. Cast in resin with an extensive etch set, including coloured parts for the cockpit. The kit went together relatively well for a resin kit, no major fit issues. Transparencies were cast in clear resin and were thin with fine detail. Painted with Xtracolor enamels and the decals were from the kit too. Thanks for looking Angelo.56 points
-
WW2 Pacific Adversaries
TenSeven and 55 others reacted to oppenheimer for a topic
finished 4 years ago but never had the chance to take photos of the two together , both models are form tamiya in 1/32 scale, just used decals for the small data, the rest is all airbrushed,56 points -
hi all, here a "Kappone" (big K) built on request of a colleauge of mine, itself being the son of a pilot serving in the Aeronautica Militare Italiana, 51° stormo, in the 60ties. strange enough, being an aircraft built by Fiat on license from North American, there is not so much references about it. so, I mantained a low profile attitude, trying to hold off my rivet counter attitude and finish it in a reasonable time to present it to the unaware final recipient. I just added an Eduard set, very useful in the cockpit area, and made some stencils for the italian codes to emulate the 51-32, serial 54858, aircraft of the "pluto" group with the red tail, to wich was attached my colleauge's father. the only thing I modified was the angle of the opened speed brakes, totally mistaken by KH. painted with Alclad II and fitted with beautiful HGW RBF flags. a simple wooden base with lightly painted sandpaper was made to accomodate it safely. actually I haven't a big feeling with modern era airplanes, but build this one was relaxing and interesting, opening a new mental window toward the post WWII era in my mind. enjoy!56 points
-
I would like to show you the model of the jet that I love. A-6E Intruder from Trumpeter 1:32 scale as always, a model made straight out of the box. Therefore, some of the decals don't match the original. The Trumpeter A-6 model is one of the best models of this company in the 1:32 scale. Unfortunately, model it's quite complicated and demanding to build. However, this is one of those jets that you must have on your shelf. 1: 1 I 1:3256 points
-

HK Lancaster/ Air Sea Rescue
Spooky56 and 55 others reacted to patricksparks for a topic
Well as hard as I tried to build a kit out of the box, I failed miserably, couldn't do it... This is the HK Models Lancaster, pretty much from the box other than filling in 22 windows cutting in 3 new windows, scratch building a lifeboat, blanking off the turret gun ports, removing their gun sights, ammo cans, put an Eduard cockpit set in as well as the radiators and intake screens. Also printed the markings for it which in hind sight I wished I had cut stencils for them instead... The model is pretty much finished, don't know where I can store it, it's a monster...atleast I can remove the wings still. The HK kit goes together well, I liked building it more than their B-17 or B-25.56 points -
55 points
-
.thumb.jpg.f0920d798d5d8600fb58b1d8a906ddff.jpg)
Trumpeter P-38 | Wishful thinking | Pacific 1945 1:32
viperfixer and 54 others reacted to shadowmare for a topic
Hi guys! This is my Trumpeter P-38 in 1:32. I used Gunze SM2 metallics - Duralumin and Chrome Silver. I didn't wanted it to be as shiny as airshows RedBull ones so I didn't polished every place - it helped for differentiation of surface, making dull and shiner panels. For sealing I used Vallejo Polyurethane Gloss (kind of Aqua Gloss - not damages metal effects in greater extent). List of changes/added details: - Kagero decals - Pacific Lightnings and Eduard PE into cockpit, Master gun barrels, - cockpit cables, cables in wheel bays, seat moved forwards, side panels in one engine cutted, - changed side mirrors shape, landing light made from scratch, - additional rivets lines added beetwen existing near cockpit, - really, really many of fishing lead grains placed in nose, - landing gear drilled and 1mm steel wire placed inside, side struts are from wire too, magnetized propellers, - outside parts of the wing wasn't glued - it helped handling, model was more elastic which prevented bonds from cracking and more... Kit isn't perfect, nose panels don't fit (canopy too), large amount of weight needed so it's making gun bay opening harder, too large rivets. Geometry checking is needed for correct alignment wing/fuselage. But I'm overall happy with result. More photos in my FB site. Hope you like it!55 points -
GWH 1/32 CURTISS HAWK 81-A2 AVG FLYING TIGERS
Quinta Studio and 54 others reacted to oppenheimer for a topic
Finally done, this kit is OOB except the intrument panel it came from quinta studio decals set55 points -

Zoukei Moura Bf 109G-14 Jagdgeschwader 11 1/32 scale
Rockie Yarwood and 54 others reacted to Gazzas for a topic
A Quick barrage of photos... I apologize for the background... but the light was too 'right' to let the opportunity pass. Thank you for looking! Quote55 points -

B-17G “A bit o’lace”
Loach Driver and 54 others reacted to FreightDog for a topic
WIP thread here https://forum.largescaleplanes.com/index.php?/topic/85552-hk-models-132-b-17g/ Here is my reference pic. She and her crew went through 83 missions and she survived the war only to end up scrapped. I’ve not aimed for a 100% replica of the original, but enough hopefully to capture her likeness: My longest project ever a year on & off. Magic Scale Modelling light & sound so there’s a link to a short video of the startup & shutdown process at the end. I might add some more pics & another video later showing the lighting but the aluminium needed outdoor shots to do justice. Thanks for looking. Seldom have I placed my faith in any higher body more than when I released my grip after fixing this to its wall mount. Thank you HKM for this superb bonus! If you watch the video don’t forget to turn the sound up!55 points