Leaderboard

Popular Content
Showing content with the highest reputation on 11/22/2021 in all areas
-

1/32 P-51B conversion from Revell 1/32 P-51D early
Kaeone57 and 14 others reacted to ironman1945 for a topic
Quick update. Middle of coaching high school football playoffs (GO MT DOUG RAMS!), so have not had much time to spend on the bench. But I have progressed a bit. Weathering. Flat coat. Taking the masks off the clear parts always make it look better. Just need to finish/frame the canopy area, attach the antenna, landing gear, and flaps. Add the .50 muzzles. Weather the exhaust stacks. Pretty happy with how its looking so far. Not perfect, but not bad. Sorry about the bad lighting for the photos. I'll try and finish this ASAP, because you know once I do, one of the model companies will quickly announce a new 1/32 P-51B Mustang. Your welcome guys!15 points -

Short Sunderland MkII
Sharkmouth and 10 others reacted to tomprobert for a topic
Afternoon guys and gals, Progress has been slow on this recently as I got to the point where I knew I needed to start to cockpit interior or there was a real danger I would lose steam on this build. I HATE doing cockpits so struggled a bit with motivation to get this done - it's all had to be made from scratch so it's rather tedious. Before I go any further I'll say that don't use this build as a reference for your own Sunderland models as I've used a bit of poetic licence here and there, but hopefully you'll agree it looks the part. The seats and instrument panel (including the radio) were all made from plastic card (Airscale's excellent etched bezels were used too) along with some bits and bobs from the spares box and Millput for the seat cushions. Control columns were made from Evergreen and some paper clips cut and bent to the correct shape. I found some 1/32nd seatbelts which did the job - pictures of MkII pilots' seats were hard to come by but they'll do: Individual parts painted up: And positioned as they will be in the cockpit: When dry-fitted into the flightdeck, all fits as it should: I've also had the airbrush out and given the front turret area and cockpit and window surrounds a squirt of interior green so the glazing can be added when the time comes: I've still got to make the overhead panel that'll go under the roof of the cockpit glazing, but that can wait until another day. I think I'm going to do something more fun next and maybe have a crack at the beaching gear. Take care all, Tom11 points -
well...a gin tonic? I think I need one. or two. seiously, I dont think, I'm sure about: the more I dive in this work, the more I curse myself. but either me or it, this workbench is too small for both of us! today I worked on tailplane, again. I like these? NO. and since they are mirrored, I can flip these over and give it another try. I know I may look crazy, but these are just guinea pigs for wing, flaps and ailerons! so, again. let's see, what else have I done: carried on the big feet, also called "spats". I filled and filed the seats of the landing lights, re-engraved the doors and the steps, glued the bulkhead that acts as a fender, placed the strikers for the fixing keys of the covers, created by vacuform what will be the lights ... but these are still so far from being called ready! but no one forbids us from doing a test ... but how ugly is it? ok, ok, this is body shaming, forget it... let's change argument: are ribs, the ones that can be glimpsed? actually yes: I threw in some ribs, and a sort of oil coolers. they are hideous, but all you will see will be this: and for today it would be enough, but I wanted to try to see how looks like the fuselage tubular structure which should be the cockpit cage and the wing support. it seems that even the two pieces that constituite it have some major mistakes, but I don't think I feel like doing it completely from scratch. rather, for a brief moment I hoped I could cannibalize parts from other kits, but the only thing I managed to adapt is the cloche, taken from a tempest Super Hobby. so it will have to do form scratch... everything, for a change. I started with the rudder bar footplates, on the right the ones proposed by the kit. phew. and that's it, for today, don't be too severe with it! cheers, Paolo10 points
-
found a bit off time to play with some paints. Not much but i hope to find some time this week Mark9 points
-
First worked on the vertical tail today. The fairing at the base of the tail is repeated on the fuselage part, so I cut off the extra one on the fuselage. Then after gluing the tail halves together I cut out the rudder and started some shaping: I then designed and printed the horizontal tails: The horizontal tails are only 6 percent thick (thickness is 6 percent of chord length) : In preparation for designing the main gear wells I first took measurements of the inside of the fuselage at seven locations in the area of the main gear: I photographed each profile, then scaled and adjusted them in my graphics app. These photos then became textures to apply to some squares in my CAD app. I'm now at the laborious stage of adding the triangles to build the mesh that will represent the inside of the fuselage. Those coke bottle fuselages are difficult to recreate. A 3D scanner might be of use here, but I don't have that technology so I have to do it the old fashioned way. -- Dave8 points
-
Thanks gents! John, I agree that the Novus stuff works REALLY well, and pretty much has saved this builds bacon. I still do often Future as on some builds I like using ultra thin CA to attach windscreens and if you can get a good dip, the Future really makes it easy to use CA without fear of fumes clouding things Getting close now boys! The basic finish line is not too far off now. Ill be putting the rest of the model together, then putting it aside for a bit until Mikkel can have a chance to finish the XM-158s and I can then add those and take some RFI shots. Cheers and thanks for looking in on me!8 points
-

HK Models 1/32 B-17E/F WIP
Rockie Yarwood and 6 others reacted to Gil Hodges for a topic
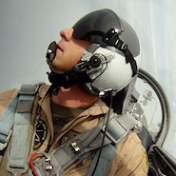
Since I think I have 99% of all of the internals done, or at least ready to be glued in place, I've started playing with the figures. Now, I KNOW that these figures are "technically" wrong for Old 666....they should have basically just flight suits and jackets for their standard flying uniforms in the Pacific (lower altitudes, hotter climate, etc.). However, these are what the client provided (ETO bomber crew with typical heavy/warm flight gear), and there's not much else to choose from out there in 1/32 that I'm aware of. I did see a 1/32 B-25 crew in "light" uniform gear...but couldn't find much in the way in actual info on them, and the price looked to be high too (and he'd have to buy 2 of them). So, bottom line is I'm going with the figures provided. Besides, outside of a very few people (like us), almost anyone he shows the model to won't know the difference! These are the 1/32 Master Details resin figures, and I'm impressed with them to begin with! They're sharply molded, with separate arms and legs, and come with a choice of 2-3 heads that are either "in flight" (O2 mask on, goggles on), or pre-flight with headgear on, but goggles on top of the head and the mask (supplied) off. The fit of the arms and legs to the torso was quite good. The resin is also soft enough to cut pretty easily with a new #11 blade so limbs can be repositioned. I began by fiddling with the bombardier and navigator. Their both the same figure (bombardier), so I did some minor surgery to reposition arms and legs so they'd look slightly different, and gave the bombardier a wire cigarette. I'll use this method with all of the rest of the figures, determining where and how they'll be posed throughout the plane, all of them in casual pre-flight poses. Since I'm an airplane builder, THIS may turn out to be the most challenging part of the entire project! We'll see.... GIL7 points -
I hope you all are not yet tired of seeing the wheel bays of this monster. But there is more. Landing gear doors - these are items that are best installed late in the game. To keep out of harms way. Also true of the landing gear struts, for the same reason. But sequencing is a real puzzle with this project. As I have lamented before, in order to finish the cockpit, the center wing assembly must be installed to the forward fuselage. But to do that the upper wing parts must be installed to the lower wing part. But I need access from above and below to install the gear struts, and the landing gear doors plus actuators and plumbing. So that work must be done before buttoning up the upper and lower wings. Hence - you will see landing gear doors installed now, just begging to be broken off as I continue work on the fuselage, soon. I must therefore create some sort of protector shield for them - a project coming very soon. OK - recall the LG doors are 3D print items as are their forward hinges. The aft hinges are easy details that I could scratch build. Here is one of the four doors - resplendent in its final finish, grime, and leaking hydraulic fluid: Installed they look like this: Can you imagine, as I can vividly, breaking off one of these? Recall this picture of a real Corsair - this is the look I wanted to simulate in the wheel bay: Here is what I have at this point, with the addition of the door actuators and black flex hoses: I still have some hydraulic lines looking for a place to terminate - that comes after the upper wing parts are permanently installed; in the next few weeks I think. So you be the judge.... Some more shots of the aft wheel bay to date: That last one shows some unintended overspray from painting the bottom of the wing. Masking is pretty tough from now on. My solace is that Corsair wheel bays appear to have suffered from paint overspray anyway! Ok that is the RH side LG door effort. Now for the LH side. Gonna take a while - this is painstaking work from beginning to end. But it's coming together. Next steps include prep and installation of the inboard and mid flaps, flap hinge fairings, and the flap gap doors. Also it hurts me to say I have to install the lower LG struts including the brake drums and torque links, to allow completion of the brake lines and the shrink mechanisms, both of which require access from top and bottom to complete. Another sequencing nightmare. Stay tuned - exciting stuff coming your way.7 points
-
Me again. Very quick post, mainly just to show I'm still here and this one hasn't (completely) stalled. It's very nearly there, as you'll see, just the horizontal stab and a few aerials to go on, and a few cock-ups to sort out... Underside: You can see one of said cock-ups by the underwing roundel this side; and of course, it's the side you'll see when it's on the shelf and top: At least it's not a tail-sitter. Well, at the moment anyway! Also, the dark green sorted itself out; the shiny edges disappeared once the satin coat went on. All for now - should be done by Wednesday, hopefully Cheers! Sepp5 points
-

1/72 DHC Dash 8-300
scvrobeson and 4 others reacted to chrish for a topic
Moving along with the dash 8, both fuselage plugs are now fitted and dealing with the seams. Tamiya putty to the rescue; a comparison of the size change; Thanks for looking5 points -
ejection seats front rear remade pilots pillows5 points
-
cockpit canopy4 points
-
A small update. Not much done recently due to other priorities. Still fitting in the second figure. Similar alterations were done. You don't want to know what I had to do to his feet to get him in there!4 points
-

Another Hasegawa T bolt Bubbletop, my first LSP. November 12, 2022, It is DONE at last!!!!!!!!
Greg W and 3 others reacted to Citadelgrad for a topic
I have not lost my mojo on this one, far from it. Ive been wrestling with the ridiculous PE legs for the gunsight reflector. Gator glue was a no go. Ca did nothing. The issue is, its impossibly small and the area where the pe attaches is, literally, the thickness of the acetate sheet attaching to a part that is the size of a capital O. I got very close to trying to attach it a couple times, but each time the legs just folded. They sort of stuck to the acetate, but would not hold the weight of the part, to give an idea of the weakness of the join. i finally tried Migs Ultra Glue, which is supposed to be both strong and not interact with the clear parts, which of course was the claim of gator glue. i am NOT knocking gator glue, i really like it, but these parts are on the cutting edge of what can be attacked with glue. the ultra glue showed up Friday, so i tried it. It seems to work well. Well enough that when repainting the legs, there was no telltale flop of the legs, but i was very careful. tonight i glued the part in position. Barring disaster while drying, i am going to try to cover any glue sheen with black and call it good. photos, please be kind, the macro REALLY shows the mess i made of it. With the naked eye, it seems to look fine. Hopefully i can salvage it. Its just such a prominent feature, i cant leave it off. Next step, i need to dig up a PE mechanical backup sight that is so prominent in cockpit shots of Col. Gabreski’s ride. At least this is progress. Soon i can attach the windscreen and move on from here.4 points -
Airframe complete, almost ready for paint. Cheers, Tom4 points
-
Work that body! Going to be lots of fitting and sanding today....oh joy! First sanded by the wheel wells. Then I primed the whole rear fuselage. Sure enough, I had to do a wee bit of bettering there. Put down a big slap of putty around the seam in the drop tank....the work will continue on that in a few days Then I cut out the canard flaps, of course I managed to break one of them...like I don´t have enough to do. No worries, I just CA-glued a piece of plasticard to it. Cut it to shape and sanded it smooth. next it was time to add some 3D printed stuff to the fuselage but before that I mixed Tamyia white putty with thinner to get a liquid filler. First victim is this rear fillet of the KCA gun....you see the printing layers. I used a wide flat brush and put down 2 layers on the fillet and the belly strake. Shitty picture I know :/ but anyway, I polished the parts and shot primer ontop, polished a bit more and glued them in. There is a gap where the strake meets the fuselage but that is a minor thing I´ll get to it in time. I went on to the wing parts and did the same to them Looks rather nice with primer on, had to rescribe and redo all the rivets...of course I only hav e one wing to work on yet so I dry fitted the part....and well it needs tweaking. To remove the step I had to sand the bottom of the part and hoping I wouldn´t destroy anything. After a long while of sanding and fitting I got the step removed...but there are other issues..it doesn´t line up correctly. I scraped one edge until I got alignment https://hosting.photobucket.com/images/cc63/Aigore/IMG_5301.JPG And glued it in place...will have to do the same process on the other wing when I get it. Now it was alrigt to lightly sand around the wheel wells in the fuselage. The fit between the wing and fuselage isn´t stellar.... The top side even worse. Well after a while of scraping, sanding and fitting I got this far...still some work to do but that´s for another day Cheers!4 points
-

ICM Gladiator Milestone.
Jan_G and 2 others reacted to Bradleygolding for a topic
So here it is, the first 1/32 model I have completed since about 1975 when I made a couple of Hasegawa inter war biplanes. It's not perfect, but I just wanted it out of the way to work on other projects, like the still uncompleted WnW Felixstowe. Although that will have to wait a little longer. What did I think? Well generally it's a really good kit, great fit and reasonable detail. Only the seatbelts were added. I do have one or two niggles though. The plastic is very soft and weak allowing many small parts to break if even breathed on, I wondered if Revell's version would have Revell's plastic which is stronger? ICM show rigging spreaders between the wings, and a mast above the wing, but these are not part of the kit. I almost had to buy a biplane jig to put the top wing on it was so tricky. I still think it slopes forward too much, and the box unless shut up completely allows small parts to fall out and disappear! Apart from that all good. Steve3 points -

3 Viggen build threads on page 1 ...
frank83 and 2 others reacted to Rainer Hoffmann for a topic
Just noticed, that three Viggen build threads are on page 1 of the Works in Progress section. That will probably never happen again. Viggen rules Cheers Rainer3 points -

F86 D Sabre Dog ... Revell 1/48 NMF Paint Trial
coogrfan and 2 others reacted to Panzerwomble for a topic
So this ended up as mixture of black gloss and matt basecoats, Tamiya acrylics for spot panel work and varying Alclad shades for the main work. It forces me to mask , which is something I can avoid 99.9% in my armour antics . "Go to" weathering on Alclad currently is black Flory wash which seems to “pop” the aluminium more than oils .3 points -
F86 D Sabre Dog ... Revell 1/48 NMF Paint Trial
coogrfan and 2 others reacted to Panzerwomble for a topic
And in Technicolor TM3 points -
Some concept work on the windscreen. I don't do vacform very well, so anytime I can come up with something different that works it is a win. So here are 2 pictures. What have I done? I have taken an old forward fuselage section and cut a windscreen shaped chunk out. Below that I have glued in a flat plastic plate. I then cut up a plastic soda bottle into a rough shape and jammed it in place. The plastic from the soda bottle already has a curve to it, but I pinched it down a litte bit and then let it spring back. The sides of the fuselage cut hold it in place. There is no glue on the windscreen at this point. I think this might work. When I have the logistics all worked out I will modify the 3d part to incorporate these changes. Dan3 points
-

JetMads 1/32 Viggen
Christoffer Lindelav and 2 others reacted to Out2gtcha for a topic
Yay! Just looked up the USPS tracking # for my Viggen and found this....Its currently 11/22 1:52 PM CST here in the middle of the US: Expected delivery November 22, 08:00PM Tracking number created In transit 2021-11-22 05:51 OMAHA, NE 68127, Arrived at Post Office -> Your item arrived at the Post Office at 5:51 am on November 22, 2021 in OMAHA, NE 68127. 2021-11-22 05:00 OMAHA NE DISTRIBUTION CENTER, Departed USPS Regional Facility 2021-11-21 21:08 OMAHA NE DISTRIBUTION CENTER, Arrived at USPS Regional Facility 2021-11-21 00:00 In Transit to Next Facility 2021-11-17 00:22 LOS ANGELES CA INTERNATIONAL DISTRIBUTION CENTER, Arrived at USPS Regional Facility 2021-11-15 17:31 ISC LOS ANGELES CA (USPS), Processed Through Facility 2021-11-06 09:48 Origin Post is Preparing Shipment 2021-11-06 09:48 TURKEY, ISTANBUL ULUSLARARASI POSTA ISLEM, Processed Through Facility 2021-11-06 09:17 TURKEY, ISTANBUL PAKET MERKEZI, Processed Through Facility 2021-11-05 15:08 TURKEY, Acceptance Origin - Cached time: 2021-11-22 10:32:01 (GMT-06:00) 2021-11-22 08:51 United States of America (the) (Yurt Disi), Receive item at delivery office (Inb) 2021-11-15 20:31 United States of America (the) (Yurt Disi), Gonderi (Gelen) alip verme merkezinde alindi Receive item at office of exchange (Inb) 2021-11-06 09:48 TÜRKIYE, Turkey, The item was forwarded to the destination country (Otb) Expected delivery in a scant few hours I hope!3 points -

Any chance HPH does a 1/32 Me 410 injection like the Helldiver?
Phartycr0c and 2 others reacted to Tony T for a topic
Anything you like, as long as it's after the Vampire and Beaufighter are released. Tony3 points -
JA 37 D(I) - 1/24 ---- SOD
Christoffer Lindelav and 2 others reacted to Rainer Hoffmann for a topic
Morning gents, thank you very much for your kind words! Yes, I know that the doors can be opened. Unfortunately, because I got the spacing of the stiffeners wrong , the proportions of the pipes and tubes are also wrong. So the door will be closed ... Well, actually I have no idea where I could display this big bird in our home. So, if I can do the mighty Viggen justice, I consider to donate it to one of the wings that actually flew it. Thanks a lot, Kev! Cheers Rainer3 points -
I don't know why people are so down on Roden (apart from the decals which can have a tendancy to shatter upon contact with water). Are they as good as Tamiya or WNW? No, but they are all perfectly buildable with the simple application of some basic modelling skills, and if you throw in a few aftermarket goodies you'll end up with a very respectable result. I'm willing to bet that most people on this forum wouldn't be able to tell a built Roden Dr.I from a built Meng Dr.I if you placed them side-by-side.3 points
-
Received my kit this friday. Definitely worth the wait. Now i hope the second kit arrives much quicker than this one. No damage what so ever, not even the ladder and the towbar. No dent on the box.3 points
-

1/32 Spitfire Mk.IXc weapon bays (for TAMIYA) 32001
Rockie Yarwood and 2 others reacted to CruZz for a topic
Here are finished bays in Mk.IXc. Build by my friend Zdenek Šebesta.3 points -

Libyan Mig-23MF, 0200 Tripoli August 2005
GMK and 2 others reacted to Daniel Leduc for a topic
Oh boy it's been a while..... but here my ''MDFT'' (Motivation Dry Fit Teaser)....lol Yeap, most of the time that's how you get back on track, looking at new decal sheet, matching paint colors or looking at other members built... For me, all the above. Minor adjustment to cover Aires shrinkage..... Finally on his legs. Some engraving left to do on the shoulder, canopy masking and that baby will be ready for the fun part, the paint booth.. Missiles and tanks almost done beside some decals and weathering. Hope you still remember that one and will put some more soon and have fun. Dan.3 points -
JA 37 D(I) - 1/24 ---- SOD
Treehugger and 2 others reacted to Rainer Hoffmann for a topic
Dear fellow modellers, the second update in one month! This must be a first in this thread Looking at pictures of the right MLG well of a Jaktviggen you could get the idea that the guys at Saab had a couple of meters of pipes and tubes lying around that they just put in some unoccupied space in the MLG well. It looks messy (sixties style ... ). So does my rendition of the MLG well. And, what's more, unlike Jetmads I got the spacing of the stiffeners completely wrong. Sigh. Too late, I won't change anything. As I said in my previous post, nothing of this part of the MLG well will be visible once the main gear door is installed. And that's a good thing. Anyway, here are some pics: I'll install some more pipes and then I will proceed to the parts of the MLG well, that will be visible. As allways, thanks for looking. Cheers Rainer3 points -
Straight out of the box, the Roden kit is fine but the Meng is better. You can make a good model from the Roden kit, and if you use Aviattic enhancements it'll be a lot better https://www.aviattic.co.uk/132-accessories.html. The key weakness of the Roden kit is the crappy decals. If money is no object, go for the Meng over the Roden.3 points
-
1/16 scale scratch built AT-38B Talon-The Smurf jet is back!
Model_Monkey and 2 others reacted to Timmy! for a topic
Of all the things in that picture to live in, the stadium was not what I thought.... With that out of the way and to keep some goodies going on this thread, how 'bout s'more CAD...you know you want it! There's going to be a sprinkle of magic on some of these parts after printing. I have tentative confidence that the resin I'm using would support the model on it's own but, long term I lose confidence in its strength quickly. So I'll be working on a method to strengthen the parts and preserve them better than King Tut. I'm thinking it could be a good alternative to aftermarket metal gear that seems to be the first or second thing people are clamoring for these days for their new kits. TaTa see ya! Timmy!3 points -
you are too kind ... this is a job that, however hard I try, will turn out a disaster! so. resumed the lines of the rivets on the stabilizer, which I would take for granted, and tried a way to emulate the details on the canvas of the elevator. does not convince me at all, I think that the next session I'll pull everything down and start it again. i scribed the tail after a turn of primer, and here too I see some lines to redo. and started bickering with the landing gear. just so as not to miss anything, I cut off the wheel covers and rebuilt the leg (which in reality was a single, big piece) with brass square and round profile. I thought it appropriate to install sections of aluminum tube in the landing lights holes to strengthen the structure of the fairings, weakened by the cut of the covers. in short, a disaster. it is true that this kit has its +40 years, but it seems to me to be Penelope, who makes and undoes the canvas over and over... nonetheless I go ahead, if only to see it come out of the IBG in the next six months! cheers, Paolo.3 points
-

3 Viggen build threads on page 1 ...
Stefano and one other reacted to Treehugger for a topic
It always helps looking at other people's work on this before starting the same project. I am thankful for people hopping on it and start working with the new kit. If everything goes as expected I will get my kit some time after new year from the second batch.2 points -

Short Sunderland MkII
Derek B and one other reacted to Phartycr0c for a topic
Saw the update on FB so thought I would come here and sing your praises! Lovely stuff matey. Will be a most impressive beastie when finished.2 points -
JA 37 D(I) - 1/24 ---- SOD
Derek B and one other reacted to Phartycr0c for a topic
Stratospheric modelling going on here, how did I miss this? incredible stuff, keep going!2 points -

Roden and Mengnuts Dr1 pros and cons
LSP_K2 and one other reacted to thierry laurent for a topic
It looks many kits had such a problem but not all of them. The three wings of my kit are straigth as a rule. It is a pity they did not better control the quality of the output.2 points -
'Very nice modelin'. 'I got the spacing of the stiffeners completely wrong.' As long as it fits. Sincerely, Mark2 points
-

Z-M Bf109G-14 “Old Man Blog”
Rick Griewski and one other reacted to LSP_Kevin for a topic
That was my point! The original was posted here over 10 days ago. And now it's going around again as if it's brand-new, which had me fooled for a sec. Kev2 points -
Roden and Mengnuts Dr1 pros and cons
LSP_K2 and one other reacted to thierry laurent for a topic
It is first a matter of evaluation point. Roden kits are not 'bad' as such. However, from a comparison standpoint with the Meng kit, there is no doubt the Roden Dr.I has no advantage. If you build both OOTB and know a little bit the Dr.I you will see easily the difference even if both are triplanes!2 points -
Fair enough on the 21cen kit Kev! I think I’m going to go ahead and get the new parts into CAD once I have my new workspace set up. Kinda convenient now that I think about it, as I have already designed and printed a new cowling and engine for my Hasegawa A6M5 to make an A6M8. I can use the leftover kit cowling and engine as donor parts for my Tamiya model 21 base kit (or steal the cowl parts off my old built Tamiya model 52 if I want the rivet details to match2 points
-
After a bit of a break, I’ve managed to start on the suspension mounting points. Not much, but just easing into it. Each suspension station has an axle, an ‘A’ frame that mounts on either side of the axle, plus two vertically oriented shock absorbers. This week was the shock absorber mount’s turn. Locating these will allow the detail & structure of the lower hull to be completed. Then production of the lower hull can commence.2 points
-
Save your money mate... Avoid Roden unless they offer something that isn't offered by anybody else.2 points
-

Z-M Bf109G-14 “Old Man Blog”
Tolga ULGUR and one other reacted to Gazzas for a topic
Having recently completed the Revell G with all of it's shape issues (there are a ton), and spending 4X what the kit is worth on AM and still having major shape issues that cannot be fixed without replacing both fuselage and wings... I'll be looking forward to an accurate one. Revell will never get another penny from me. How ROG could mess it up so badly is beyond me.2 points -
Short Sunderland MkII
tomprobert and one other reacted to LSP_Kevin for a topic
Terrific stuff, Tom. Usually, when people hate doing something, it's because they're bad at it. Obviously not the case here! Kev2 points -
Roden and Mengnuts Dr1 pros and cons
Martinnfb and one other reacted to thierry laurent for a topic
As you need other decals (the quality of the kit ones is terrible) and possibly the Aviattic sets, the price is not that relevant either.2 points -
I have built the Roden kit twice, it’s a perfectly good kit If for some bizarre reason I built another DR.I I would build the Meng one because of its WNW heritage. Especially as it doesn’t have a WNW pricetag. Richard2 points
-

1/32 Modified Zoukei Mura Do-335 B-2
Piprm and one other reacted to curiouslysophie for a topic
I am slowly plugging away at this kit. I have pretty much finished the cockpit for now, and I have been working on the plumbing for the main fuel tank. The cockpit was upgraded with the Eduard set provided through Zoukei Mura, some ANYZ toggles and switches, the obligatory HGW Seatbelts, some Airscale Luftwaffe placards, and the odd bit of scratchbuilding. I did some reworking of the seat. I redid the cushions with some Tamiya epoxy putty. I’m not too happy with the leather painting and I feel I may do a few more mods to the seat to make it look a bit more like a later version. The fuel tank has had some pipe work added, though it isn’t fully finished yet. I plan on making the panel over it removable so it will have some more details passing through this section. That is all I have done so far. Today I am mostly working on the front engine, so hopefully I’ll have more to show soon. I have a few other projects in the pipeline, my what-if Fw-190 should be started soon. I am also working on non-LSP models too! I hope you all like my work so far! Please let me know what you think, I’m hoping I can get much better as I still feel my skills are limited (you don’t want to see what I’ve done to 1/35 figures trying to paint them!). Cheers, Sophie2 points -
assembly and fitting in the fuselage2 points
-
Now, the weapons bay. In the two-seater version of the Tiger, the weapon compartment differs from the single one. Therefore, it needs to be redone.2 points
-
Another time-constrained week, so the stowage on the side was used as a bite-sized project to keep the momentum. The most difficult shape to get right is the brush-deflecting chevron on the hull sides. The two twin jerry can holders are more tedious than tricky, though the corrugated backing plate required a bit of thought. Almost time to return to the hull proper. Overhead shot for proportions. Thanks for looking in!2 points


