Leaderboard

Popular Content
Showing content with the highest reputation on 06/09/2021 in Posts
-
F-4J VMFA-115 "Silver Eagle" - 1/32 Tamiya - FINISHED
Rockie Yarwood and 12 others reacted to Cicciuzzo for a topic
Good evening guys. With this new update I start painting the model. Mr. Finishing Surfacer 1500 Black as a base and then white and brown diluted randomly throughout the model. For the rest ... pray for me . Grazie picciotti!13 points -

Short Sunderland MkII
Sharkmouth and 9 others reacted to tomprobert for a topic
Thanks, Anthony - I've not been doing a log on the F-4 as I've just been working on it as and when I've felt like it. It's good to have a 'shake and bake' going on behind the scenes when working on long-term vacs such as these. Paints are my trusty Xtracolor enamels... Appreciated, Craig - thanks. The tape is low-tac builders' tape and will be pushed through and fished out after painting... he says hopefully... The long process of scribing the panel detail has begun. This is the culmination of two nights' work so far - with at least another long session needed to finish the upper fuselage: Back soon with an update over the weekend, all being well. All the best, Tom10 points -

Tamiya 1/32 F-4C 54th TFTW 1976 Bicentennial DONE
Kagemusha and 9 others reacted to oppenheimer for a topic
These resin engine nozzles from WOLFPACK looks more convincing than the kit ones, i need to rework the bare metal on the elevators, i am not satisfied with the shine of the metal10 points -

EA-6B Prowler (02 April: Done!)
Scotsman and 7 others reacted to easixpedro for a topic
Thanks guys! Aaaand we're cooking with gas now! Polished my good canopy with varying levels of micromesh. Got me to this point I followed it up with about 10 minutes of polishing with baking soda and a dip in future. Would've skipped the future, but need it for when I attempt the color to replicate the gold lining. Now I can get going on the canopy framing etc. More soon! Peter8 points -

1:32nd scale Hansa-Brandenburg W.20
scvrobeson and 5 others reacted to sandbagger for a topic
Hi all, I thought you might like to see my 1:32 scale build of the German ‘Hansa-Brandenburg W.20’. This model is from ‘Omega Models’ and is resin. This aircraft was a single seat float, designed to be carried in a water tight container on a type of submarine. The intention was to surface and remove the aircraft from its container, assemble it then launch it for reconnaissance missions. After landing near the submarine, it was be taken onboard, disassembled and stowed back in its container. The special submarines were never built before hostilities ceased and the three prototypes were eventually put into storage. The basic list of changes/additions to the model are: Engine: The resin engine replaced with the equivalent engine from ‘Wingnut Wings and detailed with Nickel-Silver valve push rods and copper wire ignition leads. Propeller: The resin propeller was replaced with a special made wood laminate from ‘ProperPlane’. Modified or corrected: All wing, float and tailplane resin struts were replaced with hand made Brass Tube struts with internal Brass rod. The entire engine support frame was hand made using Brass tube and rod. Rigging is 0.08 mm or 0.12 mm diameter mono-filament with ‘GasPatch’ 1:48th scale turnbuckles and 0.5 mm or 0.4 mm diameter blackened Brass tube. Animation of the ailerons, rudder and elevators achieved by cutting out with Brass rod supports. The beaching trolley and trestle were scratch built, apart from the wheels which were from a 'Kellerkind' model. Aftermarket additions: ‘Aviattic’ Clear linen effect (ATT32236). ‘Aviattic’ German Naval Hex (faded) (ATT32113). ‘GasPatch’ Elite Accessories 1:48th scale metal Turnbuckles. ‘Wings Cockpit Figures’ 1:32 scale Seated pilot (LSK 07A). ‘Elan Miniatures’ 1:32 scale German Naval pilot (EL19). ‘Elan Miniatures’ 1:32 scale RFC Mechanic (modified) (EL41). Coastal Kits’ 1:32 scale Abandoned Airfield Display Base (modified for 3D effect). As usual I've created a downloadable build log in Adobe PDF format, for those who might want to refer to it for reference or build details. It contains full step by step descriptions of the model build, its modifications/changes and is also supported with illustrations and photographs. If viewed in Adobe Reader, each build log has book marked chapters/headings for easier navigation through the log. My model website has the gallery page, so to view any model, go to the gallery and select it. If it has a PDF build log, it will be available to download using the 'PDF' icon on that models photo's page. For any photograph, just click the photo to enlarge or reduce the viewing size. http://igavh2.xara.hosting]Mikes WW1 Aircraft Models Mike6 points -
Hi guys, Having just finished the engine of my 1/20 scale Nichimo Fuji FA-200 over in Works In Progress, I thought, let's show it here as well. Sooo, after all the fine heavy machinery in this thread, here is my humble 4-pot Lycoming O-320: Hope you like it. Cheers, Peter6 points
-
It's quiet at work today so I did a little on line shopping and now have these baby's coming in the mail....
 5 points
 -
Well, this was boring and tedious, but more like what I was looking for. I’m glad I started on the bottom to get my technique worked out as well as learning to keep oil paint at a safe distance otherwise it has the tendency to leap up and get on places you don’t want it, like your hands, pants and lunch. Oy vey!5 points
-
F-4J VMFA-115 "Silver Eagle" - 1/32 Tamiya - FINISHED
F`s are my favs and 4 others reacted to Cicciuzzo for a topic
Good afternoon guys. Today I painted the bottom of the fuselage. In the end, among the various shades of white, gray and brown, the black was covered for 80% so the white FS17875 covered the surface very well. Several shades have disappeared but I imagined it even if in some areas I let them glimpse. Photographing the white color with the mobile phone is very difficult but from the images I would say that it's fine. Tonight I complete the other accessories and then I pass a nice microfiber cloth to "clean" it from lint and tomorrow I spray the gray of the upper part. Well friends, see you at the next update ... and thanks for your prayers!5 points -

Review: HobbyBoss Consolidated B-24J Liberator
D.B. Andrus and 4 others reacted to Martinnfb for a topic
https://coldwarstudio.com5 points -

TA-7C / EA-7L "Twosair" - Trumpeter conversion
scvrobeson and 4 others reacted to Starfighter for a topic
Steve, it's actually more fiddling around with stuff I like rather than real modelling - it's just super difficult to get some bench time with a little daughter and a baby girl in the house... Marcel, I will certainly bring it to EME, butI doubt it'll be finished by then. The ERA-3B is priority #1, but I am planning to play around with the TA-7C at the same time. Once the basic cockpit structure is finished, I can starttweaking the outer shape. The thing is - I need bench time to do that. Hopefully soon...5 points -

Fuji FA-200, 1/20 Nichimo
Alain Gadbois and 4 others reacted to mgbooyv8 for a topic
Hi guys, It took some time to update this WIP, life got in the way. In the meantime, thanks to Thor and Bart, I was able to finish the engine and firewall with piping and cabling. It is now ready to be mounted on the model. Here are the pictures: I plan to add the flexible baffles later, I have to make sure everything will fit in the engine cowling. To be honest, not all wiring was included, aiming for e representative busy look. However, all oil lines and air hoses for carburettor heat and heating are present. Speaking of the latter, when the cowling will be fitted, additional air hoses will be neded to connect air intake and heater intake to the engine. There was only one spring available in the kit, so I made my own by wrapping lycra biplane rigging thread around suitable plastic tubing, fixing it with CA, painting it orange and giving it a wash with Tamiya Smoke: I think I can make two suitable air hoses out of it. To be continued... Cheers, Peter5 points -
EA-6B Prowler (02 April: Done!)
brahman104 and 3 others reacted to easixpedro for a topic
Funny thing...my tube of Tamiya polishing compound was all dried up and the LHS was out. Read online and there was a suggestion about using baking soda. Holy smokes, it worked well! I just mixed a little bit with some tap water and set about rubbing it with the tip of my finger. Surprised at how well it worked--may have found another one of those non-model tools to put in the toolkit! Literally that shine was less than 10 minutes worth of work on both sides of the plastic. -Peter4 points -
A little progress on the built: Kent4 points
-

Little Bunny - Italian Front Thunderbolt
Rockie Yarwood and 3 others reacted to John1 for a topic
Plugging away on the cockpit. Port sidewall is complete (just need to add the throttle quadrant) and glued in place. IP front is done, just need to add the instrument housings and wiring on the backside since that area will be partially visible once the cockpit is sealed up. Back armor plate. MDC gives you a PE stencil so you can add the factory markings to the armor plate. I pretty much botched it but doubt much will be visible once it's fully assembled. If it is, my story is that the Republic factory rushed the stenciling job (it was done on a Friday afternoon). Not going to bother smoothing in the Flory wash on the bottom as it will probably not be visible once it's assembled.4 points -
Hello, one RAF Harrier GR.5 is not enough in my collection and I want to do one in the artic-white camouflage for the exercise in Norway in the 1990. So, this is the new GR.5 nose I've just made converting an AV-8B's standard nose. As there is no good 3-view drawing available, I used some pics that I found in some books and magazines and also some photos taken during the GR.5 restoration in the Pima Air Museum. Here the result... I would like to do a resin copy in the next few weeks... if the result will be good, maybe I'll do some other resin copies. CIAO! Piero3 points
-
.thumb.jpg.f0920d798d5d8600fb58b1d8a906ddff.jpg)
Hasegawa | Fw-190A-5 | Emil Lang 1:32
Fencer-1 and 2 others reacted to shadowmare for a topic
Fw-190 from Hasegawa. Added Yahu IP, seatbelts, Montex Masks, resin exhaust plus little bit of work with seat, wheels and other stuff. Enjoy!3 points -
Here is My A-7D that I did last summer. I correct the intake and the windscreen with zactomodels correction set . All major markings have been painted on.3 points
-

1/32 P-51 D-5 Revell
Nikola Topalov and 2 others reacted to dani7705 for a topic
A few pictures of the newly completed P-51, this time version D-5 ... The kit pleasantly surprised me with its quality details and relaxed assembly.From the details I added rivet lines for the fuselage,horizontal stabilizer and flaps,propeller cone, radio with accumulator and rear view mirror I designed as a 3D models, which I then printed out on a 3D printer,I made wiring from the lead wires in the landing gear bay, cables from the radio station and fuel pipes for additional tanks, the cockpit was supplemented with belts for the pilot's seat and the spur was replaced wheel for resin from Eduard and that's all, so the construction is almost a box...NMF surface is sprayed with Alclad II, other colors I used: Tamiya acrilic, MRP, Humbrol and Valejo..I used heavy diluted acrylic Tamiya and watercolor to illustrate the weathering, wash - Tamiya accent line color + Promodeller.National marking and other markings are a combination of my own masks and decals from the kit. As a final varnish I used a mixture of Sidolux - glossy warnish for wooden floor and Flat base from Tamiya, which created a semi-gloss final effect. The model represents the P-51 D-5 serial 44-13334 from the RAF Leiston base, whose pilot was in July 1944 Capt.Calvert L.Williams 362nd.FS / 357th.FG ....3 points -

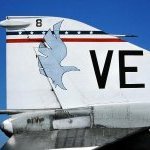
USAF F-4 Question - Folded Wings
Kagemusha and 2 others reacted to phasephantomphixer for a topic
Just need a reason, the maint. forms, a speedhandle, -6 manual, wingfold lock, and four ground crew (one on top of wing, three to walk it up - or two gym rats). Some reasons like parking space, inspection, or lube. Been 30 yrs. since I did one so mighta forgot something... HTH3 points -
But they did fold them at times: Jari3 points
-
...you’re not the only one !3 points
-
Tamiya 1/32 F-4C 54th TFTW 1976 Bicentennial DONE
Kagemusha and 2 others reacted to oppenheimer for a topic
So far, i have benn working on the aft section of the fuselage, if everything goes right by this weekend the cockpit will be ready and i will close the fuselage and start working seriously on this airplane3 points -
Short Sunderland MkII
Sharkmouth and 2 others reacted to tomprobert for a topic
Evening all, It's been a while since this build saw any action, so time for an overdue update... Last time I'd been working on this I had made some good progress with the interior and was more or less ready to join the fuselage halves. I finished off adding some details such as the radio operator's chair to the flightdeck and the depth charge racks to the centre section, as this would be impossible to install once the fuselage was together. I'd also fabricated some beefy wing spars and attached these to the appropriate internal bulkheads: I also added some low-tac tape to the interior of the cabin windows to keep dust and debris entering the fuselage to the minimum - this can easily be removed after painting is complete: It was then that disaster struck - I was happily working away on the kitchen table when the need for a cuppa meant I got up from the table and unbeknown to me, my hoodie had caught on the rear fuselage and whole lot went crashing to the floor. Typically, it was the side where all the bulkheads were glued and as you can imagine, when it hit the tiled floor it was carnage. The interior sections all came away, some breaking into smaller parts. The nose section was totally destroyed and the flightdeck, stairs and forward floors all smashed into an unknown number of pieces. A mammoth, and totally morale-sapping repair job was needed. I simply picked the whole lot up and put it all into a bin liner - manging to overcome the desire to bin the whole thing - and put it into the back of the attic until I could gather my thoughts and find the mojo to repair it all... ...fast forward a few months and I was in the loft having a rummage and I came across a rather sorry bag of Sunderland parts. Suddenly the accident seemed a distant memory and it was time to get going again. The interior was painstaking rebuilt over a few evenings and then it was a case of adding the two fuselage halves together. This went without a hitch, and here we are now: It sure is a big old brute - here it is alongside a 1/32nd F-4J that's entering the home straight, and that ain't small! Barring any further mishaps, this build is back on track! All the best, Tom3 points -
F-4J VMFA-115 "Silver Eagle" - 1/32 Tamiya - FINISHED
Rockie Yarwood and 2 others reacted to Cicciuzzo for a topic
Good morning dear friends of LSP. Today I show you my latest update. I mounted the PE Aires to the canopy structures and then I added some details to the MK77 MOD 4 configuring them in "Primary Fuzing". PE Aires MK 77 Mod 4 "Primary Fuzing" I hope to start coloring soon. By the way, I would like to use black surface 1500 as a primer with random white but as a white color for the lower surface which one do you recommend, the Gunze H316? Thanks for the reply and I hope you enjoy the job.3 points -
Here is my F-105g this again I built last summer using Aires cockpit set and wheel wells .I also was able to get a hold of a cutting edge nose cone set ,I was also reshaped the rudder . All the major markings were painted on ,the wheels came from Reskit.2 points
-
.thumb.jpg.5da8bff9741de420eb2e87addd8f2cf6.jpg)
Tamiya P-51 $78 at HLJ
scvrobeson and one other reacted to RadBaron for a topic
https://www.hlj.com/1-32-scale-north-american-p-51d-mustang-tam60322 A bunch of other 1/32 kits on sale as well, but that is a fantastic score!2 points -
I'm slowly making some progress. I've added the wiring to the nose landing gear using lead wire, then primed it with Tamiya surface primer for metal and plastic. I'll be painting next then will assemble, paint, and add the wheels. Interestingly, Minibase gives you the choice of round or flattened main wheels but you only get round for the front wheels. They would be kept at high pressure but even so there should be a slight flattening, which I will have to add. Until next time! Cheers, Tom2 points
-

USAF F-4 Question - Folded Wings
Isar 30/07 and one other reacted to LSP_Ron for a topic
Well if you really want to be outside the box you could do it flying with the wings folded.2 points -

Weather Delayed Sets Coming in March/April 2021
Piprm and one other reacted to D.B. Andrus for a topic
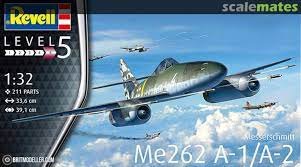
Not yet. Life, in many respects, has gotten in the way of this part of the business. Re. the A-4 (H & T) sets: The 90% of the masters are in their flasks waiting for the mold material. Both the Has. and Trump. sets will include wheels and separate disk brake parts. The wheels are modified Has. parts with added valve stems & slightly flattened bottoms. Both the Has. & Trump. sets will release at the same time. Re. the 262 (Rev) set: Masters ready to mold. Re. the P-40 (Has) set: Masters ready to mold. Re. the B-25 (HK), B-17 (HK), Mirage III (Ital), P-61 (HB), F-16C (Tamiya.- early & late), He 219 (Rev), F-86F (Kin/Ital) : All undergoing prep & modification, as time allows. All will be done.....please have patience. Cheers, Damian2 points -
Haven't updated in a week simply because I haven't gotten much done... A couple of days ago, I did get the failed U.S.NAVY markings sanded down and repainted the rear half yellow. I'm giving the yellow several days to dry before I try masking again. I've cut many additional masks with less force and slower speed on the Silhouette Cameo and achieved better results. In the meantime, I'm knocking out an old Testors/Hawk F8F-2 Bearcat just for fun. Pretty much SOB and replicating one I built as a kid and had up until a few years ago when it met an untimely ending. I needed something for fun break while Stearman paint is drying. Don't hate on me for building a 1/48.2 points
-
Also note the position of the insignia on top of the wing, at the wing fold: Jari2 points
-

Kitty Hawk models is going out of business
zerosystem and one other reacted to ade rowlands for a topic
The lack of some profile shots to show what you are getting doesn’t help either. I go to https://www.aero-spezial-modellbauversand.de The owner tends to scan a lot of instruction sheets in giving you a better idea.2 points -

Kitty Hawk models is going out of business
LSP_K2 and one other reacted to blackbetty for a topic
i ordered the berna sheet with the greek colourful tail and the "under the skin" book this begins to be expensive (sigh.....again)2 points -
I use facial tissue with making fluid to hold it together. I just use small pieces and when wet it's quite easy to form, and when it's time to remove it just add a little water and it comes right out. Ain't pretty but it works.2 points
-
And you're not looking for the bargain Airfix kits at all, of course.2 points
-
Hi Brad - I'm not formally one "of the people at Fundekals," but I did help Jennings with the research for that sheet as well as the aircraft profiles and information within the accompanying instruction manual. Based on your question, I re-looked at that B&W photo of 63-7683 you point out on p. 13; and while I do see the tonal difference in both stabilizer tips and the overall color of the underside of the stabs, I stand by our judgment that '7683 in particular, and most of the pre-Block 25 F-4Cs in the 8 TFW during 1966-1967 had white bellies. In this particular photo, if you look at the light tones of the undersides of the wings and aft fuselage, you can easily see that the underside of the wings matches the tonal qualities of the (white) underwing stores pylons (the inboard pylons are still the original white, Navy-style LAU-17 missile rails) the (white) AIM-7s in the forward wells, as well as the (white) centerline tank. Additionally, you can see light reflections on the undersurface of the wings consistent with a gloss finish including reflections of light due to a low sun angle from the pylons themselves on the surface of the wing. Also prominent on the lower-aft fuselage are the red turbine stripes (look just behind the aft-most high-drag Mk-82 fin on the port outboard MER), which were not typically masked or re-painted on aircraft with the FS36622 flat gray applied on the lower surfaces. Further, the low-sun angle may be catching the very tip of the starboard stab, and that could account for the apparent brighter, white tone. Notice how the low-sun angle highlights just the tip of the port wing? The right stab tip might also be just below a shadow line: hard to tell with the B&W halftone and resolution of the reproduction. [Edit: the more I look at this photo, this is exactly what I think is going on: the right stab tip is just below a shadow line and is lit-up by the low sun angle and looks much brighter than the rest of the stab. I'm not even sure if '7683 has the white stab tips seen on other MacSorley images...but I'm keeping the rest of my thoughts in this response as a more in-depth explanation of the white-bellied Phantom era in SEA.] As for the tonal differences of the lower surface of the stabs in comparison to the stab-tips: We don't know if the "white tips" were masked when the camouflage was applied (not very likely -- recall that the upper side of the stabs were also gloss white, with the factory-applied LGG and white scheme), or if crew chiefs painted the white tips later (more likely); in which case the white tips would likely be a "different" variation of white paint, not to mention that those white tips would be much fresher than the ca. 1964 factory white paint applied to the undersurface of the airplane. Also realize that the underside "Gloss White" FS17875 on the Navy/early-USAF scheme was still an "off-white." So, even a fresh coat of FS17875 would have a tonal difference from a stark white paint color. But in this case, you are also looking through 2-3 years of J-79 soot, leaked hydraulic fluid, jet fuel, and other air pollutants on the underside of these aircraft. The influence of J-79 smoke and soot alone would easily explain the tonal differences of the inner sections of the stabilator undersides and the tips. Early Phantoms in the Vietnam era produced huge volumes of engine smoke and soot; much more than updated Phantom engines in the 80s, 90s, and modern era. And, throughout any "era" of F-4 service, it is common to see many hues of red, brown, and black smudges along the lower-aft fuselage, aft portions of the wings, and the stabs from the many fluid leaks through those panel lines and flight controls, as well as the smoke and soot build-up on the fuselage and stabs aft of the jet nozzles. I don't doubt that by spring 1967, as the SEA Theater F-4 depot line built up momentum at the Air Asia facility in Taiwan, that there were F-4Cs returning to the three main theater operating bases (Ubon, Cam Ranh Bay, and Da Nang) with freshly painted gray 36622 bellies, but this photo of '7683 in late 1966 or early 1967 shows a well-used and dirty, original gloss white underside. HTH, Chris Mayer2 points
-
1/12 Ford GT Mk II/Meng
D.B. Andrus and one other reacted to nichenson for a topic
Some GT40s had a bulge to fit one 6'4" Dan Gurney2 points -
Third email did the trick; they’re working on fixing it now...2 points
-

A-6E VA-65 Desert Storm "500"
Anthony in NZ and one other reacted to Marcel111 for a topic
Thx guys! I am having waaaaay more fun with this Trumpeter kit than with the Trumpeter F-14. The shape of this Intruder looks spot-on to my eye, the only really obvious blooper I have come across is the location of the inside wing fence, but that's an easy mistake to make since they differ from A to E, plus not so hard to correct. Filling the rivets is pain but I think if I had done this prior to assembly it would have been a whole bunch faster... it's the type of work that can be done on vacation by sneaking the parts plus some sandpaper into the luggage :-). All the additional, many hours are really just enhancing a really nice kit. On the other hand, with the F-14 I felt like most of the many hours I put into that kit were just spent correcting bloopers. And as much as l like the final product in my display cabinet, the shape is still off, with the entire front section just looking to heavy. Steve, yeah, the Eduard stuff always looks great and the production quality is fantastic but the accuracy isn't reliable. I will say that their customer service is exceptional, some sway braces were missing and they sent me some I think the same day I contacted them. Cheers, Marcel2 points -

TA-7C / EA-7L "Twosair" - Trumpeter conversion
scvrobeson and one other reacted to A-10LOADER for a topic
You've got a lot of irons in the fire buddy. I don't know how you do it, I have enough trouble with one build at a time. Another masterpiece for the display cabinet for sure. Steve BTW, I'm still working on getting your ES-3A decal sheets scanned, hopefully soon.2 points -
I didn’t buy the Brassin just to use the foam. All I was saying was: just look around you. You’d be amazed at the number of the number of innocuous things that would be useful to your modelling.2 points
-
ANOTHER BRIEF UPDATE Added chipping using silver ink. I really don’t like doing it with a brush because I never get the results I want - just looks like paint daubs but I guess I’ll just have to live with it. The only thing that looks like chipped paint is chipped paint in my opinion. Frankly, at this point I want this build over with, it’s been over a year since I started and enough is enough already. I then sealed everything with clear and started with the weathering which isn’t really looking the way I was hoping. I had much better results with washes and streaking on my mule by just applying over the bare paint without a clear coat. BEFORE AFTER So, back to the drawing board to try something else to get the grimy streaking I’m hoping for.2 points
-
Today I received my lower strut test part, 3D printed out of grey resin. The goal here is to try to determine if this part can be used as is, or does it need an internal strengthening member like a stiff wire. Previous posts have discussed this. In which case, the lower strut would have to be made in two halves split down the middle, and hollowed to accept the bent up wire. Recall the lower strut looks like this: The part of interest is labelled "I worry about this part". Here is the lower strut detail test part fresh from Tim: It is a gorgeous part. Wonderful detail. OK, this Corsair is going to weight roughly the same as my 1/18 P-47D. So to determine approximately how much dead weight the lower strut must carry, I measured same on the P-47: 0.972 pounds. I assembled the lower strut by adding aluminum tubes for the oleo and the axle, and added the tire and wheel to it. Then I put together a crude test stand of sorts: Now to put weight directly above the strut. I have a can full of civil war style lead slugs which weight 0.062 lbs each. So I started to load it up and see if/when the strut breaks..... 1 pound: No appreciable bending either . Good. This is how it's going to be on display. 2 pounds: Messed up the three pound photo.... Four pounds: Got some bending going on! But no fracture yet. Five pounds plus: Wow! I ran out of slugs. Look at that bending. I guess I could have tossed in some other things, but I had seen enough. When I relieved the strut of weight it sprang back to its original shape - no permanent set. I also did an engineering analysis at the critical section just below the oleo, determining the bending moment for one pound dead weight, and using the advertised ultimate strength of the material (5076 PSI). My calcs suggest the part fractures at around 5 pounds. So the part beat my prediction. I have concluded that the single piece lower strut will be strong enough and stiff enough to adequately support the model. So relax folks! It's gonna be OK! I have been working on the cockpit. But not quite ready to show progress. Next post, I promise.2 points
-

1/32 Infinity Models SB2C-4 Helldiver
Greg W and one other reacted to monthebiff for a topic
Not a lot to show but also had limited bench time over the last week or so unfortunately. Managed to get my head in to the build and first things first the fit of the major fuselage parts are pretty awful so far! Initially I decided to fit the base of the turtle deck in place but found the tailplane fillet was very undersized and poor fit. The tail fillet needs replacing with a scratched plastic card replacement so I decided to add some internal structure and check the fuselage halves go together nicely. The fit of the foward bulkhead in to the starboard fuselage half was very poor due to the fuselage being out of shape And the foward fuselage halves closed up. On to the rear fuselage and the fit of the turtledeck floor is poor on the port side when closed up. I'm pretty well sorted on these fit issues now but don't have pictures yet. All I can say is this is one difficult build needing lots of foward thinking just like an HpH resin kit funnily enough! Regards. Andy2 points -
Hi Matt, Jim and Martin, Thank you for your kind comments ! @scvrobeson , @Beaconroot, @Martinnfb I was afraid the wurger would gather too much dust and disapear underneath, so i got it out this weekend. First job, wich was responsible in the build lag, was to cut the rivet sheets for the belly. Here they are applied and seams masked. Ready for flat aluminium spray. Same pic after the booth session, and unmasked. Close up. pretty rough, but rivet edges will be adresses after. I forgot to document a few steps in the process, RLM76, sponge sanding, dark wash, and RLM76 over it to blend. Here after these. RLM04 has also been applied. Next are the exhaust stains. Fuselage are hard to spot on the pics, but on natural light there is a greyish touch over the black, will try ti get better pics later. Belly is still a wip, still need to add the liquid stains over the airflow dirt. Walk area are sprayed on the upper wings as well, hope this will stop handlers to leave fingerprints all over unpermited areas ! After a slight sponge sanding session, to blend it on. Lastly, Horst took the bird for an in flight test. https://i.imgur.com/IY3d26o.mp4 Cheers Mathieu2 points
-
Tamiya 1/32 F-4C 54th TFTW 1976 Bicentennial DONE
Kagemusha and one other reacted to oppenheimer for a topic
i started on blending all the paint to see how it looks, this Phantom will have a subtle weathered paint because i am going after a Bicentennial scheme on this one, sothey are most of the time in pristine conditions. this is the scheme i am trying to replicate2 points -
aeroscale.net/news = Seamless Liberator Turrets Juraj EDIT: Just seen this posted in the other thread. Sorry.2 points
-
Some quality work here on those engines gents!......Its one part I really hate doing is engines, thats why I like inline ones where you can put all the panels on and not worry about it. Here is the engine from my current P-47 build... Cheer's, Jeff.2 points
-
I will build this straight OOB. Looks close enough to a B-24 for me. Brilliabt review Iain, thanks a mill.2 points