Leaderboard

Popular Content
Showing content with the highest reputation on 07/30/2020 in all areas
-

The Birth Of A Pup...Early days
Whitey and 6 others reacted to Bobs Buckles for a topic
vB7 points -

1/32 Trumpeter F-14A Tomcat
vvwse4 and 5 others reacted to Mark Jackson for a topic
HOLD THE PRESS! I had a nagging doubt, something was not right and I knew that I could obtain a better fit. So even though the two panels which seal the wing box area were super glued in place, I used a metal rule to snap them off. It could have ended in broken mess but the modelling gods must have been looking down and both panels had no plastic breaks or tears. I wanted to obtain an accurate wing sweep, droop and minimize the gaps around the wing where it sits inside the wing box. All too often you see great looking Tomcat models but they have big gaps where the wing sweeps in and out. The Trumpeter rubber wing seal bags are not easy to work with and require some scalpel slicing to create the correct level under each wing. The wings move independently but the mechanism is hit and miss so both wings will be fixed. Then the gaps will be filled and made good.6 points -
This is the Hasegawa A6M5 1/48 kit with some Eduard etch seat belts with the decals from Rising Decals Dying Sun sets. The kit itself was rescued from the shelf of doom, I can't remember why it was put there as the model itself isn't bad. The decals are also top notch. ATAIU-SEA stands for Allied Technical Air Intelligence Unit -South East Asia and a number of Japanese aircraft wore these markings post war while being the subject of evaluation by the RAF. I believe that the centre section of this aircraft is now in the Imperial War Museum and the only section of the ATAIU's aircraft to survive.5 points
-

Liberated during quarantine -PB4Y-1
Derek B and 4 others reacted to patricksparks for a topic
Started doing a little work again, had to "Time Out" for a little bit, I was hitting the wall modeling wise... Anyway I did some re-scribing on the engine nacelles, not quite done yet. I finished putting in the "Tunnel Gun" windows. I started to re-work the lower nose, the conversion to a PB4Y-1 with the ERCO nose turret requires a different profile on the lower nose, this only applies to the early conversions of "D" model air frames, the first PB4Y-1s were standard B-24 Ds and then they started to convert some of them with the ERCO turret, later production aircraft had the nose more the shape of the "J"s lower nose shape. Of coarse I chose to make the earlier. The first photo is the kit's nose being cut off and the clear bomb sight window is in place to show the shape difference, the second photo is a forming(black styrene) that I made to replace the original lower nose. The earlier nose didn't have the clear sides on the bomb sight window, only some small rectangle windows that I have to add, other versions had no side windows at all. You have to do some research when building one of these!!!5 points -

1/32 Tigermoth - Glider Taining School
Trak-Tor and 4 others reacted to VW Chris 1969 for a topic
Hi all I am new to this Forum and I hope you don't mind e posting this , but I have a model I have just finished last week. I have been building the model initially for a group build but in true form I did not finish in time !!! I have enjoyed the kit very much and was provided much encouragement, support and references by Max known on here as @mozart, so I would like to say a big thank you Max, your help and support was very much appreciated. The kit is the Revell venerable Matchbox Tiggie and I picked it up second hand for just a fiver at my then local model shop Hythe, Kent Models, in those days I only lived 100 yds away from the shop so I was always in there and the owner got to know my interests and would set kits aside for me, what a great shop it was and I still miss going in there. I have made a few modifications to the kit such as new compasses and mounts, front seat, some controls, new windscreens, fuel **** and mechanism, rudder controls, aileron control cables etc, new access doors, corrected vertical tail position and anti spin strakes, oh and a new fuel gauge. The engine also received some attention as did the cowling panel that is open. Rigging is Invisible thread with Bobs Buckles Eyelets and tubes, not prototypical I know but I am very happy with it. The model is brush painted using Humbrol enamels and the decals are from the Kit Anyway enough of the chat her are some photos, I hope you like. Fuel gauge Thank you for looking in, I hope you enjoyed, apologies for the phot quality but my camera has broken and I am using my soon to be replaced phone. I am just finishing a much modified 48th scale Seahawk and then will be moving back onto a very heavily modified Hobbyboss Spitfire Mk Vb and waiting patiently in the wings is a Revell 32nd scale Hunter that I am building into a GA.11 and a 24th Scale Airfix Sea Harrier FRS. All the best Chris5 points -

1/32 Tamiyia F4 Phantom VF-33 TARSIERS
Cicciuzzo and 3 others reacted to miketippingmodels for a topic
1/32 Tamiyia F4 Phantom VF-33 TARSIERS The main build was OTB, apart from the ordnance which is Eduard, the pilots are resin figures and the yellow shirt is from Reedoak. Many of you will know my preferred paint is MRP , just because it drys really quickly, and allows a lot more applications of weathering than other paints. The decals are from MILSPEC, which I have to say were very nice to work with. And on this occasion the base was built by my good friend Mario Catania, he’s very good , you should go over to his face book page and see what he’s doing. Established in September 1943, VF-33 were first equipped with the Grumman F6F "Hellcat". Their first operation was to the Soloman islands, the first time a US Navy squadron has used the F6F in combat. VF-33 was land based at this time, supporting the island hopping Pacific campaign. VF-33 disestablished in July 1946. VF-33 was re-established on the 11th of October 1948, this time flying the famous Chance-Vought F4U "Corsair". After seeing action during the Korean war (and being awarded the Navy Unit Citation for their success) several changes of equipment and location followed in quick succession. By 1962 the unit was flying F8U-2NE "Crusaders" from the world's first nuclear powered aircraft carrier, the USS Enterprise (CVN-65) and as part of this team took part in the blockade of Cuba. In 1964 the squadron started to become familiar with the aircraft which (in two different versions) would last them the next 17 years and became the backbone of Naval Fighter Aviation. The plane was, of course, the F-4 "Phantom II". Initially equipped with the F-4B, VF-33 set a new Atlantic Fleet record by winning the CNO Aviation Safety Award for four years in a row (1961-64). However VF-33's time with the F-4B was short and in 1967 they upgraded to the F-4J. The new F- 4 featured a different radar, higher thrust engines, slatted tailplanes, extra fuel cells and larger main wheels (to handle the increased weight). Almost as soon as the new F-4's were received VF-33 was once again deployed to combat, this time to South-East Asia onboard USS America (CV-66). During their time in theatre VF-33 dropped over 3,000,000 pounds of ordnance! This was in the space of 4000 combat hours flown over 5 months. On the 10th of July 1968 a VF-33 bird downed a MiG- 21C, the first air to air kill by an East Coast Fighter squadron over N.Vietnam. After returning from Vietnam VF-33 continued it's association with CVW-7 and USS Independence (CV-62), deploying most years. Several awards were won during this time, including the CNO safety award in 1969 and 1970. The 75-76 cruise saw the squadron win the Golden Tailhook Award,4 points -
The Birth Of A Pup...Early days
KiwiZac and 3 others reacted to Bobs Buckles for a topic
Hello fellow plastic junkies, I'm in the process of knocking up a Pup. Here is the cockpit assembly near complete barring seat and belts. More updates when orders calm down...See you here in 2040! Stay safe my friends. Von Buckle4 points -
I have quit stalling and have begun work on the exhaust stacks. Lots of trepidation, but geez - it's a model; it's supposed to be fun. My plan is to use a combination of .125 inch diameter aluminum tube and also .125 inch diameter solder. If perfectly to scale the diameters would be about .14 inch. But I could not find material that size that would suit this application. I will use the solder where I can because it is easier to bend and form. The aluminum tube will be used for the lower portions of the stacks where they exit the fuselage and the ends are exposed. The stacks must be hollow there, obviously. The aluminum tube must be bent and formed as well - and in order to prevent the walls from collapsing I have filled the ID with .093 plastic rod. Then after forming, I can easily drill away the plastic rod from the ends to regain the hollow. I have a variety of tools and fixtures in which to accomplish the bends and accurately locate the ends common to the cylinder exhaust ports - so far so good I guess. There are three pairs of stacks, each one serving three cylinders. I have started with the middle pair of stacks. What I really need to do this is to mount the engine on the fuselage. But it isn't time to do that yet (far from it), and I don't want to handle the engine a million times in the process (which is what would be required - lots and lots of trial and error here). Also don't you know I would drop the engine on the floor doing untold damage to a 6+ month project. So I made a fixture that simulates the rear portion of the engine and has all 18 exhaust ports accurately located. Here it is with the two almost completed middle stacks: This thing mounts onto the fuselage "bulkhead" that I am using to mount the engine: That bulkhead kind of has a counterpart on the real aircraft, kinda doesn't. The real aircraft has something called a diaphragm that provides an aerodynamic surface for air that enters the cowling and passes out the cowl flaps. All radial engine aircraft have such a thing. But it doesn't support the engine nor is it a firewall - it is merely a thin sheet metal surface. The real aircraft has six flexible "Lord" mounts (motor mounts) that attach the engine to a mount ring. While I will model these "Lord" mounts later, they are too weak and fragile to hang onto that engine, so I had to modify the diaphragm and have it support the engine: I did the same thing on the Thunderbolt. You may also notice the aft fuselage and tail are gone. I have done this on all my 1/18 efforts except the P-38. One, the fuselage is very long and bumps into things. That was painfully apparent while messing around with the exhaust stacks. Two, a staggering amount of work must take place inside the fuselage - cockpit, engine compartment, aft landing gear and empennage. This way all that work can be split up and joining the fuselage halves is easier. I split it at the bulkhead where the pilot seat is hung - along a prominent panel line. Here is the LH middle stack: Inspect it just a moment and you will see it has a long single tube, and two short pieces of solder bonded onto it (with copious amounts of 2-part epoxy and a little putty). Those bends are exceedingly difficult to get just right, and were the reason for my trepidation. Although it fits well to the cylinder exhaust ports, and seems to fit well to the fuselage, I still don't know for sure how it will fit with the upper stacks that kind of lay on top of it. And that is going to be next. Wish me luck - this is the most challenging part of the build to date.4 points
-

1:32 scale Ansaldo 'Baby'
Tnarg and 3 others reacted to sandbagger for a topic
Hi all, The 3D printed Le Rhone 9J engine is complete. Painted with 'Alclad' Steel lacquer and weathered using by sponging 'Tamiya' Weathering Master Burnt Blue, Gunmetal and Silver. Complete engine washed with 'AK Interactive' Kerosene, thinned with White Spirit. Spark plug leads twisted from 0.125 mm diameter copper wire. Mike4 points -
And the Zip Modelist kit I forgot this picture of the wings in the first part of this post, sorry I hope I have been clear and that this will be help you, Regards Topper71 (Marcel)4 points
-
3D cockpit render posted on SH page https://www.specialhobby.net/2020/07/sh32047-westland-whirlwind-132-prace.html?m=14 points
-

Teutonic Starfighter
F-4Phanwell and 3 others reacted to Madmax for a topic
Painting this very German Starfighter is fun. The splinter camouflage is rather reminiscent of Luftwaffe builds from another era, and is much nicer to mask than any organic camo pattern! On the sheet of paper are my mixes for the green and grey - real hit and miss stuff I'm afraid. As it turned out, my green was too yellow. Don't take the "Gelb" in the "Gelboliv" too seriously, it is actually quite a dark green. Sponged on masking fluid is used to add some visual interest, and I then sprayed darker shades over the existing green. The same was done for the grey, and lighter shades oversprayed to get the contrast right. You will notice that I have sprayed some green over the grey in areas to simulate the green showing through worn paint. As mentioned previously, it looks to me like the grey is sprayed over the green. I used Tamiya TS-96 Fluorescent Orange for the dayglo on the tip tanks. It is quite important to get the right undercoat for it to work, and here you can see a yellow undercoat that fades to white on top where the dayglo fades quickest. Apart from getting the undercoat right, it is also quite important to get the dimensions of the panel right! I got hold of some cool Uschi stencils (that Mig Jimenez markets) at my LHS, and have put them to work creating some variation to the silver/grey undersides. Most enjoyable stuff! Sean4 points -

1/32 Hasegawa P-47M Thunderbolt ”Josephine”
Paramedic and 2 others reacted to Tolga ULGUR for a topic
3 points -
Hi at all I returned from my vacation, I made more comparatives pictures which the Legato kits Avia B35 (in grey )and the Zip Modelist (sand color), I find that there last was not so good molding that the Legato Kits, and is more basic (no photo ech, no decals) but I precise that the Zip modelist has officialy bought on ebay for a few years, also I built my avia B135, I molded this one from the Zip modelist Kit, here the pics and the thread from my AVIA B 135 built progress Avia B 135 THE AVIA B 35 FIRST THE LEGATO KITS IN GREY3 points
-
So ... I take it you're not new at this then ... ?3 points
-
Another little bit of progress, albeit slow... I've started to do the rivets on the wing, aft fuselage and vertical tail. Still a lot more to do, but hey, it's an update, right? The rivets that aren't deep enough after sanding, are done again one by one. The wing isn't glued to the fuselage yet, neither are the trailing edge flaps. First set of rivets on the vertical tail. Still struggling what to do with the rudder though... I don't like the two connecting points so clearly visible. Have to think about that. The added tube needs a bit of cleaning up too and the panel line behind it fixed. I bought some Master AOA probes. Those look good! Next in this area are the details on the inside of the nose, since I'm building it with the radar visible. And again; some more details like the yaw vane, which is way too thick in the kit have to be added. The area behind the cockpit needs to be detailed too, especially since in the diorama, the canopy will be on a cradle next to the jet. So, I scratched the inside of the ducts. Now I have to add the details on the top side . Gonna be fun! I still have to do some work before I can fix the wing to the fuselage (water reservoir on the wing and the area of the outer riggers), but then I get started on the air intakes and scratching the open in-flight refuelling robe. Very motivated to do that, since it'll be an area of interest. Lot of detail possible there! And I'll have to scratch the homing antennas on the sides of the air intakes in front of the forward nozzle fairing. I noticed that the leading edge of the inner wing pylon got a bit damaged, so I'll have to see to that. Still have to add some detail in the open pylon panel too! I will add the drop tanks, but I'll place them on the mid-wing pylons, that way, you can see more of the fuselage and nozzles. This kit is taking quite a bit of time, but it starts to look like something. Till the next update! Nic3 points
-
The Birth Of A Pup...Early days
KiwiZac and 2 others reacted to Bobs Buckles for a topic
I have been working on the doped linen. I'm not 100% happy, but I'm as close as I'm going to get without losing the plot. Cheers, Puppy Von Bucky3 points -
Hi all, I've been working very slowly on this Airfix Spitfire for the last few weeks and months. I was prepared for some of the fit issues before starting but even so, haven't found it a particularly enjoyable build, hence the time it's taking to finish. The cockpit is nice, but over engineered and some of the smaller parts have a vague fit. I added belts - not entirely correct, but better than nothing. Once painted and weathered, the cockpit does look pretty good though to be fair. As expected, the joints at the wing roots weren't great and the upper part of the cowling didn't fit well either. I battled through, and I'm now at the painting stage. Undersides were painted with Vallejo blue and upper camo with Mr Hobby Aqueous paints. I'm working towards applying the decals now... Thanks for looking Matt2 points
-
1:32 scale Ansaldo 'Baby'
AceofClubs and one other reacted to sandbagger for a topic
Hi all, I'm waiting for the propeller to arrive to complete my Siemens-Schuckert D.III model. Therefore I'm making a start on the 1:32nd scale resin model of the Ansaldo 'Baby' by 'Lukgraph'. I'll be modelling the first 'Baby' built (Ser No: So 5005) by the SA Aeronautica Gio Ansaldo of Turin. This aircraft was fitted with a Le Rhöne 9J rotary engine (120hp) with a circular engine cowl. I've made a start on the 3D printed engine, which I must say is the best finish I've seen thus far from a model company. The surface shows very little, if any, of the layer striations seen on some 3D printed model parts. Cutting the parts from their support trees is a bit tricky and because the material is quite hard, removing the tree stubs on such small parts is difficult. Mike2 points -

MESSERSCHMITT BF 109E-7 TROP 1:32, HGW MODELS
Castor and one other reacted to MH Design Scale Models for a topic
Hey guys, I would like to share a few pictures of my build of Messerschmitt BF 109E-7 TROP 1:32 by HGW Models. If you would like to see pictures of the entire build, please visit my web https://www.mhscalemodels.com2 points -

Wingnut Wings - Large shipment and Meng
phasephantomphixer and one other reacted to Peter Browne for a topic
I came across this YouTube about https://andyshhq.com/ having just received a large shipment of Wingnut Wings kits ordered before the closure. The video is from 28 July 2020... Sale starts 30 July.... Now I have read snippets on that YouTube posting and on the Meng Facebook page and elsewhere that Meng may have acquired the Fokker Dr.1 tooling from Wingnuts. https://www.facebook.com/pg/MENG-195290177250981/posts/ https://www.themodellingnews.com/2020/06/preview-meng-takes-mantle-with-new.html I gather this is now old news since mid June Anything about the WW Lancaster??2 points -

1/32 Spitfire canopy ejection system ball?
LSP_K2 and one other reacted to Ossington 1 for a topic
There is a winged tab fitted high up in the windscreen arch of early Spitfires. It releases the canopy latch, enabling it to slide rearwards for exit. When a more rapid exit is needed, a cord attached to a red painted ball pulls the canopy latches apart and forces the canopy into the slipstream.2 points -

The antique BoB Revell Spitfire Mk.I
MikeMaben and one other reacted to thierry laurent for a topic
Hi again, Unfortunately I did not have a lot ot time to allocate to the Spitfire today. However, I still added some additional details. I already mentioned the missing reinforced corners on the radiator faces. Note it is useless adding them on the rear face as the ducts would be hiding them. However, this is different on the front. This was the last item to add in that area. I also worked on the canopy ejection system. The Barracuda part is very nice but is lacking two elements: the handle and the ball. I already added the handle. I made it with some thin copper wire and a bent section of fine Albion aluminium tube. I used a very shap pointed tool rather than a drill to make the two small holes in the wings of the resin part. I was a little bit nervous as I was afraid of breaking the resin wings but fortunately the resin was souple enough. I just have to add the ball on the rear side. However, I'm still wondering where I will find a small ball with a diameter slightly under the millimeter...? Any idea?2 points -
Hi Oliver Your drawings are correct. On this photo you can see the position of the dog tooth. Cheers Nick2 points
-
So I haven't posted anything new for quite a while, but believe me I have complete several projects and have some big ones in progress, and even more I'm gathering aftermarket for (Don't tell my wife :-). This is the Tamiya 1/32 F-16CJ, which is a great kit on its own but I decided to backdate into an F-16A OCU for the USN/USMC. I used the True Details 1/32 F-16A cockpit (it required a lot of sanding, trimming, and swearing to get it to fit, but it now fits like a glove and I can even close the canopy with no problems), GT Resin 1/32 NSI inlet, a generous gift of the Tamiya 1/32 F-16C Thunderbirds landing gear parts, non-bulged main gear bay doors, and early-model 'thin' wingtip launch rails from GT Resin as well, really nice fellow, I highly recommend any of his stuff, KASL F-16A tail with the parachute housing removed and kit parts grafted (I later found out it wasn't completely accurate after it was done, but its really hard to tell), GT Resin PW exhaust, lots of scratch building antennas, deleting/adding certain details to make it into an F-16A OCU, like only 2 prongs on the inboard leading edge slats, redoing panel lines on the rear fuselage, etc., Two Bobs F-16 Aggressor Decals. I hope you enjoy checking out the photos, I've got a big WIP diorama of "PROJEKT FLANKER," Kilp Yavr Russian Air Base with (3) highly modified and detailed Su-27s, (1) Mi-8 Hip, and various ground vehicles, equipment, tarmac, and a small amount of terrain thats been underway and I'm hoping to start the WIP this weekend. I need to take photos of the Tamiya 1/32 F-15C Eagle of the California Air National Guard which used Chuck Sawyers build for reference and is very similar but with some more rivet detail and weapons on it. I need to upload photos of the Trumpeter 1/32 F-105D 'Thunderchief' "Cherry Girl" (wait until you see the nose art :-) I finished. I have a 1/32 A-1H Skyraider in white primer, almost ready to paint up on a rainy day, as the plane Dieter Dengler flew in the Vietnam War. Also lurking on the distant horizon is a 1/32 A-6E Intruder (HEAVILY weathered CAG bird from the Gulf War), Academy 1/32 F-16B 'Fighting Falcon' in IDF markings, inspired from 'Iron Eagle,' and a 1/32 A-10C Thunderbolt II of the 163rd FS/122nd FW in Ft. Wayne the 'Blacksnakes'.2 points
-

Wingnut Wings - Large shipment and Meng
Dave T and one other reacted to ringleheim for a topic
WNW is gone for good. This was not ordered prior to the shut down. This was acquired post WNW going out of business, from the regional supplier in HK. It's similar to the batch MBK has had for a while now, as AHHQ and MBK are related entities. The understanding of this entire situation is horribly understood at this forum, and yet folks here post as though they actually know what's going on. An excellent example of the Dunning Krueger effect in action!2 points -
Wingnut Wings - Large shipment and Meng
esarmstrong and one other reacted to ringleheim for a topic
He has mentioned the prices will be normal MSRP. He has approximately 300 kits at his brick and mortar store in AZ and another 300 coming to his online retail operation in Portland, OR. Those are the kits that become available on Friday.2 points -

Galland's Bf 109 E-4
MikeMaben and one other reacted to Jerry Crandall for a topic
While researching the print we did of Galland's W.Nr. 5819 E-4 Gerhard Meyer related that Galland demanded that his a/c was painted in gray as he flew over water and any shade of green no appropriate. They both believed that Galland was instrumental in getting the RLM to change over from 02/ 71/ 65 to 76/75/74. Exactly when the color change happened on Galland's 109s is unclear. Cheer, Jerry2 points -
Well KHM and Glen did still confirm their Jag is set for later this or early next year. No idea on the L-39 however2 points
-

ICELANDIC FINE ARTS 1/32 F-4K/M PHANTOM!
thierry laurent and one other reacted to ColinR for a topic
Better resin in the mould than promises and CAD images!2 points -

Wingnut Wings - Large shipment and Meng
Rick Griewski and one other reacted to Radub for a topic
WNW kits are not "rare", they were made by the thousands. The only "rarities" are test shots. If you got a "test shot 1" (TS1) of any kit, then you have a valuable item on your hands. TS1 always contain errors, then the moulds are modified. So, a TS1 with "errors" is a unique, never to be repeated "upside-down Jenny". You got a WNW TS1? Name your price. You got an off-the shelf WNW kit? So have thousands of others. Radu2 points -
I believe the Meng Triplane release has been mentioned previously...2 points
-
Good work Dennis, here is a pic of a rear turret: And the other end: Jari2 points
-
Thanks, Tom. More or less completed the upper hull, which means I can’t put off the rework of the front end much longer.2 points
-

1/32 P-47D Razorback.....to bomb or not to bomb
ARay87 and one other reacted to David Mooney for a topic
Hello all, I hope you all have been surviving lockdown by modelling-on.....this is the second Jug of lockdown. I set about Trumpeters P-47D Razorback version this time and found that the Razorback was a bit more of a drama than the Double top version, I think it maybe a different mould completely. Its a little tricky to get together and line up, but as long as you proceed slowly with the build, you should be fine. I added a few aftermarket pieces, these were the resin wheels by Brassin and the gun barrels set from Master (32115) and I get rid of the metal seatbelts and made my own from masking tape as I can never get the photo etch belts to 'sit' right. Paints were from Gunze Mr Colour range and as ever.....are brilliant. I added some magnets into the wing where the pylons attach, then added some magnets in the pylons so the lower wing is untouched for displaying without the pylons attached or kept clean. So here is aircraft 42-75242 which was flown by Capt Michael Quirk flying for 62nd FS/56th FG, Halesworth. I'll add a link to the Bubbletop..... Thanks for looking :-)2 points -
Looks like it's going to be a superb kit straight out of the box.2 points
-
Well just received the next project , spotted on Evil bay last week, and bought on sunday , cost almost as much as the buc, someone was keeping me honest I guess.. To be honest I'd forgotten this kit ever existed , but I just had to have it , fortunately it comes with all the Resin extras, Front and rear cockpits, U/C and fuselage sets, but no decals or instructions .. Since there are 2 fuselage and wing sets , I've been mulling over an idea... since Paul Fisher's tragedy , and the cancellation of his Firefly project . I'm thinking about something like this2 points
-
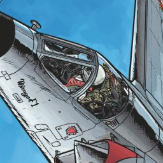
1/32 Trumpeter F-14A Tomcat
Marcel111 and one other reacted to Mark Jackson for a topic
Now this photo may alarm some readers: It actually shows progress being made!2 points -

HK Models Avro Lancaster Mk.I WIP: Canopy Attached 3/31/2021
Paulpk and one other reacted to Dennis7423 for a topic
Folks- Wow, it's been a long time since I gave an update! I think it's about time. I had shelved the Lancaster after getting frustrated trying to sort out the ammo chutes for the .303's in the turrets. The kit molded parts have the ammo chutes going in a funky direction, and I sanded them off fairly quickly with the intent to create something more accurate. I was having a hard time scratch building them, so it went to the SOD for the last 6 months or so. I pulled out my Tamiya 1/32 Mosquito the other day, and observed that I had purchased the Eduard Brassin armament set for it, which contained resin ammo chutes for the nose .303's. The were perfect! They were structured correctly, and even had the correct bend in them. I was able to heat them in boiling water, shorten the curve a little bit, and then trim to fit. Viola! They worked perfectly. I ended up ordering two more sets from Barracuda Resin to complete the upper turret, and also to replace the ones I robbed from the Eduard set. While the Eduard set is pricey and covers the entire gun assortment, the Barracuda set covers only the ammo chutes. It's also significantly cheaper to boot. 115984721_574545806570140_1501663275536710403_n by Dennis SAuter, on Flickr With the ammo chutes sorted out, I could move forward with the rest of the scratch building in the nose turret. This consisted of new ammo box covers with the circular cutouts (complete with .303 ammo inside), the turret locking lever, and various pipes and hoses. 115908154_745118143004819_7613127090577830365_n by Dennis SAuter, on Flickr 116420309_603844623657521_4125874062612944937_n by Dennis SAuter, on Flickr 116347576_285479516092194_2984050289915380796_n by Dennis SAuter, on Flickr Another missing piece of the turrets are the spent casing bags. These were scratched using Milliput, and wiggled inside the turret mechanism. They aren't very flattering, I must say... 116274594_1152592251793364_6747290124345493417_n by Dennis SAuter, on Flickr Another missing piece, and quite visible, is the framing on the rear of the turret dome. The piece is molded in clear, but it is metal on the rear bird, so being totally neat here wasn't a problem. The stringers were added, along with a passable oxygen regulator and associated hose: 109449528_933406410490108_712335263458866913_n by Dennis SAuter, on Flickr 116353671_700797260553173_7143077821224813437_n by Dennis SAuter, on Flickr 116345491_289098379005505_2976607860387803828_n by Dennis SAuter, on Flickr With that sorted out, I could start adding some paint. This is only a basic painting with interior black and flat aluminum, with further details and whatnot to be added later. Best I could muster with 20 minutes at the bench this morning before work! Feels good to get a little bit of paint on this beast. 116702278_327074281806705_2974317843926589177_n by Dennis SAuter, on Flickr The only other piece I intend to scratch build for the nose turret is the metal backpad at the rear of the turret opening. I am planning to fashion this out of tin foil, as its a complex curve. Here's to hoping it works! As always, comments and critiques are welcome. Thanks for tuning in. - Dennis S. Thornton, CO USA2 points -

1/32 Magister Test Shots by MikroMir
Rick Griewski and one other reacted to Anthony in NZ for a topic
Maggie arrived from Ukraine today. Haven't had a lot of time to look at her, but initial impressions are very good!2 points -

HK B-17...C 7/11 I'm still alive! :)
Greg W and one other reacted to brahman104 for a topic
Thanks Peter! Yep, I'm pretty happy with how they've turned out. Always learning though! Thanks mate. It's all relative though.... my skills have grown exponentially through this project alone, but it might be another 44 years before I finish it! Wow! another month flashes by with the blink of an eye. Precious little time spare for the bench, but...... Since I've moved to NZ and completed conversion onto their platform of choice I've been kept very busy. I thought I'd share a few pics from last week of the new bus. In my mind, still not as awesome as a Chinook (I am possibly biased), but not altogether bad either . Especially not when I get to fly around places like this! Yes, all three are of me, freezing my a*$e off in -10 degrees at 7,000 feet. I know for some of you that's nothing, but when you've lived pretty much all of your life in the tropics........ Good fun though! Back to the build. I've been chipping away for what seems like forever to blend the kit and my printed nacelles together in preparation for casting. I don't know how Iain is doing it with his Andover build, but I've certainly had enough of sanding for a while! So this is where they're at now: They still look a bit rough, but they are in fact quite smooth. It was quite challenging to recreate the seam that runs around the nacelle. As always, it's done 90% by eye so hopefully will look the part once it's all together on the wing. The shape of them alone makes for a challenging proposition when casting. No I'm certainly no expert on the matter, but hopefully by each nacelle on these brass pins, everything should stay in the same place. Because I could, I drew up and laser cut some MDF for the mould boxes. I figured that would support the weight of the pin a bit better than simple balsa wood. So that's pretty much where it's at right now. I'm waiting for the first pour of the silicone to go off so I can pour the second half. I really hope this works, as I don't fancy going through this process again! Cheers, Craig2 points -
Michael, Yes, I'm sure. I tried to buy one last night and there was the same note next to the quick view button that said orders couldn't be placed until 7/29 and then this morning at 6:30 that message was replaced by out of stock. Steve1 point
-
Well done Chris, first of all for your truly fabulous Tiger Moth, and secondly for your doggedness and determination in getting it over the finish line! That STGB on Britmodeller was 5 or 6 years ago I think, so very many congratulations for sticking with it! You’ve taken a blank canvas with the old Revell Tiger Moth and transformed it into a detailed and accurate beauty, photos 8 and 9 of the underwing structure and aileron cable runs are especially good. I’m sure many others here will show their appreciation. Let’s hope it’s the first of many models for you on LSP, a WiP perhaps coming up with your Hunter or Harrier?1 point
-

P-47 D Thunderbolt, by Trumpeter
AlbertD reacted to Dpgsbody55 for a topic
Progress has been very slow lately. I seem to reached that point in every model build at which hours have been spent at the workbench with not a lot to show for it. Oh well, c'est la guerre . I've cleaned up the wing and tail joints then spent some hours scribing the now sanded panel lines and repairing the rivets. This bit I'm quite pleased with the results. In some instances, I used a 0.3mm drill bit to pick out the rivets. Next, I repaired all the damage done to the cowling mountings on the engine, especially the front one. I'd previously added some photo etch to the front mount, and these got destroyed in my attempts to get the cowling on. I should have done these after fitting the cowling, but test fitting with the not yet mounted engine showed it was all good. If ever there's a next time, I'll fit these small and delicate pieces later. This time, I've straightened and refitted, then added some plastic square stock to strengthen it. If you look at some of the earlier pics, you can see these fine metal parts getting damaged. Next up, I'm working my way back along the fuselage adding parts to finish it prior to paint. So the gun sight and windscreen were next. First of all, I drilled out the lightening holes in the gun sight mount, then painted it flat black. Then I painted the gun sight itself gloss black and drilled a hole in the base for a wire. Then I went into the photo etch set and cut out the clear base glass and reflector glass. The base and an etch piece were glued in, then the reflector glass was added to more etch, and the two pieces brought together. There's also an etch ring and bead sight on these , so the ring was added next. This is the result. This was then carefully glued into place. I engaged the bottom pin into the instrument panel first, then the top pin went into it's hole. Great care is needed here so that the windcreen coaming doesn't fowl the gun sight mount when windscreen assembly is mounted. Here it is in place. Next, I started work on the windscreen coaming,/armour glass assembly. The armour glass was masked then glued to the coaming and the whole painted. More etch was added to the rear edge of the coaming as well as the top armour glass mount brackets, masking was removed then this was glued into the windsceen. Once dry, it didn't fit. Of course. . Despite making very sure the gun sight was mounted in the holes provided on the back of the IP. So I filed a tiny notch very carefully into the coaming, being very careful not to tear off the photo etch on it's trailing edge. Thankfully I only needed to file about a half a millimeter notch, following the contour of the gun sight mount, and the windscreen assembly fitted perfectly. That seems to be the way of this model. Some parts fit perfectly, but others have you . As I said, c'est la guerre. Here's what it looks like. Once that had dried, I painted the cockpit colour onto the windcsreen frames. Here's where the model is now. As you can see, I've corrected my boo boo with the ducting fitted inside the engine cowling. What was I thinking??? I've also added some etch in place of the kit part at the back of the turbo outlet. I'll also be doing the same with the intercooler outlets. On the ground, these should be either closed, or in the trail position, never open, both because the drag in the open position added enough drag on the take off run to spoil your chances of getting off the ground before the end of the runway with a fully loaded plane, as well as to discourage wild life from snoozing in there. You didn't take off with the supercharger working as these engines were restricted to 51inches manifold pressure dry or 58 inches MAP wet and running the turbo would have damaged the cylinder heads at low altitudes. The pilot's notes said to set the intercooler and oil cooler to trail for take off. Then I'm going to add the gun feeds but not the bullets, belly drop tank/bomb mounts and the remaining parts to the lower wing surfaces, then masking an painting can begin. I may also paint the panels behind the pilot's head in medium gray, as per the painting guide above, courtesy of MikeMaben, which I've preserved for the next time I do a P-47. Thanks again Mike. Cheers, Michael1 point -

Greyhound -An Apple original film
Troy Molitor reacted to pacificmustang for a topic
I listened to a recent James Holland podcast where they had the writer on. He was on to talk about Band of Brothers, but mentioned he had been writing on the 8AF series. Writing is finished, filming is due to start in England next year. Production has moved from HBO to Apple or Netflix, I cant remember which. Bruce1 point -
P-47 D Thunderbolt, by Trumpeter
daveculp reacted to Dpgsbody55 for a topic
Work continues, after a lot of humming and humphing as to how to do the gun bays. In my eagerness when I bought this kit many years back, I rushed out and bought and bought the full Big Ed package of Eduard upgrades. At the time, I had no time for modelling thanks to work commitments, but I wanted to eventually build the biggest and bestest P-47 Razorback I could. I've since come to realise that I have neither the talent, the tools or the eyesight to mess about with all this, and I'm not much of a fan of modelling guns anyway. Plus I'd already sprayed the insides of the wings, again in my eagerness, which would need re-doing . There's a lot of bending in this, and as I don't have the tools to do so, this is now consigned to my spares box, which means I stand a chance of finishing this kit this year. I've walked away from this build twice, but I want to finish it now. Maybe I will be able to use some of this when Tamiya release their 1/32 P-47??????? So here we have all the wing bits, air brushed and ready to go together, along with the flaps ailerons and tail planes. If I'd used the photo etch, I would have needed to remove the ribs in the gun bay you can see in each wing top, the air brush again. And that's just for starters. I assembled the guns and started painting them. Here we have a veritable forest of guns. The gun barrel ports in the wing leading edge are a separate piece, and I decided to glue these into each lower wing to help with positioning of the guns. After these had dried, the wing tops were glued into place, but had to be slid into place around the gun barrel ports, which was a little fiddly as there's a locating lip around the entire edge, and a locating pin adjacent on the wing. After they had dried, I cleaned up each wing, checked the joint to the fuselage and glued them into place. The wing joint is very good, and the stub wing spars in the fuselage means setting correct dihedral is no bother at all. Well done, Trumpeter. I put this aside to dry for a while, then set about attaching the tail planes. Trumpeter provide an elevator link rod to each elevators. This goes into a bracket on the fuselage, but they don't line up. One side is worse than the other, and this interferes with attaching the tail planes, as they won't stay in place. So I cut them off and drilled new holes for a single elevator link rod and cut a length of 1.00mm stock rod, glued it into one side, then glued that side tail plane into place, then glued the other side on, as well as gluing the link into the elevator. Now I have elevators that work together, as they're supposed to. Here it is in test fit. So now we have a model that looks like a plane, which is always a great stage to get to. The dihedral of the tail planes was set using ordinary sticky tape, and this is still in place as it dries. Here's a couple of shots showing where the build is now, with a 1ft ruler along side to give an idea of size. She's a biggie!! I've set the propeller in place temporarily so you can see the full length. I've also glued in the ailerons and flaps into their final positions. That wasn't quite as straight forward as you'd think. There's a lot more work to do before I get to the painting stage, and I'm still debating about further work on the guns. The ribs in the gun bay would appear to preclude any further work, and the bullet belts kit provides are made from vinyl and look like a nightmare to paint and get into place without ruining that paint job. For me, this build was always about the cockpit and engine/turbo detail, and that's what I've concentrated on. I think it will still be an impressive kit without the guns being detailed. So it's on with cleaning and filling, then the details needed to get it to the paint stage. More soon, I hope. Cheers, Michael1 point -
P-47 D Thunderbolt, by Trumpeter
daveculp reacted to Dpgsbody55 for a topic
Here's a pic of the missing part I mentioned above. It's not finished yet, but it fits the hole. A bit more progress on the model. It's now beginning to resemble a plane, rather than a mess of bits and guts. The fuselage insides were painted the other night, along with wing insides etc. I didn't put much effort into the oxygen bottles, as they're totally encased in that area behind the pilot's head. I'm not at all sure how the service crew got at them, but as a pilot, I'd hate to have explosive oxygen bottles stashed that close to my head. Hope it was armoured well. The fuselage is now together, and looks like this. Lots of cleaning up to do, but anyone can tell it's a P-47 now. You can also see I've cut out one of the access panels to view the cockpit tub behind, and the plumbing I've added. The next pic is the other side view, with another access panel removed, and the rear cowlings in place. These are still a work in progress, but close to being properly set in place if I display if closed up. That's it for the moment. Cleaning up, filling, filing and wings next. Cheers, Michael1 point -
P-47 D Thunderbolt, by Trumpeter
AlbertD reacted to Dpgsbody55 for a topic
My opening line of my last update almost became famous last words. During the build of the left side cockpit wall, I almost put this back on the shelf of doom, such was the grief caused by the throttle quadrant. So I walked away from it, then went on a holiday for two weeks and I'm back into it again. This isn't going to be a quick a build as my previous three Russian jobs. I had actually started the cockpit back in 2016. Here is as far as I got back then. The green paint on the front wall is just me experimenting with colours. Here's the major components finally completed last week. After some research, I decided to go with green zinc chromate as being more appropriate to the plane I'm building. The throttle quadrant was the hold up as this took many goes at it before it would finally stay together. Close ups: Next, I started assembly, gluing the right side and rear wall to the floor. I also added a length of 0.3mm wire for the tail wheel lock operating rod, though the map box got in the way a little. The next step was to add the seat. Here's the progress shots of that. Once again, I had troubles with the seat belts, so please excuse any deficiencies there. Definitely not my thing Then the left side was added, together with the control stick and instrument panel/rudder pedals assembly. Lots of photo etch on both the IP and rudder pedals. The instrument faces were enhanced with a drop of clear gloss to give the appearance of glass. The gun sight and cockpit coaming have not been built yet. I plan on doing them later and adding the windshield straight after to protect the gun sight. As you can see, I've also painted the exterior of the cockpit tub as this will be visible through the access panels I've cut into each side of the fuselage. I have no idea whether any of this or the turbo ducting will be visible, but it's part of the kit so I'll give it a shot. Since I've cut a panel out of each side, sufficient light may get through to make it worthwhile. I'm hopeful I'll get the fuselage together soon, so we'll know then. But at least I have the photos . Here's the cockpit mounted in the engine/turbo ducting assembly, finished yesterday. I may add some wiring to the outside of the cockpit tub as I think this will be visible through the left side access panel I've cut from the fuselage half. Here's a shot of that together with the repairs I've made to all the access panels and engine cowlings after I hacked them off the original fuselage parts. Thankfully I made a better job of the right side. So my next job is to spray the inside of the fuselage and wings etc with yellow chromate, add in the aforementioned wiring and perhaps see about making the canopy slide. Then I can glue the fuselage halves together and I'll begin to have something that looks like a plane. Cheers, Michael1 point