Leaderboard
Popular Content
Showing content with the highest reputation on 07/27/2020 in all areas
-

1/32 Tamiyia F4 Phantom VF-33 TARSIERS
Cicciuzzo and 9 others reacted to miketippingmodels for a topic
1/32 Tamiyia F4 Phantom VF-33 TARSIERS The main build was OTB, apart from the ordnance which is Eduard, the pilots are resin figures and the yellow shirt is from Reedoak. Many of you will know my preferred paint is MRP , just because it drys really quickly, and allows a lot more applications of weathering than other paints. The decals are from MILSPEC, which I have to say were very nice to work with. And on this occasion the base was built by my good friend Mario Catania, he’s very good , you should go over to his face book page and see what he’s doing. Established in September 1943, VF-33 were first equipped with the Grumman F6F "Hellcat". Their first operation was to the Soloman islands, the first time a US Navy squadron has used the F6F in combat. VF-33 was land based at this time, supporting the island hopping Pacific campaign. VF-33 disestablished in July 1946. VF-33 was re-established on the 11th of October 1948, this time flying the famous Chance-Vought F4U "Corsair". After seeing action during the Korean war (and being awarded the Navy Unit Citation for their success) several changes of equipment and location followed in quick succession. By 1962 the unit was flying F8U-2NE "Crusaders" from the world's first nuclear powered aircraft carrier, the USS Enterprise (CVN-65) and as part of this team took part in the blockade of Cuba. In 1964 the squadron started to become familiar with the aircraft which (in two different versions) would last them the next 17 years and became the backbone of Naval Fighter Aviation. The plane was, of course, the F-4 "Phantom II". Initially equipped with the F-4B, VF-33 set a new Atlantic Fleet record by winning the CNO Aviation Safety Award for four years in a row (1961-64). However VF-33's time with the F-4B was short and in 1967 they upgraded to the F-4J. The new F- 4 featured a different radar, higher thrust engines, slatted tailplanes, extra fuel cells and larger main wheels (to handle the increased weight). Almost as soon as the new F-4's were received VF-33 was once again deployed to combat, this time to South-East Asia onboard USS America (CV-66). During their time in theatre VF-33 dropped over 3,000,000 pounds of ordnance! This was in the space of 4000 combat hours flown over 5 months. On the 10th of July 1968 a VF-33 bird downed a MiG- 21C, the first air to air kill by an East Coast Fighter squadron over N.Vietnam. After returning from Vietnam VF-33 continued it's association with CVW-7 and USS Independence (CV-62), deploying most years. Several awards were won during this time, including the CNO safety award in 1969 and 1970. The 75-76 cruise saw the squadron win the Golden Tailhook Award,10 points -

HK B-17...C 5/4 sweating the metal
Greg W and 8 others reacted to brahman104 for a topic
Thanks Peter! Yep, I'm pretty happy with how they've turned out. Always learning though! Thanks mate. It's all relative though.... my skills have grown exponentially through this project alone, but it might be another 44 years before I finish it! Wow! another month flashes by with the blink of an eye. Precious little time spare for the bench, but...... Since I've moved to NZ and completed conversion onto their platform of choice I've been kept very busy. I thought I'd share a few pics from last week of the new bus. In my mind, still not as awesome as a Chinook (I am possibly biased), but not altogether bad either . Especially not when I get to fly around places like this! Yes, all three are of me, freezing my a*$e off in -10 degrees at 7,000 feet. I know for some of you that's nothing, but when you've lived pretty much all of your life in the tropics........ Good fun though! Back to the build. I've been chipping away for what seems like forever to blend the kit and my printed nacelles together in preparation for casting. I don't know how Iain is doing it with his Andover build, but I've certainly had enough of sanding for a while! So this is where they're at now: They still look a bit rough, but they are in fact quite smooth. It was quite challenging to recreate the seam that runs around the nacelle. As always, it's done 90% by eye so hopefully will look the part once it's all together on the wing. The shape of them alone makes for a challenging proposition when casting. No I'm certainly no expert on the matter, but hopefully by each nacelle on these brass pins, everything should stay in the same place. Because I could, I drew up and laser cut some MDF for the mould boxes. I figured that would support the weight of the pin a bit better than simple balsa wood. So that's pretty much where it's at right now. I'm waiting for the first pour of the silicone to go off so I can pour the second half. I really hope this works, as I don't fancy going through this process again! Cheers, Craig9 points -

1/32 MDC Hawker Typhoon Mk.Ib 245 Sqn Sharkmouth
MikeC and 7 others reacted to monthebiff for a topic
So after a few months of having absolutely no interest in building I have felt the urge to start again and after looking through the stash I decided upon this one, low part count and back to basic modelling skills with just a little AM added, I also got an awful lot of mojo back from following chuck540z3's Tempest build which is just amazing so here we go again with the obligitory box shots. First thing first I spent an afternoon at the sink with lots of hot water to get the fuselage and wings in to shape as the resin was quite heavily warped, one all was in line I was happy to continue with the build Happy with the basic fit I decided to order some AM for the build to improve things here and there. Barracuda Studios Wheels Barracuda Studios Seat Squadron Vac Canopy HGW Seatbelts CMK Tempest Exhaust set CMK Gunsight Aviology Sharkmouth Decal set Special Hobby Rocket set Excited to crack on with this build and you never know Special Hobby will now duly release their Typoon kits in 32nd scale! Regards. Andy8 points -

Dragon / CE 109D ... nearing the finish line ...
R Palimaka and 7 others reacted to MikeMaben for a topic
Puttin' some color on just to prove I'm doing SOMETHING !! Using the Cameo cutter for some of it. I'm aslo making a canopy masking set (inside and out) which is taking more time than I thot it would (major slowdown)8 points -
 Almost forgot here's the photo the diorama will be very similar too, but minus so many planes. This was the inspiration and due credit given. Maybe one day Blue 03 with the wolf but i don't have all angles, only some....maybe one day i luck out again?7 points
 -
It has wings! And, not the gaps have been managed at the wing roots. As usual it seems, progress is moving at the speed of a sleepy sloth. I've attached both sides of the fuselage, cleaned up the seams bottom and top and the moved to the wings. As noted in other threads, the gap at the wing root was bad if you follow Trumpeter's instructions (attach top wings to bottom, then to fuselage = gappy!). So, I attached the top of the wings to the fuselage first, then to the bottom single piece wing. Smoothed out the gap and blended it much better than it originally was. I really dislike the clear nose that Trumpeter provided. I could see if being useful if it were actually clear (which it's not), but it is just a bit of pain to work with and see what you're doing. Good thing it'll get painted. Again, no extra parts in the nose area since they won't be seen, so why use them. The clear nose is just sitting there for now, along with the upper panel....they fit...meh. More work to get that squared away. I had start using some panel liner but am stopping for now.....as I'm about to descend into the rabbit hole and try to find Pete and his PAVE HAWK.... Thanks to Woody at Archer Fine Transfers and his brilliant work on the rivets package for Trumpeter's SBD, I'm about to start filling all of the rivets on this Dauntless and replace them with his raised rivets. Woody sent me one of the first batches of the decals/rivets to cover the body and they are brilliant looking. As this plane is covered in raised rivets, this is going to make it look 10x better than what Trumpeter intended, as long as I don't bollix it up. If you want to take a peak at what he's done prior to me starting on my own, check out his SBD-3 build here...... I'll be starting with the rivet filling this week (ha ha...I've said that before). I'll be using thinned plastic putty, then spray everything with Alclad Aqua Gloss....then madness of decals/rivets! Otherwise, the normal "in progress" pictures to share. Not a lot.....and I must say again I hate working with clear plastic parts for major panels. Thanks Trumpeter! Thanks for browsing this tiny update!7 points
-
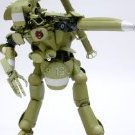
Let me take a moment to tell you about what I've termed 'Projekt Flanker.' This will be a large scale diorama based at the Russian Kilp Yavr Airbase up in the Arctic Circle. I've been at work off/on this project intermittently for a couple years so far. It features (3) Trumpeter Su-27 Flankers heavily modified with basically all the aftermarket you can throw at it them, Zactoman nose, canopy, intakes, weapons pylons, and missiles. Aires 1/32 Su-27 Cockpit, and Exhausts (2) Quickboost Ejection seats with pilots, Eduard 1/32 Su-27 Exterior Detail, aftermarket wheels which name escapes me now (or do I need to order these?), Linden Hill 1/32 Su-27 Flankers on Patrol: Guardians of the North' decals, Begemot 1/32 Su-27 stencils, Trumpeter Mi-8 Hip with quite a bit of aftermarket from Profimodeller thats en route, Scale Aircraft Conversions landing gear, Eduard Mi-8 stencils, Linden Hill 1/32 Mi-8 decals, Speedway Decals custom decals for various parts on the Mi-8. I've also got a Trumpeter GAZ-66? Russian oil/fuel? truck, Trumpeter 1/35 rutruckssian utility-type, various ground equipment, tow bars, ladders, etc., a tarmac and a little terrain/bunker (although I have NO idea or experience with stuff like that, what better way to learn than sink or swim?). I lucked out and got the motherload of reference photos for several Su-27s (Blue 38, Blue 36, and Blue 41 among a couple others) that show all angles of the actual subjects shown (I waited YEARS to find these), these aircraft get REALLY weathered, which I just love airbrushing so I can't wait to get to airbrushing again sometime soon. I've also re-riveted essentially the entire airplane, 3 times over, so you can imagine its rather time consuming, however, the rivets really add to the weathered and beaten look of these aircraft and I have an idea to help make this even more apparent. I thoroughly researched the actual rivet patterns of the planes, and while not 100% accurate, its probably about 95% accurate (minus some of the double riveting), drew them in pencil, made edits/changes, and went over it with my 'rosie the riveter' and another rivet tool, I will more than likely end up deepening the rivets each by hand so that they show up well with primer, paint, gloss coat, etc. I had a problem without doing it where after the primer for the first 'test' plane I used filled in most of the detail I spent HOURS adding so I very carefully went over it VERY precisely and deepened the rivet without it looking doubled and weird. I actually mostly painted and did some weathering with a first to try out techniques/planning on 'Blue 36' however I decided once I started re-riveting the other two that I would have to go back and add the rivet, panel, panel line detail to make them look 'uniform.' While a little bit of a setback, its not bad, just time consuming and meticulous work but I'm not in a rush. I'm planning on this project taking quite a while, so I'm planning some other builds to actually complete and paint sooner than this project will allow. A 1/32 A-6E Intruder, 1/32 F-16B Israeli Air Force, 1/32 A-1H Skyraider (already primed) will help "fill the gaps." I apologize for not getting these photos together sooner, but I'll try to just start with a few and describe some of the harder steps and how I tried to handle them. Any help, tips, criticism (lets not get out of control here though), reference photos, etc are welcomed. Lets begin with the cockpit, I prepared the Aires 1/32 cockpit with a power drill loaded with a sanding attachment, a dodgy affair if there ever was one. You need to dry fit these things very carefully and diligently, I don't believe I had to take too much material out of the inside of the plastic near the cockpit on the kit. You do need to make sure that the there is proper fit/clearance near the nose gear bay top, I believe you need there to be a gap between the bottom of theremin cockpit and the nose gear bay part otherwise it won't fit. That and what I talk about below with removal of the resin 'shims' were really the only tricky parts of the fit, overall its pretty good especially for Aires (if you know what I mean) Also, if you look at the sides of the cockpit here you see that little 'shim' of plastic on the lower edge? I sanded that down really smooth, I don't believe I sanded the inside of the fuselage sides that much (or at all) but it was quite a while ago. I painted it with Badger Stynylrez Primer (lightened with some white), sprayed a base of aluminum, used AK interactive chipping solution, and sprayed Akan Flanker cockpit blue, then used a moistened/damp brush and a small stiff one to pick out some scratches to help with the weathered look. Various details were picked out with reference photos and painted accordingly when possible, some of the detail I just painted randomly to represent replacing/different parts? and give it a little interest to the eye. Painted the pants in a camouflage color I saw one of the pilots there wearing these pants and thought it would be a neat little touch. Some dry brushing and wash was added to, and then a flat coat to knock it back a bit. Next time, I'll talk more about the nose....its a beautiful piece of resin, that is challenging to properly attach. Finesse and not strength is key. Basically you have to "compromise" a little on the angle/positioning to capitalize on as even a look as possible. Carefully adding CA glue is best to strengthen the bond, once carefully sanded smooth (to preserve detail and masking tape helps wonders even if you have to reapply it several times), oh well, I'm getting carried away, the pictures are more interesting and should speak wonders and i'll discuss the technique in detail.6 points
-
Last shipment? Kent6 points
-

1/48th Boeing B-52H Stratofortress
dodgem37 and 5 others reacted to tomprobert for a topic
B-52s are festooned with various lumps and bumps covering a wide array of sensors and jammers etc., but these are not covered by Sanger so it's a case of making your own. So when it's a rainy afternoon, it's time to get out the BUFF and Milliput... Untitled by Thomas Probert, on Flickr First off, the rear fuselage has this (what I presume is) chaff dispenser that later model Hs don't have: Untitled by Thomas Probert, on Flickr This was swiftly removed with a razor saw to make way for a new fairing to be made: Untitled by Thomas Probert, on Flickr Speaking of making fairings, I've adopted a fairly fool-proof method of getting a snug fit to the fuselage. Step 1: place some masking tape on the area the fairing will sit, and then make an approximate shape of the required fairing in Milliput: Untitled by Thomas Probert, on Flickr Step 2: When fully cured, remove the tape (which by default removes the fairing,) sand to shape and then reattach to the fuselage for a perfect fit: Untitled by Thomas Probert, on Flickr There is a fairing in place of the chaff dispensers on the rear fuselage, as well as one on either side of the fuselage near the rear landing gear bays: Untitled by Thomas Probert, on Flickr As well as two atop the forward fuselage: Untitled by Thomas Probert, on Flickr As you can see from this image, I've also started adding the various strengthening plates at the upper wing-roots and atop the mid-section: Untitled by Thomas Probert, on Flickr Until next time, Tom6 points -

Has anyone built the Tamyia 1/32 mossie with Eduard engines?
Rick Griewski and 4 others reacted to Grizly for a topic
The answer is, Yes, I used the Eduard port engine in my build. While the Eduard engine is certainly a step up from that offered in the Tamiya kit, I found it really tested my ability to put it together. Specifically, apart from deciphering certain aspects of the nine pages of instructions, it requires that you acquire five different gauges of (lead) wire not provided for the build. I found shaping those various wires a real challenge. As for the exhausts, I compromised and adapted the kit parts to fit. The following are some shots ....5 points -
1/32 MDC Hawker Typhoon Mk.Ib 245 Sqn Sharkmouth
D.B. Andrus and 4 others reacted to monthebiff for a topic
I've made a start on the cockpit sub assembles and first up is the rear cockpit frame/ rear seat armour, as you can see it was in need of a little cleaning up in some tricky to reach corners. I decided the simple option was to remove the armoured plate and replace with plastic card rather than try and clean up. Next on the list was to work on the armoured head rest which needed some small improvements adding some of the missing detail and then fitted to the rear frame worked on previously. I then carefully removed the seat anchor points from the kit part and grafted them on to the Barracuda replacement as well as making a new seat spring. A few other bits and pieces to do on the cockpit sub assembles but happy with progress so far. Regards. Andy5 points -
Not so great at the documentation side of things, but I'll try. A conversion of the Trumpeter CH-47D to a SOAR MH-47G using Werner's conversion kit. There might be a smattering of Cobra Company stuff in there too, but so far, I've remade pretty much most of the components in that set. First things first, one of the defining characteristics are the enlarged fuel tanks. As Werner notes, the starboard one is cast short, so it was lengthened to fit. Held in place with 5 minute epoxy and brass pins...... Fits! Needs to be blended in top and bottom. Then something needs to be done about the rear of the fuselage in the ramp area. I'm aiming to get the majority of elements in here...........I know its not as surgical as Oliver's work! And then I ran out of styrene I do have the Live resin sets, and plan to crew it. So be patient, especially with the postage systems the way they are - I haven't even ordered from Live or Reedoak for figures yet, but there is plenty to do in the meantime. Comments and criticisms welcome5 points
-
Thanks Marcel, the Cheetah D should be next in line, but Ihave back back to the F-1C again for now. Next batch of Cheetah E molds and first castings. Note that the lower section of the lower main landing gear is reinforced with a 1mm steel rod, which runs down the leg and is also bent into the axle. This was the weakness of the Italeri kit, but the upper section of the kit part is structurally sound. Cheers5 points
-
Michelle Choquette built this beautiful ID (now Tigger) Models B-58 that featured in this 1995 issue of FineScale Modeler. In fact I competed against (and was thoroughly outclassed by) her at the USA Nationals the year before in Omaha, NE. This was before the large scale revolution in modeling...the choices were quite limited and often very crude, especially by today's standards. But Michelle had a reputation for making a silk purse out of a sow's ear and produced some truly outstanding works of art in 1/32 scale, including some scratch built subjects as I recall. Rich5 points
-

Mosquito MK 39
Paul in Napier and 4 others reacted to Moonraker 1 for a topic
MK 39 Mosquito Part 2 I removed the seams for the side cockpit entrance door and my next job was to start detailing the interior rear fuselage. Reference for this was from the Airframe and Miniature book No.8 on the Mosquito (Bomber and Photo-Reconnaissance). This was built up from my spares box together with some 'real' wood to make the box section that went along the port side and covered the control cables going to the tail. The tubular item behind the crew seat which looks like a porter loo, is actually used to deploy the target shoot! (but I suppose can be used in emergencies Next in the build was the cockpit area which I planned to change the crew entrance which was easy enough as I used insulating tape which I cut using a template and sticking down. With a coat of Tamiya XF71 (interior green) it made a convincing representation of one. The other 'hurdles' which I had to tackle was the MK 39 was converted from a MK XVI so the instrumentation was not the same as a MK VI. Luckily as the Airfix kit gives you X2 different instrument panels I managed to cut out the ones I needed and re-positioned. For the instrument panel Airfix print the dials on the front of the clear acetate and so it does not give that clear glass shine. So on all the dials I used my Waldron punch tool and cut out small acetate discs and secured them with Humbrol Clear. This gave a very realistic 'glint' when the light hits them. The same changes and modifications were done to the Starboard instruments and switches. I had to also cast a another radiator control lever as the MK VI had only one (well this kit did anyway). This was not an issue as I have a product called 'blue stuff' which is casting substance which softens in hot water (and is blue!). Once soft I just push the part in and then remove. Once cool I fill with putty and when dry I have a twin! The port side too had to be change as was different to the MK XVI although it was nice to see they had not moved the throttle control . I added lead wire of differing diameters for all the wiring to all control boxes and switches. Before I was going to close the fuselage up I had to cut and fill the front of the cockpit aperture as again the MK 39 has a bomber canopy not a fighter. For this I scaled up on the plan view of a MK XVI canopy and fitted across the cockpit aperture. This gave me the front point to cut and the areas that needed filling. I followed the front section of the windscreen with tape which when marked gave me the exact templates for the plastic card. Once the plastic card was cut to size I glued this in place and ensured the underside was sanded and painted as I will concentrate on the outside when the fuselage is closed up The front cockpit was finished off with a scratch built pilots control stick as that is different to the fighter version. As Airfix does not supply seat belts I ordered a set of cloth ones from HGW Models. Before I buttoned up the two halves of the fuselage I fitted the tail wheel spigot. For this I'm using a white metal undercarriage as I'm thinking with all this adapting this is going to be quite a heavy model! Now the time had come to join the halves together.Firstly I glued the cockpit to the starboard side as I had to thread some more wiring to the instrument panel. Once that was dry I glued the mating surfaces and pressed home using lots of heavy duty tape to get a strong bond with the Tamiya adhesive. I will be leaving this alone now for a couple of days just to ensure it dries fully. Then onto some of the more challenging parts of this build To be continued.....Till then stay safe.5 points -
Im so exited just received my Bithday gift from me to me !! ordered on my bday in May. using my favorite hobby shop luckymodel snail but cheap 8$ shipping!! Add some alclad and assorted paints4 points
-
I was curious too Thierry, so curious that I won it!!4 points
-

The antique BoB Revell Spitfire Mk.I
BradG and 3 others reacted to thierry laurent for a topic
Hi again, It was quite difficult to assess what would be visible on the tank face. So, I finally decided to add the most obvious features. There is one connection going to the upper tank as well as two rows of rivets. To be fully accurate, I should have used rivet decals with a longer pitch. However, I cheated deliberately as I wanted the rivet lines to be visible thanks to a black wash when the tank will be painted. As the part will be in the shadow and painted with a rust red, this is a way to see something! With regard to the fuel hose, you can barely see it. As it was painted a sand color, it is only visible on the left of the compass. The full scale hose was corrugated but as it will be barely visible I did not go mad about such a detail. For the connection system, I used a combination of a punched disk, a modified Top Studio connector (resin car accessory) and a Contrail tube. Now, I think the last visible internal component to recreate is the canopy ejection system. And finally, I will probably go back to the seat lever as I do not really like the one from the kit in spite of the fact this will not be very visible...4 points -
I have an old Dremel motor/flex shaft that my Dad brought home in the early '60s that I rebuilt and still use only because it's one low rev speed (about 1500/2000 rpm) It's a tuff little beast so I figger it will outlive me. As far as sentimental, the only thing I have that I will 'never' use again is my first airbrush, a Binks Wren B. I have no reason to keep it , but I also have no reason to throw it away4 points
-
Found myself losing some bits I thought I had stashed away safely...so safely even I cant find them. Drat! So with some spare time and no real need to hurry ahead I decided the fuselage of the 111 although nice, could use some rivets. I decided to punch some rivet marks with an RB riveter.4 points
-
Another long over due update. I've been side tracked with getting in some fly fishing and building 1/20 F1 kits. When I was reviewing the decal placement sheet for my build, I realized the jet did not have the green antenna on the vertical stabilizer, but a red cap instead. So, I had to do a little repainting. I need to add a some weathering to the build, add the armament, and the pitot tube in order to wrap this build up. Hopefully, it won't take a month to complete. Thanks for checking in. Mike4 points
-
Hi folks, hope you're all keeping well. The wing tips required quite a lot of work to prep for lighting. Lots of thinning required to allow the electrics to fit and some careful carving of the lit areas that will be visible. You can also see the wingtip nav light in the prep stage as discussed previously. The good thing about EL panels are they are quite thin but you need to be quite conservative with how much you use as a 3v coin battery doesn't drive a large amount of it (typically <25cm for good brightness). I had to use two strips back to back so that the top and bottom illuminated but wasn't sure what it would look like side on or whether it would just short out! That arrangement made for quite a bulky wiring connection but luckily the Revell plastic is quite thick so can take a fair bit of hacking. Before assembly I sprayed the wing insides black as the thinness in some areas would easily let light bleed through and make it look like a ghost ship! Once trimmed to the right size, I added thin clear plasticard on top of the EL tape so that I could scribe in some of the distinctive panel lines you see on the wingtip slime lights. I scribed a single longer sheet of plasticard with the same lines so that even if they weren't quite perfect they would all line up when I cut each of the 4 sections (2 wings, top & bottom) out. I wasn't sure how to make sure the wingtip slime lights blended together (rather than look like 4 layers sandwiched together) so I used CA glue to help create the final shape and seal the EL tape (hoping it wouldn't short the ends again!). I'll need to lightly coat the lights with the right colour to stop them looking so green. On this photo you can also (just) see the fuel dump amendment I made by adding a squashed bit of copper tube and the modified ECM bullet which looked too small so I removed the original, added a longer bit of sprue and shaped accordingly. And of course the fingers crossed moment..... And breath. Next, it looks like I need to return to the forward fuselage area for some more rivet love.4 points
-
I applied a decal !!! See if you can find it. Anyway, I finally got the oil bubble removed from my right eye so I have a little better depth perception (not perfect yet) so all I've been able to do is putz around with relatively small things. Hope to be getting more done now. Aahaaarrr !4 points
-
I've FINALLY finished this one and all I can say is "Good riddens"! This kit was not a fun build and with the piecemeal style build of the ZM kit, this one was a bear to get reasonably correct. I managed to screw up the left and right wings when assembling and had to correct (remove about 1/16" from subsequent assemblies going forward) parts fit as the build progressed. If you have this kit please take note that when you assemble the wing bottoms to the spar assembly, install the center section first and make absolutely sure it's centered or you might wind up like mine did. I replaced the 20mm wing guns with brass tube and the prop is a HD VS9. It's painted (somewhat ham-handed I'll admit) as yellow 2 from III, JG301 in the early part of 1945. I was going to build wooden flaps but I got impatient with the build and decided to model them up so I could get on with it. I filled all the panel lines on the tail to represent the Ta152 wooden tail. It's not known how many Ta152H's were fitted with the wooden tail but this one is (based on the Hitchcock Ta152 text and profile therein of Yellow 2). It's not some of my best work but it's ok. My Nikon D3400 catches little white dots that I can't really see with my eyes. I haven't a clue where these come from but surmise that they're from the Testor's Dullcote I used (the white dots on the canopy are the dessicant packs (decals) and are supposed to be there). The mottling on the fuselage only came out so-so and after having messed with air pressures and paint consistencies until I was sick of it, I just settled on the best I could get from my old Passche H and you'll noticed paint spatter. Afterward, I went out and purchased an Iwata gravity feed airbrush so the next time I do mottling, I may have a bit better luck. I used Testor's enamel RLM 76, Floquil RLM 82 (its actually labeled as RLM 83 but I guess it's now accepted that 83 was dark green and 82 was bright green), and White Ensign Models (now Sovereign Hobby or something like that) RLM 83. The WEM RLM 83 looks more like RLM81 to my eye. Oh, decals are from the awesome Eagle Editions sheet and really are a vast improvement over the kit decals. I added pastel exhaust stains and general staining after these photos were taken. Oh well, on the with photos....3 points
-
Hi, Some pics I took from SNASM years ago. Close up of propeller hub, have an antifreeze tube (RED) for each propeller, and some more Regards, Matsu.3 points
-
Nope, it's the original Cameo 1. I have all the software up to Business 4.3 which I got so I could import AI files as I do pretty much all my imaging in Illustrator 6. I may upgrade to a 4 as it cuts heavier materials like sheet plastic. I've cut sheet plastic with the 1 but I think 10 thou is the thickest I could cut successfully. They're a fun tool if you have the patience to climb the learning curve.3 points
-
I still have my first gift modeling knives, and X-Acto files...Christmas 1974 My dad made me a modeling tool chest when I was early 20s. Needless to say I still have it. Reclaimed mahogany.3 points
-
The antique BoB Revell Spitfire Mk.I
Gazzas and 2 others reacted to thierry laurent for a topic
I also allocated time to end what I really dislike: the infamous nose bumps! I assessed various options as I did not want to reproduce the exercise of the wing small bumps. And as I was looking in another Spitfire kit box full of aftermarket sets, I found an old resin one (probably from Airwaves) intended to convert the wings of later marks into various types (including the E one). If the guns were OK, most of the bumps of the set were quite crude. So, this set stayed in the box. However, I realized today I could quite easily modify the smallest ones to get the most of the early nose bumps! This picture is showing the original wing bumps and the nose ones I obtained. And this one is showing all the nose bumps. On the left, you can see the two bumps as well as the small intake located close to them, on the nose starboard side. The intake was also done from a section of the wing resin bumps. On the right, I put the two port bumps as well as the small intake located under the exhausts. This one was made out of a Contrail thin plastic tube. Useless to say I'm happy I just have to glue them! The tweak list that was made of close to seventy points is now going down to nine items! I'm closer to the end of the modifications and corrections.3 points -

Are you sentimental with your building tools/equipment?
Rick Griewski and 2 others reacted to mozart for a topic
No Pete, you’re not the only one, though most of my “treasures” were my father’s, he too was a modeller. So when I use his rat tail files, his soldering iron, his snippers, I feel as if I’m in contact with him. A photograph of him sits on my bench too.3 points -

Matchbox 1/32 Bf109E-3 Resurrection
Paul in Napier and 2 others reacted to turbo for a topic
Thanks very much guys! Just doing some bits I've been avoiding to finish up this build. The previous owner painted a frame down the middle of the canopy. As pointed out by Mike earlier, the Emil did not have a frame here but rather overlapping panes of plexiglass that the pilot could slide open, which is sometimes mistaken for a frame. Thanks for pointing it out, sar! The canopy was masked off and the offending paint stripped with a q tip moistened with IPA. The Matchbox canopy also has these bizarre and ugly locating tabs running along the bottom of the canopy. Thankfully a design concept that never caught on. Paradoxically, I will retain the bottom one for its intended purpose of supporting the canopy posed in the open position, but will sand off the top one. The kit landing gear is also nothing to write home about so....I won't. Here it is painted, weathered with oils and pigments and fitted to the airframe. OK, just the fiddly finishing touches to go now....3 points -

1/32 Revell Bf109 G-6/AS White 7
monthebiff and 2 others reacted to Wackyracer for a topic
I've buttoned up the fuselage and installed the Reaver AS resin upgrade. Went really well and only a little filler to fair it in on the lower portion. Nothing to difficult even for a beginner like me for this type of conversion. To be fair I have to thank Thunnus for his amazing Bf 109G-6AS as I used his WIP as a guide for mine; thanks John. Pit is fitted and all that work disappears As does the radio compartment Wing to fuse join for the top is spot on though. I've built 3 or 4 of these Revell kits so far, but this is the first time I've glued the tops on before joining the bottoms. I will employ this method for the next ones. Bottom wing sections were test fitted to enable me to mark and cut out the cartridge ejection shoots. And finally used some Eduard PE grills from the K-4 for the larger oil filter. Aaron3 points -

Got my jet back from rehab- The Wave
chukw and one other reacted to Pete Fleischmann for a topic
After my emergency gear-up landing back in 2018, the jet is back, fully operational, and has some new Garmin avionics. missed the old girl. cheers Pete2 points -

Focke Wulf Fw190 F-8 1:32, Revell
Paul in Napier and one other reacted to MH Design Scale Models for a topic
Hi everybody, I would like to share some pictures of my Focke Wulf Fw190 F-8 1:32 by Revell.2 points -
The battle of Isandlwana took place on the 22nd of January 1879 in Zulu Land, South Africa. A British force of at least 1700 was out manoeuvred and out fought by a force of 20000 Zulus. All British soldiers who fought on foot were killed, approximately 1500 in total. It is the worst defeat inflicted on a western army by tribal warriors. Unfortunately the victory was a Pyrrhic one. The Zulu's casualties were 3000 warriors killed, and ultimately it saw the destruction of their nation. Figures are white metal from Beneito Miniatures in 54mm. They were painted with Humbrol enamels. Thanks for looking Angelo2 points
-
Here is my recently completed 1/32 Hasegawa Bf109G-14 build of Erich Hartmann's Double Chevron. The aftermarket items used in this build include: 1. MDC Bf109G-14 Cockpit Set 2. MDC Bf109G Tail Wheel 3. RB Productions Bf109G-6 Wheel Wells 4. Resin exhausts (maker unknown) 5. Strategic Ordnance Works Bf109G Landing Gear 6. Barracuda Bf109G-6 Spinner and Prop 7. Barracuda Bf109G-6 Oil Cooler Fairing Major markings were painted with custom cut masks from my Silhouette Portrait cutter. AK Real Color paints were used to establish the underlying RLM74/75/76 camo. Tamiya and Mr Hobby Aqueous paints were also used. The complete build log can be found here:2 points
-

Hobby Boss 1:18 Scale UH-1B Huey
Derek B and one other reacted to Rick Griewski for a topic
Another model in the “interesting” scale. This will be an impressive model on the display shelf. A detail person’s heaven. The kit will be all about the quality and fit of the clear parts. I know at least one man that spent combat time in one. I may pick one up. The kit would be a whole new adventure in model building for me. https://www.themodellingnews.com/2020/07/preview-four-polar-opposite-kits-from.html?m=12 points -

Hobby Boss 1:18 Scale UH-1B Huey
Royboy and one other reacted to Troy Molitor for a topic
40 Mike-Mike chunker up front with the Ride of the Valkyries ringing in my head. This would be hours of fun to work on this 33 inch beast. I loved flying this bird in the Guard and the AH-1’s. The OH-58’s were also a lot of fun to buzz around in.2 points -

EE Lightning - Echelon vacuform
thierry laurent and one other reacted to Kagemusha for a topic
I was watching it and tempted, but I already have one, so didn't bite.2 points -
on reqeust some pics off the B-58 This is what you get im not going to discuss on how acurate this one is for me it looks like a B-58 so im happy and it will be a lot off fun I placed a few parts on the cutting mat and thats size A3 so you get a idee about the size still a lot off resaerch to do before i start this one buti have another vac to try first Mark2 points
-
Thanks Antonio! Always enjoy following your 109 builds as well! Thank you Chuck! I appreciate the kind words! Thanks Troy! It's summer time so hopefully I'll be fishing a little bit more! Thank you Kevin! Thanks Marek! Just trying to get better with each build. Still a long ways to go! Thank you Marty! Thanks Herr Hartmann! Thanks Mike! Thanks Aaron! Will check out your G-6AS now! Thanks Mark! Thanks Kagemusha! Far from perfect but it was an interesting color scheme to play with. Thanks Brett! Thanks Michael! I had an image in my mind of how this was going to turn out but it didn't quite work out that way. Which makes the build process so interesting. Thanks Lothar! I really enjoy sharing my builds here! Thanks Jeff! Thank you Basta! Thank you! Will try to keep the conveyor running! Thanks Kirby! Another one finished... on to the next!2 points
-

Hobby Boss 1:18 Scale UH-1B Huey
Troy Molitor and one other reacted to Out2gtcha for a topic
Wow, that Huey actually doesnt look that bad for what it is...................but its over 33" long!2 points -

Hobby Boss 1:18 Scale UH-1B Huey
Rick Griewski and one other reacted to David G for a topic
these are the ex-21st Century Toys prebuilts/prepainted that were sold in Wal-Mart and Toys r Us about 15 years ago. For about $30-40 for a huge prebuilt model. These are mostly screwed together. No they are not Tamiya quality and are not superdetailed and were not made to be, they were "made to a price point" set by Wal-Mart and other retailers, they were somewhat simplistic in details but most of the later ones like the 262 and Fw190 had good overall proportions. These are a good basis for superdetailing if you so choose, or just bang them together for one heck of a large display. I have the prebuilt Huey and it is a huge beast. There are several modellers on here who have taken the prebuilts and redone them to high detail, check the build section. 21st went belly-up years ago so some Chinese firm such as HobbyBoss has repopped the parts to sell as a kit. Just like the 262 and the Fw190 and the SBD and the Harrier.2 points -
Are you sentimental with your building tools/equipment?
Rick Griewski and one other reacted to thierry laurent for a topic
A Badger 150! This was also my first airbrush and I got it around 1986 as well! It was always a reliable tool but I hated dismantling it to clean it. Putting back correctly over the needle the part behind the trigger was really difficult.2 points -
1/32 MDC Hawker Typhoon Mk.Ib 245 Sqn Sharkmouth
monthebiff and one other reacted to mozart for a topic
Good to see this one being done in your capable hands Andy! I have one in the stash so I’ll be watching very carefully.2 points -
PR.XI & Mk.Vc - Revell Mk.IXc & Mk.IIa kits
Gazzas and one other reacted to Wackyracer for a topic
Added the rest of the markings and started on the weathering. Oils and white spirit and blending with brushes. And installed the fuel cells. Still got to weather the undersides properly btw. Aaron2 points -
The final experiment yesterday was to test whether the near 20 year old transfers were still going to be ok, critical to the success of the build. So a nail-biting few minutes, but the results (just water and gentle pressure) speak for themselves: From this angle a little silvering is evident but in real life not at all obvious.2 points
-

Tamiya 1/32 JASDF F-4EJ Black Panthers
Greg W and one other reacted to spyrosjzmichos for a topic
Hi everyone! Hope you're all doing well. After some preparation time spent sanding off small imperfections and smoothing the airframe I finally started with the camouflage painting. I was planning to depict the ACM2003 winner and had done the initial camo pattern as such. However, I eventually changed my mind and went with airframe 27-8306 as I was able to find some good reference pics with some nice weathering. Because of that, the tailfin pattern is slightly different. I also based the underside painting on an RF-4EJ picture instead as I couldn't find any photos of an F-4EJ. I used the black basing method and MRP colours throughout. I also applied mixes of the main colours with black and white to depict all the touch ups and subtle variations across the airframe.2 points -
And so with the wings glued together it was time to fix the lighting. As with most of this kit, you start with a pretty blank canvas. Painting plastic to look like glass is quite a trick so if possible I revert to transparent plastic. First task is to cut the right shape from the plastic for which I used a sharp knife and some scraping tools. I next cut a chuck of plastic from an old toothbrush (as plastic sheet wasn't thick enough) and carefully cut it into a shape where one side fitted the gap where the light needed to go. The more accurate you can get this bit right the better. You can use paint to help define the edges but you run the risk of light bleed through. Once super glued in place you end up with this: Then I used a sharp pair of cutters to carefully trim the plastic to shape before sanding with ever increasingly fine sanding sticks until it is the right shape and a glossy finish. Finally, a light test! Next up is finishing off the wingtip formation lights which are somewhat trickier!2 points
-
So I've been slowed down since I lost my right eye I've decided to press on anyway with one and a half eyes. The lack of depth perception improves when I hold things closer to my eyes and use magnification. Getting the cockpit together I decided to go with a Yahu panel (first time) and MRP rlm 02. I think it's a little dark so I lightened it up with some white. I just hate sittin' around watchin' the boob toob Some progress ... Going back to the eye doc next Tuesday. Maybe get an eyeball transplant ?2 points