Leaderboard
Popular Content
Showing content with the highest reputation on 05/31/2019 in all areas
-

1/32 Kitty Hawk F-5E Kicked Up A Notch. Oct 3/19. Finished!
CarstenB and 10 others reacted to chuck540z3 for a topic
Quick follow up because I just sprayed X-22 on everything to smooth things out. BEFORE: AFTER: I'll let this dry for a few days, sand out the tiny flaws, then give it another coat to create a nice smooth finish for bare metal painting. Cheers, Chuck11 points -
1/32 Kitty Hawk F-5E Kicked Up A Notch. Oct 3/19. Finished!
CarstenB and 10 others reacted to chuck540z3 for a topic
May 29/19 After 1 month, I'm finally back with an update. It may not look like much, but this next step took me about 20 hours of picky, detailed work! The engine on the F-5 has a zillion fine rivets, both on the rear nozzles and the titanium panels just forward. This is what it looks like on a Swiss real deal.... There are two types of rear nozzles supplied with the kit. One set has fine recessed rivets and comes in two halves, creating a big seam, while the kit also supplies some one piece resin replacements, which I used. As you can see, they are cast kind of rough, the raised rivets are huge and there's an unfortunate casting block right where you don't want it, on the lip of the nozzle on the right. They also seem to have been cast crooked, but I found that the shallow lip goes on the outside, while the thicker lip goes on the inside. Of course the instructions say nothing about it! Here I have sanded off the monster rivets on the left. The rear of the nozzles should have two thin circles of metal, separated by a gap. To improve this look, I sanded the outside thinner, while carefully sanding the gap within. It's not perfect, but from a few inches away, it looks not bad. The titanium panels just forward of the nozzles have recessed rivets, which look OK, but I can make them better. As mentioned above, I have used Archer resin raised rivets many times before, so I've learned a few things about this great product as follows: 1) The wider the decal film, the stronger the chain of rivets, but the higher the chance that it will show under paint, no matter how much decal softener you use. 2) The narrower the decal film, the more fragile the chain of rivets, which often break apart, but it will not show as easily under paint. 3) Rivets applied to curved surfaces should be done in short chains, for ease of handling. 4) Even single rivets can be applied successfully, so if you bump off one or two, repairs are easy. With the above in mind, I found some Archer rivets that were about the same spacing as the kit rivets, but just slightly larger, so they would still adhere without filling the recessed ones. I found that chains of only 5 worked best, because they were easy to apply, but also compensated for the slight differences in rivet spacing. These are found in #AR 88015, with thin strips of rivets cut as shown. After many, many hours of work, they look pretty good. Not perfect by any means, partly because the kit spacing isn't perfect either, but when these areas are painted the same color, the small imperfections should almost disappear. Engine nozzles and V-shaped antennae on the sides are only dry fitted with masking fluid "glue". Top And don't forget the bottom, because it is covered with raised rivets as well in roughly this pattern from references. I see that I've missed a 3 rivet pattern on the top and bottom of the antennae at the front, so consider that fixed. Next step is to spray these rivets and panels with clear acrylic X-22, to seal them, toughen them and help hide the decal film. After paint, all you should see is raised rivets and no film. On to the fiddly stuff, like landing gear, gear well doors, etc. Not my favorite part of any build, but very important nonetheless. Cheers, Chuck11 points -

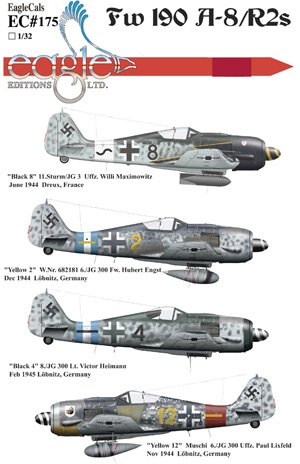
Revell Fw190 A-8 Sturmbock - any reviews / what's inside etc
Dany Boy and 8 others reacted to Isar 30/07 for a topic
http:// http:// http:// http:// http:// http:// http:// http:// http:// http://9 points -

Harrier GR3 - Airfix 1/24th classic
Starfighter and 7 others reacted to tomprobert for a topic
Afternoon folks Here's Airfix's classic Harrier GR3 from the venerable 1/24th scale kit, warts and all. Built as it comes, but with some home-made additions to the cockpit and seat. The kit decals and Xtracolour paints were used throughout. For its age, it's a really nice kit. The cockpit is very basic and the landing gear and bays are lacking in details, but with some good old-fashioned scratch-building you can make a decent representation of the Harrier. Happy modelling! Tom8 points -

A-4N Ahit 1/32 Trumpeter
Tony T and 5 others reacted to Peter Gregor for a topic
Hi guys, I would like to present my other project, A-4N Ahit tail number 389. I used the Trumpeter A-4M kit with Wingman Models A-4N upgrade set, AMS corrected intake, wheels and refueling probe, Aires cockpit set with homemade upgrades to N version and Eduard exterior, flaps and slats set and Isradecal decals. I used MRP paints and Ammo of Mig washes and Oilbrushers as usual. As the source of information and pictures, I used Double Ugly Book A-4 in IAF service. Thank you for all comments...6 points -

Revell Fw190 A-8 Sturmbock - any reviews / what's inside etc
nmayhew and 5 others reacted to Jerry Crandall for a topic
Reimund, thanks for posting the images of the new Sturmbock kit I'm excited someone is releasing it in 1/32 scale. I do see a few problems right off. For some reason they have an oval panel on the port side of the fuselage just behind the cooling flaps. It does not belong there. You are right about the colors. Undersurfaces RLM 76, Upper RLLM 75 and RLM 74 is correct. I don't see the armored windscreen triangular quarter panel it is not on the art work anyway. Most Sturmbock a/c had them. There is confusion about "Yellow 3". The A-8/R2 as shown is W.Nr. 680718 was never at Barth in May, 1944. It was built on 19 June ,1944 and Fw. Ottfried Baisch was killed in it on 18 July ,1844. There is only one known photo of it and the tactical number is not known and the unit emblem cannot be seen in the photo. Baisch's earlier Sturmbock was "Yellow 3" W.Nr. unknown and was mounted with the Krebs-Gerät rocket but it was not a A-8/R2, it was a standard A-8 with Sturmbock equipment(R7). It did have the unit badge on the Panzerplatten not on the engine cowling. Cheers, Jerry6 points -
6 points
-

Revell 1/32 P-51D Glamorous Glenn II
BlackCanopy and 5 others reacted to JefH for a topic
Scrounged together a little time and managed to get a wash down, add the HGW belt and seal things up with alclad Matte. The pictures showed me a few things to correct, but should be able to move on with further construction pretty soon. So far enjoying the kit, but if I built another or if Revell released a P51B or C I would probably spring for an aftermarket instrument panel. Thanks for looking. Jeff6 points -
I've pretty much taken care of the rivets on the horizontal stabilizers. It took a couple of rounds of filling though. When the Mr Surfacer failed to fill the holes, I resorted to Black CA glue, which I probably should've started with. The loop antenna on fuselage spine is a good replacement for replacement since the plastic loop is so thick. I used my trusty piece of Coke can to fashion a new loop. The FuG whip antenna and the pitot tube were similarly upgraded.5 points
-
Revell Fw190 A-8 Sturmbock - any reviews / what's inside etc
Dany Boy and 4 others reacted to Isar 30/07 for a topic
Gents, here is the Revell Sturmbock: http:// http:// http:// http:// http:// http:// http:// http:// http:// http:// http:// http://5 points -
The clear parts Thanks to my friend Jean Bodson, famous french modeler, who made me these parts, using thien plexiglass softened in hot oil. it's as thin as vacuform and clear and strong like parts in the best standard kits and can be glued with plastic cement. Whe have corrected the front glass of the windshield because in the kit this part is too square at the top. Frames added using thin card and layers of Mr Surfacer. For the machines guns, Jacques Druel made me photoetched parts as 12,7 mm Safat have a ring of small holes at the front. Hatches of the guns were reengraved as the majority of the hatches of the plane. All the numerous louvres were carved. For all these works I used the pictures from the real plane and drawings of the Aero Detail 15 which are the best for me.5 points
-

1/32 Fiat RS.14
Starfighter and 4 others reacted to AlexM for a topic
The rudder got some "fabric stripes" by spraying primer (using masking tape): And I printed new stabilizers with elevators (each as one single part), and attached them:5 points -

Attitude Aviation Buchon Conversion
Chris Wimmer and 4 others reacted to LSP_Kevin for a topic
Time for another update! Things are progressing more slowly than I would like, but I have now at least got both fuselage halves modified and ready to accept the new nose: Test fitting has reveal that I didn't do the greatest job on the port side, with a gap opening up towards the bottom of the vertical join: I'll shim this with some styrene strip. Check out the level of detail included on the resin nose, however - those panel latches! I'll need to remove the two umbrella attachment pips under the cockpit eventually, too. OK, more soon! Kev5 points -
Coming soon! In the works. Also don't forget about our EagleCals #99 that has FW 190 Sturmbock from JG 3
 4 points
 -
Zulu number one is getting there. Another week and it should be done.....Prep for number two has also been started.4 points
-

1/32 Hasegawa Bf109K-4 Weisse 8
daHeld and 3 others reacted to D.B. Andrus for a topic
John Here are a couple of shots of the Moraine mast. HTH, D.B.4 points -

1/32 Tamiya F4U-1a Corsair - Boyington's 17740
Chris Wimmer and 3 others reacted to Thunnus for a topic
The lipped edged around the main wheel wells have been masked off and sprayed Insignia White. I've also added some black staining to the wood block on the rear wheel well wall, although it is hard to see in the pics. Since the wheel wells are complete, I want to see if how the landing gear fits...4 points -
When I decided to make Yellow 17, I knew it too was going to require scratching up a Krebs-Gerät. It can be done, but as you have noted, it does require a bit of research and scratch building. My rendition is far from perfect, but I think with some work you can probably get a good rendition from the Revell kit with less scratching than I had to do even with the Krebs-Gerät:4 points
-
I have taken a bit of a mechanical step with the engine assembly. Since I added some details, and may add more...I decided to try to make the cowl assembly removable for viewing. It's not 100% because the cowl all comes off in one piece instead of a top and bottom half ( Unlike the Patbay Air 180 ) In any case, here's a couple of pictures of how my removable cowl may work. The two components side by side tail pipe angled forward sliding into place fitted, reverse for removal4 points
-
Did some work on the inside and the landing gear 110_5528 by Rick Martens, on Flickr 110_5529 by Rick Martens, on Flickr Working on the internals, starboardside cockpit done. Made the sidewalls behind the cockpit to cover the area to the observers place. I know most of it will not be visible but I know it is there. Ran out of ribbing material... 110_5534 by Rick Martens, on Flickr IP done with a little help from Airscale. Used all references I could get. Maybe not all that accurate but with some paint on it, it might just look right. 110_5536 by Rick Martens, on Flickr Starboard side console done 110_5539 by Rick Martens, on Flickr Made a start with the floor, all out of Evergreen card. 110_5543 by Rick Martens, on Flickr Also made a start with the landing gear. Filled the ejectionmarks and hollowed the wheelhubs. 110_5544 by Rick Martens, on Flickr The bench is the usual mess... Hope you like it.4 points
-
Some more pics: On the left my motor, on the right in the kit....... This comparison is, unfortunately, symptomatic of all the detail of the kit. The carburetor after some hours. Paint and light weathering.4 points
-
and Type 10 in process http://www.icm.com.ua/news/610-i-16-type-10-wwii-soviet-fighter.html jan3 points
-
Well, after a week that I'm going to try very hard to forget, it was good to clear the mind with some more time spent on this. Firstly, the moulded gun barrels (or, I suppose, more correctly muzzles) have been drilled out and replaced with the lovely Master brass set. Apologies for the poor pic. Then I set about the wheel wells. I decided that out of the box, the kit doesn't have enough parts, so I detatched the inner gear doors from the centre divider. This made access to the side walls easier as I would be adding a few things to get the feel of lead wire, CA glue etc., and it will also help when it comes to installing a modern VHF aerial between them (as this build will represent a heritage/memorial flight bird) and when I play with bare metal foil on the scuff panels. In the process I discovered that said CA glue is very good at sticking anything to anything else, except the two things you're actually trying to stick together (particularly if one of the unintended participants is, say, one of your own fingers)... however, eventually i arrived here: Again, I'm not going overboard on it because 'how' currently trumps 'what'. Finally, I couldn't resist trying out the masks to see if my intended sequence was going to work so the Revell mule was stripped down and out came the Paashe. Don't look too closely at the finish because I barely allowed each layer to dry before moving to the next and didn't pay much attention to ensuring the masks were seated properly, because (as you can probably guess by now) the process is still more important than the finish at this stage. The red part of the diamond was another experiment and there might yet be more of that involving Sharpies and smaller stencil masks. I'm still heavy-handed with the airbrush but at least there are no runs, and although the wavy leading edge is not going to make it to the finish line it looks like the plan might actually work : The dry run has shown some improvements I can make to the markings masks to ensure proper placement and orientation but I'm happy with where things stand. Next up? Cockpit tub, I think - but for now, I can hear a cold beer or three calling! Cheers, Sepp3 points
-
Revell Fw190 A-8 Sturmbock - any reviews / what's inside etc
David66 and 2 others reacted to Jerry Crandall for a topic
Oops, Baisch was not killed in 1844! But 1944.3 points -
Revell Fw190 A-8 Sturmbock - any reviews / what's inside etc
D.B. Andrus and 2 others reacted to Isar 30/07 for a topic
This is not a review, but after a quick research there are some Questions/Critics: - the glass add-on armour on the canopy was srewed/bolted on. The flat backside of those often called "Blinker" leaves a gap when attached to the curved canopy. Revell did this not very accurate on the canopy as the Blinker are molded on. Experten might cut the Blinker from the canopy, sand it down and polish it and add it to one of the two canopy parts without the add- on armour. - Research on the decal sheet was carried out by AIRDOC. I´m not sure on "yellow 3", if the JG 3 badge was placed correctly on the side armour. According to my reference the badge was seen on the black cowling or wasn´t added at all. Next are the Colours on topsides: Revell says, RLM 75 and 82 are correct, but I would likely use RLM 74/75 as this a/c was in use in early summer 1944. Later this year they omitted the white fuselage band and the black cowling… Having a look at Eagle Productions there is a sheet for Sturmböcke, available in 1/72 and 1/48 only: http://www.eagle-editions.com/aircraft-decals-for-the-modeler/48/fw- 190s/eaglecals-8-48-fw-190-a-8s-sturmj-ger-part-2.html "Yellow 3" is pictured using a "Krebs-Gerät" instead of the auxiliary fuel tank. As far as I know, such a "Krebs-Gerät" is not available yet. For those interested in: The "Krebs-Gerät" was a single 21cm rocket that would fire backwards. The idea was flying though a bomber box and fire this rocket would cause some serious Damage to the bombers due to the blast and/or the shrapnels so that these damaged bombers are an easy target once the left the cover of the bomber box. The "Krebs-Geräte" had little to no success and made the Fw 190 less maneuverable so they so little action. Creating a "Krebs-Gerät" should be no Major Task using sheet/plastic profiles and one of the Werfergranten 21 from Edaurd, HPH or Schatton Modellbau. According to the instruction of Eaglecals "yellow 3" was a Fw 190 A-8 - no R2. A quick Research couldn´t answer this question.... - If I would build the "Raubautz" I would paint the spinner black using the white spiral which makes much more sense to me than using a red spiral on a white spinner in order to confuse pilots/bomber gunners in a head-on attack. Good to see, Revell adds both opportunities. I´m a lucky man as I could get my Sturmböcke for 29,99 € as an offer on eBay/Germany. Cheers Reimund3 points -
1/32 Kitty Hawk F-5E Kicked Up A Notch. Oct 3/19. Finished!
CarstenB and 2 others reacted to chuck540z3 for a topic
Thanks everyone! Since there seems be some interest in a tutorial on applying Archer Rivets, here’s what I do. First the basics as mentioned above, which are my opinion alone and not necessarily those of others, including Archer. Archer Decal Rivet properties: 1) The wider the decal film, the stronger the chain of rivets, but the higher the chance that it will show under paint, no matter how much decal softener you use. Checking other builds using this product, you will see what I mean. 2) The narrower the decal film, the more fragile the chain of rivets, which often break apart, but it will not show as easily under paint. 3) Rivets applied to curved surfaces should be done in short chains, for ease of handling. 4) Even single rivets can be applied successfully, so if you bump off one or two, repairs are easy. 5) Like most decals, these rivets come off the backing better with very warm water. 6) If you don’t like what you’ve done, the rivets can easily be removed with a finger nail and you can start over. 7) Archer rivets come in many different sizes and spacing, so I like to have a variety of them on hand. 8) The raised rivets are not always perfectly round, but after paint, you’ll never notice the small imperfections. 9) As long as you keep the decal segment wet, you can move it around for a very long time. Even after using Microsol decal softener, you’ve got more time to play with it than a regular decal. 10) These rivets are quite expensive at ~ $22/sheet! Application: 1) The surface should be super smooth and clean of any debris and oil from your skin. 2) Cut a long and thin strip of rivets off the sheet, then into shorter chains to be applied individually. If you’ve got a flat surface free of detail or curves, you can apply segments of an inch or more. Curves and detail require shorter segments. 3) Soak the segment in very warm water like any decal, for at least 5 seconds, then place it next to where you want to apply it for another 30 seconds or more. 4) Using a soft paintbrush, push one edge of the decal film off the backing, let it attach to the surface of the plastic, then push the rest of the decal off the backing. For longer segments, you can push one end off the backing by sliding it in one direction, then grab the backing and pull it off, leaving the entire segment behind on the plastic. If it breaks, don’t worry about it. You’ve got lots of time to get everything back together. 5) Using Microset (or plain water), re-wet the segment so that it floats, then move it into place. Using a paper tissue, pull the water away from the edge of the segment without touching it. 6) When you’re happy with the decal placement, using another soft brush dedicated to decal softener, apply some Microsol in very small dabs to tack it down. If the decal moves, you’ve still got at least 30-40 seconds to move it around without fear of destroying it. 7) For the next decal segment, apply it as above, but somewhere else! If you try to apply the next segment next to the one drying with Microsol, you will likely move it and create a mess. 8) When the first segment has dried a bit (~ 5 minutes), liberally apply more Microsol to it over the entire decal. Unlike regular decals, you can’t wreck it by applying too much softener. 9) In a bit of an assembly-line process, apply new decal segments while applying more Microsol to others, keeping new ones away from old ones. 10) If you knock a single rivet or two off, don’t worry. Just cut off a replacement and apply it in the gap. The strength of the rivet to plastic bond is mostly under the rivet and not beside it. 11) When you are done and everything looks pretty good, add yet another coat of Microsol to everything, all over again. You want to nuke the decal film into oblivion as much as possible. 12) When everything is clean and dry, I like to apply a good coat or two of Tamiya X-22 acrylic clear gloss to seal the rivets to the plastic, but also to smooth out the fine lines of the remaining decal film. I like to use about 2/3’s X-22 and 1/3 Tamiya lacquer thinner, which sprays very fine. Future/Pledge works just as well, but is softer than X-22 and harder to sand later if you have any imperfections. 13) Paint as usual. I use Archer Rivets on just about every one of my builds lately, because there are almost always raised rivets somewhere that are not represented on the kit plastic. Other than the extensive rivet detail on my A-10C above, here's another application of subtle detail on my F-15C Eagle build. Note the Archer rivets on the front of the titanium panels and also reinforcements on the tail booms, according to reference pics I have of the real deal. After paint.... For those interested in buying Archer Rivets, they can be found here, along with a host of other modeling products: Archer Fine Transfers HTH, Chuck3 points -
Kev's spot on I mistakenly painted a white circle for a US star, put the mask on and airbrushed the blue, I was left with a white fringe on the completed marking. I have been doing it the pre camouflage finish on a couple of builds, the first was a Revell Spitfire I found it very useful for the four colour fuselage roundel. Cheers Dennis3 points
-

Brunty 2019
Anthony in NZ and 2 others reacted to TonyT for a topic
Lightning Run by Tony Taylor, on Flickr Lightning Run 2 by Tony Taylor, on Flickr Lightning return by Tony Taylor, on Flickr Lightning Return 2 by Tony Taylor, on Flickr Lightning open canopy by Tony Taylor, on Flickr3 points -
I hope not to steal the thunder from Squizzy's wonderful build, but nearly a year ago I posted information about the problem the USS Arizona Memorial was having with the access onto the memorial itself. I thought it was time to give you folks an update; especially for anyone who might be planning a trip here with plans to visit the memorial. In May of 2018, the staff determined that the concrete structure used for visitors to disembark the boat and provide access to the gangway leading onto the memorial itself; was damaged. Access to the memorial was suspended until repairs could be made, and first estimates were "probably a couple of weeks." That quickly changed into "two months" and then into "the fall." Then, it was hoped that it could be completed by the December 7th Anniversary ceremonies, but that didn't happen, either. They then said "by the end of March." And, when that date rolled around, they said "fall." The current explanation for the delay is that the large anchoring screws that anchor the structure to the seafloor are being custom made. This is one of the State's largest tourist attractions, and frankly, I am disgusted and angered that it has taken this long to accomplish so little. The memorial IS very much worth visiting, although it does not give you quite the same experience if you cannot go onto the memorial; read the names of those interred there; and reflect on the location and events of it's history. Whenever the repairs finally DO get completed, I will re-post on this thread to let all of you know. -Mike3 points
-
I also found an almost perfect match for 182 main wheels...1/48 Hasegawa F/A 18 nose wheels But since then I've also found another set of wheel fairings, so I should be able to (hopefully) spat all 3 wheels3 points
-

F-104D Starfighter - 57-1315 - AFFTC Edwards AFB, 1960
Alain Gadbois and 2 others reacted to Out2gtcha for a topic
The only real disadvantage to the 9v setup VS the 4 AA setup is run time. Per MSM, the run time of the lighting animation is shorter than 4 AA setup. However, I believe because of the low overall draw of the LEDs, that even with a 9v setup the animation time will still be long enough for displays and contests, since I wont have it on all the time. First thing I did over the long weekend was to glue the rear empennage halves to their respective fuselage halves, VS trying to glue the forward fuselage together and then glue the rear empennage section of the fuse to it. I also noticed at the same time that after I glued on the speed brake doors, they were a bit sunken in, and about 1/2mm too deep, so while I was at it, I used some PPP (Perfect Plastic Putty) to fill the speed brakes, which I will later re-scribe after sanding: Next, after receiving the 9v battery case, I started back in on my experiments on powering the system. I think the 9v is the solution I've been looking for! It has the right size I need, and after full power tests, I can confirm how long the battery will last with all the LEDs powered. First things first, I know for sure, no matter the actual power source, I will need access to all this from the outside. A hatch had to be created to allow access to replace the 9v battery, and the obvious choice was the MLG doors. After initial dry fit trials, I found the MLG door fit to be excellent actually, so I proceeded with using them as the new hatch for the system. The MLG bay, with two bulkheads around it fit so nice, that I decided to keep the internal bulkheads so that the hatch will stay more aligned in the end. The fit of the MLG bay and bulkheads is really nice: After more dry fit trials, I glued all 5 of the MLG door parts together to make a single solid part, reinforced with styrene strips: After once again going through extensive dry-fit sessions, I found the fit of the hatch after assembly also really good, save a bit of a gap at the back of the hatch that I will fill later with styrene and filler: After removing the hatch and disassembling the unit once again, I made some modifications to the hatch; cutting the tab off the front, and cutting down the tab in the rear, along with its corresponding hole in the fuselage, so the rear was a snug fit that slides in and holds solidly, and the front just lays down lightly on the front edge (later to be held on with magnets): You can see here the hatch seated with its rear tab in place and front tab that will be cut off that normally fits into the slot below it: Here you can get an idea of how the hatch will lift off after the front tab was cut off, although in the final config I will have to push down the trailing edge first to get it to catch, then lower the front onto the magnets: When I get the internal bulkheads configured like I need them, I will cut out the center section of the MLG floor, keeping the outer edges so the hatch will have a place to set on once finished, yet I will still be able to remove the battery. I did some gluing and cutting of the internal bulkheads yesterday, and it appears the size is about right for removal and placement of the battery, I will do more testing tonight on the power supply itself, now that I have it wired up, and ready to plug into the circuit board. Now I just have to find out what kind of switch I want to use to proceed with the full electrical tests. More pics later! Cheers3 points -
1/32 Fiat RS.14
Starfighter and 2 others reacted to AlexM for a topic
Sooo, here we are again Here is the trolley (or however this is called). It is higly speculative, as it's based just on a few crude black/white photos. I was inspired by this awsome model: http://archiwum.plastikowe.pl/relacje/cant-z506b-airone-72-supermodel I'm afraid the weird wheels are a bit too big, so they probably will be redone. I made new floats with the Anycubic Photon printer. I could print some surface details. The forward parts are filled with some lead bullets to prevent the notorious tail sitting. So, here we are at the moment Cheers Alex3 points -
Hi All, After seemingly endless masking I’m almost done with the painting bar a little touching up. I used mr color paints and they were really great and performed faultlessly. Gloss coat next and then a few decals before weathering. cheers Matt3 points
-
The cockpit. The only part I used from the kit is the instrument panel with some changes. The rest is scratch built.3 points
-
I have found others pics on a flash drive: And for the wheels bay, because I'm crazy about wheels bay, is it serious doctor ? Good day to you ! Alain3 points
-
Well this was a surprise, a 1/72 kit that fits well and i enjoyed to build, thanks to Revell for the review sample, i hope you all like2 points
-
MiG-23ML "4644" 1. SLP. Planá airport, České Budějovice, 1991 -first take-off of the aircraft was made on November 27, 1982 - fly to Czechoslovakia to ČB 22. 12. 1982 - total air raid 1136h and 41 minutes - The last flight took place on 26th October 2000 by Maj. Zdeněk Ouda Model: Trumpeter, Scale: 1/32 Author: Petr Pícha Photo: my frend Miloslav (thank you) Accessories: Aires-cockpit, nozzle, Wheels bay, avionics Eduard- photo etched part-exterior, Quickboost-cooling of aggregates Master-pitot tube, sparkers Linden Hill-Decals Customization: partially modified air intakes, APU-23, APU-60 -Helping keel - exhaust and suction channel of the turbostrarter - undercarriage legs -IR sensor -Other little things More Photo + building: https://www.leteckemuzeumliborezy.cz/mig-23/2 points
-

PCM Macchi 200 in 1/32
Model_Monkey and one other reacted to baffozac for a topic
My Macchi 200 built with a little help from my friends and months of patience, most of the parts had to be scratched : For example the engine.2 points -

New I-16 Type 24 from ICM
Rick Griewski and one other reacted to esarmstrong for a topic
That's because the pilots are not a feature of the original release of the type 24 I-16, but they are here. Unless the markings are different in some spectacular way from those already offered, I'll pass. I would imagine those who like crew figures with their models (not my "cup of tea") will enjoy this release.2 points -

1/32 Gotha G.I Scratch Build
Alain Gadbois and one other reacted to guitarlute101 for a topic
I've spent some time considering the future of this scratch build and I've decided to put this build on permanent hold. Looking at my limited budget and the materials I have on hand I have decided to start a new scratch build to enter into the group build. Thanks to everyone following along with this one and all of the positive comments, I really appreciate that. I'll start a new build post with the new aircraft tonight after I get back from the copy shop. Mark2 points -

Attitude Aviation Buchon Conversion
Alburymodeler and one other reacted to ade rowlands for a topic
Progress is still progress no matter how slowly it comes. Also for anyone interested in the rockets for the Spanish Air Force version of this conversion set, I contacted Attitude Aviation and they say the rockets and pylons are due the end of June.2 points -

Revell 1/32 F4U Corsair - DONE!
sandokan and one other reacted to themongoose for a topic
Thanks Tom! I have to tell you the fit was really good on this one. Almost none of my rivets got sanded off in the process...a few are smaller than when they started tho i’m Working on taking some better pics and finishing up the canopy. Here’s a couple where i was able to use a tripod and adjust iso and shutter speed...i think you guys can see the weathering better with these.2 points -
It's strictly builder's preference, Jeff. Painting the markings on after the main painting is done is the more common way to do it, but my personal preference is the reverse. I find it easier to prevent the base undercoat (white, usually) from fringing at the edges, and it also helps minimise the amount of paint you have to use for the markings in order to completely cover the underlying colours. The markings end up looking thinner, and with less build-up around the edges. YMMV. Kev2 points
-

Academy AH-1Z for HMLA-267
Durangokid and one other reacted to Dave Roof for a topic
The Kinetic 48th kit. I built five of them earlier this year for VMAQ-2's CO, XO, OpsO, AMO and SgtMaj. Here's the CO, LtCol Rundle and I with his model.2 points -
I promised an update with modelling content within 24 hours, and here I am 22 hours later with exactly that! I have to confess that I haven't really achieve all that much, however, but it is at least something. The major element of this conversion is of course the new nose, which requires removing the corresponding sections from the kit fuselage halves. Below is a photo of the terrific one-piece resin replacement nose, which I borrowed from the review: My first task was to remove the substantial casting block, and happily the cut locations are quite well defined, which makes the process easier. It's a tedious process, but it's important to proceed slowly. I used my JLC razor saw in a stroking fashion to initiate and then deepen the cuts, with any tricky bits being handled by a #11 blade. Here's the result: Still a little bit of refining to do, but it's basically ready for business. The next task, and probably the most important one of the project, is to remove the corresponding sections from the kit fuselage halves. I used the same technique outlined above for removing the casting block from the nose piece, but the instructions here a slightly vague, and I managed to misread the supplied photo, and remove too much material from the forward wing root section: In the photo you can see that I've glued a section of styrene strip into place to compensate for the material I removed in error. Once this has set strong, I'll set about shaping it to fit the corresponding cut-out in the resin nose. I'll also be more careful doing the other fuselage half! So, that's as far as I got before running out of time. I'm slowly starting to feel like I'm shaking off the rust! For the next update I aim to have the other fuselage half cut down, and the mating surfaces on all parts fitting nicely together. It's really important to go slow here and get this part right, as the success of the project rests on it. Kev2 points
-
The landing gear: From the kit, I kept only the fork and the bottom of the doors with some modifications, for the rest, thank you Mr Evergreen ! Main and tail wheels don't have the right dimensions although it is indicated on the tires. For the markings on the sidewalls, thanks to my friend Georges Olivereau who made dry transfers I use on the masters. The rims not having the characteristic details are also redone. With a little paint and a cat hair ........ Have a nice day !2 points
-
Well after tonight’s session at the bench it’s beginning to look a lot like a ju88! I’m not out of the woods yet and it’s still a while before it sees any paint but I’m starting to put some major construction hurdles behind me. Cheers. Matt2 points
-
More pics, The oil radiator, actually it's the only part I kept from the front of the kit (propeller, motor, cowl, etc.) It was carved to put the 14 reinforcements. To allow cylinder heads to exceed, a new cowl is made in 0,3 mm plastic card. And hollow bumps with a small border, because on the real aircraft it was separate parts. The cowl flaps and the exhausts with trumpet shaped exit.2 points
-
Ok for more pics, but as I started this it when it came out (may be more than 12 years ago) a lot of pics are not digital, as that of the engine, sorry. PCM Macchi 200 is a very good kit in shapes and dimensions, but for me, poor in details. Start at the front of the plane: The propeller hub: left part are mine, right the kit one. Copies in resin, if one day I decide to make another, not tomorrow ! The propeller: not perfect in shape and too flat. Down is the firing mecanism through the propeller, not in the kit. A coat of Alclad to verify the moulding The beginning of painting and weathering.2 points
-

1/200 USS Arizona, with the works
Javlin1 and one other reacted to Squizzy 78 for a topic
It's been difficult to get a lot of time at the desk lately with family and work commitments, but finally I've managed to get the lower hull done. There isn't much info on the docking keels, but with the little info I found, and looking at other on line builds, I've taken a guess at how they were, and although it may not be 100% accurate, it's better than nothing. I also took a crack at the bilge keels, I think trumpeters version was a bit like a smiley face. With the lower hull done, except the rudder, it was time to join the two halfs, and now I'll be starting work on the details such as the straps on the torpedo belts, the port side fuel line, and the water ways on the deck. In short, still plenty of work to be done before paint, and I there's also the join between the two halfs! Thanks for looking.2 points