Leaderboard

Popular Content
Showing content with the highest reputation on 02/12/2019 in all areas
-
Hi everybody, Really happy to show you my last built, the famous WNW Fokker DVII, with HGW seat belt and Aviattics decals. Paint with Gunze and weathering with oil paints. Have nice building for 2019 !! X1512 points
-
Thanks! I have started to add some different weathering effects now that the markings have been completed. The chipping on the wing roots needed to be toned down a bit, so I removed the tip of my airbrush and sprayed a lightened and thinned mix of SMS Forest Green around each of the chips. Removing the tip allows for very tight lines to be sprayed. The different colour green suggests fading and underlying primer. I will add a panel line wash as well as other effects to this area soon A good clear picture of a similar Boomerang from the same SQN shows the darkened panel aft of the exhaust running along the fuselage. This panel was metal unlike the rest of the fuselage which was wood. I masked it off and tinted it with Tamiya Smoke. I will add exhaust staining once closer to finishing the model. The machine gun ports were next, I sprayed the forest green around the 2 ports to simulate the white area having been cleaned and washed away and then sprayed the red doped area freehand to depict multiple applications of the protective dope. I outlined the forest green area with the Foliage Green. I had to adjust the white demarcation of the tail as I had it slightly wrong when I first sprayed it. Once that was complete, I applied the A number in the neatest but roughest way that I could to depict a field applied serial number. getting there. I am looking forward to applying the stencil data and bringing it all together with a panel line wash.11 points
-

MWP Project: Mirage IIIC "Ça va sans dire!"
mpk and 9 others reacted to aquatarkus10 for a topic
Hi to all I present my new MWP (metal work panels) project based on the Italeri Mirage IIIc 1/32 scale model kit: I chose the version (optional) ECT02 / 02 Côte D'or Dijon-Longvic 1970 (NMF finished) Aftermarkets: Eduard BigEd: part 1 & 2 Eduard Brassin: Wheels resin parts Scale Aircraft Conversions: landing gears Master (Air): Pitot tube & adapter for Italeri kit Berna Decals: for version ECT02 / 02 In this first session of work: I assembled, detailed and modified the cockpit: Test to fit on the mock up (1) : test :ok - please note the light wash (mix oil & resin) over the aircraft surface: preliminary step of the MWP procedure for reveal all the informations on the panels. MWP: the self-adhesive metal tape (aluminum) belowe the model: The instrument panels: Final test to fit (2): I tested the Chameleon colors on the SNECMA Atar 9c which I then placed on its support : note the variation of the colors ( different combustion temperature) Final assembling SNECMA Atar 9c & support: That is all for the moment. more pics & info: http://www.adventurephotomodels.com Thanks for the attention George10 points -

1/32 Kitty Hawk F-5E Kicked Up A Notch. Oct 3/19. Finished!
Out2gtcha and 7 others reacted to chuck540z3 for a topic
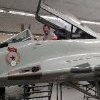
Now the intakes present a much bigger problem, because they don’t exist at all and so far, there are no after-market ones available. Phase Hanger Resin is making some, but after at least 10 attempts to contact them and get a real date for delivery, I gave up and for the first time, tried to make some of my own. With small engine intakes and a fairly straight forward trajectory, I found some 5/8” OD/1/2” ID PVC pipe and gave it a whirl. Let’s call these “Econo-Intakes”, because they are nowhere near as good as resin ones, but they are better than nothing- and waiting for some to show up one day (or not). I started with a few tools to shape and bend the plastic pipe. The pliers on the right give an intake opening similar to the kit plastic and the awl-like gizmo on the left (it’s really a wine stopper) should spread the pipe enough to get it around the engines. After a lot of trial and error using a heat gun, I found that the pipe will become very flexible when heated and you can shape it. The pipe also has a bit of shape memory, so by re-heating the pipe, you can get it to go back close to where it started before heating. So here is Proto-type Econo-Intake #7, which worked out quite well. In order to get the intake to fit over the gear well, you need to sand down both the bottom and top so that it will clear. This was done using a sanding wheel on a Dremel tool, which made quick work of the plastic. Other parts were heated and shaped accordingly, but you have to be careful to let the pipe cool before it touches the kit plastic. While the outside of the pipe is quite rough, the inside remains very smooth. The fronts are a bit rough right now and everything is still only dry fit. After the top fuselage has been cemented to the bottom, I will sand and shape them super thin so that they are one smooth unit with no gaps. When the front portion of the intake is installed, it will be tough to see this join anyway. This front piece has lots of issues to deal with anyway, so I plan on making everything smooth as one unit and, well, seamless! From the front you can see the intake fan, which is really hard to photograph. I’m leaving these intakes white, so no need to paint them. That’s it for now boys. Next up will be clean-up of the “Econo-Intakes”. Cheers, Chuck8 points -
Thanks guys! This will no longer be a black-base build. I've done and sprayed the whole thing silver. Decanted Tamiya AS-12, thinned with Tamiya Lacquer thinner and some Mr Leveling thinner to help even out the coat. The plan now is to establish the putty lines and then apply hairspray over the wing roots to facilitate chipping afterwards. Not sure if I'll add some mottling to give the camo some tonal variation... maybe some color other than black.8 points
-

1/32 T-38A Thunderbird Completed
BradG and 6 others reacted to themongoose for a topic
Tonight I had some time while the wife was talking to her mom...can you say 2 hours lol. I made a splitter plate for between the intake and the fuselage. Dang this is small. It's 0.010 styrene. I made a spacer so I could hold it in place while using a needle to apply the CA. There's a 1st for me haha. Finished product! Some sanding and a little primer, then repeat for the other side. I'm getting closer to primer for the whole plane. I keep telling myself that...I thnk to keep the mojo up because every time I go into the workshop I find another detail I have to do before I can primer.7 points -
That together with Mike's pictures is enough proof for me! Styrene strips added. I wasn't going for accuracy but more for a busy look. Two very very tiny bits added. The valves on the right console. They consist of stretched sprue and copper wire with (hardly visible) blobs of PVA glue on the tips. They're not perfect but that's the best I could do: Quick and easy was the installation of the HGW rudder pedals with their straps from Tamiya tape. Afterwards I was in the mood to do some more fiddly stuff. I started with the camera auxillary units. First up the motor for the camera. It has two functions. First: Tillting the camera via a flexible shaft (like those for the dremel) and second there's a compressor on the other end which powers (at least I think so) the film transfer and shutter. Luckily this motor is included in the AIMS set. I made the flexible shaft with some wire and a very thin strip of Tamiya tape wrapped around it. The pressure hose consist of 0.3mm steel wire (maybe too stiff) and 0.2mm copper wire. Two wires were added, too. I'll show more pictures of the original when I build the other auxillary units. So far thanks a lot for the discussion,comments and pictures guys. You are amazing!6 points
-

"The Star of Africa" - Hans-Joachim Marseille's Do-335 A-2/Trop - Yellow 14 - FINISHED!
Paul in Napier and 5 others reacted to Out2gtcha for a topic
Ok, finalizing things and rapidly heading for paint............... I had to rebuild a tab on the horizontal stabilizer I broke off, as well as getting the Revi 16b gunsight finished, as well as a multitude of other little things. First up was the gunsight since I had to put that in before mounting the windscreen (Apparently I also need to finish sand and repaint some of the pit sidewall/rear bulkhead too). Uggg, the macro lens is NO ones friend: Next up, I got the two rear engine cooling scoops mounted permanently as well as the small mounting support arms finalized for the sand filters. Nothing complex here, just some very simple styrene strip and punched out disks. The disks are a tad thick, so Ill finish sand these prior to paint too: Lastly I glued on the windscreen and got it smoothed in to the fuselage, sealed up the MLG doors and used some masking tape and liquid mask to mask off the nose well. Also got the tip lights masked off, Makatar masks installed and cockpit, engine and vents sealed. I ran out of time to do the black base tonight, but it appears Im ready for paint: Cheers till your older!6 points -

"Willie the Whale", FINISHED
Out2gtcha and 4 others reacted to blackbetty for a topic
still some red overspray to correct. one stencil decal is applied. they work good (this means the F4U-5N decals will be availible - they are at the printer) man, black planes are hard to photogtaph.. 92 by karl holubar, auf Flickr 93 by karl holubar, auf Flickr5 points -
primer is on still needs some filler and sanding on some places so i know what to do Mark5 points
-
1/32 Kitty Hawk F-5E Kicked Up A Notch. Oct 3/19. Finished!
Seversky and 4 others reacted to chuck540z3 for a topic
Thanks Bryan! The answer is yes, as I will show again below. Peter, you make me blush, especially coming from the Master! Feb 12/19 Thankyou Gentlemen! With the front fuselage done, it’s now time to attack the rear fuselage. Before I go any further, many of the modifications I’m making I found in the LSP Kitty Hawk F-5E SIG thread, so thank you to everyone who pointed these out before. You guys tell me what’s wrong with this kit, and I’ll try to show how to fix them! My jet doesn’t have the chaff and flare dispenser (B12), so the raised panel should be removed and the two small holes filled. At the rear of the fuselage are 4 raised lumps. Two should be there and two should be sanded down. As mentioned earlier, I rescribe every panel line and re-punch every rivet to enhance detail, so I also always use a dark wash to see if I goofed up somewhere. For all my criticisms of this kit, the bottom detail is excellent. I was also going to hide the landing gear bays with closed doors, but with this fine detail, I’m having second thoughts. I may jazz this stuff up some more and leave it exposed. The top of the fuselage, however, isn’t as well detailed and it has a few errors. The engines have nicely formed intake fans and compressors, but there’s lots of crap in the way and ink marks for some reason, so I’m not sure why KH bothered. There is a fix, however. Eduard supplies flame tube screens to cover all the warts and some nice detail for the compressor face. Some engines have this screening and some don’t and I found a pic of a jet that had one of each, so anything goes. All painted up and ready for assembly. With the exhaust extensions dry fit, most of the seam lines are covered. And no ugly seam lines on the sides either.5 points -

Another LHS closing...sign of the times
scvrobeson and 3 others reacted to R Palimaka for a topic
Just got a notice yesterday that Leading Edge Hobbies in Kingston, Ontario will be closing in June. The two brothers who owned the shop have decided to pursue other avenues and spend more time with their families. They have been a fixture in Kingston and area for 25 years, and have always been helpful and friendly. It is currently one of the largest hobby shops in Ontario, and of course also carries supplies for hobbies other than plastic models. They also provided space for meetings for various clubs. They will be missed. If they didn't have it they would happily order it. Like others who have lost their local shop, it's not just the kits, but the supplies like paints, adhesives, finishing supplies that will be harder to find. The closest shops that still survive are now two hours away in Toronto or Ottawa. Sad day yesterday seeing that. We've lost our social hub and chance to support a local business, and spend spontaneously on kits we didn't need. :-) Thanks guys! Richard4 points -
 Here are some renderings of the Beaufighter cockpit design at about 75% complete. Much work yet to do and much of what you see here will change, but you can get an idea of the design's potential. Changes will include the sidewall panels which will be replaced with simple beams supporting the instruments and throttle quadrants. Radios will be further detailed. The floor and bulkheads will be thinned, too. Other features will be added including a yoke, rudder pedals, heater duct, etc. The instrument bezels are sized to match Airscale 1/32 RAF instrument decals. If there is sufficient demand, I can design upgrades for the observer/gunner's station and an instrument panel for the Beaufighter Mk.21. No gunner canopy, however, or aft gun. That will be up to the modeler or another vendor.4 points
 -
"Willie the Whale", FINISHED
GMK and 3 others reacted to blackbetty for a topic
some masking 90 by karl holubar, auf Flickr 91 by karl holubar, auf Flickr4 points -
Canopy polishing
Big Tex and 3 others reacted to themongoose for a topic
Took the canopies out from under the hood tonight. Ohh they look really good. These are going to show well and not detract from any other part of the build. Here's a collage of each stage for comparison.4 points -

Mustang Red Tails - 1/72 Duchess Arlene B/C and D
mustang1989 and 3 others reacted to CANicoll for a topic
Making some progress with the Red Tails, and here is where I'm comparing the MRP to the Vallejo paints. Originally thought that they were two different colors, but actually they are pretty close. BIG difference is that the MRP is glossy (Right) and the Vallejo is very flat/matte (Left) as shown here: Also notice the difference between Tamiya (left) and Academy (right) when it comes to sprue attachment points... Here are the fuselages. Working on getting the elevators attached but have to so some touch-up and respraying on the Academy elevators. Some Duraluminum around the exhausts. More to come! Chris4 points -
Yep , I doubt anyone could get their head in a position to see inside that hole It looks like an open access to what is probably a throttle tension adjustment.4 points
-

P-47D "Raid Hot Mama", 1:32, Trumpeter
AceofClubs and 2 others reacted to Hartmann52 for a topic
Step two:3 points -
Indeed it is! I might finally have a reason to build mine, now. Kev3 points
-

Fokker pair
bstachel and 2 others reacted to sandbagger for a topic
Hi all, I'm making a start on the 'full built' Fokker D.VII. Cockpit items (not yet completed) and flight control rigging and cockpit frame cross bracing. Mike3 points -
WNW have literally created a market that either did not exist or no one knew existed. Before WNW there was zero chance that anyone would do a new tooling kit of most of the kits WNW have released. Take WNW first release the Junkers J1. No manufacturer would have released that in 1/32 as no one would have thought that anyone would buy it. I am comfortable that as long as there is a scale modeling community there will be a demand for WWI aircraft. WWI airplanes have a certain inherent attraction. Their use of wood, fabric and colorful markings will always leave us with a reason to build them. The argument that the market depends on people that have a firsts hand memory of them is entirely wrong. Most people that remember byplanes from first hand experience, unfortunately we are loosing generationally. Now they are only obscurities that show up for enthusiasts to see at the odd air show or museum. Maybe plastic modeling dies someday, but I am not worried about that. Maybe WNW decides to cease production or Peter Jackson buys one too many islands in the Caribbean and goes bankrupt. Anything can happen. However, until then I want to quote Aaron Rodgers and just say “Relax”. WNW going out of business is not an immediate or imminent problem. If it becomes an immense problem then we can go nuts over it as the world may end and the Zombies finally wipe us all out.3 points
-

Another LHS closing...sign of the times
phasephantomphixer and 2 others reacted to AlanG for a topic
The UK government is already thinking about this which means the likes of Amazon and Evilbay will finally have to pay the right amount of tax in the country they earn the money from. Gets my vote all day long. It's a total con when a highstreet shop pays more in tax than a multi-national company.3 points -
My nearest model shop is still standing. But on the same street there are at least four empty premises that used to be clothes and shoe shops. On the same street there also used to be two shops selling electronics (TV, sound systems, computers, etc) and they closed too, one is now a cafe and the other is a phone repair shop. All shopping is changing, not only hobby shops. Brick-and-mortar hobby shops closing is not the "death knell" of the hobby. The hobby is thriving on line. High-street shopping of all kinds is under pressure from skyrocketing costs such as rent, utilities, wages, taxes. The hobby is fine, you should be worried about the rest of the world around you. :-) Radu3 points
-
It is Wheels and Wings in the east end of the city...and they are very close to me. A bit too close...a champagne problem that I won't complain about. It does show that one can still run a top flight LHS. Like all the great remaining ones, it has embraced the old ways and incorporated the new. Hats off to them and their successful bretheren!3 points
-
Another LHS closing...sign of the times
BiggTim and 2 others reacted to R Palimaka for a topic
Thanks Tim, but nope. I owned a hobby/military history book store for a while and it's a hard slog that can be rewarding. Retail means long hours and small margins, and now you're competing with the whole world. I admire those that have survived and are thriving. I still prefer going to a store and browsing shelves more than browsing an online catalogue, but it's getting more difficult. Nope, thankful for my government job, pension and benefits, and thankful for the shops that still open their doors. Richard3 points -
It is a bummer. We are so lucky to have a LHS in Toronto run by two different generations that has turned itself into the best styrene model shop in the city. The real last one. Kudos to their customer service on every level. I have to drive twenty five minutes...but it's one stop shopping. Cheers to to the guys there who help at every level!3 points
-
Personally Ive had the best luck doing exactly what you did Chris, sanding, polishing, and Future.3 points
-
Another LHS closing...sign of the times
R Palimaka and 2 others reacted to Out2gtcha for a topic
Bummer. All we have are two "Hobby Towns". We used to have several LHSs in town, but they too sadly closed up. A sign of the times for sure. Sad, but I can understand. Maybe if taxation on the internet was implemented, the small local guy would stand more of a chance.3 points -
Another LHS closing...sign of the times
R Palimaka and 2 others reacted to The Dude for a topic
Bummer to hear another shop is closing, But judging by the lack of responses sadly few care that another shop is going away and it is indeed a sign of the times. Hobby shops in general will be far and few between in the near future. Years ago a city population of 1 million would support 6 or 7 shops and now just 1 maybe 2 shops could probably supported. Warehouse e-businesses will take over the rest. It would be unwise to start up a shop these days unless you had a very large amount of money backing it and are not expecting to get rich. The old saying is true, if you want to make a million in the hobby business start off with 2 million.3 points -
WNW is nowhere near the end of its run...!
nmayhew and 2 others reacted to The Phantom for a topic
Unfortunately they are nearing the end of their run, 2045 will be a bad year for WNW.3 points -
Yep, I've put a rod over a boiling frying pan (flat and shallow). Wear gloves and bend the center of the rod into the water until you can turn it sideways and get more of the rod in the water. Once it's soft wrap it around a jar or can to your desired radius.3 points
-
I've used a dremel for polishing before, but not canopies......its just too dangerous IMHO. Even at the super slow speed, a bit too much pressure and you will melt the canopy. If you are stl seeing a hazy canopy when done it's likely you need to start with a slightly coarser grain of polishing cloth than you originally started with. Cant say how much time to spend on each segment as all clear parts can be different. You may also want to spend a bit more time with the heavy polish to get more of the larger scratches out then move to the fine. You also may need to use a polishing cloth on some canopies first before the polish depending on the starting condition.3 points
-

Finished... 1/32 Hasegawa Focke Wulf Fw-190A-9
Fanes and 2 others reacted to Tolga ULGUR for a topic
Some progress.. Number 22 painted to red by using Montex masks. After that, landing legs installed and oil paint weathering applied.3 points -

Another LHS closing...sign of the times
R Palimaka and 2 others reacted to 1to1scale for a topic
I was spoiled living in the Dallas are for 15 years, there were no less than 6 hobby shops I could go to withing a half hour drive, unfortunately, since I moved to Nashville, there are only two hobby shops, but one concentrates on trains and games, has almost no model supplies, and the other is primarily an RC shop, but they are trying to stock more plastic hobby supplies, but their kit selection seems to be the same crap Hobby Lobby carries. I have talked with my wife a while back about opening a hobby shop, but I have trouble justifying the need for it in this market, as other shops can't seem to make it. I think for now, people have gravitated to online purchases, and the only way to open a new shop and be successful is to have a great selection, but that cost money. and the likelihood of success is low.3 points -
1/32 T-38A Thunderbird Completed
BradG and 2 others reacted to themongoose for a topic
Time to force myself to take a break and let some glue dry. I've got the fuselage halves together. Originally I thought I would use putty to build up the belly but looking at it yesterday it just seemed like too much. I am afraid it will crack in the future. Thought about it overnight and didn't really have a good solution until just a little bit ago. I cut out the shape I wanted from some styrene sheet and then used my heat gun to soften it and shape it. Now I need some thin sheet along the side and it will take just a little bit of putty to taper all the edges into the fuselage. Here's a broader view. I have all the scribing done. This morning I also installed the landing light on the nose. That's all for now folks!3 points -

HobbyBoss 1:32 Liberator GR Mk.VI - RAF Coastal Command
Paul in Napier and 2 others reacted to Iain for a topic
Hi Darren, The brass inserts are exactly the same a the kits - and will be strong. The SAC set is a direct copy of the kit parts as well (with the plastic jackets fitted) - but, from experience, won't be strong. You takes your pick. The shapes of the kit parts are out I reckon - but you stand a better chance of fixing by using the brass set and modding the plastic jackets to suit. Iain3 points -

Wingnut Wings Albatros B.II early
AlbertD and one other reacted to campingbaer66 for a topic
Hello , It's a longer time now since I have postet my last build here. But finally I have made some pictures of my latest Wingnut build and would like to share it with you for discussion. Maybe it is not one of my best ones but it was a lot of fun to build. It was the first time for me to work with "wood decails" and I must say the quality of those included in the kit was really great. Hope you like the result , if not please let me know your recommendation for making it better next time :). Peter2 points -
We have no LHS near to us. Even the one down where i was born has gone. I tend to use one shop online now as he is more often than not the cheapest i've found in the UK (and he runs a forum). His service is second to none. But i think the shops in the highstreet have had their day because they have bigger overheads due to physically owning a shop and foot-fall (people passing by) is smaller than years gone by. It's a shame really as i love going into a shop and chatting and physically seeing the items.2 points
-
I've been using a dremel for years and have never melted one yet. The trick is to use the right wheel. Nothing is safe but the soft cloth ones, in my experience. However, I HAVE ruined them by cracking them and/or shooting them across the room many times doing that, so that's something to watch out for.2 points
-
Canopy polishing
BiggTim and one other reacted to themongoose for a topic
out2gtcha when using the novus can you estimate how long you spend polishing with each stage? I still seam to have a hazy canopy when I’m done. Wondering if I’m just not spending enough time to really get the surface smooth? Do you use a dremel or polish by hand?2 points -
Thanks for the tips! Way beyond ootb already! Have to check with a ruler to see if I can find the hump you're mentioning. I have Milliput. I'll see what I can do about the tires. I opened up the shell chutes. The sight got some color and a piece of glass. I decided I wanted to have a boarding ladder, so I had to open up some slots. I have a Trumpeter ladder and one in 48th that I will use as template. Just need to figure how to build/make it. Looks like I need to order some square rods in the right dimension. Håkan2 points
-
First update. I built the 12 supplied Mk82 slicks in the kit, plus four more. Will try casting the six more required next for total 22. Fins were reshaped to be a lot thinner, plus added texture to the front half with Bondo putty. Fuses to be painted separately: Chicken and egg problem next - I want to detail up the MERs but I needed to work out the proper sway brace locations and see if the weapon pylons inner details were visible (theyre not a flat filled edge with notches for the sway braces as Trumpeter molds them). Was easy to modify, just cut away the lip, insert a 2mm wide piece of styrene channel and add various channel/nuts/wire detail inside for 3D effect. Needs some seam cleanup, but I'm more concerned about the piano hinge, Im thinking of either replacing or just carefully adding more cuts in between the molded detail. also I cut the panel line straight through on the ends: I actually started with the separate ejector racks, these hang on the lower portion of the MERs and out of the box are okay. I drilled out underneath, added the lugs that are absent, plus replaced the flat detail with Meng nuts, plus the arming (?) detail on the top. Seven more of these to do! The sway braces will need attention next, Im hoping to replace the cups with some punched discs and the soft nut details. I've almost finished modifying the first MER, but need to add the arming wires, that will be next update. I'm thinking I should have just bought resin drop in replacements, but this is a good exercise, I've never done this to an aircraft kit before...2 points
-

1/32 Trumpeter Me 262A-1a "Yellow 3"
Azor and one other reacted to VintageEagle for a topic
Rivets and panel lines can still be seen in close up photos. The surface was not completely smooth, but imperfections removed. See for example a close up of W.Nr. 111711: https://airandspace.si.edu/collection-objects/messerschmitt-me-262-family-photograph-412 points -
"Willie the Whale", FINISHED
Kagemusha and one other reacted to blackbetty for a topic
slow progress, but the engine nozzles are done (the pipe is still missing) 89 by karl holubar, auf Flickr2 points -
I still cannot believe so many people are taking this thread so seriously (no offence to the OP). WNW are like Tamiya. They do what they want, when they want and how they want. We as a consumer probably don't dictate their way of thinking when it comes to releases As said earlier. Build them and enjoy them.2 points
-
I did a bit more research on Hep Cat and found that he was a cartoon during the mid 1940’s. I figured that this is what the artist would have based his painting on and decided to fill in the blanks with the cats face as it stood in my last update. Due to the fuzzy nature of the original photo, some of details had disappeared, but close examination allowed me to see that his ears and face were of slightly different shades, which matched up with pictures of the cartoon that I found on the WWW. I believe that the cat has stripes on a shirt which may represent an Aussie rules football team that maybe the pilot liked or even played for. I worked on the mask a bit more and sprayed the face and ears. I then used a .03mm Copic Multiliner to outline the cat, and draw his eyes and whiskers as well as define his paws. I have sprayed a thin gloss coat over the nose art to protect it whilst I finish the rest of the model.2 points
-
WNW do what WNW want to do. There is no limit. Yes, there are some assertions such as "they don't do French subjects" (except that they do a Salmson), ""they are not doing a Camel" (they were not doing one when asked), "they are not doing kits done by other manufacturers" (apart from the RAF SE5, Fokker Eindecker, Fokker DVII, Camel, DH2), "they are not doing WW2 subjects" (Lancaster?). You see, these "hard and fast rules" about WNW that are parroted and regurgitated all the time are not really that set in stone. The truth is that WNW demonstrate all the time that they do not "play" by those random "rules." I am quite certain that they will "break" all of these "makey-upey" rules in the future. As for the "sold out" kits, they can always be reissued. The moulds are still there. So, even if the company were to shut down (but there is no reason to expect that), the moulds will still live on, just like or it happened with most other companies (Frog, Esci, Accurate Miniatures, etc). So, to cut a long story short, the sky is not falling we can still expect great things from WNW :-) Radu2 points
-

WNW is nowhere near the end of its run...!
whiskytngofxtrt and one other reacted to LSP_Mike for a topic
His is the only IM company to step into the 1920s with 1/32 plane kits. Since WNW has become the benchmark for 1/32, I can think of many aircraft I'd like to see by them. The Wright Flyer would be at the top, along with the Spirit of St. Louis.2 points -
Wingnut Wings Albatros B.II early
AlbertD and one other reacted to campingbaer66 for a topic
2 points -
1/32 T-38A Thunderbird Completed
BradG and one other reacted to themongoose for a topic
Working on both ends this weekend. Trying hard to get to a point where i can prime it all 1 color. There were gaps at the exhaust. The Belcher bit kit instructions said to expect it to be rough and that it should be sanded down. To keep the overall length and avoid trying to square everything up i decided to add a spacer. Turned out to be perfect because now there’s a slight gap between the nozzles whereas before they touched at the base of them. on the nose I worked to scribe the new panel lines. Started with a template to sketch it out in pencil. the big panels were scribed. While i was looking at Archer Rivets I discovered they have a sheet of miscellaneous panels and fuel doors. They all have rivets...wow just what i need for this plane under the cockpit. and then last i worked on the light for the landing gear. This thing is 5.5mm in diameter. Not enough spares for me in my short modeling career to have this. I was able to make one though out of the main runner from a clear parts sprue! Sanded some curvature on it using a special sanding block for pool cues. It’s shaped just like the face of a light. Some sanding and polishing and POOF 1 light. Covered the surface with blue tape and cut it off. Traveling for a few days, so till next weekend happy modeling!2 points