Leaderboard

Popular Content
Showing content with the highest reputation on 07/18/2022 in all areas
-

Silver Spitfire 'The Longest Flight'
R Palimaka and 10 others reacted to kkarlsen for a topic
A little progress on the long range fule tanks... The tanks are made from plastic card, it's only the rough form. Cheers: Kent11 points -

1/32 Mirage F.1C
Paul in Napier and 8 others reacted to Renegade for a topic
Hi Guys, Next challenge, main gear bays... Work in progress on the port one. Hope you guys like it Cheers, John9 points -

USMC Herc Honorarium - Kara Sahin Phantom - Finished!!
zerosystem and 7 others reacted to themongoose for a topic
Long long night! The Black Hawk portion is complete and I have her in a gloss coat! Here's her glamour shot These next 2 are prior to the gloss coat. The only thing I'm not happy with is that alot of the different colors I used for black have gotten lost once I cleared it. I did the bottom in satin and it still lost almost all the variation. Gonna have to work on that. Lots and lots to do. Off to make masks for the markings8 points -
Silver Spitfire 'The Longest Flight'
R Palimaka and 7 others reacted to Ol' Scrapiron for a topic
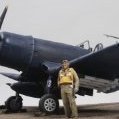
I was lucky enough to catch Spitfire Mk IX MJ271 (G-IRTY) when it was at (relatively) nearby Paine Field in Sept 2019 during the world-round trip. Did not get to see it fly, but was able to spend some time in the hangar while maintenance was being done. Maybe one of my shots will be of some benefit to your project. - - - - - - - - - - - - - - - - - - - - - And of course a selfie to celebrate the opportunity of photographing such a worthy warbird! Hopefully something here will be of benefit to you or someone else building a Spitfire project.8 points -
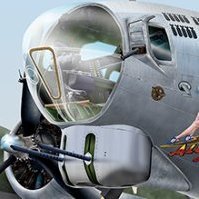
evening all Thans for stopping by & thanks especially to Waroff for those incredibly helpful pics I noticed a few things as a result, particularly the shapes of the early fairings.. I had a fantastic day on Sunday, having spent the morning crawling all over The Fighter Collection's P40C G-CIIO. The team were really helpful, taking the covers off, opening the cockpit and even dropping the flaps! I took 300 pictures of every inch of the airframe and cleared up many mysteries in realtion to what a drawing says and what real life looks like.. just a few here.. ..got lots of the cockpit.. ..lots from angles you just don't see unless you have access - see the spine panel layout & rivet patterns.. ..and lots up close and personal in places the internet just doesn't get to.. ..I will have to work out a way of sharing them for other builders.. anyways, when I left you last, I had vacformed the wing gear leg fairings.. ..well, I didn't take any in progress pics (slaps wrist..), but these are now fitted, blended and most of the basic internal structure added... ..clearly, still lots to do but happy enough for now.. ..next up was assembling the PE I made for the wing part of the flap structure - the plan was to drop these into the space left when I skinned the top of the wing ..complex assemblies with a lot of parts, but both were assembled over a couple of days.. ..the torque tube slides along to raise & lower them - something I learned from the Duxford guys.. ..before I could assemble the big panel with holes in it, I had to prime and paint underneath it so everything was given a basecoat... after that the little strips were added which are part of the individual rib pressings on the real one.. ..once finished, these assemblies didn't drop in as expected, well they did, but the trailing edge of the wing skin was a bit wonky and it would have doubled the thickness, so I chopped the skin off and just let the flap structures into the wing.. ..these were then blended in... ..and from underneath.. ..starting to get closer to working on the wing fillets, which is the final major shaping / sanding - then I will cut out the ailerons and start skinning the wings.. TTFN Peter7 points
-

1/48 SB2C Helldiver--Attack on Yokosuka and IJN Battleship Nagato, 18 July 1945 (finished)
MikeMaben and 6 others reacted to easixpedro for a topic
Ok, calling this one done. Finished making all the debris in one of the dry docks as well as a transport submarine (that was sunk) and 4 different auxiliary patrol boats. Those were tough as they’re about 5mm. Not a show stopper by any means, but wasn’t intended to be either. Just happy to have an interesting display that is one of those great intersections in life. See everyone at Nationals! -Peter7 points -

1/16 scale scratch built AT-38B Talon-The Smurf jet is back!
Azgaron and 5 others reacted to Pete Fleischmann for a topic
Hey all- more nozzle stuff- The rusty and smoky patina was done with MiG pigments over the previous painting steps- cheers P6 points -
Now for the main paint scheme. In an attempt to get the faded look I started with an overall coat of grey (Tamiya XF19), over which I preshaded with a random mottle of XF63 German Grey. I'm afraid we jump a bit here, so sorry no photos for a while. First I had to deal with a pesky "ghost seam" that's appeared; then I started with the white ID bands round the wings, tail surfaces (but not elevators and rudder) and cowling leading edge. The main scheme is Medium Sea Grey underneath, with Dark Earth and Dark Green above, and I used the Mr Hobby Aqueous colours for these. After applying each one, and trying to let just a little of the pre-shading effect work its magic, I post-shaded each with a lightened (with white) mix of each colour. Each colour was allowed to dry thoroughly before starting on the next; the division between upper and lower surfaces was masked, the Earth/Green divisions were free-handed. Now for the markings: I started off by applying all the masks: the letters and numbers were white, and I decided to back the roundels and fin flashes with white as well. Having done the white, I masked off the codes and serials as required and sprayed the lighter blue colour of the national markings: Mr Hobby H25 Sky Blue mixed with white uilr* sufficed for this. And that's where we are. Next job is the darker blue. There will be more to come, but when, I couldn't say. * "uilr" is a paint-mixing formula I frequently use: "Until It Looks Right".6 points
-
Agree, it is likely AM won't be needed as the kit looks exceptional in the renders - I am only looking at doing a set because I like folks to have a choice, and Airfix do have some previous for doing odd things with their Instrument panels - clear parts, decals on stalks on clear parts, and looking at the panel render it is possible they do somehing left field again.. ..will have to get my grubby hands on a kit and see if I think either the instrumentation or the panel or other bits need some PE love Peter5 points
-
All right - the cowl flap ring is complete as much as I can for now. This next project (or sub-project) is the nose cowl installation. This is something I CANNOT screw up. Outside of the gull wings, one of the most noticeable things about a Corsair is the nose cowl with the big engine inside it, and a big 3-blade prop just in front of it. It has to be spot on. The nose cowl in real life, similar to the cowl flap ring, is attached to the engine in 18 places - one for each cylinder head, this time to the front row cylinders of the engine: There are 18 heavily rivetted nose cowl ribs, each one attached at its aft end to a link and a triangular shaped pair of plates - the plates bolt to a dedicated flange on the cylinder head. I have simplified my installation to not include the link - my ribs attach directly to the triangular plates. I just could not hope to duplicate that many little parts. You will see these plates next post (not this one). Recall I have had in the queue the 3D printed nose cowl and its ribs, which I showed in a previous post. The first thing I had to do was to add the better part of 1000 rivet indentations using a #3 punch (scales well for a countersunk head 5/32 rivet) to that nose cowl: I could not put too much pressure on the awl lest I crack the somewhat fragile cowl detail. I hope they show up after paint. Here are a few of the 3D printed cowl ribs, freed from their stalks, and painted up and ready for installation: Actually, many are having to be trimmed and whittled on - the cylinder head flanges are all over the place. Sometimes too far forward, or too far aft. If too far forward, the cylinder head flange will clash with the aft end of the rib. When I made the engine, I did not control the location of the cylinders all that well. This post is all about accurate installation of those ribs so they line up with the cylinder head flanges - step number 1 for the nose cowl installation (step two being attaching the ribs to the cylinder heads). Recall that I made a nose cowl location jig for centering the cowl and controlling its fore/aft location relative to the engine: Vital that the engine and nose cowl are properly located relative to one another before this work begins. So I was ready to rumble. Let me take you through my process - it was revised a bit from what I first envisioned and became more refined as I got into it: 1. Bond (weakly) engine to the nose cowl jig, so it doesn't wiggle around, and so that later I can break it free from the jig: 2. Place the nose cowl in the jig, over the engine, clock it perfectly to my handy-dandy vertical scribe line on the jig, and make a pencil mark inside the cowl, exactly where a cylinder head flange is: 3. Remove the cowl, and using 2-part epoxy (5-minute dry), locate and bond a rib to the inside of the cowl at the pencil mark. Wait a couple minutes for the epoxy to start to set up, again place the cowl in the jig, reclock, and make any location adjustments to the rib before the epoxy dries: The rib must line up exactly to the cylinder head flange, so that the triangular plates can be installed during step two. 4. After the epoxy sets up, remove the cowl from the jig, and apply some thin CA to the rib. That rib ain't going nowhere. 5. Repeat 17 times. So, I have 10 ribs so far, 8 to go: I had hoped to install ribs plus triangular plates right on the jig without needing to remove and replace the nose cowl umpteen times. But clearances just didn't allow. I really had to butcher the aft end of some of those ribs due to my poorly located cylinder heads. Perhaps you can see that. But that will be very hard to see once the triangular shaped attach plates go in. There will be 36 of them (two per cylinder head), with Meng nut hardware. Yikes. I love this kind of work. Very challenging. If successful, I will have a very stout nose cowl attachment to the front row cylinders, properly centered about the thrust line, and convincing looking. That is in addition to the cowl flap ring, also firmly attached to the aft row of cylinders and properly centered about the thrust line. And once that is done, I can get to work on the cowl panels directly behind the nose cowl, which will be removable (with magnets). What a huge ask! Very excited to try to make it happen. Stay tuned for step two - which is to attach the nose cowl to the engine cylinders via the ribs, 18 places. Ta-ta!5 points
-

Revell F4F-4 Wildcat
John1 and 4 others reacted to Rick Stone for a topic
And here it is assembled. It's already rather fiddly, even at this early stage, so this kit might be a bit problematic. At least I have more patience at this age, unlike when I was 10! LOL PS.... can someone tell me how to resize my images? I can't figure out how to do it on Postimages, nor can I do it within LSP.....5 points -

Zvezda Star Destroyer - a new detailing project
mustang1989 and 4 others reacted to The Madhatter for a topic
wow - it has been a while hasn't it? Hi all, and thanks for stopping in. First of, sorry for the really long delay in doing anything to it until recently. RL has interfered a lot as have other projects blah blah. We all know the reasons why etc that things go on hold but, I do have an update that's worth showing So, I am unable to paint anything ATM due to weather and other such stuff like getting ready to move up north to Brisbane at the end of the year, plus a reno and as such, that limited my options. But I have been chomping at the bit to get restarted on just something to do with this build as its just dragging on and on (rather my my words) so I thought I would continue on with the base. And I must say, so far, I am super happy with it. It's coming out way better than I had hoped so far! I am almost finished the edging on the top plate as you'll see in a sec and the shape of it is working perfectly. I will need to cast another 2 or 3 plates and some more of the original plating for the bottom and mid tiers, but that won't take too long So, first up, the top plate as it is now: The advantages of using resin is you can sand it super thin and then remove excess bits with a sharp knife to create new shapes And the bottom plate has also had some treatment started to it. There is HEAPS more to do of course And combined, it starts to take shape. There is a tier to go in between them but not there just yet Well, that's it now for the next 3 months.... nah, just kidding. It's 7 if you're lucky Hopefully the next update will come sooner rather than later. Thanks for any continued interest Till then!5 points -
As I inch toward the finish line on this project I am preparing all components for a limited production run. I have decals coming from a fellow LSPer to provide the smaller markings and hope to have paint masks for the larger markings. There will be 2 squadrons available, VAH-1 and VAH-7. I will produce kits for all that are interested. I expect to sell the kit for approximately $100. Shipping in the US should be about $15. International would be calculated depending on country. I am trying to gauge interest here on LSP. If interested please let me know. I don't expect to sell more than a handful but if interest is greater than I expect I need to know. I would hope to be ready to enter production sometime in the October. Each kit would take approximately 1 week to complete. As you can see from following this work in progress the shapes look quite good. It is a big model, 25 inches long with a wingspan of 20 inches. Part preparation will entail filling and sanding before paint. Thanks in advance, Dan5 points
-
Thanks Maru Some minor goodies were added to this, but I posted an earlier picture earlier The hinges for the legs are in place. Cheers, John4 points
-
USMC Herc Honorarium - Kara Sahin Phantom - Finished!!
GreyGhost and 3 others reacted to themongoose for a topic
Moving right along today. Almost all the small parts are ready to go. Now to just get the aircraft done :-) Satin black primer on the bottom. The Black Hawk is all black on the bottom so this will be the base for the color and weathering. Gotta like simple. I needed some of that Then for the top I had to do something different. After experimenting with the colors for the Hawk the light gray looked totally different over the satin black. It just wasn't going to work. So this is wraith bone, which is an off white that lays down very smooth. Next up I'm using haze grey, the old WWII battleship color, for the light gray on the hawk. Then a break for an hour or so to let that dry while I print the masks. See you on the flip side4 points -
USAF Skyraider.
KiwiZac and 3 others reacted to Nighthawk Calling 1 for a topic
Afternoon All Slow progress this last couple of weeks, cockpit coming along, first time using the Quinta Studio set and I must say very impressed easy to use and for me who struggles with painting cockpits these are a game changer. Sorry photos are not the best, shaky hands. It still needs gluing together and final details that will go on just before the fuselage haves go together so I don't knock them off because I will. That's it for now thanks for looking.4 points -

Revell 1/32 P-51D-5NA Mustang
Greg W and 3 others reacted to Nikola Topalov for a topic
She's got wheels.4 points -
Silver Spitfire 'The Longest Flight'
R Palimaka and 3 others reacted to kkarlsen for a topic
Starting with the wings: The bottom wings have had all their shell ejector openings filled in. A couple of bulges has been replicated. Next up the top wing fuel tanks. The panel with the gun bulge has been replaced with a plain one without any bulges. The fuel 'cells' Closeup of the scratched filler caps. Cheers: Kent4 points -
Silver Spitfire 'The Longest Flight'
R Palimaka and 2 others reacted to kkarlsen for a topic
Although I have a lot of projects lingering in the background, I have decided to move this one 'up the ladder'. I really wanted to wrestle with this 'Silver Spitfire' when it went around the world in 'The longest flight. But now I have learned that it has come into Danish hands, by Blackbird AIR A/S in Billund. And I also know the danish Pilot who is flying it Casper (PEL)! At the Danish AIR Show I had the opportunity to watch the presentation of the 'Silver Spitfire'. Completely overshadowing the entire show for me, at least. A couple of years I was able to secure the decal from Draw Decal fro the Silver Spitfire. So on to the project, the Revell kit of the Spitfire Mk. IX will be the base kit for this build + the Brassin resin cockpit. But most of all It will involve trying to recreate the polished aluminium surfaces. There has also been a few modifications after it has been around the world. The long range fuel tank has been removed, and I can also see there has been a change of the rudder. I want to 'backdate' it to when it returning from 'the longest flight' back in 2019. Casper has promised me to go and have a 'look see' at some point in Billund Right now it is back in Chichester at the Goodwood Aerodrome for an overhaul... Cheers: Kent3 points -
OK guys I bought a 3D printer, finally took the plunge! I have always liked the look of the Scimitar and thought it would be ok for a scratch build. Not too complicated. The software I'm using is Fusion360, but even though I have a CAD background I am learning the program. As far as the model, I'm scaling up the AFV Club model, taking dimensions off of it and 3D modeling the ones that are appropriate for this medium. Here are some shots of the lower hull in progress.3 points
-
https://www.flickr.com/photos/159342774@N07/albums/72177720300583451 I’m working on a better way to post the photos here directly. Click on the above link, and it will take you to flickr.com where the album is. I was able to build this pretty old kit for a good friend of mine. He was in the Navy, and worked in the aviation branch . He picked up this kit for $20. Pretty straight forward build. The only issue with the kit was that the canopy was warped on the rear section. Because of this, I chose to open the canopy partially as they were going down the taxiway. Thanks for taking a look. Any comments or feedback are welcome all the time. Happy modeling! Chris3 points
-
Jay's jigs are better than my models! Kev3 points
-

Wolfpack Phantom - 8th TFW F-4C
Peter Greengrass and 2 others reacted to Finn for a topic
John here is a nice head on view of the front seater: https://12tfwpersonnelvietnam.shutterfly.com/pictures/12 and a rather used pylon under a clean and looks like freshly painted wing: https://12tfwpersonnelvietnam.shutterfly.com/pictures/35 note panel 238 is a different shade compared to the rest of the pylon. Jari3 points -
You know your the war is lost when TF-38 literally anchors outside one of your largest naval bases and launches strikes at will. Still boggles the mind. I’d originally planned to do this with a 1/32 Beast. Convinced myself otherwise after looking at the trials and tribulations of others. It turned out so good, imagine if the scene supported an LSP Beast?! That would be pretty slick. Maybe if I see one at Nationals for a reasonable price? Naaaaaah, gotta work one what’s in the stash, don’t need more. Or do I? Would be so cool! Would just need to raise the plane a bit and could reuse the base. maybe go with 1/144 scale Hellcats? That’s how I ended up with that 1/24th Airfix Hellcat - I did it in 1/48th first. To quote Ralph Wiggum, “I’m in Danger”3 points
-

Hasegawa FW 190A-8 Gustav Salffner, 7./JG 300
themongoose and 2 others reacted to duke_ for a topic
some progress.. stencils painted / decals from eagle cal EC77 i was lucky enough to see that this specific profile was included in this decal sheet, although there is a different color on salffner's cowling insignia, it is in cyan color instead of red, i don't know which one is correct. anyway i used the eagle cal insignia .. . gloss coat and ready to start weathering for this one i am using oils now i have to wait for a while number 6 is still not painted yet,, i am balancing between the eagle cal decal or wait to prepare a correct paint mask thanks for watching!3 points -

Messerschmitt Bf109G-6
John Stambaugh and 2 others reacted to Phantom2 for a topic
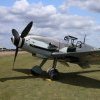
Hi and thanks to all! More Black primer and now I can add some missing parts, first a desert airfilter from Quickboost… The fit was outstanding and as in most cases with QB parts, they fitted with minimal work… Next detail to add was the ”gunboats” under the wings, once again BarracudaCast parts, perfectly done and outstanding fit…. This set also included two sexy metal barrels from Master…. …and they fit perfectly against the wing and the simple instructions are crystal clear where they will go. They are handed so be aware! Bad (I know, I know...) photo, but I can tell You that the detail on these are outstanding, as always with `Cuda parts! More to come soon! Stefan3 points -
USMC Herc Honorarium - Kara Sahin Phantom - Finished!!
Robertjon5 and 2 others reacted to themongoose for a topic
Oh man that’s right Mike! Trying to keep the momentum going. NATS is close. Was hoping to be in primer tonight but my sister visited and my daughter wanted to go to the antique mall, and hey life comes at you fast! Os i am down to the last rounds of fine sanding and filling to get the contours right. Just for my own motivation let’s go thru what it looks like Nose it nearly there. Only an odd spot around the bottom to do Found these after the fact of course. HOW! Did i not catch this before assembling the wings? Need to use a finer sandpaper and they will go away Need a 4th round here. This area of all things was a mess. I guess due to the number of poeces all coming together in this area around the nose gear. The amount of flash and just plain weird plastic flow created all sorts of things to sand lol check out that glob around the bottom section of the tail… Spines in good shape And remember that big warp and the giant gap at the back, well here it is. A little fine sanding and this will be invisible even in black. That’s the big kicker on this one - the jet is pretty much done in black!3 points -

Vigilante
themongoose and 2 others reacted to Dandiego for a topic
As I come closer to a finished product I realized that I would need to provide engine exhaust parts with nozzles. So here is the first one off of the printer. There are better resin J-79's out there to be sure but I wanted to provide something. Dan3 points -
Vigilante
Model_Monkey and 2 others reacted to Dandiego for a topic
Small update. Wing tanks have been attached. Main landing gear doors are on. Overall shot of the underside. Also, I have given the entire airframe a coat of clear flat. Dan3 points -

1/32 Trumpeter SU-27UB
Loach Driver and one other reacted to miketippingmodels for a topic
Just finished the Trumpeter 1/32 SU-27UB , its the 2nd time I have built this in this camouflage pattern, it doesn't get any easier. So its an OTB build, the only extras are the static discharge’s, and Quinta studios cockpit decals, I also used Foxbot masking , but as a template then cut mine out of Tamiya masking sheets, and HATAKA acrylic paints enjoy. Mike2 points -

Tamiya 1/32 P-51D/K "Mrs. Bonnie"
Alex and one other reacted to Phil Smith for a topic
With the P-51K completed, I’ve moved on to development of a diorama to display the model in an interesting way. The setting will be an island in the South Pacific, late 1944 to early 1945. I intend to render a sandy environment with shrubs and grasses, a section of Marston matting (large, perforated steel planking used to build/reinforce runways), a jeep with wagon, and a few guys standing around. I found several kits to support this effort: 1/35 Jeep with trailer: Bronco 1/32 figures: ICM "A Photo to Remember" 1/32 Marston Mats: Resin2Detail 1/32 toolbox: Eduard Thus far, the jeep and wagon are completed, a relatively straight-forward build right out of the box.2 points -

1/18 Scale Blue Box F4U-1A Corsair Modification
ctayfor and one other reacted to Citadelgrad for a topic
Maybe it's just the way my brain works, but I am as fascinated by the extremely neatly executed jigs as I am with the amazing results you are getting on this build. Keep going!2 points -

Detailing E14Y1
mechanic and one other reacted to Rockie Yarwood for a topic
Also check his gallery section, There is an example Glen cutaway there.2 points -

1/48 SB2C Helldiver--Attack on Yokosuka and IJN Battleship Nagato, 18 July 1945 (finished)
A-10LOADER and one other reacted to Oldbaldguy for a topic
I think if you were to try this again in 1/32, you’d have to redo the whole thing and would have to build it so that the base sits on the floor. If you made it table-top, I think you’d lose the perspective and all people would see would be a 1/32 Helldiver hanging in space. The forced perspective seems to work best if you are looking down on it from the airplane’s point of view.2 points -
Selfridge ANG base, MI Airshow photos
allthumbs and one other reacted to Starfighter Jock for a topic
A few photos I had taken during the airshow at Selfridge ANG base, Michigan. July 9th, 2022. KJ2 points -

What's New - 17 July 2022
TankBuster and one other reacted to LSP_Kevin for a topic
Howdy folks, I've just published the latest What's New update. Enjoy! Kev2 points -

Takom 1:16 Panzer IB
Rick Griewski and one other reacted to LSP_K2 for a topic
Ebay. Here's the link. They are the correct two different lengths too, and gorgeous. When I tackle the Panzer IA, I'll be ordering some more, as well as some other desired items; coil springs, breather tubes, tool clamps, etc.2 points -

BACK AT THE BENCH
Ryan and one other reacted to SCRATCH BUILDER for a topic
Front Controls started.2 points -
A small fix was required to fit the intake to the rest of the fuselage. The recessed part on the Hasegawa kit does not match the Academy nose section. Not even close. The solution was to build the Hasegawa section with plastic card and sand smooth. The easy part. Now for the more difficult part. The Vents on the sides of the Academy intakes do not protrude far enough to match the Hasegawa part. The solution this time was to cut slots in the sides with a razor saw and use gap filling superglue to make the vents wider. Eventually all fit together but with a lot of filling and sanding still to be done. Cheers Nick2 points
-
 I like the camouflage pattern you've chosen and I'm really glad to see how far along you are in the build. You make me jealous. I have slowed down a lot in the construction of mine due to several reasons, first the primer peeled off the spokes, I had to repaint them and secondly in the middle of summer there is less time for construction and more for the beach and the pool!!2 points
 -
 Hey Chris, I used MRP silvers for my only Mustang (Revell with a Tamiya tail), Silver (MRP-128 (mostly), White Aluminum (MRP-9), Duraluminum (MRP-8) and for the painted wing tops Alclad II Dull Aluminum (rubbed down with a T-shirt). Base coated with MRP White Primerwith some light blue and grey mottling to break up uniformity. Turned out OK. Have fun.2 points
 -

Oooooold Revell P-51B
Model_Monkey and one other reacted to denders for a topic
Another update, the fuselage is closed up and the wings are together. The fit of the wings to the fuselage seems like it's pretty good and won't require too much putty. Thanks again Rick Griewski for the AM propeller blades! They look so much better! There's a tiny bit of putty work at the nose to do and a coat of primer to see what else shows up. Dave2 points -
Hasegawa FW 190A-8 Gustav Salffner, 7./JG 300
themongoose and one other reacted to duke_ for a topic
more painting.. JG300 ..almost the 6 is not painted yet , its just a vinyl mask just to have an idea of the final result i have copied the shape using eaglecals decal as a template OCD syndrome strikes again... . i wouldn't call it 100% success.. i don'τ know how i managed to do that, but. will do it again. red stripes all stencils are painted with masks , I had to make some of my own as they were not present in the set, like the square and triangles on the flaps the only decal so far is that shiny thing on the starboard side of the windshield.. i think ii will remove and use the mask provided At first i didn't know if it was for an A6 or an A8 as the set refers to A6 and it was different than the kit's decal (its missing some arrows and a circle) thanks S.2 points -
1/32 Mirage F.1C
Paul in Napier and one other reacted to Renegade for a topic
Hi guys, Busy with the airbrake bays. Did a test fit to establish the angle of the airbrake panels (which are still in two parts), which determines the length that the hydraulic arm must be extended. CHeers, John2 points -
Wolfpack Phantom - 8th TFW F-4C
Paul in Napier and one other reacted to Finn for a topic
John those numbers on the TERs and MERs are the serial numbers, all components on a aircraft have their own serial number. It's usually a small metal plate on the part but to make it easier to identify some units would stencil the number on them. Also each rack of a TER, and MER would have their own serial number as well, if you zoom in on the pic here: https://catalog.archives.gov/id/6429350 the black and silver items on the racks are the ID plates for the racks themselves. You can see they have the MERs serial number painted on near the middle, making it much easier to read that than the one on this MER, it's the smallest plate: Jari2 points -
Revell 1/32 P-51D-5NA Mustang
GMK and one other reacted to Nikola Topalov for a topic
Oil leaks done...2 points -

1/18 Scale Blue Box F4U-1A Corsair Modification
ctayfor reacted to brahman104 for a topic
Says no-one in the universe except you Jay.... . This whole project is a case study in precision engineering! Exceptional work on the cowl. Even if I'd made a pencil mark most of mine would have still ended up at a 45 degree angle or something. So good, and waiting for more! Craig1 point -
Got my jet back from rehab- The Wave
GreyGhost reacted to Pete Fleischmann for a topic
hi Gregg- yep- we maneuvered West/SW of KIOW, but the weather was not great further south. This particular pod we were testing cannot get wet; so we had to stay clear of clouds all day- P1 point -
You're likely right, and why I decided on this smaller scale after your tipper about it being on sale at Sprue Brothers a couple years back. Included in that same purchase was a LSP B-24J, which has been patiently waiting. She's next in the build pile, so maybe I should just simmer down...!1 point
-
Hi guys, The cockpit has been keeping me busier than expected, but it's getting there. Cheers, John1 point