Leaderboard
Popular Content
Showing content with the highest reputation on 07/12/2022 in all areas
-
Changed a lot on this Has.Revll kit, You can see here on the WIP. Took too long as we had a serious amount of interruptions, but got there.11 points
-

AIMS Spitfire PR1G using Revell Mk II kit
Fanes and 9 others reacted to Pastor John for a topic
AIMS 1/32 Spitfire PR 1G conversion (using Revell Mk II kit) with Barracuda details update. Well things are slow because of mistakes I have made as well as my hands. Tomorrow I see a professor of neurology in Budapest. i have waited a year to see this person. Anyway I had been concentrating so hard on my PR 1G being a conversion from a Mk I airframe that I forgot to double check the correct oil cooler and of course it is supposed to be the Mk V style one for the Merlin 45 that the PR 1G had and so it was carefully popped out and Roy Sutherland is kindly sending me the replacement part I need, thanks Roy. I have finished the kits spinner and prop corrections as best I can and I hope you like. I will let you know when available. I also will have available at approx the same time the Mk I upper Cowl and the Mk II upper cowl. The differences are slight but it is up to you. Thanks for looking J10 points -
Almost there. Not much to show, but progress is progress I guess. Main LG legs and tail wheel assembly as well as the cannons in place. I even managed to get the guns in without scratching the paint off. TIP: If you ever get prescribed Hydrocodone/Acetaminophen 5-525 for pain don’t plan on doing anything for a long while. How this stuff ever became a recreational drug is beyond me…. No thanks. My life may not be perfect but I still want to be there while it happens. The Revel FW tail wheel assembly is a huge improvement over the Hasegawa, Fred Flintstone version. Next stop is the wheel and tire shop. It’s pretty easy from here on out. The only thing I’m really not keen on is the antenna wire, but considering how far we’ve come, tis but a scratch.8 points
-

Revell F4F-4 Wildcat
Alain Gadbois and 7 others reacted to Rick Stone for a topic
Not much to show yet. Just did the unboxing, verified all parts are there. Even the decals look amazingly good for a kit that has been bouncing around for probably 25 years. This big scale model is already sparking memories of my childhood..... and admonitions from mom and dad to make sure I put down plenty of newspaper and don't spill any paint! Most of the parts are still on the sprues, but there is a lot of flash around some of them. Old, tired molds I suspect, but nothing I can't work with. More to come soon, but for now, this is what the workbench looks like. Cheers!8 points -
Finally.. long time on this one. Post a few more to RFI this eve. And thanks for following and your support8 points
-

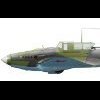
Fw 190A-8/R2 Hans Weik, 10./JG3
Castor and 5 others reacted to Miloslav1956 for a topic
1/32 Revell model, Eagle Cals EC#99, Barracuda wheels, Eduard cockpit, HGW Rivet set. All colours MRP6 points -
6 points
-
few more.6 points
-
We take an 'in-box' look at ICM's very nice Fiat CR.42 kits, in this case the ground-attack CR.42AS boxing. A cracking subject, beautifully done IMHO. Iain5 points
-

Hasegawa FW 190A-8 Gustav Salffner, 7./JG 300
themongoose and 4 others reacted to duke_ for a topic
more painting.. JG300 ..almost the 6 is not painted yet , its just a vinyl mask just to have an idea of the final result i have copied the shape using eaglecals decal as a template OCD syndrome strikes again... . i wouldn't call it 100% success.. i don'τ know how i managed to do that, but. will do it again. red stripes all stencils are painted with masks , I had to make some of my own as they were not present in the set, like the square and triangles on the flaps the only decal so far is that shiny thing on the starboard side of the windshield.. i think ii will remove and use the mask provided At first i didn't know if it was for an A6 or an A8 as the set refers to A6 and it was different than the kit's decal (its missing some arrows and a circle) thanks S.5 points -
Fw-190 A-8/ R-2 "Sturmbock" Revell 1:32
Archimedes and 4 others reacted to Sasha As for a topic
I'm back! ))))) Primed the airframe, some minor details. Almost no notes.5 points -
 Finally there - just a couple of lights to add this evening. Hawker Hurricane Mk.1 YB-E, P3673, flown by Sgt (later Sqn Ldr) Desmond Fopp of 17 Squadron, summer 1940 - built for his grandson, who's a best buddy of mine and I've shared a fair few aviation adventures with... Build log here. Colours have gone a little squiffy in some images - don't have time to correct today. Have fun! Iain4 points
 -

1/32 Czech Models T-33A (CT-133)
Rockie Yarwood and 3 others reacted to ALF18 for a topic
Next troublesome fit - the nose wheel well. The kit's plastic is somewhat recessed, giving a possible clue as to where exactly the wheel bay should go. The problem is that it doesn't fit snugly into these recesses, and could be glued in at multiple angles and in many little variations of positioning. Dry fitting to see... Aft portion of the nose wheel well. I finally applied some glue, and will try this. Next step, after it solidifies, is to see if the two fuselage halves fit nicely with this part in this position. If not, I'll use more Tamiya Extra-Thin glue to unseat it and correct the positioning. That's one thing I like about that glue. It can be used to undo a small mistake. Next, cockpit glued in place. Now that the cockpit is in place, I decided to work a bit on the intakes before gluing the fuselage together. Remember I mentioned that the kit parts are not numbered? Not all of us are as smart as Neo and will refer to the sprue drawings at the beginning of the instructions... Well, I noticed that there were two very similar parts. The upper one, dry-fit on the fuselage, is the one for the T-33. The lower one is for the F-80. You can see that the T-33's is longer, the extra length for the rear seat. I tossed the two short parts into the bin. BTW, both the T-33 and F-80 parts fit very poorly into the fuselage side. Out of curiosity, I tried both, and neither fit well! I assembled the intake trunking, and ended up with this assembly. I have some trepidation about how it will fit though... ALF4 points -

1/35 Tamiya Panzer III L river crossing diorama
jeroen_R90S and 3 others reacted to easixpedro for a topic
I've become a huge fan of this stuff. Dries clear. You can tint it too. Not as toxic and fraught with peril like resin. Just have to go slow and build up layers. I've been using it to make all my water scenes of late. First real effort was this Huey/PBR brown water scene. It'll be at Nats too if your coming. -Peter4 points -

Su-34 Fullback??
IvanVasili and 3 others reacted to blackbetty for a topic
i looked into converting the Su 27 kit from Trumpeter, but very few parts are usable, it would require more or less a full new kit4 points -

Hobby 2000 Messerschmitt BF-109E-3 - Finished
Gazzas and 3 others reacted to Dpgsbody55 for a topic
Ripped all the supporting tape off it this morning and took a few shots. Happily, there's only a little clean up needed and everything aligns OK. With the engine cowl fitted. This fits on nicely, so I've got all the alignment right in the end. In this closer shot, you can see a slight gap between the fuselage and lower engine cowl, but a little carefully applied filler should fix that. I can't fit the cowl behind, as that is the part I'm missing. I'll be chasing this up later on today. That's it for the moment. Cheers, Michael4 points -

Border 1/35 Kate
Alain Gadbois and 3 others reacted to kalashnikov-47 for a topic
Fixed-wing aircraft kits in 1/35..... Tank kits in 1/48...... Surely the end times are coming.4 points -
Hello All, I’ve been hanging around LSP for a while, but haven’t done any large scale builds lately. Here is a 1/24 Hawker Hurricane, built from the Airfix kit. It’s one of only 2 factory owned Hurricanes on the civil register. G-AFKX was a fabric winged 1939 standard airframe, used as an engine and propeller test bed. Changes involved converting the wing to fabric, changing the windscreen, removing radio hatch and mast, plus many more details. Finish is entirely Alclad, in 5 different shades. Thanks for looking. Tony W.3 points
-

1/35 Tamiya Panzer III L river crossing diorama
Gazzas and 2 others reacted to Panzerwomble for a topic
I read a review about this model when it came out that said , "this is so good , go out and buy half a dozen" . I 100% agree , it's a great mix of subject, detail, buildability....even the wubber twacks worked fine for me . Reckon there's a snowy Pz III for later....maybe a Kursk one.........and a ..and a .... Anyhoo , been doing "water" stuff this month , (number 2 will be along shortly ). So :- Take a Chance ? Panzer III , 18th Panzer Division , 2nd Company commander weighing up the risk of using a ford , Case Blau advance in central Russia during the summer of 1942 . Cheers PW3 points -
.thumb.jpg.f0920d798d5d8600fb58b1d8a906ddff.jpg)
Revell PBY-5A Catalina 1:48
chukw and 2 others reacted to shadowmare for a topic
Hi guys, my new project is Catalina in 1:48 scale. I made some changes in interior, deleting some kind of form leftovers. I added radiooperator chair and devices, beds, and other stuff, which will maybe be visible throught small windows on center of fuselage. Overall, very nice kit with outstanding surface, full of rivets. I'm planning usual camo, Blue Gray, and Light Gray on bottom. Maybe 44-P-4 japanese fleet spotter from Midway. I don't know how to paint interior, yellowish Zinc Chromate or Interior Green?3 points -
1/32 Czech Models T-33A (CT-133)
Rockie Yarwood and 2 others reacted to ALF18 for a topic
Seats installed, along with the right-side cockpit wall. Now the instrument panels too. Sorry for the fuzzy pictures. It's a very grey day here, and natural light is very muted. Dry-fitting of the cockpit into the right-hand fuselage half. Yes, the seats are buried rather deep into the fuselage. In reality, they can be raised a bit more, but in the T-33 I always felt like I was inside a deep pit. Visibility from the back seat forward was almost nil. Landing from the back seat was difficult, requiring me to look out the sides in the final stages with the nose raised in the air. I did a lot of dry-fitting of the cockpit, seeing how it should be installed. There is a small ridge that it's supposed to sit on, but the fit isn't clearly one way or another. Next kit I build (too late for this one - this is all history I'm posting now) I will glue the fuselage together, then insert the cockpit from below. That should avoid the huge fit problems I have with the fuselage join! Aft part of the cockpit, showing the small ridge on inside of fuselage. Front view of same dry-fit. Tailpipe. Sheesh. Seems the ridges (one that's chopped, and the other thicker portion toward the rear) both prevent the rear fuselage from closing properly. I hacked away at the tailpipe to avoid this. Here you can see I chopped off the thicker part at the bottom (aft) of the tailpipe assembly. Next, the nose wheel bay. ALF3 points -

Su-34 Fullback??
IvanVasili and 2 others reacted to mattcour for a topic
I was just falling off my chair when I saw the topic, thinking that this is a new release. No conversion sets I am aware of but I think it would take more than a conversion set to make a proper one, considering the many shape differences to a Su-27. This is my most favourite Russian modern jet. I am very serious to say that I will buy at least 4-5 kits of such a release and materials don't matter. Styrene, resin, concrete, carbonfiber, pudding or whatever!3 points -
And what about inner frame for canopy? JHMCS included? I think HUD will not be the problem..3 points
-
1/32 Bf 109 E-3, E-4 & E-7 trop from Hobby 2000 (Dragon rebox) - released
Rick Griewski and 2 others reacted to Dpgsbody55 for a topic
I bought my kit from Hannants, who have been pretty quick in getting on to H2K, who in turn seem to have been rather unhelpful. Hannants supplied them with my address so that they could send it on to me, but they said no and would send it on to Hannants with their next shipment to them for Hannants to send it on to me. Still waiting, and it's an important part. So now I'm in the position where I'm going to add the last parts needed prior to painting, then put the model aside and commence painting when/if I get the part. The model itself is great, but since there seems to be a high incidence of missing or wrong parts in the box, I'm increasingly unlikely to want to buy another. This is a shame, as I'd love to build their E-7, but there's plenty of other great kits out there to occupy my time. Ultimately, this type of problem is the manufacturer's problem, not the distributor's or retailer's. Kudos to Hannants for trying to help out. Minus 10 out of 10 points to H2K. Cheers, Michael3 points -

1/32 F-35C from Trumpeter in april
Neo and 2 others reacted to adameliclem for a topic
Here’s an unfinished F-35, from a gallery at Cybermodeler. Kinda cool. Really ties the room together. Cheers, Adam3 points -

Tamiya F-14D VF-11, Brown Splinter Temp Scheme
thierry laurent and 2 others reacted to Marcel111 for a topic
I've spent quite a bit of time on the nose. Getting the windscreen to fit well takes a while, plus adding the windscreen vent and radome latches is also a bit of work. I've tried to replicate the sand-blasted appearance of the radome including the woven effect here and there. Also note that I had to paint the areas of the to be applied decals gray else the stenciling would turn out brown. Cheers, Marcel3 points -

1:32nd scale RAF BE2c
Christa and one other reacted to sandbagger for a topic
Hi all, Here's the shots of the completed model. This model represents BE2c Serial No. 2635 of No.13 Squadron, RFC, operating from Savy in France during 1916. My full build log, including all materials used is here: As usual a full build log in PDF format is available to download from my site (Gallery 4) in my signature link. Just click the PDF icon to read or download. Once again thanks for your comments and encouragement - appreciated, Mike2 points -

Su-34 Fullback??
Violator1991 and one other reacted to Aviacom for a topic
Hi, My favourite jet by miles, the ultimate one and only! Is there a conversion set available to make one from any of the Trumpeter Su-27/30 Kits? If not, any plans around that can be used to make one? Surely, with it being one of the most common Soviet/Russian modern jets, there has to be a way of doing one? Any help and or advice would be very gratefully appreciated.2 points -

Su-34 Fullback??
IvanVasili and one other reacted to frank83 for a topic
Just checked the dimensions of the aircraft: 23.34 x 14.7m, wiki says. Which makes it 73cm x 46 cm in 1/32 !! Monster! I had built the HB 1/48, nice kit full of weapons but with the worst nose shape and profile this aircraft could ever had. Still a very big kit and a 1/32 version needs a properly big display space if any brave manufacturer would ever come up with one.2 points -

USMC Herc Honorarium - Kara Sahin Phantom - Finished!!
Greg W and one other reacted to themongoose for a topic
After a slow day of watching cement dry we have progress. And good progress at that. A big clamp and some plasticard and more cement went into this maybe, just maybe, i will be ready for NATS next week. Not going to rush it tho.2 points -
1/35 Tamiya Panzer III L river crossing diorama
LSP_K2 and one other reacted to Panzerwomble for a topic
Cheers - 2 part epoxy resin .....which is a whole bunch of fun to work with ....not . I've tried before only to see it all eat through the foam and disappear under the bench ...wrecking the whole thing . So was a bit of trepidation I approached this one .....went better this time . Woodland Scenics provided the "ripples" for the waves.2 points -
madness...Middle East Dukes of Hazard. Those FJ40's go really nicely with a small block Chev. Matty2 points
-
1/35 Tamiya Panzer III L river crossing diorama
Gazzas and one other reacted to Panzerwomble for a topic
2 points -
I know RESIN2detail is doing so, but not sure about click2detail (weird how their names are so similar). Kev2 points
-
Bf 109G-6 Elias Kühlein II./JG 51
BrentE and one other reacted to Miloslav1956 for a topic
Project 16/22 1/32 Revell model, Eduard cockpit (ED 632022), undercariage legs (ED 632079) & exhaust (ED 632020), Eagle Cals EC#132, Barracuda gun cover, Aires bulges, All colours MRP.2 points -
Hobby Boss A-26, Why Not ? Lets Make a A-26K Nimrod
Oldbaldguy and one other reacted to Learstang for a topic
For what it's worth, click2detail are supposed to be coming out with a new wing root and top of the fuselage insert, new cowlings, and new landing gear, all in 3-D printed resin. I don't know what these are going to be like (or what they are going to cost), but I can attest that their replacement R-2800 engines are brilliant, even coming complete with wiring, all as one moulding (and with 18 cylinders per engine!). It even sounds like they may make a B-26K conversion (by the way folks, it's either 'A-26A' or 'B-26K'; there was no 'A-26K'). Regards, Jason2 points -

JASDF Phantom stencils
themongoose and one other reacted to Dandiego for a topic
Thanks Niels. Might have to get one. Excuse my foot. Dan2 points -
New to LSP and about to start my first project
dennismcc and one other reacted to Rick Stone for a topic
I do, and thank you!2 points -
New to LSP and about to start my first project
Trak-Tor and one other reacted to Rick Stone for a topic
Since we're already into the 2nd page, and there has been a number of sidebar discussions, I have decided to start the actual build log in a separate thread here >>>2 points -

ICM Fiat CR.42AS
esarmstrong and one other reacted to Kagemusha for a topic
Great review Iain, great kit, just a pity they didn't provide decals of aircraft with squadron markings.2 points -
Gulf War Viper
Brett M and one other reacted to themongoose for a topic
Excellent idea. Have you found this site yet for Desert Storm…I’ve used it for F/A-18 builds but he has alot of specific aircraft and equipment uploaded as well. You may find something of use there. I especially like the loadout charts. edit - I’d forgotten he has a great list of desert storm decals by scale and manufacturer.2 points -
Oooo...oooo (best Horshack voice from Welcome Back Kotter), how about a JHMCS (Joint Helmet Mounted Cueing System)? There's a couple of photos of it in jmel's book on the F-16C/D.2 points
-

Takom 1:16 Panzer IB
mustang1989 and one other reacted to LSP_K2 for a topic
I assumed the turret was as close to ready as I was going to get it before testing, so spritzed on some primer to check. All in all, just two tiny areas that need a spot of putty, as far as individual piece join seams are concerned, which is great. (Closer inspection today does reveal a few more tiny issues that need straightening out, but they're very minor.) However, the two vertical ghost seams remain visible, so will need some additional putty and/or surfacer to eliminate. Once that's done, it'll be ready for paint, along with the hull/chassis, which is so close to being finally finished.2 points -
Did some final work in the cock pit. figures glued in made a little radio coil wire to dangle lol even tho there probably not a radio or coms there it still looks cool in my opinion then glued the windscreen on! Hardest part is over with! and a group shot haha now on to masking. Then have to wait to new paint arrives I ordered AK real colors US Army helo drab for the OH-58 to be continued….2 points
-
USMC Herc Honorarium - Kara Sahin Phantom - Finished!!
Greg W and one other reacted to themongoose for a topic
I am totally lost, how did I build this model as a kid? I know I built at least one and I’m pretty sure too. This is kicking my butt for sure! I’m winning though one little battle at a time. My hope was to get the fuselage all assembled with the wings this weekend. Unfortunately that’s not gonna happen but you just can’t rush this thing. I’ve got a bottle of plast-i-weld and I’ve never used that on a whole model before, well here is the first. Check out all the plastic sheeting that I’ve added for support to hold things together because there’s so much stress on it. I’m not sure there is a piece on this that is NOT warped. Jason you were a hell of a man putting these things together straight out of the box. My hats off to you and I am determined to make this a great model just for you Looks a bit of a mess but believe me it’ll be perfect when i put the final primer on it. It’s crazy smooth now but this shows what it takes to get it there after going back and forth to figure out whether to start lining things up from front or back based on which direction made it easier to remove the crazy warps i decided on the front 1st. Now, right up to this point i had working, folding wing tips. But after the 7th or 8th time flipping it upside down and right-side off they broke off. 2-3hrs work lost. Gonna have to glue them on now yeah, those clamps weren’t big enough had to break out the whole toolbox The side of the fuselage was off by a full 1/16”+. In the middle of the below photo you can see the white plastruct sheet i added as a retaining tab. The green fuselage edge has to go OVER that to line up with the upper fuselage half hahaha in between time while waiting for the plasti weld to dry I’ve been working on miscellaneous parts. The big accomplishment today was pilots and this is where she is as of tonight. I glued in more tabs to hold the port fuselage together but have to wait till tomorrow to join the top and bottom or it’ll just pull apart incentive, incentive, incentive…this is gonna be purty when i’m done. Never would have come across this one I bet if Jason hadn’t pointed it out. Was looking for Turkish pilot pics and guess what shows up, never seen in a search for the A/C Let’s close out this huge update with an original layout that I did for Jason. Definite motivation. Getting real close to paint… side note-that’s my Tamiya Phantom in the pic. I sed it to do the 1st draft before Jason sent me half the Revell kit to finish it up :-)2 points -

Land Cruisers! (And a Hilux)
GreyGhost and one other reacted to Pete Fleischmann for a topic
Click me from my bestie Dope737. good stuff P2 points -
howdy all, I went to the Romsey show with my local club Tangmere and tghought you might like to see the LSPs I spotted it was a fab show with some superb stuff to see - enjoy! ..and I know some of you like AFVs, well these were 1/6 scale and quite incredible so excuse me for posting but they need to be seen by the enthusiasts ..and from an engineering perspective, I was drooling over this unpainted Churchill.. ..and to top it off, the club won best stand, well done lads TTFN Peter2 points
-
AIMS Spitfire PR1G using Revell Mk II kit
Christoffer Lindelav and one other reacted to Pastor John for a topic
AIMS 1/32 Spitfire PR 1G conversion (using Revell Mk II kit) with Barracuda details update. Well it has been a terrible week for my hands and I have hardly been able to do a thing and but I was able to cut the clear acetate - cutting it much bigger than just the 6mm circle that I needed - then flex it and then superglue it at the edges to avoid any fogging closer to the centre. The wooded camera box once again came to my rescue as I simply needed to cut a piece wide enough for the rear portal so that the acetate could not un-flex and was trapped in place and in shape. I added some future floor varnish to the outside windows so that it will creep into the join. Thanks John2 points -
Airco DH.2 with Lanoe Hawker (Wingnut Wings 1/32)
Panzerwomble and one other reacted to sillymodeler for a topic
Hi Everyone I completed building WNW Airco DH.2 Lanoe Hawker. This is the counterpart to my previous work, Albatros D.II Manfred von Richthofen. Hope you all enjoy it! Lanoe Hawker is the first British fighter ace in WW1 and the commander of the first fighter squadron as well. He was awarded the Victoria Cross On 16 November 1916, He engaged in an intense dog fight with Albatros D.II piloted by Manfred von Richthofen and crashed to the ground. BTW the model base is not made by myself but I bought AMMO’s scenic mat FYI: This great youtube video reproduced Richthofen' fighting carrier including duel with Lanoe Hawker by using a flight simulator "Rise of Flight".2 points -
AIMS Spitfire PR1G using Revell Mk II kit
Christoffer Lindelav and one other reacted to Pastor John for a topic
AIMS 1/32 Spitfire PR 1G conversion (using Revell Mk II kit) with Barracuda details update. Spinner reshaping coming along (third layer of thinner) still lots to do. A layer of Mr Paint Fine white surface primer confirmed that I had deleted the kits sink marks well enough and helped me to see that I was very happy with my reshaped wheel clearance blisters. Thanks for looking, J2 points


