Leaderboard
Popular Content
Showing content with the highest reputation on 07/31/2021 in all areas
-
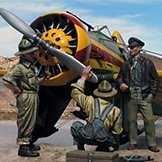
I'm back! Sorry for the month and a half delay in updates, I made the mistake of going down the F-4C / Operation Bolo wormhole. Finally decided to take a break from sanding bogus panels off the Tamiya F-4C fuselage and do a bit of work on Little Bunny. Unlike the Mosquito I just built, the Hase kit is amazingly simple with very few parts. That being said, the detail is pretty nice, especially given the age of the kit. All I've added to the fuselage was to thin out the engine cooling doors under the nose and the opening in the tailplane for the elevator linkage. After that, it was simply a matter of popping in the cockpit and gluing the fuselage together. Not sure if there are some fit issues or I botched the installation of the resin cockpit but I did have some gaps that needed to be sanded and puttied. After that, I bit of re-scribing and replaced a few rivets. One mod I did make was to saw off and lower the engine mounting stub a few mm's. From other builds, it appears that if you don't do this, your cowling will be sitting a bit too high. Next up - the engine. I used the Quickboost R2800. It's a nice replica and cheap as well. I thought about getting the Vector engine but it's pricey and honestly, for this application, all you are going to see is the front. If I was planning on leaving some cowling panels off, I would have spent much more time here but given that's not the case, all I added were the pushrods and ignition leads. Neither of these items is my best work but again, from the viewing angle, they don't have to be perfect. One last modification - the version of the R2800 used in these aircraft have some very unique magneto housings. Hasegawa missed this entirely, as did Quickboost. See below (picture graciously provided by LSP's own "Juggernut". To get something close to these magnetos, I took the ones that came in the QB kit, reversed them and added some styrene details. Being positioned as they are, a lot of the crude details I added really won't be very visible through the cowl opening. Here's my take on this engine: For weathering I did a black wash on the cylinders and then used Flory's "Grime" wash on the crankcase and between the cylinders. I plan on going back and cleaning off a bit of the Flory wash in the pic directly above. Here's the engine press-fitted in place, looks like I need to touch up the black around a few of those bolt-heads. Remember - you'll never see the tops of those cylinders once the cowling is glued on. Last item will be a Pratt & Whitney logo on the front of the crankcase. Unlike the picture of the real thing above, engines in combat service got filthy very quickly. Between the dust, oil leaks, maintenance being done outdoors in all weather, it didn't take long for the engines to develop a nice crusty patina. Along similar lines, the cowling interior was NMF but this wouldn't stay clean for very long either. I mucked up the inside with more Flory wash, I plan on going back to add some oil spillage later. It looks horrible below but when viewed with engine in place, from the front, I think it will look pretty decent. I checked, the knockout pin impressions on the interior won't be visible once the engine is in place! So that's it for now. Gotta get back to sanding my F-4 fuselage, thanks for looking and have a good weekend!9 points
-
8 points
-

Mengnut Wings Fokker Dr. 1
109 and 6 others reacted to Wolf Buddee for a topic
Finally, a week of holidays has begun, yeah! My two oldest granddaughters were supposed to arrive a couple of days ago but issues with their flight schedule means they’ll arrive tonight instead so I’ve had a little time to continue on with the Dr. 1. With the MGs installed it was time to add the center cabane struts, their rigging wires, and the rigging for the undercarriage. This is why I recommend not gluing the firewall assembly to the fuselage. The holes where the ends of the bracing wires run through in to the fuselage were drilled all the way through. This allowed me to pull the lines through the fuselage and hold them tight. Then applying a drop of extra thin CA secured the line inside the fuselage. No excess CA showing anywhere and without any further tensioning required. The cabane bracing wires will be pulled tight once the upper wing has been installed. Here’s a close up of the cockpit opening showing the Taurus Models Fokker Cowl Nuts to advantage. The sharp eyed amount you will also notice I replaced the crash pad assembly on the rear of the MGs that I’d originally installed with the correct configuration as shown in the photos of this aircraft on the WnWs website. The field applied access covers for adjusting the magnetos have also been added using 5 minute epoxy glue which gave me lots of time to adjust their position. These are kit supplied and curled slightly by pressing them against a large punch so they conformed to the fuselage curvature. They were primered and sprayed with Alclad II Dark Aluminum before being attached. As usual, 2lb fishing line, Gaspatch turnbuckles, and Bob’s Buckles brass tubing was used for the rigging. She’s gettin’ close to being finished now……… Cheers, Wolf7 points -

1:32nd scale Junkers D.I
Dpgsbody55 and 5 others reacted to sandbagger for a topic
Hi all, Engine done, Mike6 points -
Getting ready for the final assembly... Kent6 points
-

Hasegwa Bf 109G-14/AS
Paul in Napier and 5 others reacted to LSP_K2 for a topic
Look, Ma, no tape! As hoped, after detail painting of the fuselage sides, clear coat, washes and dullcote, I was able to weld the two fuselage halves together tonight. All of the other ’pit parts, including the IP, install from below, so I can now get some prep work done on the fuselage exterior itself. I’m a happy fella. (Sorry for the cheesy photo.)6 points -

HS-748 "Dan-Air London" [1:144 Mark 1 Models] - RFI
scvrobeson and 3 others reacted to Alex for a topic
I kind of hurried through the finish on this one - largely because the mojo is returning and I'm motivated to start a more complex project. I struggled a bit to get the decals to lay flat, even after a few rounds of MicroSol. Reminder of why, when I'm bring more patient, I paint as much of these liveries as possible, rather than relying on decals. The decals that came with the kit were decent though, quite thin; the only complaint was a lot of clear film around each colored area - I ended up having to trim most of them before getting them wet, because it was obvious that the extra film would make it even harder to get the decals to conform to a 3D shape. For the record, this is the first 1:144 kit I've done that came with decals to do the manufacturer's labels on the prop blades...4 points -
New camera, gentlemen.4 points
-
Quiz: I.D. aircraft type....
europapete and 3 others reacted to LSP_K2 for a topic
4 points -
For some reason I'm lacking interest in digging back into my Airacobra right now. Hopefully the zeal will resurface - GB runs 'til the end of November so I've got time... Instead, I decided to pull something I've had for a while down off the shelf. I bought this kit (and the AM decals I'll use with it) more than a year ago, having heard great things about the kit (all Z-M kits, really) and having not built a Phantom since I was a kid and they were still in active use by the US military. I've also never built a Zoukei-Mura kit, so that's exciting. This is the kit: And this is the subject: There's a whole host of upgrades that the HAF did to their Phantom fleet between 1974 and 2014 (when this photo was taken). Most of them are electronics/avionics, that won't be visible except for some updated screens in the cockpit that I may try to scratch. But I'm going to have to figure out a good way to add those prominent doohickeys on the upper front of the fuselage just behind the intakes (anyone know what they are?). And no, it's not an LSP, but these jet fighters are too big for a 1:32 model to make sense for my space. I've decided that the prop-jet transition is going to be a hard shift from 1:32 to 1:48 for my styrene air wing...3 points
-
F-4C Phantom II Tamiya 1:32 I can see that the F-4 Phantom has been in fashion recently on LSP. There is no point in writing about the model because it is a model that has been available on the market for many years. I made the F-4 on an individual order. The contracting authority had two requirements. First, F-4C model cannot have the side number 829 and the second is to be an extremely worn out Phantom II3 points
-

Mengnut Wings Fokker Dr. 1
Wolf Buddee and 2 others reacted to scvrobeson for a topic
It looks fantastic Wolf! Smart idea to leave the firewall off to run the rigging lines through. I'll have to try that on the Camel. Matt3 points -
Best news I have had today. I was not very early to place an order so I do not expect a shipment before September as they say they will dispatch about 15 kits a day, but no problem. I am just happy to see that a 1:32 Viggen is now a reality. If ever anybody from Jetmads reads this: Please make a 1:32 Draken!3 points
-

JetMads 1/32 Viggen
scvrobeson and 2 others reacted to Stokey Pete for a topic
Shipping commencing the 16th August. Received my final email update today.3 points -

HS-748 "Dan-Air London" [1:144 Mark 1 Models] - RFI
Wolf Buddee and 2 others reacted to Kagemusha for a topic
Looks great Alex, 748's were a regular sight at Manchester Airport, and though I don't remember that particular scheme I probably saw all the Dan Air 748's in the later colours, incidentally they were built at Woodford, South Manchester, where the Lancaster, amongst others, were built. Really nice model, hope your wife makes a speedy and full recovery.3 points -
must....resist....oh the temptation. To start in on WW1 subjects. Wow Wolf. What a total effort. And the rework was done such that I cannot tell it ever happened. Bravo.3 points
-
And we're back! Kev3 points
-

Quiz: I.D. aircraft type....
D.B. Andrus and 2 others reacted to Finn for a topic
Since we are in a guessing game, here are a few, a couple are easy: Jari3 points -

Quiz: I.D. aircraft type....
Pete Fleischmann and 2 others reacted to Out2gtcha for a topic
Huh......never knew Acme made pickups3 points -
https://hosting.photobucket.com/images/jj121/heloman2008/20210730_170249.jpg3 points
-
Mengnut Wings Fokker Dr. 1
Martinnfb and 2 others reacted to Wolf Buddee for a topic
What I really enjoy however, is the oily hand prints on the inter-wheel fairing! Lovely build so far, Sean Thanks Sean, Yes, Karl-Heinz, one of the maintenance crew can’t seem to be able to touch any part of the aeroplane without filthy hands. He’s such a Schwein! It’s becoming a real source of irritation for the Rittmeister……….. Cheers, Wolf3 points -
Let the painting begin! Fading and weathering next.3 points
-
Mengnut Wings Fokker Dr. 1
Martinnfb and 2 others reacted to Wolf Buddee for a topic
Well, I finally ran in to a bit of trouble with my build, and quite baffled by it. The horizontal tail planes and rudder have been installed and the control cables rigged. The lower and middle wing have been attached and the landing gear assembly dry fit. It was with the middle wing installation that things went wonky. Before installing the middle wing the rear MG mount needs to be glued to the underside of the cockpit coaming. With the mount glued to it’s location, and it can only fit one way, when trying to fit the middle wing assembly, the mount wouldn’t fit within the tubular framework in the fuselage. I removed the mounting from under the cowl and dry fit it into it’s proper location but then it didn’t fit properly under the center wing cowling. To make things even more interesting the MG assemblies didn’t align properly with the mounting brackets either. At least not the right MG. The left one was fine but the right one sat too far to the right and lower at the back than the left MG and then the broken right upper cowl piece wouldn’t fit as it was too tight up against the right MG! I also discovered that the right MG’s ammunition feed chute didn’t fit in to it’s hole. There I discovered the hole was partially blocked by glue so that was cleaned out and the problem was solved. The right MG being over too far to the right considering the left MG fit perfectly was baffling to say the least. I read through a couple of other build threads and nobody else seemed to have had the same issue. The only thing I could think of was to make the gun mounts fully adjustable and make them fit the MGs when the guns were properly aligned. I also had to have the mounting assembly fit properly underneath the cockpit coaming which is where the whole problem first started. I cut up the rear mounting assembly and started from scratch. Once everything was cut apart the outer vertical portions of the mounting assembly were glued in to their positions within the fuselage framing. The next part was drilling out all the necessary holes in the lower mounting brackets so they could slide sideways on the tubular framing. The upper mounting brackets had stretched spruce glued to them and they would be able to slide vertically to adjust for height. This assembly was now glued in to place within the fuselage leaving all the mountings free to adjust as necessary. The MGs were glued at their forward positions and aligned and then the rear mounts were fit to the back of the MGs, glued to lock them in place, and then finally the crash pad assembly was glued to the back of the MGs! Considering how well the kit has gone together up ‘till this point I’m really surprised by all this extra work and still none the wiser as to where things went sideways. Nonetheless it’s fixed and the next step is to rig the undercarriage and attach the top wing. Upwards and onwards……… Cheers, Wolf3 points -

Little Bunny - Italian Front Thunderbolt
Rockie Yarwood and 2 others reacted to John1 for a topic
I'm calling the port sidewall and floorboards done. Got the throttle quadrant mounted, added a few scratchbuilt bits and tiny decals. Next up is the seat and harness. Got the Eduard "Steel" PE harness set. Never used this before, wish me luck.3 points -

Mengnut Wings Fokker Dr. 1
Wolf Buddee and one other reacted to LSP_Kevin for a topic
Superb work, Wolf! Kev2 points -

Mengnut Wings Fokker Dr. 1
Wolf Buddee and one other reacted to europapete for a topic
Ivanmoe, just order direct from Aviattic. Very easy to do and only take 10 days +/- to get here in Rhode Island. Regards, Pete2 points -

Mengnut Wings Fokker Dr. 1
Wolf Buddee and one other reacted to monthebiff for a topic
An absolute beauty in the making Wolf, great tip on the firewall thank you! Looks like this one is getting close to completion now. Regards. Andy2 points -
1/32 Infinity Models SB2C-4 Helldiver
Greg W and one other reacted to monthebiff for a topic
No progress this last week as my wife and I decided to grab a last minute holiday to the beautiful island of Rhodes, Greece is currently experiencing a heat wave so its super hot and the usual cooling wind feels like a furnace but its super relaxing after the last 18 months of travel restrictions. Back to the build and the last things I did before going away was work on the rear stabilisers and look at adding the resin control surfaces. Sadly the fit of the resin parts are a bit off towards the outer edges Hopefully when posed in theory position things will look a lot better, I've also added the canvas covering over the rear turtle deck control wires with wetted tissue and plastic glue. Steady progress and now ready to paint the interior I'm thinking. Regards. Andy2 points -
... and done. Took 14 months but it seems longer. From the time I got the chipping thing figured out it took me 12 hours to finish the prop. I doubt I’ll be doing another one so exhausting, besides I’ll be 75 in December so I’m gonna do something simple next time. So many models, so little time. Look for the glamor shots over in RFI when I post them in a week or two. Again thanks for watching and for leaving all the positive comments.2 points
-

JetMads 1/32 Viggen
Paramedic and one other reacted to Violator1991 for a topic
Yesss, a 1/32 Draken please2 points -
Mengnut Wings Fokker Dr. 1
Wolf Buddee and one other reacted to ivanmoe for a topic
Lovely model and I'm learning a lot from Wolf's exposition. Question, though, really for any of our readers... Where can one purchase Aviattic decals in North America?2 points -
.thumb.JPG.0f0c0659a1db77808d5fa22f018de2dd.JPG)
Mengnut Wings Fokker Dr. 1
Wolf Buddee and one other reacted to N.H.71 for a topic
Wonderful build2 points -

Mengnut Wings Fokker Dr. 1
Wolf Buddee and one other reacted to Troy Molitor for a topic
Superb efforts as usual Wolf. Love it.2 points -

Mengnut Wings Fokker Dr. 1
Wolf Buddee and one other reacted to dodgem37 for a topic
This is just plain beautiful, Wolf. Sincerely, Mark2 points -

Seamless intakes revell F-4
Michael931080 and one other reacted to Mark B. for a topic
Yep, that was my experience as well 3+ years ago. I tried to get the intakes and a nose gear from these guys but only got radio silence back every time I emailed... Hey BTW if you want a great replacement for the skinny light weight nose gear in the Revell kit you should really get the landing gear set from Alistair McLean at Aerocraft. He's got a thread on the manufactures board here a LSP. I bought a set and they are stellar... The nose gear is as beefy and as stout as the Tamiya one and the mains are the proper length. And being brass, they will withstand both the weight of the model (especially if you add a bunch of resin extras) and the test of time...2 points -
I never get tired of Phantoms, especially on the last picture2 points
-
That was quick. Hypersonic Models makes a slatted wing set for exactly this kit. It’s on its way from Japan now… Thanks for pointing this out, too - I am very much a WW2 warbird guy for the most part, so my knowledge of anything jet-era is so far pretty limited. I now have two AM things coming from Japan (also ordered a set of flexible plastic seatbelts from Fine Molds). Depending on how long it takes for this stuff to arrive, I may have to start something else in parallel…2 points
-
Wow, that's a staggering improvement in image quality! Now we can see your build properly. And what a terrific build it is! Kev2 points
-

1/32 P-51B conversion from Revell 1/32 P-51D early
Martinnfb and one other reacted to ironman1945 for a topic
Received the P-51B canopy set from Alistar/Aerocraft Models. A great piece of resin, but I'm not sure whether I will use it as it will involve still more cutting and fitting to what I've already done, and I dont know that I'm up to it. Also its the endless struggle of "Is it good enough?" Ah well... I've waited this long so I'll give it some more thought. In the meantime.... decals. I think I mentioned earlier, I wanted this to be James Howard's "Ding Hao". To that end I have both the decal sets from Zotz and CamDecals for these markings, and I was surprised to see that they vary in dimensions. National insignia, code letters, ID numbers, kill markings, even the lettering for "Ding Hao". Both sets say they represent Howard's 51B before the installation of the Malcom hood. I'm about to check references to see if I can "eyeball" the more accurate version, but was wondering if anybody had some thoughts on this anomaly? Cheers! Dave/Ironman19452 points -

Revell Bf 109G6/R6 1/32 Pilot Gottfried Weiroster
Troy Molitor and one other reacted to Gazzas for a topic
Thank you Troy. It could be a lot more fiddly if you try to do things the way an engineer might. I've used a lot of Mk. 1 eyeball to make decisions. Eventually, sitting underwing in the display case it really won't matter as long as they don't fall off.... my biggest fear.2 points -
How faded do you want it? This is the rather sad looking example in the aviation museum at Gweru, Gwelo as was: In fact all the aircraft were rather sad looking but interesting nonetheless!2 points
-

Short Sunderland MkII
Sharkmouth and one other reacted to tomprobert for a topic
Afternoon guys and gals, Another update for you - can you tell I'm a teacher on school holidays? I've been working on the last of the major airframe construction which has been the vertical stabiliser. Here's how it comes in its raw form: As usual, I had to scribe on the surface details and then I set about making some internal reinforcements. Being such a massive fin, I made some beefy spars from plastic card and used some old scrap sprue to reinforce and help the bonding of the leading edge. The spars were made to protrude from the base of the fin, as they would then be attached through the top of the fuselage and secured to the spar for the stabilisers using Araldite Epoxy glue for a really solid joint: The fin was then blended into the upper fuselage with car body filler, polished and then the missing and damaged panel detail reinstated. Unfortunately, the distinctive curved fairing at the lower rear of the fin was missing in the kit, so I fashioned the basic shape of the fillet from plastic card and blended everything in with filler - see the red arrow below. This will still need some more tweaking when I work on the turret as it's actually quite a complex shape at the back end: I've also added some Evergreen ribbing on the rudder in an attempt to match the elevators - this has since been sanded right back and is much more subtle: It's now looking more and more like a Sunderland: It's good to get the main construction done and I've been on a bit of a roll... the next logical step will be the engines so I'm off to do some head-scratching about how I can convert a 14-cylinder Hercules engine (from the Revell 1/32nd Beaufighter) into a 9-cylinder Pegasus. Should be fun! Until next time, Tom2 points -
Thanks guys! Cockpit "tub" is completed. Still have a good amount to do though. I'll tone down a few scratches that seem too bright and hit the lower sections with a coating of pastels to simulate the Italian dust that got everywhere on these hard working aircraft. Tough to see with my crappy pictures but all the instruments have housings and wiring behind the panel. I will say that the Dark Dull Green paint really makes the cockpit interior somewhat "gloomy" and it's difficult to show off the details with my limited photography skills. Anyway, for those who are looking, thanks for checking in!2 points
-
1/32 P-51B conversion from Revell 1/32 P-51D early
rafju and one other reacted to ironman1945 for a topic
One more pic of the other side. Thoughts to date, when I started this I'd assumed the spine/fuselage was going to be the hardest part of this build. But it was the fit of new canopy that took the most work. Sorry about the crappy photos. Really need to buy a phone with a better camera.2 points -
1/32 P-51B conversion from Revell 1/32 P-51D early
Daniel Leduc and one other reacted to ironman1945 for a topic
Finally got around to some paint. Pretty happy with how it looks. Clear coat, decals, weathering.... the process continues. Cheers and stay safe everyone... Dave/Ironman19452 points -
Can’t beat it!1 point
-

Short Sunderland MkII
tomprobert reacted to KiwiZac for a topic
Brilliant, just brilliant. It's amazing to watch this come together - the engines sound like a real mission but an enjoyable one for us to watch, at least!1 point -
Hey Jason, Sorry for the radio silence. I was on the road all day, returning home from Apalachicola Fl. BTW if any of you are looking for a little bit of Gulf Coast heaven from the '60s, you should really check out Apalachicola FL. Great accommodation rates and some seriously good deep sea fishing.... Thanks for the link. I think you have convinced me to jump on this as well. I was wondering if you had seen these little additions from QMT.... I ordered them and the nose cone is a great way to fix the anemic Revell nose cone. It's a drop fit and comes with a the M61-A1 barrels too. The engine bay bleed vents are great too, but after ordering them I'm not sure they are a true necessity since they are on the bottom of the fuselage and will be hidden if you add a 500 or 750 gallon drop tank.... Nose Cone fix Engine Bay bleed vent fix They also have wheels and afterburner/exhausts for various Phantoms as well.1 point
-
Indeed !.. gave me chills the first time I saw her on screen.. The original show she was ok... in B & C she just looks nasty !!1 point
-

1/32 Infinity Models SB2C-4 Helldiver
monthebiff reacted to Dennis7423 for a topic
Something to look out for, too, that I just discovered yesterday: Infinity only supplied one set of scissor linkages for the main landing gear. Whoops. - Dennis S. Thornton, CO USA1 point


.thumb.jpg.745e9c32fdfafef712dcea77f75e8a27.jpg)


