Leaderboard

Popular Content
Showing content with the highest reputation on 10/28/2020 in all areas
-

HH-60G Pavehawk Kitty Hawk 1/35 DONE!!
Dope737 and 14 others reacted to Pete Fleischmann for a topic
Thanks all for the kind words! I need to sort out the un-sprung landing gear as this will be an inflight display. It’s just a matter of extending the oleo strut AND the section of the gear leg forward of the wheel attach point. the paint and construction sequence is not like an airplane- more like armor! more paint on rivets- the whole fuselage was dry brushed with a lighter shade of Gunship Grey- the rivets are very robust, and didn’t flinch at all under the abuse. couldn't be happier with the Archer rivets! cheers Pete15 points -
I got back on the PC and fired up the Silouhette. Having scanned the camo pattern in previously, I just cut each section out as a group, right wing, left wing, elevator then forward and aft port and starboard fuselage sections. I used clear frisket film to transfer each section together. This changed slightly later, as I had to improvise on the second fuselage side to keep from things turning out identical. From what I can gather of the few picks of this aircraft, it seemed to have fairly standard tight edged larger camo spots on the upper surfaces and smaller more irregular or jagged spots on the sides. It was very rewarding in a lot of ways. Like Christmas! I have to admit, it was shockingly fun. The damn Silouette has now probably paid for itself about 3 times over now. Tomorrow it's on to the IJA green/grey! Cheers14 points
-

QF-4S Phantom "VX-30" - Tamiya/Cutting Edge, 1/32
Kagemusha and 11 others reacted to Starfighter for a topic
You are right Matt, the slime lights on the wingtips are slightly different. I will fill 50% of the groove lines before painting them - thanks for the heads up! Almost no time for modelling this week, I have to prepare a new room for my little daughter as she'll get a little sibling in April 2021.. But there was time for a bit more fading with "faded white" oil paint. We're getting closer... According to Brian Plescia from Fightertown Decals who photographed Scooby in detail back in 2004, the wing top insignia was apparently really heavily faded, pretty much as on the photo I have posted earlier.12 points -

Duo Fw 190D-9 Hasegawa/Revell
red baron and 7 others reacted to Miloslav1956 for a topic
Second.8 points -

1/24 F6F-5 Hellcat--In Flight
JayW and 7 others reacted to easixpedro for a topic
Alrighty Amigos Proof of life. Managing to sneek down to the work area and do a couple of things here and there. Half hour tops since my last post. Added some more details to the figure such as the pockets on his legs. Not perfect, and slightly exaggerated...but should look good buried in the depths of the cockpit (and remember the rudder pedals are underneath the IP, so be hard to make out too many details). Also fixed the right boot which was bent in the kit figures...just needs sanding to shape. Also did a little surgery on the right arm to make it the same length as his left.. Made the Mae West from .010 styrene, with foil straps. Added a Comm cord to plug into the side console, plus wiring between the headphones. I wracked my brains trying to figure out how to make the torso harness (what the parachute attaches to). Couldn't find anything malleable enough and thick enough. Then I remembered I had a piece of old school lead foil from a wine bottle. Probably been lugging that thing around in my spares bin since the mid 80s. Has mode 2 moves to Japan and back stateside even...but I digress! It was perfect! Have added the harness but haven't added the buckles yet. Will add those after painting, just cause they're metal and I'll make them out of wire, so no use going blind tryng to paint 'em. Need to make an O2 mask to hang off his chest, and I think I'm ready for painting. Then I can figure out how to make the seat belts and get him fastened in...then maybe the build will pick up steam That's it for now. Hopefully the next post will have some subpar painting to bring out the details! Peter8 points -

1/32 Revell-Hasegawa Spitfire Mk.1a "K9906"..... Finished.!!
Cicciuzzo and 6 others reacted to Tolga ULGUR for a topic
And Here is the unarmored early windscreen. This is made by Alistair McLean from Aerocraft Models Windscreen masked before painting and installation.7 points -
Sorry for the late reply! I've been AWOL for a few months doing my seasonal fishing thing. To answer your question, I use water to remove all traces of the salt from the model. I usually take the model outside and use a spray bottle to liberally apply water to the salted surfaces. Most of the salt is washed away and a clean cloth wipes off any remaining salt mixture and helps dry the model. Like I mentioned, It's been a few months since I've sat at the modeling bench with an actual model in front of me. The loss of momentum in my building activity makes re-starting that much harder. I've lost track of where I was at on my builds and my desktop needs to be transitioned from fishing reel repair back to model building. But I finally reached the end of the procrastination rope last night and made some progress into building again. First step was to clear off the desktop. Servicing fishing reels involves lots of different lubricants... different oils for ball bearings and thicker greases for the gears. These are bad for model building... as you know even the sweat from fingertips can mar a paint finish. So I put all of my fishing tools away and put a fresh paper cover on my desktop. Looking over the Shiden Kai in its present state, I've noticed that there are some unsanded applications of Mr Surfacer putty on the wing bottom/fuseage joints. These have to be sanded down and it looks like I have to wrap up the scribing and riveting in this area. So not quite ready for painting just yet. On the upper side, there is an clear window that has been glued into place. I've placed the mask, supplied by the Eduard mask set, into place. This made me think about the other clear parts and I remembered that the Brengun photoetch set included a small piece to be added on to the front base of the windshield. The Small Shop Bug is my tool of choice for most of my photoetch bending needs. The folded brass part fits completely over the solid tab. So instead of completely removing the tab, I snip off only half of it and can use the remaining stub as an attachment mount. The photoetch upgrade replaces the solid tab with a more representative hollow shroud. I'm planning on attaching this after the windshield is glued into place but before painting. It looks like we are getting closer to the painting stage. The undersides are going to be natural metal but I have some thoughts on how this will be accomplished. I want a little more depth/variation than my normal black base/Alclad on top metal finish but I have quite worked out how. The next immediate steps will be to finish the scribing and riveting along the bottom and attachment of the clear parts to the fuselage.6 points
-

Revell Piper Super Cub Luftwaffe basic trainer
Rockie Yarwood and 5 others reacted to dmthamade for a topic
Well, it's been two weeks since last update. Busy at work and stuff, so progress is sloooow. In this time i managed to get the pit done and the fuselage closed up. Really simple pit, OOB here with the belts painted on. I have to confess, i'm just trying to get something done without having things go wrong. There will be some fill on the bottom of the fuselage due to sink marks, but the fit here is really nice. I also glued the wing halves together, fit here was a little rough along the leading edge, so i added Mr. Dissolved putty. Don6 points -
Duo Fw 190D-9 Hasegawa/Revell
CODY and 4 others reacted to Miloslav1956 for a topic
Hi all, here are my last finished models. 1/32 Hasgawa kits Aires cockpit HGW seat belts, Wet transfers & rivets Eagle wheels Eagle cals All colours MRP5 points -
Kitty Hawk Mirage 2000C
Paul in Napier and 4 others reacted to Cheetah11 for a topic
A little more fixing to do before painting. As I said earlier I want all the fixes out of the way before painting and assembly. I fixed the length of the drop tank tanks to the info Romain provided. I will post it tomorrow after the filler has dried. The gun bays are also designed to be open and the doors will not fit flush with the bays installed. I simply removed them to get the doors flush and added a piece of tubing to later fit the gun barrel. The engine mount and engine are secured with super thin location pegs. I was afraid with my clumsiness I will battle to get them to fit. I replaced them with a piece of brass rod through the engine and 3mm plastic card on the fuselage sides. Now for the biggest fix. The resin AB nozzle is undersized. I think KH realized this and instead of printing a new master, they added a ring to the nozzle to get it flush with the fuselage. This leads to a step which is not present on the real aircraft. Because of the nature of the resin nozzle, it will be almost impossible to enlarge it. There are a few options. 1. Best one to get the Resikit nozzle if the fit is better. 2. Ignore the problem. 3. Size the fuselage to fit the nozzle. Option 3 is the only viable one for me, so here goes. The step if no adjustment is made. Bottom cut by sanding a wedge out of both sides Two small cuts on the side of the fuselage completed the cutting. And the corrected nozzle. Now almost ready for a normal build and painting Cheers Nick5 points -
Green is down.....Again, I have to say how utterly silky smooth the MRP paint laid down. Its not nearly as glossy as it appears here, possibly due to the aluminum underneath, but it comes out a nice satin sheen, smooth as silk. I left a lot less paint in certain areas like the wing root and along the fuse in spots. Its blotchy all over on purpose, as from looking at the blurry pics of the 1:1 it was possibly used and abused quite a bit. Now on to printing out some camo, and applying.............the real fun can begin! Cheers,5 points
-
It works pretty well, as long as you don't leave it too long: Kev4 points
-
Here is the CAD for the Tallboy. Graham4 points
-

Red Fox Studio - 3D instrument panels - P-38, A-10, F-117, F/A-18E, Bf-109G, Ju-87 etc
coogrfan and 3 others reacted to RFS Hungary for a topic
We looked at the problem ... The color of the F-117A is given by both Hasegawa and Trumpeter (given as FS36375) which corresponds to the H57 Aircraft Gray in the Gunze palette. The F-5 and F-18E Yet as you wrote Dark gull gray (FS 36231) which is H317 in the Gunze palette. This can lead to the difference. But of course we will try to bring out the color as close as possible and if we can do even better we will! Thanks Attila4 points -

1/32 Tamiya F-16CJ
Cicciuzzo and 3 others reacted to David Mooney for a topic
Hello everyone, I hope you all are keeping safe. I've just completed the 1/32 Tamiya F16CJ and thought I'd share a few pictures of it, i swapped the static dischargers for the superb Master set (AM-32-084) as the kit parts looked a bit too chunky, MasterCasters Soft FOD inserts, other than that...its out of the kit box. All comments welcome....stay safe folks!4 points -
Something a little different. I've been working on this for a couple of years and I've only just got up to the stage of buildings and fine details. It's a bit hard to explain it all, but it's all N Scale Japanese stuff that I bought on the occasions when my wife and I were in Japan. Everything has been modified/repainted. Scenery is plaster, static grass, etc. I'm looking forward to getting into doing the details soon.3 points
-

Hasegawa Kawanishi N1K2-J Shidenkai
Wackyracer and 2 others reacted to dennismcc for a topic
What a nice modelling experience these Hasegawa kits are, the N1K2 is the last of my trio of Japanese subjects and as well as being enjoyable to build I have learned a lot about Japanese WW2 aircraft and learned (or re learned) some modelling techniques. Paints used were mainly Sovereign Colourcoats, the undersides was Xtracolor High Speed Silver and Humbrol was used for the small details. All markings were painted using Montex masks apart from the stencils data plate and kill markings (I'm not that clever !) Seat belts are the amazing but fiddley RB Productions IJN ones. And so here we are, for some reason the aerial wire looks more prominent in the photos than it really is, and yes I messed up the "no step" area on the wing, there are probably more mistakes as well. A big thank you to all the authors of the other N1K2 builds who have taken the time to publish them on the site, I have shamelessly copied from them. Build thread is here And on with the photos which are not the best as I took them with my phone. And the flip side And put to bed with the other two. Cheers Dennis3 points -
The builder is slow but the model is very patient. Here is the "finished" payload. I hope to start weathering the main fuselage in the next day or two depending on other responsibilities.3 points
-
I have a cameo 4, and haven't yet found any particular advantage over the cameo3 for cutting masks and thing plastic sheet parts. https://www.scalemodelpaintmasks.com/ is a good place to start3 points
-
the only thing to learn is - with respect - that you will have been silly not to try it earlier sprays from the bottle - no bs with trying to work out the best ration and all that nonsense no waiting around for it to dry dries extremely hard and is resilient to tamiya tape after a few minutes pretty much any colour you can wish for (ironically Japanese colours are only just coming out) will spray nicely at many pressures, but generally it will spray well at low pressure ie 10-15 psi or put at it another way - if i can make it look half decent, it really MUST be easy now back to Brian's awesome build and the glory of masks!!!3 points
-
Very tempted to do a Bulgarian one3 points
-

RAF FG.1 XV571 WILD HARE Phantom Conversion
Kagemusha and 2 others reacted to Cees Broere for a topic
Remember modelling is fun Anthony.3 points -
Just because a company carries someone's name, it doesn't mean they are responsible in some way when they then have no further involvement with it.3 points
-

RAF FG.1 XV571 WILD HARE Phantom Conversion
Greg W and 2 others reacted to Anthony in NZ for a topic
Thanks Rainer. And I am loving seeing your amazing Viggen on the bench again! Ok quick post before I go to work. I grabbed this pic off the net by Ian Black who took this of 'Black Mike' FG.1 You can really see the lower line shape, and when I pose my model next to this photo I can see I need to deepen that nose and sand a little off the top. I will see how the resin nose addresses the issue as well, but it seems I need to blend it back into the lower fuse more as it just dosent 'get fixed' by replacing the radome..... Cheers Anthony3 points -

Aero L-29 Delfin Injection Kit from Kovozavody
Alain Gadbois and 2 others reacted to Kagemusha for a topic
Live link Text in English: Today we bring you a little information about the announced preparation of the "big" Dolphin, which is created in cooperation with the company Infinity models (HPH). The model is practically ready for production, so the preparation of molds begins by the end of the year, and in the first quarter of 2021 we will go to the market with it. We apologize to all our customers that we did not meet the original expectations of the sale of the kit by Christmas. In addition to the basic training version, we will gradually launch the L-29R and the single-seat acrobatic L-29A. I would like to thank all those who are involved in the preparation of this model.3 points -

MI-24 V BG Air Force Trumpeter 1/35
John1 and 2 others reacted to ShelbyGT500 for a topic
Thanks guys Now continue with some weathered burnt paint over the half-wings: Cheers friends3 points -
Being back at work full hours means I've barely been able to touch the workbench this past week or so, but I've made some token progress, so I thought I'd better post an update before this thread slips into the cheap seats. As I was getting a little sick of being stuck on the fuselage, I decided to glue the tail feathers on, in preparation for blending the spine into them: If you look closely, you'll notice a couple of new details on the side of the fuselage. The white strip is some sort of foot step to assist with entry into the rear cockpit. Here of course it has been re-purposed for gaining access to the stretcher bed. Photos of standard Tiger Moths show one on the starboard side too, but since the modified cockpit hood opens to that side and prevents access, I decided it would have been removed in practise (probably not, but that's the excuse I'm using for my laziness). The small, dark, triangular shape is some sort of rivetted plate, which I cut from Oramask using the Silhouette Portrait. I tried adding rivets with a pin, but this material doesn't take to that kind of treatment at all. Should look OK under paint, however. I decided to avoid close-ups all the same! The only other thing I've achieved is to build out some token detailing on the fuselage underside: Photos suggest that there were many variations to what was happening down there, so I went with a representative amalgam of what appeared to be typical. In reality, I think my reinforcing strips are a bit anaemic, the forward hatch plate is too large, and I baulked completely at the idea of adding all the additional nuts and bolts that seem to pepper this area. I did however add them to the hatches, and they come from a set of Scale Hardware 0.5mm brass hex nuts (SMHN-05-B). They actually look a little more petite to the naked eye than they do in this photo. I also added them around the rigging horns on the tail, but you can't really see them in the photos. For the next update, I'll try to reproduce the fuselage latches along the lines that Mark describes, and report back. Wish me luck! Kev3 points
-
A little tidying up to do but not unhappy with this:3 points
-
MI-24 V BG Air Force Trumpeter 1/35
florin13 and one other reacted to ShelbyGT500 for a topic
Hello friends, at this topic I will show to you my next project of MI-24 V served at Bulgarian Air Force. Model is trumpy, 1/35 scale, for better details I use BigEd, Verlinden resin kit, Reskit wheels, Master pitot and machine-gun. So this MI-24 is with registration ex-139 renumbered at 146, covered over the original camo-scheme with paints that used to cover the ground vehicles as tanks and trucks. Hope this topic will be interesting for you guys and here are some pics from the WIP:2 points -

Aero L-29 Delfin Injection Kit from Kovozavody
Landrotten Highlander and one other reacted to Flipper for a topic
I am not sure, if I am the only one surprised, but due to the information from Nymburk Model forum, Kovozavody is preparing a Delfin in 1/32 injection kit. It is prepared in cooperation with HPH as a commemoration of their first kit. I just hope, that this is not a late april fool. Wow... https://ipmsnymburk.com/forum/viewtema.php?ID_tema=40789 Edit: http://www.modelarovo.cz/tiskova-zprava-kp-k-50-vyroci-zahajeni-prodeje-modelu-l-29/ Please use google translate to read it in your native language.2 points -

Douglas Dauntless
mustang1989 and one other reacted to ThomasHannover for a topic
Here an another american aircraft , which came out of service when the Avenger came in : Douglas Dauntless DOUGLAS DAUNTLESS U.S. Navy: SBD-1-5 U.S. Army: A-24 A & B Two-seat Scout Bomber. First flown 1940. Chief Designer, E. H. Heinemann. DEVELOPED from the BT-1 of 1923, the Dauntless dive bomber is fitted with special release gear for a single heavy bomb carried under the fuselage. Perforated flaps of large area keep the speed within safe limits during a diving attack. The SBD series is fitted with deck arrester for operation from aircraft carriers. More than 5,000 have been built for the U.S. Navy and Marine Corps. A-24 is a slightly modified version, without deck-landing gear, in service with the U.S. Army Air Forces. They are also used by the Royal New Zealand Air Force. Dauntless dive bombers have played a prominent and effective part in the naval battles of the Pacific, including the decisive battles of the Coral Sea and Midway Island. In a diving attack during the Coral Sea engagement a Dauntless pilot had the good fortune to sink a Japanese cruiser with a single well-placed bomb. Carrier-borne Dauntless bombers have assisted U.S. forces invading North Africa, Sicily and Italy, and they co-operated in invasions of Japanese island bases in the South and Central Pacific by heavily pounding the defences before the landings. The U.S. Navy Bureau of Aeronautics credited the Dauntless with having sunk during the first year of operations more combat tonnage of the enemy than all other branches of the services. The score included three Japanese aircraft carriers sunk and three put out of action, with full complement of planes. The disabled carriers were later sunk by other U.S. naval forces. Production of this famous Scout Bomber was discontinued on July 21, 1944, after a total of 5,936 of the type had been built. Power Unit: SBD-1, 2 & 3, A-24, 950 h.p. Wright Cyclone GR-1820-32-9-cy1inder air-cooled engine. SBD-4 & 5, A-24 A & B, 1,000-1,200 h.p. Wright Cyclone. Propeller: 3 bl. Hamilton Standard Hydromatic full-feathering. Performance: 1,000-1,200 h.p. Cyclone. Top speed unofficially reported as 255 m.p.h. at 14,000 ft., cruising 185 m.p.h., initial climb 1,428 ft./min.; range, 456-773 miles; service ceiling, 25,200 ft. Weight: Empty 5,535 lb., loaded 9,519 lb. Armament: Two fixed forward firing .50 in. machine-guns in fuselage and two .30 in. in rear cockpit. One 1,000 lb. bomb carried under fuselage, additional racks under wings. Dimensions: Span, 41' 6"; length, 33' 0". The Dauntless's service career, insofar as the US forces were concerned, had ended at war’s end, although a few were to soldier on in French service with the Aeronavale until 1949, and others were to remain on the inventory of the Mexican Air Force until the late fifties.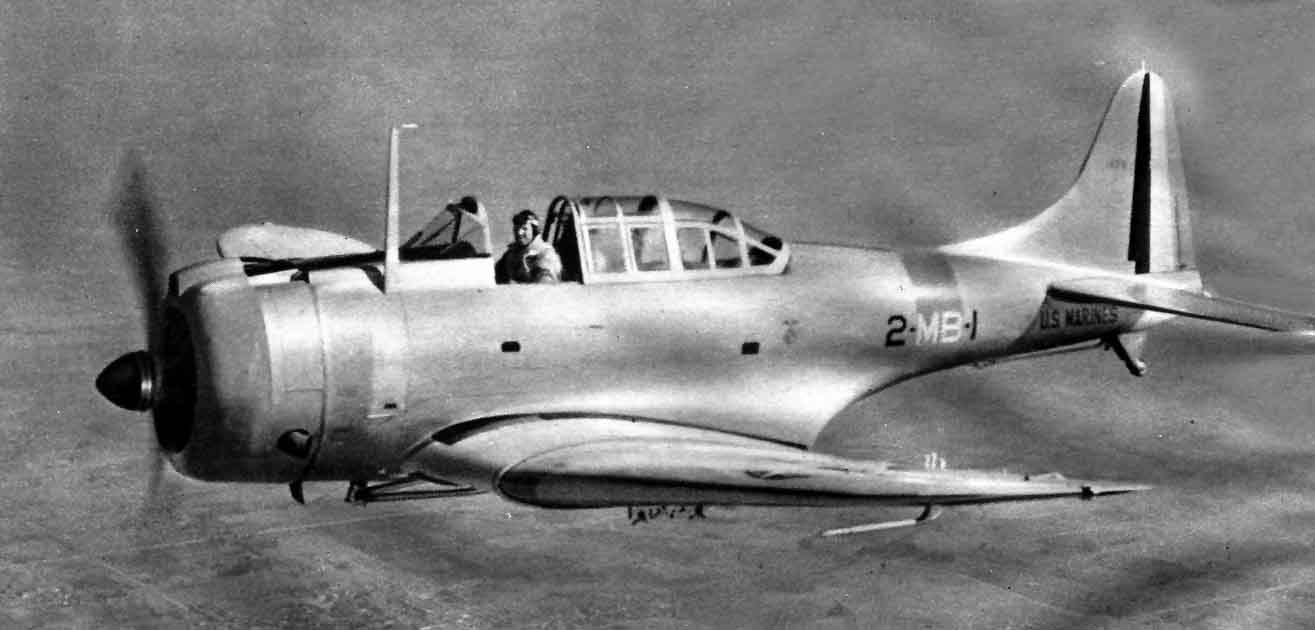 2 points
 -
Red Fox Studio - 3D instrument panels - P-38, A-10, F-117, F/A-18E, Bf-109G, Ju-87 etc
MikeMaben and one other reacted to RFS Hungary for a topic
Dear Troy, We are already working on versions A and B! We hope to be available soon!2 points -
2 points
-
Thank you gentleman. It sure looks like it has the age to date to WW2 and I have no reason to belive it doesn't. I think he said he got it for 2 cartons of Lucky Strike cigarettes which cost him a total of $2.00. He gave it to me after I built him a 1/350 HMS Dreadnought. I only wish I had a wall in my hobby room big enough to display it on. I feel honored to have it and they he thought enough of me to gift it to me.2 points
-
Jumpei Temma has some drawings on his website that appear to be very accurate and he also compared one of his drawings to a sideview taken with a telephoto lens. Might be worth asking scjh to overlay the drawing on that photo or Mr Temma's drawings to see how they compare.2 points
-
And a video! I'll be working on the fine detail on this over our summer. It looks a bit bare at the moment and I think the detail will bring it to life.2 points
-

1:32nd scale - Bristol M1.c
Brett M and one other reacted to sandbagger for a topic
Hi all, All decals applied now and weathering done. Weathering is a mix of 'Flory' Grime clay wash, 'Tamiya' Weathering Master Set A, C and D (Gunmetal, Mud, Sand) and 'AK Interactive' enamel wash (Kerosene 2039 and Engine oil 2019). All seal in with 'Alclad' Light Sheen lacquer (ALC311). Now onto construction and rigging, Mike2 points -
RAF FG.1 XV571 WILD HARE Phantom Conversion
Greg W and one other reacted to Anthony in NZ for a topic
Hmmm, I will let you all know when I see it if there is any discernable difference, or nothing a few swipes with emery paper wouldn't fix Oh this needed filling as well... And now I am reinstating panel lines.... Sorry for the overposting, but I am trying to show as much info as I can to those building a Brit Phantom in any scale Cheers Anthony2 points -

Zvezda Star Destroyer - a new detailing project
Rockie Yarwood and one other reacted to The Madhatter for a topic
I was lucky to get some free time this afternoon, so I took some pictures of where I am currently up to I have been working on this as well as the Batmobile and have actually got quite a bit done. I have cemented my base plans and I'll show you a picture later on of what I have in mind. So, I have been casting multiple copies of my very expensive 3D printed DS tile ready to layout on the sheet and that has consumed a fair amount of time so far, but TBH, it's not hard to mix up a batch of resin and make a copy while waiting for the spuds to cook or what have you. The surface detailing is coming along nicely. The main concentrations have been finished and now its just time to fill it out and then crack on with the side walls (what I have also started but not got very far with) And this is rough layout of how the base is going to go: Well, that's it for this update, but the next one will likely be the completion of the lower hull and more work on the base As always, thanks for continually coming in here and having a look Si2 points -
Thank you gentlemen! Yellow leading ledges are down and masked thanks to some quick scan and cut action on the Silouhette znd some Tamiya tape: After the leading edges were masked it was on to a cleanup coat of aluminum. I'll fix of the bit of chipping before the camo gets sprayed. O I have to say, I know I and others rave about MRP, but this MRP white aluminum went down like a dream: The liquid mask sets up fairly quickly, so it's on to some camo soon! Cheers2 points
-
HH-60G Pavehawk Kitty Hawk 1/35 DONE!!
vvwse4 and one other reacted to Pete Fleischmann for a topic
Hello all, The fuselage was primed with Mr Surfacer 1500 Black, thinned with Gunze leveling thinner..then shot with MRP Gunship Grey- the rivets look great under paint- cheers, Pete2 points -
MI-24 V BG Air Force Trumpeter 1/35
florin13 and one other reacted to ShelbyGT500 for a topic
And start with painting - first 1500 black primer, light shades with deck-tan and white. After - paint some places with original two tone of green camo, sealed with varnish. Some hair sprey covered those areas and start painting the "tank" colors. Some chipping of different zones and places, continue with other shades of those colors. When all was ready - sealed with clear and start with decals-work. Over them I sprayed some smoke to shade again some of the panels and details: Some additional touches Ohhh guys, I'm so sorry for the background with the Mi-26, but this my other project waiting to build the base for it. Sorry ones again. So that is for now, hope you are all OK, stay safe, eat great food and dring sweeet beeeer Cheers friends2 points -
I completed the decaling today. I sprayed a nice gloss coat using a 50/50 mix of Tamiya X22 and Tamiya Lacquer thinner. Unfortunately the decals I wanted to use to show a Hurricane assigned to No. 17 Squadron turned out to be unusable so I ended up marking the plane as a No. 257 Squadron aircraft. The decals are a mix of the kit decals and the Zotz set that covers aircraft during the Battle of Britain. I used the HGW wet transfer stencil set for the stenciling. The kit decals are a bit thick, and you can just see an edge when looking close up, but from more than 6" away they look just fine. I sealed the decals with another coat of the X22/thinner mix and will start weathering once it cure for a day. I also completed the pilot figure which turned out fairly decent. I wanted to give the figure a tired and/or strained look as the simple diorama will show the aircraft and pilot just returned from a sortie. I think I was able to capture the look I wanted, the challenge will be positioning the figure on the aircraft. I may end up pinning it to the wing as the pose will not give it a lot stability, but I'll cross that bridge when I come to it. Enjoy the photos, Ernest Nice and glossy! The HGW stencils behaved well (mostly). The decals laid down well after I used both Micro Sol and a hot wash cloth on the larger ones. You can make out the slight ridge to the left of the national marking. This photo highlights the uniform. I used the layering technique to simulate highlights and shadows. The direct lighting kills some of the effect, but it looks good under normal or diffused lighting. The face turned out well, and I think the figure has a tired/strained look that one might have later in the battle after perhaps 2 or 3 sorties in a day. This shot shows the face directly on. When the figure is displayed on the aircraft you won't be able to to get this view unless you are looking at the aircraft/figure from slightly below the base.2 points
-
1/24 F6F-5 Hellcat--In Flight
JayW and one other reacted to easixpedro for a topic
Ok, so by no means am I a figure modeler. But I was sick of installing cabinets, so took a break tonight. Was kind of fun to imagine how he'd look moving the control and firewalling the throttle... Last night, I'd made the beginnings of the G3 leather jacket out of Apoxie Sculpt. Looked at mine while sculpting it. I did leave the pocket off the front as I figure they'll be covered by the life preserver. The fur collar was made with putty and then dapped with a toothbrush. After that dried overnight, it was onto the arms. I used a piece of sprue the approximate length to get his hand close to the controls. Will add a hand from the figures later, and nip off the control stick to put it firmly in his hand post painting. And here you can see with the jacket sleeve. Kind of digging how the elastic cuffs turned out. All the shaping was done with xacto blades and other tools from my workbench. Apoxie Sculpt is great as its slow drying and can take water to help keep it malleable. Rinse and repeat for the throttle hand... And here's how our headless horseman looks right now. Will start working the head and helmet next... will add the life preserver and parachute harness etc as well. All in all, not as bad as I thought it was going to be. And I get a custom figure that suits my needs. Figure by the time I'm done, this thing will look like one of those Buck Danny comics from France! Thanks for following along! Peter2 points -
1/32 Revell-Hasegawa Spitfire Mk.1a "K9906"..... Finished.!!
dodgem37 and one other reacted to Tolga ULGUR for a topic
Some progress.... Wings , horizontal tails and the fuselage went together.2 points -
1/32 Tamiya F-16CJ
Rockie Yarwood and one other reacted to David Mooney for a topic
Just a couple more pictures2 points -
Thanks Lothar. Your countrymen produce some of the most amazing rail modelling. We visited a couple of years ago. One more pic:2 points
-
The whole thing. It's basically a large diorama.2 points
-

Aero L-29 Delfin Injection Kit from Kovozavody
Landrotten Highlander and one other reacted to Jan_G for a topic
first pics of parts posted on britmodeller https://www.britmodeller.com/forums/index.php?/topic/235071325-132-aero-l-29-delfin-by-kovozávody-prostějov-kp-with-hphinfinity-models-box-art-release-summer-2020/ jan2 points


.thumb.jpg.5da8bff9741de420eb2e87addd8f2cf6.jpg)


