Leaderboard


Popular Content
Showing content with the highest reputation on 10/28/2018 in all areas
-
Well I'm back on this cracker, did i mention its is stunning kit, haha I recieved a replacement sprue direct from Japan, no charge, no explaination necessary, great service I have made a decision on the finish of my Horten, i, leaving the top skin off to show the details, I have always admired cut away models So I'm just finishing to flying surfaces and a few other bits, then its done. I experimented with different oils for each panel, the flap is blue tacked in place for photo its a big kit, and when finished i'll clear the other models and display it on its own, its my best work yet7 points
-
OK - needs more polishing (and still some Novus plastic polish residue in the photos) - but this is where we're at - with a little more trimming needed on the vac part - but very almost there: Definately a good step forward! Iain6 points
-
Looks like we may have something that is serviceable! Polishing is coming up nicely - hopefully this is *the* one and we can get it trimmed and fitted. Iain6 points
-
Dakota is closer looks great! and is must have for me jan4 points
-
Online pics of the real thing, although taken relatively shortly after the aircraft was painted in this scheme, show that there is already quite a bit of weathering on the jet. It's not Navy-like but definitely worthwhile to represent. Especially the black seems to have received quite a bit of touching up and there are two shades of the black, one being a touch brown. Here is my take thus far on the weathering. This is just the paint discoloring, oil streaks etc. will follow later on. I am about ready to put the model aside so as to catch up with all of the things under wings. Cheers, Marcel4 points
-
I seem to have had my post on this removed?? So here it is again. SMW 2016 by Graham French, on Flickr Graham4 points
-
Next up I finished of the seat cushion weathering by painting a very thin layer of yellow ochre oil paint over the black and then wiping 95% of it off so a hint of it remained in the recesses as a very subtle kind of sandy/faded/dusty effect. Once happy all was glued in. The effect in the flesh is a bit more evident than in these images. Finally I painted the throttle quadrant using a mix of silvers. Again these look far better in the flesh than I’ve managed to capture in these images where the Alclad steel looks almost gunmetal rather than then wonderful sheen this product renders. I’m now ready to close up the fuselage halves... the only dilemma is whether or not I fix the quadrant and belts in before masking up the cockpit hole. I’m going to have to twist the top half of the fuselage as I fix it to the base with strengthening rods as it’s become ever so slightly warped after all the thinning I’ve done. I’m worried any twisting may break off the quadrant or accidentally crush the belts. Any advice welcome.. Thanks for looking, Torben4 points
-
Thanks Kev and Juraj - I’m slowly finding a few minutes here and there to inch this one along. I’ve now finished the raised edging detail on the floats but will share that when I start getting into re-riveting and scribing later down the track. Back in the cockpit I’m now all but done with just the shoulder pads to scratch/sculpt and seatbelts to add now I can finally get to fixing the main fuselage together and get on with the main exterior features. For the seatbelts, after more research I’ve settle on a Sutton A harness a by far the most likely (not just a lap belt) which I plan to pick up at Telford (RB and/or HGW). On with how I got to this momentous point... First up, finishing the control column. What you see below is brand new (my 4th attempt) partially painted with just the silver section painted in. I lost the previous “final” version when I was repairing the wire loops and it decided to ping off some tweezer into the cracks between the white keys on my piano which is right by my modelling bench. Ask me to repeat that feat again and the odds would be astronomical! . This new one was again shaped against a file whilst turned in a Dremel mini-drill. This time for strength I filed a half section out where the wire loop attachments are and inserted one piece of brass shim across the gap, filed and drilled to the correct shape. The remaining gap was then covered with a halved section of brass tube. I sounds complex and was... 3 evening and loads of swearing later I got the result I wanted. Thin copper wire was treaded through the holes in the wire loops and fed trough drilled holes in the cockpit floor where a small foil washer was added to clean up the join. the wires were pulled taut and then superglued on the outside. Once these were settled and painted I added the rudder control wires which I believe went down the sides as they do in the S6 for which I have photographs. After a small channel was cut into either side of the main strengthening brace, these were fed through and again super-glued at one end, pulled taut, fixed to the other end. Then painted in black with a mixture of spirit marker and acrylic. The rest of the column was then painted. I then did another spot of micro weathering and wear whilst I had the silver, black and green paints out. The control column needs twisting a fraction to re-introduce the tightness in the port wire but otherwise I think that”s it for the base interior section.. Phew!! A bit more in a minute... Torben4 points
-

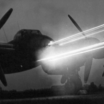
Tamiya USAF Skyraider in 1/48
Uncarina and 2 others reacted to Jan Goormans for a topic
hi all, this is the old Tamiya Skyraider, still a very nice and easy build. Finished with Hataka orange paints (Vietnam set) and weathering with the Flory Models wash "dark dirt". Jan https://i.imgur.com/W8pyJgM.jpg https://i.imgur.com/OgPG6DF.jpg https://i.imgur.com/N19dyTg.jpg3 points -
So.. this is a project from a few years ago. For some mad reason, I decided to build the massive Trumpeter Mi-8 to represent a helo serving during the USSR's Afghanistan adventure. Here's my motivation: Hard to believe that over 40 years later, there are still helo's probably landing on this peak, under fire. The list of aftermarket stuff I added is too long to fully recall but it includes the awesome Begemot decals (full exterior, interior and weapons), Part PE under-boom flare dispensers, very nice resin external pylons and rocket pods from a guy in Russia that calls himself Ruperator (he sells on Ebay), IR exhaust suppressors from the defunct Cobra Company (pretty much crap) and bits from a bunch other kits. The interior was completely built from scratch. I'm guessing I spent at least a hundred hours of time on this. First had to use a couple of tubes of squadron green putty to fill in all the voids between the framework, then just went crazy with styrene, sprue, etc. Begemots decals really added to the final look. Scratchbuilt nose MG position (one of the hardest parts of the build). That's it for interior shots, I'll be back to post exterior pics in a bit.3 points
-
Ou YES :-) Mirek3 points
-

JG300 Red 12 Bf 109 G-6/R-6 Bonn-Hangelar 1943 (Now Complete)
Gazzas and 2 others reacted to Wackyracer for a topic
Prop painted and a bit of weathering/shading/scratches Undercarriage installed Exhaust stains started to build up Overview3 points -
Hi! Dc-3 will be soon. See you in Telford https://www.modelforum.cz/viewtopic.php?f=1&t=105045&p=2156419#p21564193 points
-

1/24 Trumpeter Bf 109G-6 Late. Looooong term project.
Shawn M and 2 others reacted to ade rowlands for a topic
My attempts at restoring the kit detail lost when removing the ejector pin marks. There where some ghost marks left from the original kit parts which I used as a template, however I went a little wrong on the rear bulkhead part and got the angle not quite right, which has thrown a few other measurements out as I discovered when I test fit the cockpit floor and seat bulkhead to the fuselage halves so at what is there will need to be removed, the fuselage half cleaned up and start all over again. The RP Toolz Mitre cutter made the job a heck of a lot easier in dubplocating parts, a job I wouldn’t want to tackle without one now. It was at this point I remembered those awful pointless clear fuselage halves Trumpeter included and I’d removed to the spares box on receiving the kit. They are currently on the bench, I was reminded almost right away how awful clear styrene is to work with when cleaning up the sprue gates. I have shot some Tamiya surface primer on them and we’ll see how they come out and if they are acceptable I’ll attempt to tackle the ejector pin marks without removing the kit detail this time. I have also emailed Trumpeter about replacement parts for the cowlings which I will need if I go ahead with the clear halves and asked for a price on the non clear fuselage halves. Their answer to my email will dictate what happens in raged s to progress on this kit now. If I can get new cowlings that means I can forge ahead with the clear halves, if there’s no cowlings I’ll wipe the detail from the non clear halves and start over.3 points -
time to move on with Ta-154 Would like to finish it till the end of November. Have painted cockpit parts and wheel wells. Thanks for looking jan3 points
-
Painting!!3 points
-
Thanks for the compliments Jennings & SapperSix. Sapper- I appreciate the compliments but this isn't close to what some of the experts here on LSP can build. Those guys are true artists. All that being said, I'm glad you find this build useful! Mini update: I completed the other wheel well and repaired the missing linkage pulleys on the cowl flaps. Seems these flaps were pretty basic. They were spring loaded and in their natural state, forced open by the springs. A single wire looped around the flaps and fed into a small slot at the top of the fuselage on each side. Move cockpit control lever to tighten wire, cowl flaps close. Move lever to loosen wire, cowl flaps spring open. Simple and most importantly, easy to build so it didn't impact production. Since Tamiya faithfully replicated the slot, I added a short bit of sprue from the edge of the cowl flap into the slot. In looking a the pic, I'm not altogether happy with the way this came out and will replace them. But anyway, you get the idea of how they look, The full fuselage. Starting to finally make some tangible progress! The wheel wells. They will look much "busier" when I mount the door retraction cylinders and add some additional hydraulic lines. That's it for this week. Thanks for looking!3 points
-
Working on the wheel wells. Nice detail out of the box but I want to add some of the prominent hydraulic lines that were present on the real thing. Used .2mm copper wire. It's soft enough to bend easily and holds it's shape. I added most of the lines, still have to add some additional ones but they will be after the LG door actuating pistons are in place. Aside from that, I added a small bit of YZC primer to replicate some light scratches. Again - keep in mind that carrier based Corsairs in late '45 were pretty much brand new and weren't wracking up the high number of flying hours that their island based predecessors did. I'll probably add a few oil stains here and there.3 points
-

FW 190D-11 & D-13 Hasegawa & Real Model
daHeld and one other reacted to Miloslav1956 for a topic
Today update.2 points -

New HpH DC-3 Pics up!!
Anthony in NZ and one other reacted to LSP_Kevin for a topic
HpH kits certainly don't lack for detail! Kev2 points -
There is a fuselage stations diagram in this manual: http://www.avialogs.com/index.php/en/aircraft/usa/convair/f-102deltadagger/f-102a-flight-training-manual.html Jari2 points
-
The '102 does indeed seem to have a somewhat tapering conical shape, albeit symmetrical, at the extreme nose end.2 points
-
A bit of retrospective work on one of the FuG units, John provides a PE face for the top middle which I missed yesterday, I also missed because it's not shown in the instructions, though I seem to recall that Andy mentioned it recently, that there are decals for all the instruments on the IP and some features of the FuG units, not at all clear when you look at the decal sheet, it's not the numbers in black but dials by each in white: The old face shaved off (Ha, I wish!) ready for the new one, which is actually already two bits of PE glued together: In position and the decals alongside for the FuG units:2 points
-
Thank you Gerhard, that is very kind of you to say so ...by modellers, for modellers is how I like to look at what airscale does I am just trying to find drawings of the B24 panel now as that may be a possibility if I can also get hold of kit part dimensions when that comes out TTFN Peter2 points
-
So, as mentioned above, I'm going to be using Fundekals F4U Corsair sheet. They've got some really interesting options, many of which I've never seen before. For anyone remotely interested in the Corsair, you should head over to the Fundekals website and check out the 40+ page PDF. It's so much more than just a boring set of instructions. Lots of really good info on the aircraft and the units. Here are the options you get on this sheet (note - there are actually a few other versions which aren't shown here): Also as mentioned above, I've got a hard time deciding which option to go with. It's a race between VMF-511 and VF-85, with the nod currently going to "My Nel III", of VMF-511 flying off the USS Block Island. I like this one because it's some nose-art (most late war USMC/Navy aircraft were extremely generic), it's a pretty rare scheme (I like obscure subjects) and it's got the rocket launchers installed (some of the subjects above had the rocket launchers removed as a weight-saving measure). The Tamiya HVAR's are truly exquisite and I really want to be able to add them to my Corsair, especially since she'll have her wing's folded and the rockets will be very prominent. One other interesting fact - from the color pics of this aircraft on the Block Island, they were using HVAR's with a white / creamish-colored warhead, as opposed to the normal OD ones seen everywhere else. Very unusual, I like oddball stuff like this. Good attention to details Fundekals, I probably wouldn't have caught that myself. For armament, I'm thinking of going with one external tank, a 1000-lb bomb on the other pylon and the 8 HVAR's. So anyway, that's my plan. We'll see if I stick to it or not.2 points
-

HK Lancaster B Mk. 1 Cockpit
Padraic Conway and one other reacted to airscale for a topic
Hi Mark - no, they are scaled to drawings, but are 1.2mm - a blob of CA should bulk them out a bit I made up the test shot, but as I don't have the kit parts I made the throttle quadrant up to the kit dimensions - can't wait to see it with decals hope you like them TTFN Peter2 points -
JG300 Red 12 Bf 109 G-6/R-6 Bonn-Hangelar 1943 (Now Complete)
Erwin and one other reacted to Wackyracer for a topic
Mishap sorted, wasn't to bad a deal in the end about an hours work Then we cover them up lol Same with the sides Numbers 12. Maketar masks again Getting close now and really happy with the messy paintwork And working with Claes Sundins amazing profile2 points -

1/18TH JSI F-14B Tomcat conversion
TenSeven and one other reacted to A-10LOADER for a topic
Update for today, I went back over the top surfaces of the jet, with a thin coat of the Medium Gray, just to knock back the "sun bleached" effect and blend things together more. Thanks for staying interested in this build and enjoy the pics. Steve "TOMCATS FOREVER, BABY...!"2 points -

MH-47G 160th SOAR Nightstalkers . FINISHED
ShelbyGT500 and one other reacted to Dukie99 for a topic
And I am back after a week in the mountains. It was not the right time to take off from work (but it is never the right time) and I spent far too much time on my remote access, but the weather was gorgeous and I spent about two hours every day playing hockey with my son, precious times. Guys thank you so much for your kind words, it keeps me going on a project which is by no means easy, I will need to tackle something simpler on my next build, i.e. before going crazy again on the multi-engine GB. Currently the beast is under primer (Alclad Black primer and microfiller) and it looks sinister... More progress soon. Cheers, David2 points -
I'm not sure if it will be finished by then Juraj, but I'm certainly going for it... Cockpit parts are done... The Arado at the Udvar-Hazy Center, shows the instrument panel was made of Bakelite, so I've tried to emulate this material. Instrument decals are kit/Airscale... For the glass I've used HPH's epoxy, I think it was Wouter who introduced this? HGW Seatbelts... Cheers: Kent2 points
-
Thank you for your many encouraging comments. So it begins... I'm headed for the paintshop. Starting with the cockpit, using different shades of grey to add some interest to the surfaces. The armrests have been swept back and a scratched box for a flashlight. Continuing with the engines painting different shades of grey and aluminum mixes. Masking and painting of the 'black' middle part of the Jumo's. Airbrush work finished... Details painted... The finished Jumo engines. While I was at it I primed the fuselage and wings with some grey primer mixed with silver to get a base for the continued work. Funny how the metallic color changes the kit from a 'milk chocolate' plastic toy into the illusion of an actual metal airframe. Fitting the cockpit. The left engine test fitted... Cheers: Kent2 points
-
The nose distracted me from the cockpit. Just like on any face, the nose says a lot. It is rather important to sculpt it correctly to capture the spirit of the model (pun intended). After some fiddling and contemplation, I decided to modify the kit part. I stuck it in hot water and massaged it round for a start. Then I glued on a thick backing plate in order to shift enough material forward so that I could reshape the taper further towards the pitot. As Karl taught me on the MiG-23 build, you better have the right drawing to base your work on. This drawing appears very accurate, but I still traced a photograph to check the taper line - looks good. I did the work by hand with files and sandpaper, but I imagine those of you with lots of tools will do this on a lathe. It is still a bit rough as I type, but appears to be a doable DIY fix! Then I got back to the cockpit and did a little work on the coaming/dashboard (what is the correct name for that front bit?). I can't find much in the way of photographs of it, and I suspect it isn't terribly accurate, but will do. Added some wiring and the triangular piece that fits on the HUD projector glass. I really enjoy the way the canopy has a frame which you glue into the clear piece - a lovely piece of engineering from Tumpeter. Now its time for some paint. Cheers, Sean2 points
-
JG300 Red 12 Bf 109 G-6/R-6 Bonn-Hangelar 1943 (Now Complete)
Alain Gadbois and one other reacted to Wackyracer for a topic
Went over the base camo again as I wasn't really happy Added highlights and the rlm 76 Makatar masks for the insignia And started adding in mottled2 points -
Nothing to do with my build but a kind gent on Britmodeler just posted a link to an awesome Corsair website. https://www.jdsf4u.be/ Has a full Corsair operating manual for viewing, multiple technical drawings, pictures, etc. A truly valuable resources, especially for someone who wants to superdetail an F4U cockpit. These manuals show what a WW2 spec cockpit really looks like. Most current warbirds and museum aircraft aren't really accurate examples. Enjoy!2 points
-

Bf109E-7/Trop Jg 27 Black 3 or 8
Erwin and one other reacted to bdthoresen for a topic
Good evening, everyone. Back again with an update on the 109, and I have been busy working on the cockpit interior.... One of my favorite modelers of all time is a gentleman who used to frequent here regularly, Brian Cauchi. Brian is the epitome of a "classic basher".......using old kits, aftermarket, and scratchbuilding to produce some of the finest models I have ever seen. He has a ton of articles on LSP, and if you have not checked out his work, do so. You will not be disappointed. Two of my favorite articles of his involved rebuilding a Revell P-40E, and a Revell Corsair. Both builds used aftermarket, and some killer scratchbuilding to turn out the best builds of these kits I have ever seen, not to mention they were both built previously by someone else when he started them! I intend to use this thread as a bit of a tribute towards him. Thanks Brian! Here is the kit seat; I have thinned it out, and opened up the hole in the seatback that the harness passes through; I used a German buckle set leftover from Fotocut, which, with wine bottle foil straps, made a respectable harness. I have also built the harness support bar from styrene rod and sheet; Here is the cockpit tub; I have fabricated the anit-skid on either side of the stick with brass screen; I also fabricated the seat adjustment tracks from styrene "c" channel; The rear hatch was fabricated from .010" styrene sheet; I still need to fabricate the latch mechanism (as soon as I can find a close-up picture of it); The plumbing was made from armature wire, and was modeled after a picture of a captured aircraft I had in one of my books; Here is a shot of the seat near the tub; as you can see that the seat should slide down the tracks into place; And here it is in place where it will sit; Here is a shot of the instrument panel in its early stages; I have made the overlays from styrene, and will be making the bezels from scratch as well; the only concession is I might have to splurge on some Airscale instruments to "church" it up a bit; switches from copper wire; Here is a shot of the kit's rudder pedal (broken off the one piece rudder bar) next to a leftover True Details 109E rudder pedal; I might have a go at trying to cast a second one, as I do not have both; I am not even sure where the first one came from! And some of the interior parts. As you can see, they need some serious help; I have not decided how much I will attack them yet, but one battle at a time as they say! That is all for now, folks. As always, comments, questions, and critiques always welcome. Thanks for checking in! THOR2 points -
Thanks guys! So I'm moving on with the lower fuselage / wheel bays. Finished up the oil cooler assemblies and started the basics for the MGL bays and wing fold (yes, I opted to do the wings in the folded position because - A) takes up much less space, B ) that is how they were parked on their carriers, C) it will allow the rockets to be shown in more detail and D) I get a chance to show all the intricate parts present within the wingfold area). I have to admit that some of this probably won't be fully visible when completed but it's fun putting it together regardless and gives you a better understanding of how the real thing works. Only thing I've done beyond just gluing and painting the kit parts is to drill out some lightning holes in the MLG bays. Makes it look more realistic and that's where some of the hydraulic lines I'll be adding get routed through. I also drilled out another hole in the wing fold hinge assembly. Other than that, I shot the parts Gloss Sea Blue using Colorcoats enamel. This stuff airbrushes wonderfully and according to the experts, is a very good match for the WW2 version of GSB (most paints out there represent the later, post-war version of GSB which is a bit darker). I'm looking for weathering ideas for the wheel bays so if anyone has some pics that show grungy GSB wheel bays, send them my way. Some pics: Note - I'll be overpainting the zinc chromate in the wheel bays. Still have a lot of details to add to the wingfolds and wheel bays.2 points
-
So I'm calling it done on the motor. I took Rob's most helpful advice and decided to replicate those tubular "guards" he referenced in the pic above. It was a major pain to install these around the spark plug leads. Another example of how I get into trouble by not taking my time. I was in such a rush to get this rather burdensome task completed that I missed these entirely. If I had caught it, they would have been extremely easy to scratchbuild and they would have looked much better. On that note, I didn't really sweat the details of these too much. I discovered by dry fitting the forward cowling that you will only be able to view them from directly forward, and they'll be in the shadows at that. Even if I opt to leave one of the aft cowling covers off, they still won't be visible, so that made life a bit easier, in that I only had to do a very basic job. Here's the completed R-2800, freshly delivered from Pratt & Whitney of Stamford, CT, ready for installation. As a side note, the R-2800 was considered one of the finest air-cooled piston engines ever developed. It powered pretty much every radial-engined US WW2 fighter and was used post- war in a range of airliners, including the DC-6. Now that I'm finally done with the engine, I can move forward to more enjoyable parts of the build. Next up is the lower fuselage and main landing gear bays. Plenty of opportunities to add some small bits of detail in the wells, just a shame that the USN opted to have the bays painted the same as the exterior, Gloss Sea Blue. This won't allow as much of the detailing to be visible. This was a part of the USN's obsession to simplify all aspects of production. Why bother painting the wheel wells white or any other different color when you can just shoot them GSB when you are painting the rest of the exterior? Saves a few dollars on paint and a few manhours on labor. Here's the basic lower fuselage sections, which will be the starting point. There are around 9 separate steps required to complete this assembly. Just another indicate of how thorough Tamiya was. Note the massive main spar (outer sections are not painted since they will be finished in GSB). Looks like it could be part of a bridge, not an aircraft. Just another example of how rugged the Corsair (and it's rival from Grumman, the Hellcat) were built to withstand the hard flying that is part of carrier aviation. Compare to the light weight British Seafire. Undoubtedly the British aircraft was more maneuverable but it was totally under-designed for life on a carrier. Anyway, that's my update for today, thanks for looking!2 points
-
Back with an update. I was dreading building up the engine due to the wiring harness. I really dislike this aspect of modeling, it's too much like "work" but I got through it. I used .020 copper wire, painted a diluted tan with some of the copper showing through and then fabricated silver foil wire clips. The engine itself is a real gem, incredible details and I can't believe all the parts fit together so well (especially the heat shields over the cylinder heads). I still need to add some final details including oil lines (and the Pratt & Whitney logo that Tamiya thoughtfully provides) and then I can get back to "fun" modeling. I'm not sure if I'm going to leave one of the cowlings off or not, so there is a good chance most of my hard work won't be visible. We'll see. Thanks for looking!2 points
-
Plugging away, with the cockpit mostly done, it was time to seal up the fuselage. All I can say is dry fit carefully before breaking out the glue. The tolerances are tight. I had a couple of issues with the fuselage halves not fitting together, no reflection on Tamiya, it turns out that I had the upper portion of the aft bulkhead just a bit out of alignment. Fortunately I was able to correct it. Took a couple of small dabs of putty to address a couple of minor gaps. BTW - I just started using Tamiya putty and have to say that this stuff is great. Easy to apply, dries quickly and sands easily. Much better than the Squadron green putty I've been using for years. Quite amazing how well things fit. Tamiya opted to use a universal fuselage for both the birdcage and later versions with the taller spine. They give you a large section of upper fuselage as a separate piece. With a lesser outfit, you would have fit issues and have to putty and sand extensively. With this kit, the piece simply snaps into place and once there, you can't even tell it was separate. Absolutely amazing engineering here. I also completed the horizontal stabs. Tamiya gives you the option of having the elevators in the neutral position or pointing downwards as they would when the plane is unmanned on the ground. Thought that was a nice touch. They also made sure the trim tab was offset in the opposite direction. Good attention to detail here! Only other thing I did on these parts was to lightly sand down the elevators. Tamiya went a bit heavy trying to replicate some details on the cloth-covered elevators. I just wanted to smooth things down a bit. Took all of 5 minutes and I think it made a noticeable difference (hard to tell in the pics below, you'll have to trust me on this). That's pretty much all I've got done. I decided to bite the bullet and order the Vector resin cowl flap set. I've seen it used on a couple of builds here and it looks like it will really enhance the interior of the cowling and cowl flaps. Should be in shortly, that will be the next order of business. Thanks for looking.2 points
-
Good and bad news Good news first, I sprayed my top coat over the pre shading and it turned out great for a first attempt, i went a bit heavy in some places but it looks good (I'm not a fan of 'checker board' shading anyway), just needs a few touch up around the hatches.....cool great love my airbrush Bad news, and i cant belive I didnt notice earlier, I HAVE TWO LEFT WINGS, my kit had 2 spue 'N' and no sprue 'M', What a pain, I'm so annoyed GAHHHHHhhhhh So now i have to try and get another sprue, my first email will be to the shop i got the kit from and i hope they have good after sales service I hate shelving builds, i tend to lose my mojo, at least the skeleton is finished and its good enough to put on display now2 points
-

Dark Blue Killer - Tamiya F4U-1D Corsair
Out2gtcha reacted to ShotMagnet for a topic
Just bought the Tamiya -1D, so naturally I'm following this one closely. I don't expect I'll do half the job you're doing, but I'm following it just the same. Anyone who has this kit, can you tell me if the Lone Star Models resin upgrade for the Revell F4U plays nicely with the Tamiya kit? I test fit a couple of items; it looks like everything should more or less slot into place for the 'pit. The LSM upgrade also comes with dropped (I think) flaps, and resin wheels which are so beautiful all by themselves it seems a shame to paint them. Shot1 point -
Hi Tony I can cut the codes for you on the Sillouette machine but the post will take about two to three months. Our post is real third world now. Maybe someone closer has a Silouette and can cut it for you. Let me know if time is not an issue, then I will still cut and post it to you. Nick1 point
-
Back to David's magnificent Spit instead of you old farts reminiscing , I think you've got the finish absolutely spot on, a real gem for your display area/cabinet. Beautiful!1 point
-
I have bunch of 1/72 KP models dated from the 70's. That is a challenge, there is more flash than actual kit parts.1 point
-
For whatever reason, this photo appears to have uploaded upside-down, but hopefully it will still be helpful. The shorter nose is the Encore resin part, and the longer one is the Monogram part. There are 14 vertical lines to the inch. I propped the parts up with clay to keep them as square to the surface as possible. https://drive.google.com/open?id=1O1BwIMe22W2Azy0VXNIg6VH-uzYg4sK31 point
-

S-3B Viking - scratchbuilt
Starfighter reacted to Anthony in NZ for a topic
Ben, I am at a loss for words my friend! I TRULY love your skills and artistry Thanks for the inspiration Cheers Anthony1 point -

MH-47G 160th SOAR Nightstalkers . FINISHED
Dukie99 reacted to monthebiff for a topic
Nice update David, She looks not only sinister but really good under a coat of primer. Very clean work! Regards.Andy1 point -
Hi all, More progress - doesn't seem a lot - but a good few hours into prepping the sections I cut from the fuselage (including adding a 5 thou styrene shim to make up for clean up after cutting) - followed by some careful alignment. Removed sections now refitted in their new - forward - positions and glue going off before I add the missing sections from spare cockpit doors. Front bulkhead dry fitted (and taped), along with front and rear canopy sections from the kit to ensure spacings correct as it all dries. Rear glazing will be replaced on final model with a new, longer, section. Once I get the outer fuselage shapes sorted I can make a start on laying out internal structure. Hopefully the method in my madness is starting to look two-seat Spitfire(ish)... Have fun! Iain1 point
-
I've decided to post this on, It's been six months since I first cracked the box lid so its not a fresh build. In fact, I stalled over the summer to finish building a member of my shelf of doom. So here is the photo of the box and some of the things brought together for this build all those months ago, this isn't a definitive showing of ‘things' but it gives you an idea of my intensions. Trumpeter provides the modeller in 1/35, a base to start building a Boeing Chinook, that's all I can say. The kit is massive as is the aircraft itself. Having said that its sparse to say the least, a very bare cockpit and a very, very bare cabin leaves the modeller two options, close all doors or get scratch building, I chose the latter. I started with the cockpit, Floyd Werner provides a very good conversion/update for this area. Floyd's conversion throws out the cockpit floor, Pilots seats and centre pedestal, giving you a full MFD (Multi Function Display) cockpit. Just add looming and you are away. The cabin however is another story. I had a clear floor plan of how the 160 SOAR Night Stalkers have their cabins laid out. I set about building the avionics rack on the port side forward bulkhead, this done I moved to the seats. Eduard Big set helps with this, they provide the seats ‘fabric' and belts, you make the frame. As you can see the other cabin parts started to make me wander off the task in hand. After all that fun has subsided, the marking out and painting of the floor started. While this dried between colours, the stretcher litter was made. After this had been done I set about the cabin wall soundproofing. First a skeleton of plastic beams was glued into place, this was followed by sticking pre-cut sections of aluminium tape that had been rolled over a cooking sieve to give the crosshatched effect. With that done I inserted the kit windows and applied the Eduard masks for the windows. A down side of living in the UK is that Cobra Company doesn't ship here, so the rear ramp area has't to be scratch built. Above shows my start, the frames are to big so will be stripped out and new, smaller ones fitted. Thanks to Simon who is building a RAF Mk D, he provided the scale pattern for the framework. We've been guiding each other through the minefield of this kit, as you'll see latter on in the build. One of the first times I brought the sides, roof and floor together, this would happen a lot in the days, weeks and months to come. Thats all folks, for now anyway.1 point