Leaderboard


Popular Content
Showing content with the highest reputation on 04/07/2021 in all areas
-

JetMads 1/32 Viggen
Rockie Yarwood and 12 others reacted to panzerrob for a topic
Hi all, I hope it is okay if I post several Viggen photo's here! The quality isn't great, but maybe they can be of help for the Jetmads Viggen builders. Moderators, is this is considered a solution of this thread, please remove the photos! The photos were taken at Aviodroom in the Netherlands, were this aircraft is stored outside in the open. And finally 2 cockpit shots: As I said, the quality isn't great, but I hope you enjoyed them anyway! With regards, Rob13 points -
afternoon Hi Richard - no it was fine, fun actually, but it needed a lot of pre-planning. Glad it's done now Good question - I don't think they do - my Spit is coming on to 4 years old and the panels on that while not as highly polished as these look the same as the day it went in the cabinet just a couple of bits done today.. this intake sits each side of the fuselage - I had already built a recess in the fuselage to house them and cut holes in the panel where they go, so next up was making them. I started with a perspex buck and spent a few goes trying to skin it - that was an epic fail as it's juts too compound to get right.. in the end I used my little proxxon milling machine to mill some Ali rod into a blank I could then mill out the end intake - it cost me three tiny milling bits as I am such a noob, but did the job in the end.. ..then they were simply CA'd in place.. ..next were these teardrop blisters on the upper nose.. ..again a perspex buck was skinned and they were applied - I also did the very last nose panel behind the spinner to complete the nose skinning.. ..all it needs now are the dzus fasteners and a few more rivets ..and yes, one of the exhaust stubs broke a bit - that is going to be a difficult repair at some point.. TTFN Peter11 points
-
pics of the sprues posted on icm website:9 points
-
I just noticed that the holes for the lifting shackle just above the center of the upper gear housing casting printed perfectly. So I checked and all the holes for the housing bolts themselves printed clearly, too. Though it's a bit hard to show them all at once. Damn, this could be a badass kit.8 points
-

Finally!
scvrobeson and 6 others reacted to Hacker for a topic
One of my major wants was the Hobbycraft 1/32 A-36 Apache. l got the P-51 and the 51A models but trying to get the A-36 was a long time coming. On the weekend l was checking my Ebay lists when the kit popped up at a reasonable price and with buy it now button. Of course yours truly jump right on it and it is now making its way to the stash which is in boxes right now for the big move to bigger digs. Maybe l can sneak it into one of the boxes before the wife sees it lol Hacker7 points -
my last built , enjoy :7 points
-
Thanks for the input so far, I am taking it all into consideration. I printed the 8th scale crankcase today, it took 4.5 hours and I learned a few lessons from it to change for next time. The first was not to let the raft interfere with the body at the base, it overwrote all the holes in the base and is making the cleanup in that area a pain. I think I'll raise it off the build plate by 4mm next time and just connect to the raft via supports. I'll also move a few supports a tiny bit further away from body so they stick less. Here's a gallery of the larger piece. I kinda like the idea of making a standalone kit, I think I could get away with 1/6th scale if I really wanted to. I will probably move ahead with a patreon just to get it started and see how far that can take me. I'm still trying to figure how I'd do rewards on that, in that the rewards would be kits. Anyway, thanks for the support so far and please, let me know what you think. I really do want to know.6 points
-

"Your Spitfire I believe Sir?"
scvrobeson and 5 others reacted to mozart for a topic
So just the serial number to add then she's finished painting: I'm really pleased that there's only one small area where the wing and fuselage masks didn't quite mate together as planned. Five minutes work to correct. My Hawker Fury is just behind, it surprised me how similar it is in size to a Spit!6 points -
6 points
-
Decals on, which came from the spares box. Lathered up in Mr Mark they went down without too much of a fight. Now onto the weathering. These things got pretty filthy, so I've been washing with pigments, chipping the paint and I'll paint in some repaired areas and fading later.4 points
-

Sopwith Camel (Old Revell 1/28 Kit)
Panzerwomble and 3 others reacted to denders for a topic
Checking how the struts line up. And how everything is going to line up. The tail surfaces are in place.4 points -
Hi can I offer and input? From the CAD by the lower cowl seams and fullness they uses a restored examples but all the restoration tend to use the later model P40 as a guide for the lower cowl lines (little fill and sand easy fix on model) the early P40 lower cowl is more " V" or heart shape vs the "U" of later P40's lower cowl And a marking behind the real glass fuel port that no one makes a decal for.. i seen this marking on just about ever Tomahawk4 points
-
She's done. I put the wonky kit wheels on for now. Still waiting on some Eduard diamond treads that should be here this week.4 points
-
Painting continues. This time with some Tamiya Sky. Followed by Tamiya XF 22 grey. It's meant to be RLM 02 but its much closer to slate grey and works well for this purpose. More masking, then some Tamiya XF 24 which suits pretty nicely for dark sea grey. Right, not too bad. Some touch ups with the brush to do, but otherwise it will be onto gloss and decals.4 points
-
I spent pretty much the whole day playing with the weathering on this thing. Tried this, didn't like it. Tried that, looked better. A little too much, wipe it down. Not enough, try some more. Dooh! Too much...try again....LOL It was kinda fun, and a little nerv racking at the same time. Hard to make that little voice in the back of my head that kept saying " You are gunna screw this up", to be quiet. This is where I ended up walking away from it at. Any tips, suggestions, or criticism is welcomed.4 points
-
thank you so much everyone - I want you to know you are why I got better at modelling - thats what a WIP on here does for you Ha - I agree Chuck - foil is soo hard to get right, I have never managed it - I think the sheet metal I use is easier to work with if that makes sense, foil is way too fragile and creases way too easily That really made me warm inside Richard, thank you, what a kind thing to say well, here is the next chapter.. ..this is the nose panel I have been secretly dreading... one, it has to fit with other panels on 3 sides, two it is full of raised rivets despite being curved and needing burnishing into shape, and three - last bu not least, look at those perfect little oval apertures for each exhaust pipe... challenging... ..the first thing to tackle was the ovals - here a suitable brass template was taped over a perfect scale drawing that fits my 3D exhausts and a pin in a pin vise (what else?) used to go round and around until the oval pops out - each row took about 45 mins... ..with those done, other openings were added and a tape template from the model is applied to get some of the borders, plus the panel was polished before anything else.. ..then all the raised rivets were applied and the panel gently shaped to fit at the edges - once a good fit on all the straight edges was achieved the panel was annealed so I could start to gently burnish it to get the imprint of the lower curved edge.. ..at this point I have about 4 hours in this one panel.. ..making the other side - I goofed and over heated a panel when annealing it - it's all distrorted around the ovals - this was a write off of many hours work and the language was most anglo saxon.. ..after a good couple of days work they are done.. ..they still need all the dzus fasteners which are coming in some PE bits i made for the radiator next week and some rivets, but I am vary happy with how they came out.. ..its just resting on the U/C legs - they are not at all at the right angle, but you get the picture.. ..still more details around the nose and a last panel to go, then it will be moving on to the big under fuselage radiator.. TTFN Peter4 points
-

Bf 109G-10Erla Stab IV/JG301
Dany Boy and 2 others reacted to Miloslav1956 for a topic
Project 9 1/32 Revell model, Aires cockpit, exhaust, wheels, AIMS gun cover, HGW wet transfers, Painting mask homemade, All colours MRP3 points -

1:32nd scale Hansa-Brandenburg W.20
Rockie Yarwood and 2 others reacted to sandbagger for a topic
Hi all, As I'm nearing the completion of the Fokker D.II model build, I've started preparing the next model. This will be another resin kit from 'Omega Models', which will represent the Hansa-Brandenburg W.20, Serial No:1552, photographed on the 14th of March 1918, at the seaplane experimental centre (SVK) at Warnemunde before being accepted for naval use (by the SAK). The Hansa-Brandenburg W.20 was designed during late 1917 and early 1918 by Ernst Heinkel whilst working at Hansa-Brandenburg. The intention for this small, unarmed spotter float plane was for it to be partially dismantled and stored in a water tight container on board the projected ‘Cruiser’ class of submarine, such as U139 and U155. It was to be removed from its container, assembled quickly and launched whilst the submarine was on the surface. After the flight, the submarine would surface again, the aircraft loaded, dismantled and stowed in its container, after which the submarine could submerge. The aircraft was intended to be prepared for flight or stowing in less than 2 minutes and was to be stored inside the container which measured 20 feet long and 6 feet in diameter. However, the intended submarines to be used were never built before the armistice and only three W.20 aircraft were built. The first version, Ser No:1551, had only fuselage to upper wing support struts. The second version, Ser No:1552 had interplane struts added between the wings and these struts were wire crossed braced. In addition the span of the lower wings was increased. The third and final version, Ser No:1553 had the interplane struts replaced by single interplane struts. Although this design of Ernst Heinkel never saw operational service, he did design a similar aircraft in 1921, which was known as the Caspar-Heinkel U1. Two examples were purchased by the U.S. Navy for evaluation. This aircraft was intended to fit into a smaller space of 18 feet long and 4 feet 6 inches diameter. The design was a cantilever wing biplane, powered by a 50 hp engine and capable of a speed of 87 mph with a climb rate of 1000 m in 6 minutes. Four men could dismantle and stow the aircraft in only 22 seconds and reassemble it in only 31 seconds. One of the aircraft was wrecked when being transported on a truck when the aircraft struck low hanging trees. Interestingly Heinkel built and sold two examples to the Japanese, who subsequently followed on with this technology in WW2. Mike3 points -
A good read, and some great photos
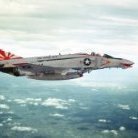
JeepsGunsTanks and 2 others reacted to Ayovan for a topic
Happened across this today. Interesting article, with some outstanding photos. Part 1) Hunting for jets in the High Sierra with Camden Thrasher | Hagerty Media Part 2) “An immense fault in the earth”: The hunt for jets continues (msn.com) I go off roading in these areas a few times a year and have seen some aircraft, but never anything like the photos in the articles. I'm definately going to keep my eyes peeled the next time we are up there.3 points -
Tired of looking at this one on the SOD. Got a hand full of paper towels, cup full of Mr. Color Leveling Thinner and sat out on the rear porch. Half hour later, i got this. Stuff took off the paint, clearcoat and decals quickly and with no damage anywhere. Will have to refill a couple of spots, but this is close to repaint as is. Now i have to think what i will do for decals. Really want the Norm 72 scheme, i'm pretty certain i have the needed decals, but after the trouble with silvering, may rethink this...anyway, i will restart this build. Don3 points
-
I prefer the one on the left.3 points
-
As it was in 2013, when I saw it. The paint was kind of fresh then, it is not the original painting and colors. Eight years of natural weathering seems to have given it a better looks, as the dark green is now more natural, but the light green and the tan need maybe another decade or so to come close the real thing3 points
-

ICM NEWs 2021 - Bell AH-1G Cobra in 1/32
Rick Griewski and 2 others reacted to Out2gtcha for a topic
Very cool! Really looking forward to these releases, and SO glad ICM decided to make them in the correct scale.3 points -

A good read, and some great photos
Ayovan and 2 others reacted to Pete Fleischmann for a topic
I used to love it when spectators would wave at me on a low level. It’s not anything you are actively looking for- you just happen to notice it if you are looking in the right spot for that brief nano-second at 9 miles per minute trying not to hit the ground or anything attached to it. Low level over the water was an easier environment to spot spectators..cause they’re on boats. cool story! cheers Pete3 points -

EA-6B Prowler (02 April: Done!)
Greg W and 2 others reacted to easixpedro for a topic
No pictures, as I was on a roll. I finally got the pneumatic lines made--they were a bear. Took me five attempts to get it looking acceptable. Problem being that it's 3 lines in parallel, which is pretty hard to do, even in real life. Once that was done, I actually got the back cockpit together and stared futzing around with the front cockpit. Hence the reason for no pics--went from exasperation to the 'zone' and kept on going. It's actually kind of fun to sort through the puzzle in my mind and figure out what goes where, and how to make the pieces. Pictures soon!3 points -
3 points
-
Small update on the BMW factory. Engine ground running in progress. Soon ready for aerial test. Cheers. Mathieu3 points
-

Eagle Head. Horst Hannig's Fw-190A-4 - Paint job
HerculesPA_2 and 2 others reacted to MDuv for a topic
Hi Guys @wingman777 @MikeMaben @MARU5137 Thank you for your interest and encouraging comments. Time for an update. First I got busy with the ailerons. The internal structure and ribbing is different on A4 an earlier. So once i found the right reference, back at the computer with the drawing software. The ailerons are sanded smooth (I tought so) and the new structure is applied in negative with masks. The whole mask is set with the help of a transfer panel, to keep the lining and spacing consistent. Then the undesired parts are lifted, and the surroundings are masked. A mix of thick Mr Surfacer is sprayed onto the surface. And the edges are smoothed with a sponge. The result with a coat or Rlm02 to check the blending. Strangely the original ribbing is reappearing with the paint on the unsurfaced areas. I might have to redo the whole operation. Will see later. The underwing panels are blended in, adjustment of theses panels is tricky to say the least. Some of the edges must be smoothed as they are not panel lines, and some need to be kept, references check is a must. I have read a bit too late that the MG FF were often removed and the gun panel was replaced with an unbulged one. Lets say this bird kept them.. I then started to add the last bits to the cockpit: Throttle Handle, Stick, seat and belts. Time to get this part finished and go on with the assembly. Belts are made with HGW PE and Tamiya Tape, the textile fabric on my sample set was looking very odd so it was quickly dismissed. Last bit for this weekend is the propeller assembled, painted. Added light weathering. Comments and critiques are welcome of course. Cheers. Mathieu3 points -

RAF FG.1 XV571 WILD HARE Phantom Conversion
vvwse4 and 2 others reacted to Anthony in NZ for a topic
Hey Damian glad you're still hanging in there on this build! Quite fancy doing my Trumpy Skyhawk now you mention it LOL... no, no rush buddy! I present to you one Spey intake ready to glue to the fuse when the other side is finished! I havent riveted across most of the top of the intake rear section as this still needs extensive modification of shape. Overall pretty happy with it, especially those new vent sections.....man I spent some hours in there! Thanks as always for stopping by Cheers Anthony3 points -
EA-6B Prowler (02 April: Done!)
Greg W and 2 others reacted to easixpedro for a topic
Thanks for the paint recommendations folks. In the end, I just shot it with Tamiya primer. I think with a bit of weathering, it'll look the part. Here's the slow March. First layers of paint...need to weather it and blend some more. And some washes. -Peter3 points -

Ukrainian Mania - The digital ‘Flanker’ - time to call it done, I think.
Greg W and 2 others reacted to Stokey Pete for a topic
A bit of a resurrection for this monster after I’ve finished off building a couple of quickies (quick for me anyway). I’ve recently decided that I no longer want to build kits with gear down. I’m enjoying the inflight look. Mrs stokeypete loves it too because it means more builds completed, and fewer boxes cluttering shelves. So, I’ve done some serious sanding and dry fittings of the nose cone and intakes, along with finalising the fit of the canopy before I detail it up with bits. Wings were added to each half of the fuselage to avoid steps/gaps before I glued the two halves together. The nose fitting is about as perfect as I can get it, with a little filler to finish it off. It’s quite the size, I’d forgotten just how big, until I put the Mirage next to it.3 points -
I stumbled onto this tonight and thought I should share. Even though it's ship building (which I do also) I thought it was well done and hit a note.2 points
-

Gordon Bennett! RNAS 1214
themongoose and one other reacted to RLWP for a topic
Rib tapes, the old skool way Richard2 points -
Well, the Barracuda wheel set doesn't include a resin tail wheel and I decided I would prefer that. The Reskit wheels and the 'donor' (TBM-3) for the extra wing tanks arrived. So I guess I don't have any excuse for not starting.2 points
-

Great Wall Hobby P-40B Tomahawk in 1/32
D.B. Andrus and one other reacted to HBBates for a topic
Yes that from the Jun Temma’s drawing. He got the difference in the lower cowl cross section.. his drawing are excellent.. only fyi on those drawing is the radio hatch on the P36 early P40 ..do to simplify the fuselage framing on the Hawk 87 P40D to N the radio hatch is slightly narrower then on the Hawk 75, Hawk 81 P36 P40 B-C.. its very hard to spot and to me some time to document..Jun Temma notes on creating the doing the drawing assume the radio hatch was the same size across the whole P36 To P40 N ..I had made the same assumption for years because I couldn't figure out why they would make a slight size change in the opening to I found the frame simplify on the later P40 vs the early P36 P402 points -

Any interest in an aftermarket Merlin engine/P-51 engine bay?
Johnny Cloud and one other reacted to rtwpsom2 for a topic
Ray, I could have sworn I replied to this but I guess it got lost in the shuffle. I've seen the kit, there are some areas I think that could be improved on. The engine mount leaves a lot to be desired in my opinion. Also, you will notice that the cowl frame covers the last exhaust port of the Merlin. Es no bueno.2 points -
That about raps it up for the first installment. Lots of preliminary work to do. Hope everyone is well..be safe Geoff2 points
-
2 points
-
2 points
-
2 points
-
The Matt Drawings...2 points
-
2 points
-
I think making add-ons for Tamiya kits would be a nice easy win, and there are a number of Merlin related kits you could augment I don't see the point in this - just buy the Tamiya kit! More generally, one aircraft that is **just crying out** for an engine plug is the Hasegawa Fw190 Dora! Why no-one in 20 years (yes it probably is that long!) has done anything for this kit is beyond me - maybe it's too difficult? And as D.B Andrus alluded too, stuff that actually fits the donor kit would always be welcomed Wishing you all the best with your ventures. Nick2 points
-
RAF FG.1 XV571 WILD HARE Phantom Conversion
GMK and one other reacted to Anthony in NZ for a topic
Thanks Marcel, I am really quite excited by those reheat cans and interior Kerry put in them! He is a talented guy and I am glad he likes Brit Phantoms too! I never thought of it using the 2 extremes of modelling, certainly a lot of chopping up of plastic, use of resin, some printed stuff and no doubt photoetch...LOL it will all be in there! Hey Matt, yes mate, the trick will be to do them justice with painting!! Aww man, you're too kind mate! I have learned a lot from you Ben.....thank you LOL, thanks Derek, to be honest this has nearly reduced me to tears before I am really looking forward to getting these intakes epoxied on, then comes the fun part sorting that top shoulder shape. The real biggie will be getting the lower wing on and bringing everything together...that seems miles away as I hate doing cockpits! As you say, Onwards and Upwards Thanks everyone for all of your reactions, suggestions and encouragement, I hope we are all learning more about this mysterious Spey engined bird's secrets! Cheers Anthony2 points -
EA-6B Prowler (02 April: Done!)
Greg W and one other reacted to easixpedro for a topic
Fun fact, the Prowler still had Kapton wiring in it when she finally retired. The FAA mandated that airliners stop using it in the 70s after several airliners were lost due to arcing. Navy was too cheap to replace it. There was a ton of circuit breakers in the cockpit and there were plenty of warnings saying not to push them in, as lord only knew which ones had kapton and would start an electrical fire... Made troubleshooting in-flight interesting to say the least. Stole a page from Timmy! and Pig to work up some of the wiring looms. Easy enough to do. Used this beading wire and wrapped it a bunch of times. Then used lead foil to make the ties. I 'almost' started to make the cloth ties too, then realized that nothing will be visible. Seriously, with the seats in place only the top 5mm or so will be visible. But dang-nabbit, I know it's in there! I usually don't even paint, let alone detail areas that aren't visible, but OCD got the better of me here. Next up will be the pneumatic lines that go to the piston in the middle of the cockpit. Not sure how crazy I'll go there after seeing how much is visible. Probably TLAR, and definitely not making the fittings. Till then, thanks for following along! -Peter2 points -

1/32 Copper State Nieuport XXIII
Alex and one other reacted to scvrobeson for a topic
Thank you everyone for your feedback on my build. I'm glad you're all enjoying it so far. I've gotten the first paint stages done now. Started with the normal pre-shading of the fabric sections, then laid down a base coat of "silver dope." I used MRP Super Silver and MiG Traffic Grey for the dope paint. Then it was mottled with straight Traffic Grey, and blended back with one more coat of the dope. The mottling is very subtle, but it's there, and changes via light and the direction you see it at See, slight shift in the viewing angle, and it disappears into the background That's all for now. I'll try to get the metal panels done during the week, then probably the topside green next weekend. Let me know what you think. Matt2 points -
Sublime work! I was wondering, do those metal panels keep their shine or do they oxidize quickly?2 points
-
I have a question about that panel, Peter. Was the dread of making it worse than actually making the panel? Richard2 points
-

Revell 1/32 Heinkel He 162
Nachtjaeger and one other reacted to Grunticus for a topic
While waiting for the HGW Ki-86 seatbelts I finished up the He-162. It took me quite a while to get the number "23" good enough for the Silhouette cutter. Today I made gunbarrels from serynge needle and painted them gun metal. In the photos below the barrels are not yet in pace but they are now. Here's the end result: A very enjoyable kit it was. Aftermarket is not really needed, the kit is very detailed in the box. Recommended!2 points -
I will get one or two as soon as they come out. There are some interesting schemes available besides the boring OD ones (except for the Sharkmouth ones of course). Does anyone know of proof the the top three-view example? Or a Spanish one.2 points