Leaderboard


Popular Content
Showing content with the highest reputation since 07/16/2024 in Posts
-

*** Finished *** 1/32 Airscale Boulton Paul Defiant Mk.1 "Test build"
red baron and 65 others reacted to Tolga ULGUR for a topic
Here is a new Project Many of you know that Peter (from Airscale) is working on a new project: This is exciting 1/32 Boulton Paul Defiant Mk.1 Peter sent me a draft (pre production) copy of this kit for a test build. First of all, I would like to thank Peter for sending me this excellent project. I am not used to this kind of draft projects, but I will try to do a test build as much as I can and give Peter feedbacks. Peter stated that since this is pre-production, it may not be perfect and the final production will be printed with more precise layer height. First step; here are the parts66 points -
Tbd-1 Devastator - Trumpeter - 1/32
Durangokid and 60 others reacted to jimvit for a topic
Bonjour à tous, je vous présente mon dernier projet, un Devastator. Le kit Trumpeter est très bien réalisé, mais il faut avouer qu'il manque de détails, notamment dans le cockpit ! C'est pourquoi j'ai ajouté un kit Airscale Pro avec cockpit, hélice et mitrailleuse. Et des pièces d'Anyz. Demandez des pochoirs. Et un peu de grattage aussi. Dévastateur n° 1505 VT-6 L'équipage participe à une attaque à la torpille sur l'île de Kwajalein. USS Enterprise . Merci d'avoir regardé61 points -
Hi everyone I haven't been making models for about a month... but I have been modelmaking It has always been a little dream of mine to use airscale to make my own kit and take a tiny weeny bit of the power of what gets released and when from the big boys.. So, I started making my first kit in 3D - something I toyed with in 1/18 and I think is an interesting subject - the Defiant Mk1. Before I go any further I will justv say that this is a project that I thought might be interesting to share - I have no idea of what I am doing and there are some significant practical challenges to overcome on the way, not least of which are: Transparencies - I want these to be Injection moulded - If I can find clear parts on a toy in the pound shop, I must be able to get something made - if that fails then maybe resin but that is very labour intensive, failing that maybe 3D has advanced enough, and as a last resort vacforms Print dimensional accuracy - I have faces that are within a micron of each other on screen, but when printed have quite a bit of deviation - I expect this is a lot to do with the orientation & support placement, but for detailed surfaces you are kind of pushed into limited options Print time - All the parts for now are printed at the lowest, but fastest quality @ 60 micron layers, I usually print in 22 microns for my AM parts - but this speeds up the prints - even then, on 60 microns it takes about 9 hours to do the wing parts so each kit will take days to print at the proper resolution I think it's worth a shot, but for now can't say if, or when it might be available, or how much it would be.. Anyways, enough of the negative waves man, let's have a look at progress so far - this is the Mk1 but I also have a MkII nose and prop.. ..the kit currently breaks down like this.. ..and the first prototype prints - I primed and painted it because I wanted to see how the surface detail held up - should have painted it a lighter colour though.. So, I am quite pleased with how some of the parts came out, others clearly need work.. thats why it is here as a WIP as I want you to come on the journey with me. I also want to get some feedback along the way and although I will do my best, this won't be a Tamiya quality kit so I hope if it ever does come out you can help me not get it rubbished by the critics next up will be the gear bays, then surface detailing the wings & fillets and unlike every other model I have ever made, last of all will be the cockpit. Oh and by the way and drawings or reference pics are always welcome - just PM me TTFN Peter58 points
-

Tamiya F-16 "Ghost" Aggressor, Kicked Up a Notch
Castor and 55 others reacted to chuck540z3 for a topic
September 23/24 Here is my latest “Kicked Up A Notch” model of an F-16 Aggressor, which is the first one painted in the “Ghost” camo scheme, to sort of replicate the SU-57 “Felon” Stealth Fighter. Here’s a pic I took in 2019 of 84-1220 at Nellis AFB at their semi-annual airshow. Another pic I took of this same jet flying at the 2022 airshow: Since 2019, at least 3 other Vipers are now painted in this same scheme (84-1236, 84-1301 and 86-0299) and while they all are very similar, there are a number of small differences in the digital paint pattern, so there is a bit of latitude as to what is “correct” or not, and the exact location of certain features can be quite variable. For the most part, pics of these jets show them to be quite clean with their new paint jobs, so I kept weathering to a minimum accordingly. I was fortunate enough to already own the relatively rare Tamiya Thunderbirds kit (60316), which is a Block 32 that can easily be modified to create my subject above, which is a Block 25. I also added a significant amount of aftermarket items as follows: · Aires F-16C Cockpit Set (2066) · Aires F-16C Wheel Bays (2067) · ResKit F-16 (F100-PW) Exhaust Nozzle (RSU32-0018) · ResKit F-16 Block 25-32 Wheel Set (RS32-0024) · Kopecky Scale Models LAU-129 Missile Rails (32016) · Kopecky Scale Models Horizontal Stabilizers (32036) · Master Brass Static Dischargers (came with above) · Zactomodels AIM-9L/M resin missile · Bandit Resin Factory ACMI Pod Type E (BRF-32-005) · Master F-16 AOA Probes (AM-32-032) · Cross Delta F-16C Stiffener Plates (CD32001) · AeroMasks Camo Masks and Decals- Ghost Scheme (AM32-F1643T) · Two Bobs Blizzard Bad Guy Decals (32-063) · Uprise F-16B Fighting Falcon Decals (UR32223) · Airscale Cockpit Instrument and Placard Decals (Various) For details on how I pulled all these parts together, I have a fairly long build thread here: Tamiya F-16 Aggressor, Kicked Up a Notch Although there are a few errors here and there, I’m pretty happy with how it turned out and it will sit right next to my F-15C Aggressor I made about 7 years ago in my new display case. Here are some pics from just about every angle, which might be helpful to others in the future. I hope you like it. Cheers, Chuck56 points -

F-104G Starfighter, USAF markings, In-flight + parked
CODY and 54 others reacted to F`s are my favs for a topic
Well, she is ready for some pics. Hope you like it. My first time doing something like this - with the NMF foiling, the complex staining of the panels, and many other things... Here is the WIP. Some distant pics, then the close-ups: It could easily be my most detailed model to date... The decals are so good. You could read more than 90% of the lettering in the zoomed photos, and are quite realistic too: Cheers!55 points -
55 points
-

WALRUS 1/32 HPH
Anthony in NZ and 53 others reacted to Plm for a topic
Hello, Here is the last one of the year. Not a easy built so happy that I was able to finish it. Camouflage and markings are from HPH, not sure it really existed, Iadded yagi antennas seen on some Walrus.54 points -
... overall a nice kit with the usual gap and flush issues with the nose requireing 'some' fill. This is the kit OOB plus antenae, some solder tubing on the nose gear. Looking at many many pix of 262s I only found one that had the head armor plate, most had that remove so only the mounting brackets were left. I used a few AM decals, l stenciled the serial and ID number (2). The 2 on the nose gear door is and Alps product. Fun build , recommended. Thanks for lookin' in.54 points
-
Hello! This is my recently completed build of the Hasegawa 1/32 Bf109K-4 kit. I've had this kit + a bunch of aftermarket goodies on the shelf for a while and thought that I should crank it out before the new Kotare K-4 kit hits the market. Some of the add-ons I used on this build are: Eagle Editions Bf109K-4 Cockpit Set RB Productions Bf109K-4 Wheel Wells AMUR Reaver Bf109K Airscrew Barracuda Bf109G/K Main Wheels Quickboost Bf109G/K Exhausts Eagle Cal Bf109K Decal Sheet #32074 1ManArmy Bf109G-6 Stencil Masks The aircraft I tried to depict is this K-4 flown by Uffz. Martin Deskau, III./JG3. Most of the markings are painted, either with custom cut masks produced at home using the Silhouette Portrait 2 craft cutter and few of the 1ManArmy maintenance stencils. AK Real Colors (first generation)paints were used for the main camo scheme. The full build can be found at... Finished Photos taken with Canon 5D Mark IV with EF 24-105 F/4L IS53 points
-
.thumb.jpg.f0920d798d5d8600fb58b1d8a906ddff.jpg)
Bf-109E-7 Trop Dragon/Hobby2000 1:32
109 and 52 others reacted to shadowmare for a topic
Hello guys! Hobby 2000 Dragon Emil Rebox. I added Yahu Panel, rivets, Aber metal barrels. Differences between Eduard and Dragon are colosal - not one detail is looking same. Canopy could be better there are sews and defects so polishing is needed.53 points -

Ki-45 Kai (Nick) Zoukei-Mura 1/32
red baron and 51 others reacted to AngryJazz_Models for a topic
Started in March 2022 - thinking it would be a fun and different build. Well different was definitely correct - it was maybe a bit above my skills for the time. Interior was very easy to build, but the exterior was where the real challenge were. All the issues took the fun out of the build and it went on the shelf. From time to time i would take it down - do some work - lose motivation - repeat. December I decided to complete it or trash it - no more looking at the grey half built kit. Im happy I finally managed to push it to completion! Now its a joy to watch on the shelf - a victory over the kit that beat me several times 😊 Thank you to all who motivated me to keep going with the build! With a few more ZM kits in the stash - hopefully the next one will be easier! Build log can be found here:52 points -

P-47D Thunderbolt Razorback - TRUMPETER - 1/32 - “Lonesome Polecat IV”
themongoose and 51 others reacted to Furie for a topic
Hello everyone. Here is my latest build, a 1/32 Trumpeter P-47. This model is nice to build, there are no big mistakes, the rivet lines are present and I didn't notice any pitfalls during construction. I decided to improve it with AMs for the 8 x .050 guns (Master Model AM-32-115), wheels (Eduard 632088), cockpit (Eduard 32943), seatbelts (Eduard 33215) and propeller (Quickboost 32243). I chose to represent the P-47 D-22-RE “Lonesome Polecat IV” of Cpt. AHLES, in June 1944 at Raydon Air Base. Here are the 2 reference photos that helped me, as well as this “superb” color profile... ...which is partly wrong. I'll let you find the 5 errors, one of which is really huge... This P-47 has been painted with the Mr Color Super Metallic 2 paint range, which offers very interesting NMF modulations : All markings were made with masks (Silhouette Cameo) : But also the yellow and black checkerboard on the cowl engine : The "nose art" on the engine cowl was made using a laser printer (many thanks to madame!) and a blank transparent decal sheet : The link to the WiP : P-47D Thunderbolt Razorback - TRUMPETER - 1/32 - “Lonesome Polecat IV” - Works in Progress - Large Scale Planes Thanks to Thunnus, alain11 and Tolga ULGUR for their builds, which helped me a lot. And a big “merci” to Juggernut for the help he gave me on the P&W R-2800! And here are the final photos of this Jug : I hope you enjoyed this build and look forward to your comments and feedback ! Denis52 points -
For the last three months I have producing parts, detailing of the hull etc.. The stabilizers build from styrene card... The complete hull has been clad in 0.125 mm sheets of styrene with positive rivets. The profiles of Evergreen strips and rods... Start of the double engine housing.. Production of the Cowlings.. Only parts that are not scratch build are the Wingnut Wings Rolls-Royce Eagle engines, leftovers from the Aeromarine build.. Dry fitting of the major parts.. The production of parts for the build has seemed to be a task that was never ending. Many of them has been done by casting them in resin. In the coming days/weeks hopefully I will be able to bring all the parts 'together'... Cheers: Kent52 points
-
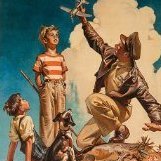
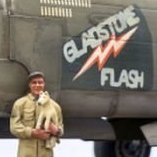 Hello, everyone. I'm happy to finally present my interpretation of the Gladstone Flash, an A-20G Havoc assigned to the 674th Bomb Squadron of the 417th Bomb Group in Saidor, New Guinea, 1944. I've been a military history enthusiast since I was a kid, but my interest has always been the human drama of war. While I've certainly studied the broad campaigns and strategic decisions, they really only help fit the personal stories and dramas into context. As we build dioramas of soldiers rushing forward, or a panzerfaust crew stalking a T-34, it's easy to forget that the guys that lived through this stuff were just like you and me and they all had a story to tell. So, with this project, I wanted to do something a little different; I wanted to capture something less dramatic, but more personal. And, what can be more personal than the bond between man and dog? When I saw the 2nd photo above, it kinda hit me that I had to recreate it. I love everything about it... the happy moment between man and dog, the weathering of the aircraft, the nose art, the unique features (blast tubes, repair patch, and unusual strakes below the nose). So, when I saw it, inspiration hit. Naturally, I started looking around for figures that may fit the bill... and equally naturally, nothing even close existed. So, I resolved myself to sculpt the figure myself, dog and all - a definite first for me. According to sources, the man in the 2nd photo above is Staff Sergeant Richard Hart, the Crew Chief of the Gladstone Flash, the pup is the squadron mascot (for whom I can find no record of a name), and no word on who the fella in the 3rd pic is. The aircraft is an A-20G-40-DO Havoc flown by Lt. William Paterson from Gladstone, MO, thus the name. It apparently survived the war and was presumably scrapped in situ somewhere in the South Pacific. I don't know the fate of Mr. Hart, Paterson, or the dog, unfortunately. When I built STINKY last year, I had shortlisted the Flash as a possible candidate, but ran into a snag with the cowlings. The A-20G kit from HKM comes with the smooth cowlings for the earlier variant, whereas the Flash had the later style with protrusions for each individual exhaust stack akin to the B-25. While I was working through STINKY, our very own @Uncarina took it upon himself to do some scratch building to form the later style cowls. I was envious of his methods and vowed that if I could get my hands on a set of cowls like that, I would build the Flash. Well, as luck would have it, Uncarina started working on it, then decided to shift directions, and put his kit - coveted cowls and all - up for sale for a screaming deal. I bought the kit on the spot, and with his blessing took over the build thread. Check in there if you'd like to see how this whole thing played out. Of course, as it turns out the A-20J/K kit that HKM recently released has the cowls I would have needed anyway. (sigh) Again, thank you @Uncarina for your hard work, generosity, and words of encouragement throughout the project - for that latter part, I'm grateful to everyone who chimed in on the build thread to offer words of encouragement and keep me going. ❤️ Aftermarket includes PE set from Airscale, Eduard wheels, and 1 Man Army stencil masks (super cool, BTW). All other markings are either homemade decals or, far more often, masks cut on my silhouette cutter. Weathering is everything - oils, enamels, airbrush, pastels, etc. This is the second A-20 kit from HKM that I've completed and I can't recommend it highly enough. It's really a fun build. I have plans for the J/K kit already. Anyway, without further ado/yapping - A Man and His Dog - The Gladstone Flash in New Guinea My MO of late has been recreating historical photos in miniature and I've gotten tired of trying to pull the source photos up on my phone or somesuch when trying to show the finished product. So, with a little basic groundwork and some ingenuity, that problem is solved. Check out the build thread for details on how the figure was sculpted. I used a resin mannequin to get the basic shape and scale. The mannequin includes boots and hands, while the head is a 1/35 head from Hornet. The body, clothes, doggo, and hat are all custom sculpted by me using a mix of Green Stuff and Magic Sculpt epoxy putties. I'd guess there's probably upwards of 10-12hrs of actual sculpting work here, though the whole project took several weeks owing to the amount of time it takes the putty to harden. I make no pretenses to be an expert at sculpting (or painting for that matter). This is the first full figure sculpt I've ever done, so while I'm happy with the results, I already see things I want to do differently next time. The aircraft is pinned and glued to the base so as not to make an unexpected and unfortunate departure. All markings including wing walks are masks. I used Future floor polish mixed with just a dab of olive drab acrylic to recreate the dope tape residue. It was applied (deliberately) sloppily with a fine brush. Shoulder patches are printed decals. If you look closely, you can see markings stenciled on the filler caps and various places around the fuselage. Those are from the 1-Man-Army mask set and they work really nicely. There are better, clearer pics in the build thread. It's tough to get a photo of the cockpit, but Uncarina did a nice job altering the IP so that it sits more correctly further aft than what the kit calls for. Reference photos show what appears to be a large (presumably) hydraulic leak streaking down the left nacelle, so I tried to capture that here. Thanks for looking!52 points
 -
my last built , enjoy52 points
-
Hi All Its time for another F-16 - This time it is one that is pretty special to me. I first saw the "Orange Lion" at a local airshow in 2012 and I thought it was the most beautiful thing ever. Unfortunately the weather was really poor so he mostly made (VERY) high speed passes. This was even before I got back in to modelling so at the time I had no idea I would be building a model 12 years later, but there you go.. The model is the Tamiya Thunderbirds kit, with a KASL tail conversion. The Smokewinders are from WANDD Studio and the pilot is from Reedoak. The travel pod is also from KASL. All markings are painted on except the data stencils around the cockpit. The paintjob was really a handful and tested my patience to the limit. The camera does not pick it up very well but the orange colors are all metallic. I used the two part set from MRP on top of a gloss black base with some highlights in silver. I am satisfied with how it came out in the end but I will not be attempting to do it again anytime soon The paint masks were cut with the incredible help from DN models once again I want to thank @Shujaa for helping out with a ton of images of the real aircraft he got from a personal walk-around. Incredible stuff. I couldn´t resist having a shot of this one in formation with my "Dannebrog" model.. Thanks for looking Niels52 points
-
*** Finished *** 1/32 Airscale Boulton Paul Defiant Mk.1 "Test build"
Out2gtcha and 50 others reacted to Tolga ULGUR for a topic
Today is the last stage of "Le Tour de Defiant". The Tour, which has been going on for almost two months, ends today. I would like to thank Peter again for making this experience possible. It was a great experience for me. I think he also was happy with the result. Thanks for watching.51 points -
It is done! I declared my Revell Salamander in 1/32 scale finished. It was one of the most arduous modeling projects I put myself into. Of course, I had to make many concessions along the way, but it is virtually impossible to foresee all the problems from the outset in a project like this one. Some parts were made three, four, or five times – only to discover that the last was not all that better than the first one. However, I enjoyed the journey immensely, as it was one of those opportunities when you can incorporate much of your research into the model, and, in the process, I shattered David Parker’s Panzer IV record by almost a year. I will leave with just a few photos, but I do, however, want to write an article showing the methods and techniques used to scratchbuilt all the details of the Salamander. This model is planned to be part of a diorama, over a flatbed being pulled by a maneuvering engine. The diorama will still take a while because my apartment is under a major overhaul. I have had a lot of support and encouragement from many friends during this project. Thanks, everyone! Rato Marczak https://ratomodeling.wordpress.com/ https://www.facebook.com/ratomodeling51 points
-
Well Kev, it’s time to hit the deck This auspicious date is perfect to announce what marks the start of the next journey for airscale. The Defiant kit is selling so the venture is a success in my eyes, meaning I will take a chance on another subject in what I dream will be a long line of new exclusively 1/32 kits The Typhoon, the brutish, powerful, hedgehopping, unrelenting powerhouse that didn't whisper death from above; it announced it with violence – especially after D-Day. I chose the car-door version, both because I think it is more atmospheric, but also because I thought the transparent parts would be easier to manufacture – bubbletops are hard and have seams…. that said, the centre section is modular so assuming there weren’t many/any other airframe changes it could be done afterwards Key with this kit is the partnership with Typhoon Legacy, where Ian Slater and team are restoring JP843 to fly. As mammoth a task as could be imagined so I wanted to help. A healthy % of the sale proceeds will go towards that. The kit will feature JP843 before her conversion to a bubbletop as one of the options. I am keen on suggestions for other options too, especially any that were in non-standard or interesting markings. I have also been working with Arthur Bentley whose drawings and CAD knowledge have really helped kick-start the project. So here is where we are at… the cockpit is virtually complete, the remaining structure about 90% done but not ‘kit ready’ and the surface detailing less than 50% ..and a few coarse test prints to check a few things.. I would anticipate another 4 -6 months of development / production and welcome any and all contributions to this thread so we, together can make this something to fill the gap in the market. We are off again Peter50 points
-

HK A-20G Havoc
The F-16 Freak and 49 others reacted to spook for a topic
Hi all Here my 1/32 A-20G. It's a good kit, easy to build which need details in some area (bomb bay, cockpit). I used Zotz decal for nose art and mission markings. I used paint mask for natinal markind, indivifual letter, serial number and squadron marking. Hope you like it.50 points -

Kotare Mk.I Spitfire
Loach Driver and 49 others reacted to Rod Bettencourt for a topic
Spitfire Mk.I 234 squadron August 1940. After seeing some of the beautiful builds posted here I thought I would give it a try. Quinta cockpit and HGW seatbelts were used. Paints were model master. I ended up using the kits decals which were just fantastic. I was waiting for an overcast day to get that England airfield look. Pics were taken with my Iphone. I Tried some studio type pics but I am terrible at doing that. I am not a photographer in any since. I was hoping for a few more pics but the rain came down. Outside photos are far easier for me. In the end it will look scale, or it will not. I sure look forward to more kits from Kotare. Thanks for looking and all comments are welcomed. Rod50 points -

I’m famous
KUROK and 49 others reacted to Pete Fleischmann for a topic
48th Scale..but Scott Brown at Bullseye (awesome dude) helped me with a custom 32nd scale sheet. Grabbed a couple of the new Kinetic 48th scale kits as well for this- Pete50 points -

FW-190A-8 (Gelbe 6) Crashed near Vreeland, Netherlands, January 1, 1945
ringleheim and 49 others reacted to jeroenpeters for a topic
This Revell model took me the better part of a year to finish. All masks, no decals (1Manarmy.be). 3D printed ejection chutes and all the aftermarket you can think of. Master, Eduard, HGW, etc.. The crash relic is from the this particular plane itself, gifted by Cees Broere. It's the edge of the aileron. The plane was hit by friendly ground fire during operation Bodenplatte. The pilot bailed out. Chute did not open and he fell hard on the frozen water. The trim gauge and button are both from a Fw190 left cockpit console. The base was shaped from aluminium.50 points -
Greetings all Here is my latest offering of a Ju87D-8(N) E8+HH that was operated by 1./NSGr.9 during the second quarter of 1944 near Florence, Italy. It was lost in action on 7th July 1944. The final camo pattern and colours are a bit of a departure from the kit call-outs, but the rationale behind the decisions because of actual photographic evidence can be found on the build article. 1/32 Hasegawa JU87D-8 kit Aires cockpit AIMS AB500 bomblet containers plus some flash hiders I poached from one of my AIMS Bf110 detail sets and an antenna isolator HGW seatbelts SB cannon barrels and pitot tube Quickboost Type A exhausts Quickboost Spinner and VDM blades Profimodeller detail set for airbrake hinges and underside bomb release Master Mg81Z barrels for the observer position Nice build overall, great having a big Stuka in the collection now!! Real bird is the 2nd aircraft of the image underneath...48 points
-
F-100C Super Sabre by Trumpeter in 1:32 scale — this is a typical Trumpeter kit, with quite a few accuracy issues. However, the kit itself fits together reasonably well and is definitely not difficult to assemble. The biggest challenge lies in the NMF (Natural Metal Finish), especially the heat-stained effects in the tail section.47 points
-
Now I probably shouldn't do this yet, but it's my company and I will do what I like My great friend Antonis Karydis has just sent me the box art he did for me rendering the kit parts and I am absolutely stunned - just take a look at this We changed the subject to PS - H as he didn't have an early Do17, but I like this one better, he is an absolute master of his art quite literally speechless...🤪 Peter47 points
-
the last one left the workshop at the same time as the mustang entirely covered in kitchen aluminum:47 points
-
Hello all Here is my JETMADS AJ37 #264/500 I haven’t seen any content referencing the AJ, so I figured I’d post this up. Everything written about JetMADS resin & 3D printed kits are accurate. Very challenging, but bags of fun. I decided not to use the kit's M70 rocket pods or 2x RB04 Anti-ship missiles (for the moment), instead mixing options for Shrikes, RB71 (Skyflash), RB75 (Maverick) and RB74 (Sidewinder) All pylons are fitted with tiny magnets, thus all weapons and the fuel tank are detachable. Thanks to JETMADS, and please enjoy.47 points
-
Hi All I decided to have a go at the Airfix 1/24 Spitfire Mk IXc - who doesn´t love a spitfire? - I really wanted to make a desert camouflage version as they have always been very attractive to me, but during the build I realized I have never actually built a Mk IXc in the standard Grey/Green Camo 😮 - So now you understand why immediately after building JE-J I started working on a desert camo version.. Call me crazy but the kit is actually really good and a joy to build. I did not want a heavily weathered aircraft, hatches open or engine compartment showing. It was all about showing off the beautiful lines of this incredible aircraft. I also don´t think, if I am completely honest, that the engine is detailed enough for a 1/24 scale kit - I hope someone will make a 3D resin engine with all the details on it and I will consider a 3rd model.. For aftermarket stuff, JE-J only has resin wheels but all external markings are painted on using the stunning 1ManArmy masking set - Not enough good things can be said about this set.. just get it! UM-B has resin wheels and the @airscale cockpit set as well as the Barracuda control column. All markings are painted on this kit as well. The Airscale cockpit is really nice but it does require a bit of work. The tolerances in the Airfix kit are very very tight so expect to make quite some adjustments. it does look great when finished though. On second thought - both models have a resin door, Master Model guns and the Eduard exhaust stacks - these are pretty essential as the Airfix versions are quite messy. Here Goes Thanks for looking Niels46 points
-
Hello everyone and I wish you a great year filled with models. These last few months have been dedicated to the construction of this Japanese aircraft, not the best known, nor the most beautiful but surely the most efficient! The Hasegawa box is very well made but lacks details and requires a lot of improvements. To do this I was helped by Eduard's interior board and turned metal guns. And I also carried out a complete riveting and stressing of the sheets on the entire cell. Also modifications on the intrados at the level of the fixings in the area of evacuation of the cases. National emblems also painted. Aircraft piloted by Shoichi Sugita of the 343 kōkūtai in April 1945. See you soon46 points
-
Pilot from Hasegawa kit, bomb from the spare box…rest OOB. Cheers Collin46 points
-

1/32 P-51D 'Big Beautiful Doll'
Greg W and 45 others reacted to David Mooney for a topic
So this is my Tamiya P-51D 'Big beautiful doll' complete. This a very highly recommend kit, if you can get one for a good price...buy it! On this build I used the Red Fox Studio set for the instrument and radio panels, Tamiya LP-11 and XF-62 fir the OD. Most of the markings (including the chequered front) are painted, but I wish I did the insignia...I was lazy here and I'm kicking myself for being as such. I hope you all like it! Feel free to send any critique as well, as we all learn from others critique :-)46 points -

P-51 D Revell 1/32 + Life Like Decals
Castor and 44 others reacted to Daniel Iscold for a topic
One less box at the stash. Hope you like it fellas!!!45 points -
Hi, I've visited the massive (almost 2500 models registered for competition) show in Moson today. And I want to share some interesting LSP presented there. I'm not sure if these were discussed here already, as I haven't been here taht often lately. Breguet Bre.693AB2 by mhmodels.cz coming in 1:32 later this year: S.B.S. Model's B-17G nose for HK kits (probably nothing new for most of you): F-4B Phantom II by redpill: And LukGraph looking great: I'll put some LSP models from the show into separate post. Juraj45 points
-

1:32 Dornier Do 17Z - ‘The Flying Pencil’
dutik and 44 others reacted to tomprobert for a topic
Greetings all… and Happy New Year! New Year - new project. I’m struggling at the moment to really get my teeth into a build so have put aside my numerous other projects for the time being and dived into this… the mojo is a funny thing. What we have here is a very rare example of the old ID Models’ 1:32 scale Do 17Z which Tigger now have on a very limited release. The first couple of sheets contain fuselage halves, the tail and nacelles: With another couple holding the wings - notice how the port wing has part of the nacelle integral, but the other not. Yes, I’m scratching my head too… I’ve also got two copies of the transparencies which will hopefully be some insurance against the inevitable muck ups! So - some careful removal of parts from the backing sheet and I’ve come across my first hurdle. As you can see, the fuselage parts are badly warped and the tail sections like a banana: However, some warm water and tabs added to the mating surfaces has gone a long way to straightening it all out: As you will see I’ve also removed the glazed cockpit area and bomb aimer’s bubble at the extreme nose, and also added the tail area which will eventually mate with the stabilisers: It’s all a bit rough right now but I feel I’ve got a good starting point to build upon - time (and mojo!) will tell… More when there’s more! Tom45 points -
I present to you a new build! The Trumpeter F-14B Tomcat in 1/32 scale. For the build, I used the following materials: Pitot tube from Master Cockpit decals from Redfox Studio Wheels and landing gear from Quickboost AIM-54 missile and BRU-30 bombrack from Reskit The paints are from Gunze and Real Colors.45 points
-
Hello friends, well, here it is, the latest baby from my workshop, the Tempest from Special Hobby. This is a Tempest flown by P. CLOSTERMANN when he was with the 56 squadron at Volkel in Holland, in early April 1945. This “US W” is far less famous than the “JF E”, but it did fly in aerial combat. All the main markings were made with CAMEO masks, except for the rows of black crosses/victories, which are decals. The SH model isn't easy to tame, but all the effort put into it has resulted in an absolutely superb model that pays homage to the real Tempest. A fantastic blend of raw power and finesse of form. I hope you enjoy these photos and I look forward to your feedback on my build. I'd like to thank John and Chuck again for the superb WiPs they made on this Tempest, as I've used them a lot. Thanks in advance for all your comments. Denis. The WiP is here.44 points
-
HK's Meteor Magic....Mk.4
Castor and 43 others reacted to David Mooney for a topic
Hello and Merry Christmas to you all, I hope you all have had a good time over the Christmas period. I took on this build after a few futile and very-very annoying builds, absolute epic fit issues with a few good branded kits that to be honest sapped a lot on modelling energy out of me. So, I took this HK Gloster Meteor out for the stash and set about it. Why this kit, well after all the issue and lack of enthusiasm, this kit didn't have many parts to it, considering the size 125 parts in a low count. Yes, ok, the low count does come with making the cockpit a bit basic, but you can do what you like to add extras to it, but this was a build and be happy idea. What HK did here was a good idea, if it was their idea, but its given a good base of a kit to build with a good fit and many things modellers can improve on. The stand out to me was the lower wing section....its one big part, now if certain manufactures did this, it'll be in at least three wing section (2x outer + 1 x Centre section) and two lower engine nacelles that would come with the fit issues to boot, so this as great. The decals that are in the kit seem to be losing integrity, breaking into many annoying bits from what I've seen in others builds, mine looked very dodgy even though I didn't intend to use them. I was going to mask all the markings to save all the decaling drama, which I'm glad i did. All paints are Gunze Mr Colour....love'em! Here it is.....44 points -
As you probably know already I am obsessed by seaplanes in short everything that floats and has wings. Aeromarine, Catalina etc... For years I have been planning, researching and working on a scratch built Dornier Do J Wal. Partly because it's a seaplane that will never get 'kitted' in a large scale, partly for the amazing history that this seaplane represents. I have been reluctant presenting my latest project, because I just didn't want to have another project which wasn't going anywhere... But now the project has reached the final phase and I'm ready to to share it... the Dornier Do J Wal - Amundsen and Ellsworth 1925 Arctic Expedition. History: In 1925 Roald Amundsen attempted to fly to the North Pole with five others in two aircrafts, the N24 and the N25. They started from Ny-Ålesund, Svalbard, on 21 May 1925 and flew side by side to 87°43' N, where they landed on leads in the drift ice after more than eight hours in the air. N24 had been damaged on take-off and it was now obvious that the plane could not be flown again. The six men struggled for 3½ weeks to create a take-off strip on the drift ice. On 15 June Hjalmar Riiser-Larsen managed to get N25 into the air with all six men on board. They landed off the north coast of Svalbard and were able to hitch a ride back to Ny-Ålesund with a small ship which was in the area by chance. There were huge celebrations when the men returned to the capital. I have been building continuously on the 'Wal' (Whale) to be able to finish it by 2025, the hundred anniversary for this attempt on reaching the North Pole. I started the building the 'hull' a long time ago and it' exactly way a boat is build. The basic shape has been build using 1 mm styrene. The build stalled for a couple of years and is was close to ending as another idea that went absolutely nowhere... Last year I suddenly had the motivation to start the Wal again by trying out a method for the building of the wings. The wing spars have been cast in resin. Tesa double-sided tape The 'skin' for the structure of the wings.. To my surprise, it went surprisingly well. The scratched cockpit build Instrument panel from photoshopping the real instrument panel and using HGW 'WWI Aircraft Instrument Bezels' To be continued...44 points
-
1:32 Dornier Do 17Z - ‘The Flying Pencil’
andrey75 and 43 others reacted to tomprobert for a topic
It is almost certain that as soon as I apply the finishing touches to this, a top quality injection kit will be announced! I’ve made a bit of headway this week with the nose and cockpit area. Due to the complexity of the forward fuselage shape, I decided to chop the nose off, mate the two halves and take advantage of the ample room to start detailing the basic structure. Blanking off the wing root apertures was a little tricky, but other than that it’s all very simple use of Evergreen and plastic card, with lots more to add, but a start is a start… This also means I can work on the bomb bay as a separate entity too, and then join them all together when the detailing is complete. Seems to be working ok thus far… More when there’s more! Tom44 points -
ZM Hs129B2/R2
Castor and 43 others reacted to jeroenpeters for a topic
Some progress shots:44 points -
Legendary Blackbird - YF-12A "Project KEDLOCK" (3D Printing in 1:32 scale)
Johnny Cloud and 42 others reacted to Serkan Sen for a topic
Hey everyone, I'm thrilled to finally share some progress on my latest build – a 1:32 scale Lockheed YF-12A! This has been a really fun project, and I'm excited to get it to a stage where I can show it off. For now, I've got some photos of the entire aircraft, along with a few close-ups to highlight some of the details I've been working on. You'll notice the engine model isn't there yet, but I couldn't wait to give you all a sneak peek. Once the engine model is completed and installed, I'll definitely be updating this post with more pictures to show off the finished magnificent J-58 powerplant. I'm really looking forward to hearing your thoughts and feedback! Below you can find the WIP link in case of interest. Regards, Serkan43 points -
This is my recently completed Spitfire XIVe using the Laminar Flow Design conversion set and the Tamiya 1/32 Spitfire XVIe kit. I also threw in LFD's cockpit details, a raft of Barracuda Studios Spitfire upgrades, Master brass gun barrels and a HGW fabric seatbelt harness. Major markings were painted using custom cut masks from the Portrait craft cutter. Maintenance stencils were from Aviaeology. The complete build log can be found at: Final model photography using Canon 5D Mk IV with EF 24-105 f/4L IS processed in Adobe Lightroom.43 points
-
*** Finished *** 1/32 Airscale Boulton Paul Defiant Mk.1 "Test build"
dutik and 42 others reacted to Tolga ULGUR for a topic
Today's update43 points -
The Danish emergency medical helicopters are of the type EC 135, which are constructed by Airbus Helicopters. Norsk Luftambulanse A/S is the supplier of Danish Air Ambulance, hence the Norwegian register (LN) The 'Plinth' is scratch build from photos and measurements... I decided to completely rework the interior as well as the equipment since the Danish helicopters differs from other emergency helicopters. There are many minor alterations as well as bigger conversions from the Revell EC-135 kit. The idea emerged when I was hospitalized for a month, three years ago. I watched the helicopters landing an taking off. Later I was invited to visit one of the bases of the emergency medical helicopters. Luckily I was able to pick up a kit from Britain as the Revell kit has been out of production for some time.. It's always a special experience if you are able to build from the 1:1 original. Hope you like it! Cheers: Kent43 points
-
Hello! I present to you the Trumpeter KAMOV KA-29 HELIX B in 1/35 scale43 points
-

Grumman Widgeon
kkarlsen and 42 others reacted to patricksparks for a topic
I have always liked this airplane, so I figured I would make one in 1:32 scale. I have drawn up and 3D printed the parts and put some of the preliminary pieces together to see how it looks, happy with the results, it is a very diminutive model even in 1:32 scale. Wanted to share some images. Pat43 points -

1/32 scale Hobbycraft Mustang Mk1 conversion
Brad-M and 42 others reacted to Snowbird3a for a topic
1/32 Hobbycraft Mustang Mk1 conversion, depicting AM251 from 414 Sqn (Sarnia Imperials) RCAF flown by F/Lt George W. Burroughs DFC. Using the excellent article in IPMS Canada’s RT Vol24 No1, and aftermarket including Aires wheel well, Hussar resin wheels, Grey Matter exhausts, Master gun barrels, KORA prop decals, RB Sutton harness, Barracuda cockpit stencils, Montex canopy masks, and for the first time; I painted the markings using Pmask masks, Only the serial number and aircraft identifier were decals from IPMS Canada. Tamiya colours used overall43 points -

1/18 Hawker Sea Fury - VX628 - 1831 Squadron RNVR
themongoose and 42 others reacted to airscale for a topic
afternoon ladies I took the plastic card wing cores and added foam & filler to generate the blanks, careful attention paid to the leading edge intakes & radiator shapes. Chopped out the landing lights and added vacformed clear replacements and then the last few weeks have been busy skinning the forms... ..I started with the cannon blisters and worked outwards - these are the hardest part and it is much easier to make panels fit things like this, than try and make the blisters fit in existing panels.. ..because of the wing fold, the panel & rivet layout is quite complex.. ..also started on the radiator skinning, though not much done yet.. ..starting to look like an aeroplane ..think I will finish the tops and move onto the bottoms, which are even more complicated - prolly 30 - 40,000 damned rivets on this one... TTFN Peter43 points -
Hello, Here is another finished one. Kittyhawk model with Eduard photoetched cockpit, Aeromask for the camouflage, and homemade silhouette masks for markings. Homemade air intake covers.42 points