Leaderboard
Popular Content
Showing content with the highest reputation on 06/30/2019 in Posts
-
Thanks Ryan and Wingman I’ve made a start this morning and it’s going together surprisingly quickly. I’m getting as much sticking together done on the interior as I can before paint. As mentioned before, the plastic is fairly soft, the cockpit floor seems a teeny bit warped - but should squeeze into shape ok. I’ve done a test fit of the fuselage halves and it goes together - with the internals fitted - with some pressure. I’ll have to keep an eye on that as I progress. Not quite a snap build. That said, it’s a fun build already - it’s a lovely scale to work with ie it’s not too fiddly. Here are some progress pictures. A few sink holes to fill: The first part of the Airscale set fitted (kit detail sanded off) I’ll need to add some kind of seat cushion to replace the kit one moulded with straps. Thanks for looking, Guy7 points
-
So, the trip to Ysterplaat Air Force Base Museum was fun. Measuring the Mirage IIIR2Z tail fin confirmed my suspicion of the rudder issue. The angle of the rudder hinge line on the kit is not correct, and the bottom of the rudder is too high up. First the rudder actuator fairing was removed, as it needs correction too.Then I glued the rudder in place, making it easier to mark the new lines. The resized rudder was then cut out, and filling done with Tamiya putty. Here's a picture of the original tail fin, and the progress on the corrected one below it. Cheers7 points
-
Thanks for the replies guys. I had to do some fairly unsavoury things to the tube frame to get it to fit inside the fuselage but got it closed up in the end. Once this was complete, I have turned my attention to getting everything lined up and strengthened. A lot of these resin kits require extra work in this area. I have suffered the heartbreak of watching the wings of a very expensive and time consuming resin kit slowly droop over time and as a result am now super wary of these types of kits and take measures to prevent it from happening. I drilled a hole in the horizontal stabilisers and inserted brass rod. As can be seen, the part is thin enough that light easily passes through it. Visible is the rod and also two lighter holes that I have drilled which I will insert rod into that run across the fuselage to the opposite side stabiliser. I then drilled a hole through the fuselage to allow insertion of a brass rod into each lower wing x 2. This is in addition to the rod that is inside each wing already, done during manufacture of the kit. Due to to the reasonably rough nature of the kit, this will allow me to ‘pre bend’ the rod to get the dihedral right and will take the guess work out of it come time to glue the wings onto the fuselage. The tail was next. The kit parts have small pins on them that match up to corresponding holes. I find with resin kits that these are far too easy to break and for that reason, have also strengthened this part. I filled the original location of the holes in the kit due to them not matching up properly. I then drilled a hole in the tail and inserted a small brass rod, sharpened at one end that allowed me to press the part against the fuselage. This leaves the impression of the rod on the part and allows it to be drilled out in the precise location. The rod can then be removed and replaced with a longer one, making the overall assembly much stronger. You can see the sharpened rod and the small divot that it left. Next up was the engine. There is no positive way of locating the engine in the cowling in the kit. Due to complex way in which the cowling fits over the engine, I needed a way in which to be able to test fit the engine repeatedly and always have it located in the same position. I also like to have the props of my kits be able to be removable for transport and to be able to suffer the occasional ‘test flick’ from kids and sadly adults that should know better at the shows that I frequent. I needed to devise a method of solving a few problems at once. I glued a large diameter brass tube into the firewall, as close as I could get to the centre. This part of the kit is a little messy due to the way in which it has been manufactured. I then drilled out the engine to accept a medium sized diameter of brass tube. I then cut off the resin shaft on the propeller and drilled and glued into it a small diameter brass tube. This fits into the tube located in the engine, which fits into the tube located in the firewall. Problem solved. Strong and aligned.5 points
-
evening all thanks for saying such nice things Thanks Jay - always appreciate you helping me understand the airframe I have made the covers but will not attatch them until much later so they don't get squashed.. Now that is an offer I can't refuse Hawk! I will definately be in touch I added the hatches & panels to the underside and rivetted - there are a number of small fragile cup shaped air scoops to be added both sides of the main structure, but I will do that much later so I don't damage them.. I will also do the doors for the oil & radiator coolant exhausts at some point down the line.. ..with that done - I need to stop skinning and get the cockpit finished & installed as the scary bit will be building up and skinning the rear canopy area. I learned from the Spitfire not to race too far ahead with skinning as when you need to do major bodywork & filler it can be really difficult not to damage it and to work around it.. so remindingmyself where I was, I found a few assemblies to do... ..first the Hydraulic Hand Pump seen here.. ..nice turned handle, a tubular & hex section piston case and some cast bracketry.. ..I made up a kit of parts - the most complex of which was the piston housing - this was done from hex brass stock on my lathe... I have so much to learn using that tool... ..the parts were painted & assembled.. ..and a dry fit to check it all fits in.. ..next the Landing Gear Control Handle.. the black funny shaped thing seen here under the vertical trim wheel.. ..this was made from two chunks of square brass stock, shaped with a cutting disc in my dremel... ..not perfect, but near enough for me.. ..and painted and it's decal added.. ..lastly, the control column and mount.. ..I actually made the column ages ago and don't know what I did with the WIP pics, but suffice to say the pistol grip was shaped from a chunk of plastic and had various fittings & the trigger added, the shaft was turned in my dremel with it's subtle taper.. The torsion tube mount thing is again ground from a chunk of brass and is very simplified as all it needs to do is represent the shapes as it all sits under a cloth gaiter.. ..it is articulated, so you could go flying ..not painted it yet, but in situ for reference.. ..should get another good stint in tomorrow so may be back soon.. TTFN Peter5 points
-
I've been slowly progressing this build with a bit of weathering, using Flory's Dark Dirt applied over a couple of coats of MRP Super Clear gloss varnish (which isn't very gloss at all, but that suits me right now!). I like the flexibility of dark dirt, it dries very quickly (especially with some help from a jet of air from the airbrush) and I can easily take off just as much dirt as I wish, or re-apply and repeat where necessary: As can be seen from the lovely photo of the balbo shown elsewhere, these flying school Harvards were real workhorses and whilst no doubt carefully mechanically maintained it appears their cosmetic appearance was less important. I'm trying to get the Harvard and the Stieglitz finished asap because my fingers are itching to start a "Hawker double build" shortly that I'm rather excited about!4 points
-
chugging along nicely, i have started using SMS paints and the spray really well lots of touch ups to do, but couldnt resist a group shot with my stowage4 points
-

Make the others jealous
karimb and 3 others reacted to themongoose for a topic
Only the shadow knows!4 points -
Hi alal, Here my last built : the Trumpeter Mig-21 F13 in Hungarian colours. I Used Pavla resin cockpit, Master pitot tub, HAD covers and decals. Hope you like it.3 points
-
Thanks a lot mates! Thanks for the hitn Max, I may give them a try if I encounter a problem with oils. The flat coat - AK matte and ultra matte (1:1) - went on last night. I'm not a 100% happy with their appearence. Despite using retarder and flow improver they didn't level well. A lacquer based flat coat from MRP is already in the basket. But overall I think it's okayish. More pictures will follow tonight if I get all the small bits and pieces done.3 points
-
HK B-17G 5 1/2 yrs on the Shelf of Doom
Victor K2 and 2 others reacted to marauderdriver for a topic
I forgot I did the plexi floor under the bombadier3 points -

HK B-17G 5 1/2 yrs on the Shelf of Doom
Victor K2 and 2 others reacted to marauderdriver for a topic
Bomb Bay3 points -

HK B-17G 5 1/2 yrs on the Shelf of Doom
Victor K2 and 2 others reacted to marauderdriver for a topic
Radio room Gotta fix the floor3 points -

HK B-17G 5 1/2 yrs on the Shelf of Doom
Victor K2 and 2 others reacted to marauderdriver for a topic
This is were I left off 5 1/2 years ago....Gonna get back to this...One of These Days This last pic is one from the old camera3 points -

My big project! Trumpeter 1/16 Panther G
nmayhew and 2 others reacted to curiouslysophie for a topic
Sorry for the delay but here are a few more pictures for people who asked. If you want to see anything in detail, let me know!3 points -
Hi all, I've just received a rather large box from a nice delivery man. The new Airfix Hellcat! I've already got the Airscale cockpit set (photo etch & decals) - which looks lovely and a set of HGW seatbelts (Mosquito - they looked closest to me in the absence of any Hellcat ones in this scale). The kit has plastic moulded harnesses which are ok-ish but not for me. The other thing I’m trying to get is some custom masks - I would say essential in this scale. Although, I have just noticed that Funkdecals are producing a part decal, part mask set which looks perfect - except I didn’t initially want to do a dark blue one. I’ve just finished a factory finish Corsair (primer) and that’s an option too. I also like the Fleet Air Arm options. But basically, 90% of all schemes are US Dark Navy Blue which will be tricky to make interesting. The more appealing 3 tone schemes are restricted to the F6F-3. So before I get started, some obligatory sprue shots: Lovely big box! The instructions have 310 stages! 600 parts, so not a weekend kit... The decal sheet: Hopefully this should give some scale: The slightly iffy seatbelts: The stressed skin effect: Cockpit detail: Engine Sprue: The clear sprue looks good: To summarise, it’s impressive but doesn't exude the quality of a Wingnuts or latest Tamiya kit. That said, I’m sure in the right hands it could look spectacular. Will update once I’ve got started. Thanks for looking in, Guy2 points
-
my last buit , enjoy : voila voila2 points
-

1/32 Revell FW-190 F-8
JefH and one other reacted to curiouslysophie for a topic
Here is my first post of a plane, indeed my first ever plane kit! I’m having lots of fun with it! I have chucked every aftermarket part at this kit as I like loads of intricate detail. I’ve also decided to open up many of the panels to get a better view inside. I didn't take pictures before finding this forum, so I’m already a chunk of the way through. I build not too full historical accuracy, but I keep it in the realm of possibility. Today I finished the engine; a truly wonderful kit by Eduard. I hope you all like it! Sophie If anyone know of a better way to get pictures up on here, I’m all ears. Photobucket is terrible!2 points -

Live Resin figures for HH-60 Pavehawk
Dany Boy and one other reacted to Pete Fleischmann for a topic
Calling the combat K9 done (except for a few touch ups I just noticed-) I wont likely pose the dog with a PJ specifically as shown here- don’t think PJ’s are trained as dog handlers- but you get the idea-2 points -
Work started on the correct size pylons for the JL-100 pods. Cheers2 points
-

1/32 Revell FW-190 F-8
AlanG and one other reacted to curiouslysophie for a topic
Thank you Alan It is a lovely bird to build. The fit could be better, took a fair bit of filling and sanding to get it smooth (might just be my lack of skill though!). The eduard sets for this kit are great, highly recommend the engine and cockpit sets.2 points -
1/32 Early F-15B Eagle - 58TTW
Paul in Napier and one other reacted to RichieB for a topic
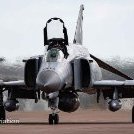
OK, progress (a bit!) I've mostly been tinkering with the pylons and fuel tanks but decided to switch to the cockpits just so I can paint something. The front pit is the Aires early model which is very nice. I have yet to add the dial instrumentation as that bit comes when I add the lighting, The sidewalls from the Aires kit are also quite nice. The holes have been added for cockpit lighting. The rear tub is the modified Revell one with a resin replacement for the IP. Again instrument dials need adding. At some point I'm going to have to work out how to sandwich these two halves together so they fit the front fuselage. The jet jockeys also get some green. They look a bit shinier in the photos than I remember, must be newbies! Clearly their heads will be added at some point but I find it easier to paint them separately and I'm toying with the idea of adding squadron markings to them rather than have them plain white. However, not seen many pictures of early F-15 helmets painted this way so it will be a bit of artistic license if I do. And something to sit on. I've got some additional PE to apply when the pilots are added. Well, another small step closer. Just plucking up the courage (and will power) to rivet and add missing detail to the external aircraft surfaces which are missing from the Revell kit for the most part.2 points -

HK B-17G 5 1/2 yrs on the Shelf of Doom
Victor K2 and one other reacted to marauderdriver for a topic
Nose with the bombardier and the "ACE" navigator!2 points -

HK B-17G 5 1/2 yrs on the Shelf of Doom
LSP_Paul and one other reacted to marauderdriver for a topic
It was kinda neat to open the box and look at what I did, so long ago. Hope my eyes will hold out. AHHH! all finished with this build2 points -

HK B-17G 5 1/2 yrs on the Shelf of Doom
Victor K2 and one other reacted to marauderdriver for a topic
I think I may have figured out how to post my pics2 points -
Well, this sucks... The Jl-100 pods seem to be about 2.8mm too small in diameter. Then there's the blast vents for the rocket pod, only three instead of six. Which means they'll be oversized as well This is most certainly not a fixer upper, but a new set will have to be scratch built. Note that the inboard blast vent has a cover facing rearwards. Cheers2 points
-
Hi guys, Next I would like to tackle the tail fin, but can only get to museum on Saturday to take accurate measurements on the Mirage IIIR2Z. In the meantime, work started on reshaping the JL-100 rocket pod cones. The ones in the kit are way too pointy, and maybe more fitting for one of Madonna's costumes from back in the day... Here's a picture the progress made on it so far. Cheers2 points
-
1/48 Tamiya F-14A Tomcat VF-84 Jolly Rogers
Landrotten Highlander reacted to madcat911 for a topic
Been working on this one on and off for a while now. It is the much lauded Tamiya rendition of the venerable F-14A Tomcat. The kit was built with the addition of Fine Mold's plastic seat belts and weighted wheels from DEF Model. Painting was done with Mr Color lacquers and weathered with enamels and oils. Decals from the kit but they were a little thick. With superb engineering, this kit was a joy to put together. Feedback welcome and hope you enjoy the photos! Mark1 point -

Tamiya P-51 with upgrades
scvrobeson reacted to WasatchAviator for a topic
Here is my first build here on the site. Let me know what you think before I put the 2 halves together! HDW Seat Belts and Baracudacals placards1 point -

1/48 Roden Pilatus Porter
Alain Gadbois reacted to kensar for a topic
Finished this workhorse. My first Roden kit. Nice detail, but panel lines are wide and shallow. Added details include an aluminum spinner, turned on the lathe. Thanks for looking, comments welcome.1 point -
Hi MARU5137 for the warm welcome and kind words The basic shape for the replacement JL-100 rocket pods have been lathed with the kind assistance of Jonathan from "Battlebirds Models", as I don't have the right equipment for turning goodies this size. Once I have refined it, I'll make resin copies and start adding the finer details. Cheers1 point
-
Ehmm, Peter, there's something new and shining flying over England these days: G-IRTY by David Whitworth, on Flickr But I think you're not thinking about your next project yet, are you? Juraj1 point
-

1/32 Revell FW-190 F-8
nmayhew reacted to curiouslysophie for a topic
Hi Jerry! I’m in the UK, another plucky Brit, lol1 point -
What a gorgeous bent wing. And a pleasure of a kit to put together on tamiya’s part1 point
-
4th of July Eagle Aviation books sale.
LSP_Kevin reacted to EagleAviation for a topic
4th of July Eagle Aviation books sale. Ends Sunday 7th of July. 15% off all books http://scaleindetail.com/desktops1 point -
NA Harvard IIa 20 SFTS Cranborne S Rhodesia (finished)
mozart reacted to ade rowlands for a topic
I really like that. Great work.1 point -
That looks sensational, Max! You're making my fingers itch to build another one myself. Kev1 point
-
You may have seen my thread about the B and all the recommendations have come to this kit, so watching with interest. Steve.1 point
-
New I-16 Type 24 from ICM
esarmstrong reacted to Tnarg for a topic
Great to see the type 10 released. I wish they would do the early versions of the family like the I-15 and 152. Spanish Ratas / Moscas call my name. Tnarg1 point -
I signed up for free with IMGUR and have never had any problems. Photo bucket sucks.. and not well !! Some stunning detail on that engine !! Can't wait to see more. The FW-190 is one of my fav aircraft.1 point
-

FLYING - Flying Fortress after the "Flak-Kat"
Victor K2 reacted to marauderdriver for a topic
http://http://1 point -
Apologies for the lack of updates, but with a book deadline looming, and other mitigating factors, I just haven't been able to spend any time at the bench. I did manage to join the fuselage halves, fix the errors that Vincent pointed out with the cockpit, and get it installed. You'll also notice that I've installed the lap belts from the HGW set. I'm not 100% happy with my work on them, but they'll be OK under a closed canopy I think. The shoulder straps will follow once the area around the cockpit rear decking has been finished. At this point, I thought I'd better test-fit the nose components in situ with the canopy, and was in for a nasty shock: The resin piece in the front of the windscreen is supposed to end flush with the cut in the fuselage, but as you can see, it protrudes quite a bit - about 1.5mm on the starboard side, and about 1mm on the other. I have no idea what I've done to cause this, and no real idea how to rectify it, either! Admittedly the canopy parts have yet to be cleaned up properly, but there are no sprue burs on the front and back edges anyway, so I don't think that's the problem. And my fuselage cut point would be out by the width of a panel line at the most. I also failed to heed the warning in the instructions that the forward bulkhead might need some trimming to ensure the top piece fits correctly. I installed it unaltered, and now the fuselage is slightly too wide at that point. That should be an easy fix, so it's not a major concern right now. I'll be back when I can figure out a solution to the fuselage problem, which at the moment is a bit of a show-stopper. I'm guessing a bit of shim-and-trim, but we'll see. Wish me luck! Kev1 point
-
A little painting in the past few days. I have preshaded the lower portion of the aircraft. I used a dark grey to add some tonal variation to the white undersurface. I have also highlighted the panel lines with a black marker. A little work on the front gear. Main gear. This got a little wonky because I did not attach the wing correctly. I have attached it too high on the fuselage and in order to compensate I had to make the main gear longer. Gloss white has been applied. Later, Dan1 point
-
1 point
-
Just thought I’d add a stock image of the Airscale set:1 point
-
Well after seeing it at Telford and Cosford I just had to get one to keep my Hawker Typhoon company. Cheers Dennis1 point
-
I-16 type 10 on sale now: www.icm.com.ua Juraj1 point
-
thanks for the comments guys, i just finished a big contract, i'm back to being retired again, so i get on the bench for few hours a day not just few hours a week, really speeds builds up I started on the stowage and remote gun pod, everything is still glossy, i'll give it all a dull coat the sand treatment when I'm finished I'm having trouble with my camo painting its a lot harder than i expected, i'll finish one complete backpack before i start the other, i need to try and perfect a good technique. Youtube here i come I got my SMS camo paint, they are an Australia paint company with good reviews so will be interesting to see how they spray, first i need to get a face mask, nasty stinky paint1 point
-
1/35 Bushmaster - I want my Emu - FINISHED
D.B. Andrus reacted to Robthepom for a topic
all ready for paint, i bought SMS paint set, hope it arrives tomorrow rob1 point -
and Type 10 in process http://www.icm.com.ua/news/610-i-16-type-10-wwii-soviet-fighter.html jan1 point
-
I've built their new 1/32 P-51D Early and FW-190A8 and both were outstanding kits So it's hardly an absolute1 point



.thumb.jpg.174cdcc09687ac8381b7989a64fbe821.jpg)


