Leaderboard
Popular Content
Showing content with the highest reputation on 05/26/2019 in all areas
-

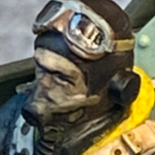
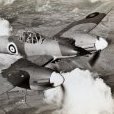
Tamiya's 1/32 Mustang and Corsair, both B&W
shadowmare and 10 others reacted to Fancherello for a topic
Hello I've been back at my B&W project and the Corsair's engine is now ready to get its exhausts. I eventually put stripped the ignition crown and reworwed it with Anyz connectors, spark plugs and braided wire. I used some connectors for the magnetos. no cheat with colors ! bye Fanch11 points -
hello again folks Hi Craig - I only do this when using annealed litho, or the soft ali I use for compound curves - a good example of this comes in a minute when doing the stabiliser fillets - it's a really good way of getting a virtually invisible seam rather than trying to butt two complex edges together.. So, fillets.... they are all curved as you woulkd expect, some in multiple directions - I was hoping the dorsal fin was the last panel as the very tip of it overlaps the fuselage skin I can't add until the cockpit is in.. but no, it's the first panel down - I guess as it's the least removed in service.. ..to get an idea of the area, this is for a P51C without a dorsal fin - I couldn't find too much on one with a fin and all the resto pics I have of Lopes Hope do not yet have all the fillets fitted so some assumptions were made from what I could see that they are pretty similar to a 'D' model.. ..you can see curvature & shapes and the fittings that fasten them too ..I did the dorsal fin but forgot to take pics, so this is the upper forward fillet first.. ..a sheet is bent & taped down to start the forming process.. ..a ball pein hammer is used to gently beat it into shape, and helped with balsa rubbing blocks and hard wood coffee stirrers.. ..here I am trying to get it to conform to the leading edge and the curved part that runs out onto the fuselage.. ..after shaping a number of scaled templates were used to derive the shapes - these are side views so I have to allow for the shape as it curves away from the eye.. ..and soon all the fillets were in place ready for final shaping & smoothing - at the leading edge you can see where the panels overlap - by sanding away the overlap a perfect seam results - in fact on the full size one this is a butt weld which is finished on the outside.. ..after final finishing and finessing some of the edges, the fasteners were added - this was a vet labourious process as each one must be punched, then marked with an awl for the fastner, then flattened, then added - there are about 60 each side.. ..once the other side has it's fasteners (I can only do so many at a time without getting bored..), I will move along the underside to the air scoop & exit under the fuselage.. TTFN Peter10 points
-

Italeri TF-104G
Loach Driver and 8 others reacted to MikeC for a topic
Coming sometime in the future to a magazine (hence only one photo - sorry, no more or I'll be in trouble with the Editor), here's my rendition of the Italeri two-seat Starfighter. The subject was an aircraft of 31 (Tiger) Sqn, Belgian AF, 1983. The tip tanks were used for the 1983 NATO Tiger meet, just before Belgium finally retired the F-104. Decals by DACO, intake covers & chocks by Video Aviation, pitot by Master, and RBF tags by HGW. Thanks for looking.9 points -

"Ironclaw 500" - Grumman EA-6B Prowler, Trumpeter/scratch, 1/32
RandyB and 7 others reacted to Starfighter for a topic
Cheers everybody, it's bee a while since I finished my big Prowler - buying a new background for my photo booth was a good opportunity to finally take some photos of the finished model. For those who haven't followed the build, here's the link to the WIP thread: https://forum.largescaleplanes.com/index.php?/topic/57040-how-to-destroy-an-expensive-kit-with-just-a-few-cuts-or-prowler33/ Photo quality is not ideal, I've been playing around with the photo settings but I am obviously not a good photographer... Anyway, comments, questions and critique are welcome as usual. "Beaker" waiting for the rest of the crew to board the aircraft.8 points -
Tamiya F-4J finished in the colors of VF-143 Pukin' Dogs: Taproom 102, USS Enterprise The right/starboard side is the 1971-72 cruise; the left/port side is the 1972-73 cruise with the late CDR Harley Hall adorning the canopy frame. Outstanding AOA Decals. Paint is Testors MM Gloss Gull Gray FS16440 and Gloss White. Radome is Testors Gloss Black, brushed on, no streaks at all, so shiny.8 points
-
I used Top Studio 0.6 mm rivets (TD23086) as screws and rivets from Archer as rivets. The upper wing under construction.6 points
-
Hello there, after a short break, there is a very little update. One thing that caused a bit headache here and at my other ongoing projects are the navigation lights. Now i got clear resin for my 3d printer, and printed some parts, that match up with the contours of the wing tips when viewed from above, but arr otherwise square. The actual lights are holes, which got some red/green paint inside. The parts are attached to the wing tips with superglue, and then get sanded down to match up with the wing surface. The printed parts are very easy to sand. I'll try to polish them to get a shiny surface. But I already got a nice result after covering the clear part with "Glue 'n' Glace", some kind of white glue. In the pictuer, the green light is just glued, while the red one is already sanded down. On the dark test-wing-tip, the clear part got some Glue 'n' Glace. I'll try this on the PZL 37, too. This might even be the solution for the Hampden One potential problem of those clear part might be some yellowing when exposed too long to UV light. We'll see how they behave over time. Cheers Alex6 points
-

P-47D-25 & P-47D-30 1/32 Hasegawa
AlexM and 4 others reacted to Miloslav1956 for a topic
Today update.5 points -
1/32 Hasegawa/MDC Bf 109G-14 Hartmann - Built in 2007
daHeld and 4 others reacted to Thunderbolt for a topic
finished:5 points -

The Academy AH-1Z decals are fine.....choose your paint wisely
D.B. Andrus and 4 others reacted to Dave Roof for a topic
After reading a handful of complaints from a few modelers regarding the decals in the Academy AH-1Z, I decided to do a quick test. First, not only is one of the colors called for incorrect (36320), one of the paints they recommend are Vallejo. I would strongly suggest you DON'T use Vallejo's air colors as they are way off. The correct colors for the AH-1Z are 36375 for the bottom and 35237 for the top. In this test, the paints used are Ammo acrylics 36375 and 36320. This was used to check for color contrast as the decals "should" be printed to match 35237 as that is the color used for the markings on the real aircraft. The gloss used was Mr. Hobby Super Clear out of the can. Now, I have used 36375, 36320 and 35237 from Ammo, Hataka (lacquer) and AK real air colors. While all three brands respective colors are slightly different shades, they are close enough for me to conclude that any one of these three paints will provide the same result. I will be doing a test on a chip painted with 35237 to see if the decals 'disappear'.........they should. Hope this helps. Dave5 points -

MWP Project: Mirage IIIC "Ça va sans dire!"
Uncarina and 4 others reacted to aquatarkus10 for a topic
Hi to all In this update I made a structural change to the model concerning the intakes opened I coated the fuselage with metal wire and colored the ventral panel with chrome-yellow. I fixed the Pitot tube of the Air Master with its adapter. I have highlighted all the details of the tail and the fuselage as well as the metal covered sub-wing tanks with advanced coating technique (MWP) I wrote the new rivets on the model with the 1/32 scale riveting machine and this is the final result: and now, the final result of this session: for more info & pics:http://www.adventurephotomodels.com Thanks for the attention George5 points -

ICM 32033: Bücker Bü 131A is on its Way
Alain Gadbois and 3 others reacted to LSP_Kevin for a topic
Just saw this on Facebook: Kev4 points -
MWP Project: Mirage IIIC "Ça va sans dire!"
Out2gtcha and 3 others reacted to aquatarkus10 for a topic
Hi Craig, Thank you for appreciation. At the moment I used only a light pass with steel wool "00 00" to get the details highlited. For weathering with this technique(MWP) I usually use the procedure that I show you below only for illustrative purposes: B-25 J Kit HK 1/32 scale model "Lady Lil" and weathering + stress effect: Nakajima Ki 44 Type II "Tojo" Hasegawa kit 1/48 scale model George4 points -
I've been cracking on with the engines and getting them into the nacelles so I can complete the piping and wiring. Once they're in I can start to look at the undercarriage assemblies. Oh the nacelles!!! Ejector pin alert!! The engines fitted into the nacelles really well and the remainder of the pipes and wiring fitted well although it's a little fiddly at the end. The hardest bit was getting the automatic fire extinguishers into place, next time I'll definitely fit the first before the engines go in. The interior of the nacelles is painted cockpit green then washed with a light brown wash with some gloss varnish in to mimic the film of oil that always clings around these enclosed spaces. Later I'll finish it off with some darker, sootier deposits on the inside to show the engines actually got used! As far as the undercarriage goes, I had a look through the instructions and did a few mock ups and realised that the undercarriage is either down and fixed or tucked away in its housing which was a dissappointment. As this model is to be made "in flight", I wanted to have the undercarriage fitted but retracted but that's not an option. Therefore, although I've built and painted all the assemblies, they're not going in On a better note I'm compensating by really going to town on the cockpit area. I've got to be careful because much of the reference material is for various variants, mainly the FB VI and I'm building an NFII so a lot of the cockpit controls present on the fB variants don't appear on the NFII I've built up the control panel area which is one part that differs between variants. The NFII had no bomb gear controls but did have separate assemblies for the early AI IV radar. The link wires between the separate boxes was of the horrid plastic kind so I took them off and replaced them with real wire ones The decals fit individually onto the clear plastic backing plate but they fit on the front which seems a bit daft. They also don't want to stay put as they're so small so a bit of crystal clear adhesive was needed After the instrument panel was painted, and weathered the dials fit in from behind. I then put a drop of gloss varnish on the face of each dial to make sure it stayed and also to give a lens effect. I painted the interior of the radar hood with a green nail varnish to try and reproduce the green iridescence from the CR tube at the base of it Finishing the nacelles next and more work on the cockpit. Thanks for looking4 points
-
1/32 Hasegawa/MDC Bf 109G-14 Hartmann - Built in 2007
Martinnfb and 3 others reacted to Thunderbolt for a topic
4 points -

Me-109 E-3-a Royal BG Air Force
josebagasteiz and 3 others reacted to ShelbyGT500 for a topic
Thanks Kev Now lets detailing the lower part of the engine: Also gear-bays detailing - imitation of leather covers for protection from dust and dirt: Add some missing rivets of the upper part of the wings: And the instrumental panel from Yaho is awesome : Cheers guys4 points -
1/32 Hasegawa/MDC Bf 109G-14 Hartmann - Built in 2007
Gazzas and 3 others reacted to Thunderbolt for a topic
Further cockpit details:4 points -
1/32 Hasegawa/MDC Bf 109G-14 Hartmann - Built in 2007
XOPCT and 3 others reacted to Thunderbolt for a topic
The cockpit assembled and painted. I eventually decided not to use the MDC instrument panel, as I will show later. I thought the Eduard IP was more realistic in appearance. These were the colored PE panels where each gauge ring was etched and colored separately - the panel alone took hours to assemble.4 points -
Attitude Aviation Buchon Conversion
Starfighter Jock and 2 others reacted to LSP_Kevin for a topic
It seems like the longest time since I've been able to work on a model, and this is my attempt to claw my way back to bench and at least try to get something built. Having lost my mojo due to the extended break, none of my started projects have much appeal to me at the moment, and having promised Espen I'd build this one after reviewing it, I decided it would be a great project to get back in to the swing of things. So, what's the project, then? I'll be using Hasegawa's Bf 109G-6 kit, and combining it with the Attitude Aviation As Hispano HA-1112-M1L (Buchcon) conversion, to build "Red 3" from the movie Battle of Britain: For more details about the conversion set, check out my review from back in January this year: https://www.largescaleplanes.com/reviews/review.php?rid=2177 I haven't cut any plastic yet, but am hoping do so tomorrow. Before we start I want to thank both Kent Strickland and William Lawlor for their efforts in supplying me with a Hasegawa Bf 109G-6 kit, and also Espen Tjetland of Attitude Aviation As for the conversion set. Hopefully some actual modelling in the next update! Kev3 points -
1/32 Hasegawa/MDC Bf 109G-14 Hartmann - Built in 2007
Dany Boy and 2 others reacted to Thunderbolt for a topic
Hi all, I wanted to share with you a kit I built in 2007 when I was 18 y/o. I had read the Blonde Knight of Germany a couple years before that and was inspired by Hartmann's story. I'll post this as a WIP, since I took a handful of WIP pictures at the time. The process of getting into medical school, then completing it, and now residency has kept me away from producing meaningful work in the last decade or so, but as residency reaches a more stable and predictable point, I am hoping to get back into the hobby meaningfully. I have been following fondly all of the amazing work on here over the last few years. Any and all comments and critiques are appreciated. The build: HAS Bf 109G-14 MDC Bf 109G Cockpit MDC Bf 109 G Spinner MDC Bf 109G wheels Eduard Luftwaffe PE Seatbelts EagleParts Bf109G spinner EagleParts Bf109G supercharger intake EagleParts Bf109G radiator housing Eduard Bf 109G instrument panel Eduard Bf 109G exterior Eaglecals Bf 109G decals Gunze Acrylic paint Construction began with the cockpit. IIRC, the MDC cockpit was very high quality, and was not difficult to install.3 points -
My fascination with Soviet Cold-War military hardware continues unabated. The Hind is arguably the most iconic helicopter gunship ever conceived. Sure, it has been technically surpassed by now, but not before striking fear into the hearts of all who tried to run or hide from its near alien presence! Given the pivotal role the Mi-24 played in Afghanistan, it is hardly surprising that at the same time it would end up in another supposed Cold-War proxy - Angola. It was flown by Russians, Cubans and Angolans (and possibly even East Germans) during some of the most intense modern combat seen on African soil. As in Afghanistan, the American "Stinger" would prove to be a deadly opponent, as well as the Soviet's own RPG, but a little known South African weapon would prove to be the most deadly of its opponents. I was inspired to build this after seeing Malcolm Reid (a fellow South African) do a beautiful job with the Trumpeter kit. http://www.saairforce.co.za/forum/viewtopic.php?f=21&t=8917&sid=7b9f0cc308e989bd28f8621829bbaeb9 Malcolm mentions a couple of interesting shortcomings in his build, and I will try to address them in my attempt at this great looking kit. The first is a question of two and a half degrees. It seems too little to bother with, but if you look at the Hind a lot, it becomes very noticeable. I mentioned in my MiG-29 build that Misha had done a sterling job in correcting this, but I am going to try a short-cut to get the "twist". In these pictures you can see how the "cockpit" is offset from the rest of the fuselage, and it is most noticeable by the apex of the canopies not being in line with the centre of the engine intakes. When on the ground, assuming the oleo's and tyres are equally inflated, the main fuselage lists to starboard when viewed from behind. I will concentrate on theses two points. The kit's cockpit and cabin are pretty well represented, but as with most Trumpy kits, just need that little bit extra. The Eduard PE set is used as a base, and then fleshed out with some extra styrene bits. Some vents added to the ceiling and a bit of structure and wiring on the aft bulkhead. The front seat was given a parachute made with leftover PE and lead foil that golfers use - handy stuff. The rear seat was left as a bucket seat, and some extras added to the controls at the back. The door frame was thickened and detail added. the same will be required inside the canopy frames as the Mi-24 has sturdy framing throughout. The troop seating was a little basic, and flat - a little extra styrene goes a long way to improving the look. Kit buckles from the PE fret. Drilling out some of the overstated detail and adding wire guards is all that is required for these consoles. The space between the cockpit and the cabin is devoid of detail, probably because it can't be seen, but I couldn't stop myself! I'm sure you can make out the rest without any further explanation... I suspect that this area may present some challenges when it comes to painting Cheers, Sean3 points
-
Color study before i decide the final paint job.3 points
-
I promised an update with modelling content within 24 hours, and here I am 22 hours later with exactly that! I have to confess that I haven't really achieve all that much, however, but it is at least something. The major element of this conversion is of course the new nose, which requires removing the corresponding sections from the kit fuselage halves. Below is a photo of the terrific one-piece resin replacement nose, which I borrowed from the review: My first task was to remove the substantial casting block, and happily the cut locations are quite well defined, which makes the process easier. It's a tedious process, but it's important to proceed slowly. I used my JLC razor saw in a stroking fashion to initiate and then deepen the cuts, with any tricky bits being handled by a #11 blade. Here's the result: Still a little bit of refining to do, but it's basically ready for business. The next task, and probably the most important one of the project, is to remove the corresponding sections from the kit fuselage halves. I used the same technique outlined above for removing the casting block from the nose piece, but the instructions here a slightly vague, and I managed to misread the supplied photo, and remove too much material from the forward wing root section: In the photo you can see that I've glued a section of styrene strip into place to compensate for the material I removed in error. Once this has set strong, I'll set about shaping it to fit the corresponding cut-out in the resin nose. I'll also be more careful doing the other fuselage half! So, that's as far as I got before running out of time. I'm slowly starting to feel like I'm shaking off the rust! For the next update I aim to have the other fuselage half cut down, and the mating surfaces on all parts fitting nicely together. It's really important to go slow here and get this part right, as the success of the project rests on it. Kev3 points
-
That's a fine piece of art3 points
-
1/32 Hasegawa/MDC Bf 109G-14 Hartmann - Built in 2007
Martinnfb and 2 others reacted to Thunderbolt for a topic
Airframe assembled. The Eagleparts supercharger intake is evident. The MDC spinner fitted temporarily. I later placed this with the Eagleparts example. Airframe canopy masked off and airframe painted alclad aluminum as a primer3 points -
1/32 Hasegawa/MDC Bf 109G-14 Hartmann - Built in 2007
coogrfan and 2 others reacted to Thunderbolt for a topic
Moving on to the rest of the cockpit. The cockpit floor was impressively detailed. It is a shame that MDC does not make these cockpits anymore. The port sidewall The MDC instrument panel. The KG13 control stick. One of the best examples of this I've seen.3 points -
Tamiya's 1/32 Mustang and Corsair, both B&W
Greg W and 2 others reacted to Fancherello for a topic
Thanks a lot Kevin, much appreciated ! Who knows maybe i'll find the time and energy to build my 1/32 F4U-7 Corsair and conversion !! And I promise that one will be full colored ! Bye Fanch3 points -

Kitty Hawk OV-10 AM products
Vandy 1 VX 4 and 2 others reacted to Harold for a topic
PM me..3 points -
Me-109 E-3-a Royal BG Air Force
F-4Phanwell and 2 others reacted to ShelbyGT500 for a topic
Hi friends, thank you for kind words and I'm glad you like my work so far Now continue with more brass and led parts for detailing the interior and engine: Thanks for watching again Cheers guys3 points -
Same part for the upper wing: 3D printed ribs and 2,4 mm Evergreen tube for the spars. The only change is the inner spar a 2 mm carbon rod. Now it looks more like a biplane.3 points
-
Tamiya's 1/32 Mustang and Corsair, both B&W
shadowmare and 2 others reacted to Fancherello for a topic
Thank you very much ! I added some details tom the Mustang's wheel wells that have to look busy, they are now painted metal, yellowZC ( well, rather greyZC ) will come next bye Fanch3 points -
Tamiya's 1/32 Mustang and Corsair, both B&W
Biggles87 and one other reacted to Fancherello for a topic
hello I'm working on a pair of Tamiya's superb kits: a Mustang and a Corsair, both being built together as a Black&White project. I've been waiting a biy before sharing those as I wasnt too sure how this would turn into. The Corsait will probably be Ira Kepford's second Corsair which is very well pictured on both sides, the Mustang will be the famous Lou IV both for the fun of tackling the blue/green color issue on my way and because this plane and his famous pilot had their fatal fate not very far away from where I live. The Corsair has been started by using Brassin's set, the pit is superb, the engine too...but i'm making a step back with the latter as it doesnt allow a clean closed display with the provided cowlings. I'm now working on the kit's engine and will keep the Eudard one for a separate display. I've added a HGW harness set that I've been whitening to keep in the topic. I've been working on the Mustang the same way with personal work on he engine: casing texturing, wiring and bits. I also worked the wings and tried to replicated some worn puttying by working layers of surfacer. I used two tines of surfacer to help controlling that. As sanding is feathered, actually filled rivets extend a bit further that the surfacer color. The cockpit is done with some Barracuda add ons and I used some RBrinzan's etched templates for the floor. so now I'm working on the Corsair's kit's engine and the Mustang wheel wells ! bye Fanch2 points -
HobbyBoss B-24 Liberator
CATCplSlade and one other reacted to CharmyDown for a topic
This entry piqued my interest, and do you know what?... ...I thought 'ooh look, a Liberator'! Very nice, so much opinion has been posted here about this kit with very little experience of its reality. I have a D on preorder and started to question the virtue of this, so thanks for putting my mind at rest. I guess others hold a more purist view of this aircraft, but I agree with your take, it's about the art rather than the detail. I'm a Brit, so I'm probably a bit more relaxed about this plane than our chums across the pond. If it were a new large scale Halifax I would likely be getting a bit more anal about it. Respect to all opinions.2 points -

1/18 P51C Mustang "Lopes Hope the 3rd"
airscale and one other reacted to D.B. Andrus for a topic
No, no, no, F-86F next!!2 points -
Tamiya's 1/32 Mustang and Corsair, both B&W
brahman104 and one other reacted to Fancherello for a topic
Thanks a lot ! Sure, my source is www.anyz.io , done by a very talented modeller. Connectors and spark plugs also come from there. Bye Fanch2 points -

Looks like Revell's rebox of the BF 110C-7 went unnoticed here
Rick Griewski and one other reacted to Artful69 for a topic
I can't be sure ... but I THINK Tony was meaning that he might be closer to committing to buying an AIMS conversion now that the donor kit is much cheaper than the original Dragon kits??? At any rate John designed his F & G conversions so that ANY of the Dragon kits can be used as a base - the logical solution. All the purchaser needs to do is advise John of the particular donor kit being used and he will tailor the parts included to reflect the kits' needs. Rog2 points -

1/24 Hellcat pilots from putty to retail items
LSP_Kevin and one other reacted to elanlane13 for a topic
I have now received the box art photos for the FAA Pilot from Mike Butler in New Zealand Both pilot are now available on the Elan13 Miniatures website. I hope this series of posts was of interest to LSP members.2 points -
1/32 Hasegawa/MDC Bf 109G-14 Hartmann - Built in 2007
Martinnfb and one other reacted to Thunderbolt for a topic
Preshading.2 points -
1/32 Hasegawa/MDC Bf 109G-14 Hartmann - Built in 2007
D.B. Andrus and one other reacted to Thunderbolt for a topic
Airframe assembly: I used the MDC riveting tool using a blueprint as my reference The EagleParts radiator intake fitted.2 points -
1/32 Hasegawa/MDC Bf 109G-14 Hartmann - Built in 2007
XOPCT and one other reacted to Thunderbolt for a topic
the cockpit with the instrument panels swapped.2 points -
1/32 Hasegawa/MDC Bf 109G-14 Hartmann - Built in 2007
coogrfan and one other reacted to Thunderbolt for a topic
I painted the starboard sidewall based on what I thought was accurate, though I question some of my decisions now. Tamiya German gray base coat and model master enamels for colors2 points -

Tamiya's 1/32 Mustang and Corsair, both B&W
Fancherello and one other reacted to Neo for a topic
Omg until i saw you thumb in one of the picture i thought you where simply taking black and white photos of your build.... Dam thats some solid work there2 points -

Tamiya's 1/32 Mustang and Corsair, both B&W
Fancherello and one other reacted to chuck540z3 for a topic
Fanch. I am in awe of that engine, which doesn't happen very often with me, despite the many top notch offerings in this Forum. Just Wow! This is an 11/10. Cheers, Chuck2 points -
Scale black for 1/32: Anyuone got a formula?
misha71 and one other reacted to Fancherello for a topic
hi sorry i come late here, a long time ago a figure painter I really appreciated explained me that he'd always add some pale yellow to his black and since i've kept the habit to add some to any black that i find too deep. I have no exact ratio, just eyeball it. My go to yellow is Gunze H79 that i add either to pure black or tyre black. A ref I ALWAYS have in my paint stock. You can also add some olive green or red brown according to the colors around the part you are painting. Black is a lot of fun to paint ! bye Fanch2 points -
Guys, this Prowler is a sight for sore eyes, saw it in "the flesh" so to speak last year in Putte, Belgium, and it's just gorgeous. Congrats Ben on your build!! Jack.2 points
-
1/32 MH-53E Sea Dragon - 3D printed / scratchbuilt
Uncarina and one other reacted to Starfighter for a topic
My messy paint booth offers the perfect background for the requested photos - there are quite a few things to give you an idea of the size of the beast. I am currently running test prints of the sponsons on my Photon but I am not happy at all with the results. I may have to find another solution to print them...2 points -
Thanks Brad and Lothar! CZPetrP - you are a lucky guy - I would love to fly a Hind one day. Filippo, huge and deadly is right . Glad you are looking in Misha, hope you enjoy it. Hi Brian! Thanks Stefan, you have raised an interesting point. The modification I hope to pull off will also hardly be noticeable, only to OCD guys like me. Hi Tim, Chopper Aero-d is not something I studied, but here is an explanation from wikipedia (using Yefim Gordon as a source): "The main rotor was tilted 2.5° to the right from the fuselage to compensate for translating tendency at a hover. The landing gear was also tilted to the left so that the rotor would still be level when the aircraft was on the ground, making the rest of the airframe tilt to the left. The tail was also asymmetrical to give a side force at speed, thus unloading the tail rotor.[9] " The main-rotor still looks tilted on the ground in many photographs that I have seen, so I'm not sure about the landing gear tilt. The lead foil (tape) I use is similar to this: It is self adhesive, and I sometimes use it like that, or take off the sticky stuff with thinners and then work it to shape. It is nice and pliable but one has to be careful as it actually is lead (toxic). Thanks Ferry! Hi Greg, the louvre is a piece of "evergreen" sheet styrene .005 (0.13mm) thick. I cut the three openings at their lower edges, and then shape the louvre a couple of times with a rounded toothpick until it holds its shape. Hope that makes sense and glad you are enjoying it. Sean2 points
-
Tamiya's 1/32 Mustang and Corsair, both B&W
Greg W and one other reacted to Fancherello for a topic
Hello an thank you ! Scratchbuilder : So far i've set one rule: interior green is my "middle grey" which is Gunze's.... RLM 75/H69. Everything else is done around this center point by photo inspiration. I've found that some Prince August Ivory white and Ak/Meng's black make a good matching combo for brush painting. This has been the first difficulty, because some blacks turn blueish or greenish when being lightenened. Now i've found how to stay in my center grey tone, things fo more easily. ( Gunze Aqueous are not easy to brush !! ) Lightenening and darkening the base grey for airbrushing has been more easy too. I've worked the wood floor, seat, znd other details just by logic, pics and inspiration. Pictures help but also tell very different contrasts and colors....so i let inspiration go. I have a good help too: i delibaretely chose two classical birds in two very well known schemes for a reason ( not the only one though ). You know whuch color is a mustang pit, you kniw which color is a Corsair's pit, you have a picture in your mind of how you'd render a wood floor, etc. All this is helping my thing tell the story, actually I think that the reader is making half the job unconsciously. This said we'll see how it turns on the airframes. And LSP-Ray....i'm not comfy at all !!! I find that very challenging too and i'm not sure hiw that will work in the end !2 points -
MWP Project: Mirage IIIC "Ça va sans dire!"
Uncarina and one other reacted to aquatarkus10 for a topic
Hi, Thank you all for your attention and interest on this work. the first update concerns the coating with aluminum tape of the lower part of the fuselage. Application of Eduard details, finishing and test to fit. MWP (Metal Work Panels) procedure start: aluminum tape self adhesive (w/protection film): Eduard pe set: removing extractors: painting parts: washing parts ( mix oil/resin ): Iosso cream to polish: MWP procedure: rescribing & detailing panels - weathering: Mirage IIIc cockpit w/ air intakes & Snecma Atar 9c mockup: test to fit For more info & pics: http://www.adventurephotomodels.com Thanks for the attention George2 points -

1/32 Marauder
Model_Monkey and one other reacted to AlexM for a topic
Hi Jason , from my little experience with this printer so far, I would say yes. The printing area is relatively small (115 x 65 x 155 mm). But that's no big problem. If the parts are to large, the 3d-models could be devided into smaler segments. Here is a improved rear section of the Marauder (with openings for upper windows). The surface was just slightly sanded, and then got a coat of aluminium. Looks pretty nice. With this printer, interior fuselage frames can be printed as part of the main part, and they tourned out pretty sharp I started with the tiny signal bombs, also printed with my new machine (just a bit more than 1 cm long): Cheers Alex2 points


