Leaderboard

Popular Content
Showing content with the highest reputation on 03/23/2025 in all areas
-
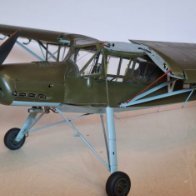
Tbd-1 Devastator - Trumpeter - 1/32
Durangokid and 17 others reacted to jimvit for a topic
Bonjour à tous, je vous présente mon dernier projet, un Devastator. Le kit Trumpeter est très bien réalisé, mais il faut avouer qu'il manque de détails, notamment dans le cockpit ! C'est pourquoi j'ai ajouté un kit Airscale Pro avec cockpit, hélice et mitrailleuse. Et des pièces d'Anyz. Demandez des pochoirs. Et un peu de grattage aussi. Dévastateur n° 1505 VT-6 L'équipage participe à une attaque à la torpille sur l'île de Kwajalein. USS Enterprise . Merci d'avoir regardé18 points -
AH-1Z Shark Mouth Academy 1:35 This helicopter model might surprise you. It’s one of those kits that you don’t expect much from, but it turns out to be a pleasant surprise. It’s quite affordable, but that doesn’t mean it’s a bad model. In Poland, we have a saying that if something is cheap, it can’t be good—but this model proves otherwise. It’s both inexpensive and well-made. The fit is excellent, so you won’t have any issues during assembly, and it’s also quite accurate in terms of details. In short, I highly recommend it!13 points
-

ICM Gladiator Mk.1 - 87 Sqn RAF 1937
monthebiff and 9 others reacted to Iain for a topic
Have also finished off the paint on the prop, the engine and the cowling. Colours for the prop based upon the Gladiator at Shuttleworth/Old Warden. Collector ring colours are an experiment at the moment - using Dark Aluminium, Bronze, Brass, Aluminium and Metallic Blue from the Xtreme Metals range... That's about it for now - determined to get this one done... Iain10 points -
Thank you Matt and Michael! The exhaust shrouds are very delicate and I didn't think I'd have much success trying to modify them so I decided to create new ones. The PE fret was previously scanned for such a possibility and I used the scan to trace a slightly modified set of shrouds in AutoCAD. I essentially made the cut-out for that front exhaust pipe deeper to accommodate that front exhaust pipe. The resultant masks were laid out on a sheet of brass and cut out using a sharp x-acto blade. The exhaust pipes were glued into place using PVA glue using an eraser tip to push them into place without damaging the paint. The new exhaust shrouds were then test-fitted. Once I was comfortable with these new pieces, I painted them to reduce the amount of masking I would have to do later. The painted shrouds were then glued into place using thin CA glue. I think that worked out ok. I'll spend some time cleaning up the joint between the brass shroud and the fairing in front of it but I can essentially move on.10 points
-

MK356 6th May 2025. A few more twiddly bits. It's a wrap.
Greg W and 7 others reacted to geedubelyer for a topic
Hello folk. The main paintwork is done. The colour varies depending on the background and lighting. It still looks more yellow in full sunshine...... ....but I'm not convinced it's quite yellow enough? I've made the decision to stick with it and move on though. This build represents the first time that I've used Tamiya rattle can silver as a primer. I should have keyed the surface because I have experienced paint lift on the underside blue which is making me nervous about using the remaining masks. I treated myself to another set of Sven's 1ManArmy masks but studying references reveals a need to tweak them a little. No criticism of the product at all since they are designed primarily to replace the Airfix kit decals and sized accordingly. On MK356 some re-alignment and modifications are necessary. (I've reproduced the 1ManArmy instructions for illustration purposes only but if that causes any issues I can remove the pics. @1ManArmy.be please let me know.) There need to be some compromises on my part. For instance, the underwing trestle position markings are much larger than on the actual airframe but they are obvious on the real deal so I can't simply leave them off. I could go with a 1/48th set but that's an expensive choice just for four markings on the underside of the model. My solution is to use the masks but see how they appear if I use more of a muted, subtle tone of grey instead of a rich black colour. On the upper wing one of the walkway stencils reads "Walkway Forward" but on MK356 it reads "Walkway Outboard". Lastly, on the full sized aircraft there were some red no step and dashed lines over the wheel bulge but these aren't included in the masks since they don't appear on the Airfix decals. I'm not entirely sure how to recreate those so any suggestions are welcome. Custom decals are the initial thoughts but there could be some silvering over the surface of the 3D printed part? I may resort to a hairy stick.... I shall tackle the underside first to practice and see how the MRP stands up to the stencil masking tape. (You might spot the paint lift along the leading edge in the pic above.) (Paint lift repaired in the above shot) Back later with the results.. *Edit. Happy to report that there were no further paint lifting issues. The masking material that Sven uses is top quality. It adheres well without sticking if that makes sense? I used some of the spare material bordering the actual masks to extend the area and avoid over spray. The red circled stencil was altered from the original to better resemble the actual placard. I'll need to go back and add a couple of lines carefully with a brush. When they go well, masks are hard to beat. Cheers.8 points -
ICM came up trumps with replacement rudder - the parts arrived last week - so I was able to crack on. I think the rudder, as moulded, is a little thick on the trailing edge - so the light fairing was removed with a scalpel and the insides of each rudder half sanded a la vacform to get the thickness right down - before bonding the two rudder halves and subsequently refitting the rear light fairing. The Squadron markings on the fuselage have been replaced - in the correct positions this time - and the badges on the fin modified to have the snake motifs orientated correctly. So, after a bit of a break, this is where we are: There's more, back in a mo... Iain7 points
-
I have started the process of preparing the surfaces for the linen effect decals, as well as cutting the shapes required. The shapes have been cut out. I either used the kit parts to trace the shape, giving some overlap where needed, or I measured distances and angles and marked and cut a few of the shapes. Orginally I had planned to prime everything in white, apply the decals to the "fabric" areas, and then spray the mix of aluminum doped paint that I made. I primed everything that was going to be the aluminum doped color white; however, while applying the decals to the ailerons I was struck by how nice the fabric effect was and thought that by overspraying the decals the effect might be lost so I decided to do an experiment using a spare part from the kit and some spare decal film. Below is one side of an aileron after decaling. You can see that the fabric effect looks pretty good with a faint silver hue, but there is no way I could leave it without overspraying in order to get a fair match to the non-fabric areas of the aircraft. So I primed a spare part, painted it the aluminum doped color and then decaled it. Below is the result after the decal has settled for a couple of hours. Even at this stage, before any cleanup of the edges and clear coating you can see both the aluminum doped and fabric effects work together well. The two parts next to each other make it obvious that spraying the aluminum doped color first provides better results. Unfortunately I did not of this method before decaling both ailerons. I am going to see if overspraying gives an acceptable result using the bottom of one of the ailerons. If it turns out to be ok I plan to just overspray those two parts - a little varience in tone/hue is ok with me - and if not, I have just enough decal film let to re-do both ailerons, sound be fun times! Ernest7 points
-

RAF FG.1 XV571 WILD HARE Phantom Conversion
Starfighter and 6 others reacted to Anthony in NZ for a topic
7 points -
It's been a busy time for "Cripes A Mighty". Especially today. First, let me show you progress on the middle wing/fuselage fairing. It's pretty cool. The wing/fuselage fairings need some back-up surface, so I designed and printed off exactly that, the two RH side parts shown already bonded to the fuselage and wing: Like nearly all of my aluminum skins, I first trace the outline of the part onto tape, then apply that tape to the aluminum. Here is the aluminum sheet trimmed up and ready for forming on the form block: Shown with the cool engineering drawing defining that fairing. Formed on the form block: And from there, bonded to the fuselage: Note that it joggles over the aft fairing already installed. The mid fairing was infinitely easier to do than the aft fairing. Before I could do the forward fairings, the engine cowl would have to be installed. But first a couple of other items: It was time to get with the flaps. First, painting of the invasion stripes, some weathering, and dull coat: Plus the fancy little drive links: I should remind everyone that the somewhat inadequate coverage of the white stripes (underlying color shows through) is intentional. The actual aircraft was that way. And bond onto the wings: I had originally intended the flaps to be movable, as you may recall. But it was just too much to ask. Positioned permanently at flaps 50 deg. And you know what? It was also time to get the radiator outlet door installed: No problem. That door had been sitting around for many months - I am glad it is now part of "Cripes". BTW - the actuating rod is a piece of .015 x .04 inch Evergreen plastic. Finally something easy. All this progress paved the way for another big milestone - engine cowl install: Yes - believe it! You all know how long that engine cowl has been sitting around. It was one of the first components I made. And finally, with the engine cowl installed, I could finish that forward wing/fuselage fairing. Form it first on the form block: Trim it umpteen times until it fits, and bond to the airplane: I have to tell you, getting a good match of contour and trim where the wing leading edge, the forward fairing, and the engine cowl meet is one of the biggest victories I have to show for this build. Huge sigh of relief. A bit of a whirlwind I know, compared to the snail's pace we are more accustomed to with this build. I still have to do the RH side forward fairing. That's next. And then I do believe that it will be time to finish off the landing gear, and adding the gear doors. And then it is going to be the aft fuselage and tail. Wow - is the finish line coming into view? Really no. The tail, tail gear, and aft fuselage are going to be pretty involved. Thanks for looking in; til next time.7 points
-

1/32 Westland Whirlwind with exposed engines, guns and everything else.
Greg W and 5 others reacted to jeroenpeters for a topic
Reprinted the slats in different resin. This one gives more detail and is slightly more flexible. Painting stage is not far off.6 points -
First cuts I always try to plan the early stages of a build carefully, step by step, to avoid surprises. The first focus is on the cockpit—after an initial assessment, I decided to modify the instrument panel and the pilot’s seat. Additionally, I sketched out the layout of gauges, controls, and control cables to ensure everything makes sense. The Oeffag D.III in Polish service had its machine guns mounted lower, below the cylinder line, to reduce the risk of fuel ignition during firing. The kit represents this variant, but the instrument panel is shaped like the one used in aircraft with higher-mounted guns. This means some modifications are needed—I’ll have to cut out a section and add a brass rod according to reference materials. The first components are now in hand—I’ve cut one fuselage from the sprues and divided them between the two models. The fit looks promising, so I’m hopeful that assembling everything won’t cause too many issues. For the cockpit, I’ve prepared a set of details from Taurus, including switches, gauges, a starter magneto, and a pulsometer. I’ll also be using instrument dials from a Yahu panel designed for the Albatros D.V. Wiring will be made from various wires and elastic rigging lines. The overall detail is really impressive. On close-ups, some minor artifacts are visible, but I think it’s all about having the right mindset when working on a model. Expectations should align with technological limitations, so let’s zoom in and take a closer look. That’s it for today—until next time! Lukasz6 points
-
Howdy folks, I've just published this week's What's New update. Enjoy! Kev5 points
-
Thanks Steve: I think I can make it out on one of the photos I have. So on with another short update. First, the postman arrived: these are near enough the right type, but will need colouring blue or black (they could be either): Next, back to the seats (pun intended ). I cut some plastic sheet to fit in the back, I'll fill that in with some filler later. Finally for today, I made a start on the tail boom. The basic structure is three parts, forming a triangular cross-section. Butt joints again, but in this case, not enough plastic to drill and pin, so I'll have to live with it. Taking it steady and giving it time to set, we see here two sides glued, the third side will hopefully add some structural strength. And I thought WWI biplanes were delicate!! I've also added some filler to the seats, more pics when it's set and I've shaped it properly.5 points
-

1/32 Mig-25_Foxbat PD
Anthony in NZ and 3 others reacted to Bekim for a topic
So meanwhile I am working on the wheel well and on the center line fuel tank....4 points -

Italeri F-104G Belgian air force, target tow
F`s are my favs and 3 others reacted to Grunticus for a topic
The main gear needs a lot of cleaning up. While trying to replicate Sean's approach to clear out the details in the gear bay I made a mistake and damaged the middle beam part 6A. I contacted Italeri for a replacement. I had already scraped away the spaghetti on one half. I have been thinking on an approach the more matches my current skill set, which is way lower than Sean's or most other's here. Maybe not so much for straight-up building, but I mean for modifications. What If I could create a blank bulkhead? I made a mask of the main gear ceiling bulkhead by airbrushing the contours on a piece of paper, adding the extra 2.2mm in the middle manually. This was then scanned in to Silhouette Studio, traced, and cut out on a piece of backing cardboard you find in Eduard PE sets, lightly scored in the middle, and bent to shape like the original part. A test fit shows I can do this, so I will make this part from stock matching the thickness of the Italeri part after I tweak the shape a bit more. That way I have a blank canvas to add all the details to, I will pick what I can do from both builds mentioned in the opening post. Before I start I will await the arrival of Daco's book. Cheers, Leon4 points -

Happy Birthday Hubert
williamj and 3 others reacted to Hubert Boillot for a topic
Thank you my friend 😊 ! Is the pic an invitation for me to tackle my DC-3 kit ? As I am finishing my NMF Cutlass, I am not sure the next one will have a (mostly) NMF finish, so I may choose another subject. Cheers Hubert4 points -
While any Phantom parts are welcomed, whats really needed for all the Tamaya 1/32 Phantoms is a revised rear fuselage. While the Es and EJs would also benefit, the J kits would most of all. The NAVY lettering on the rear fuselage just looks so wrong on the stock kit.4 points
-
I am calling this one done fellas the last coat of clear same bottle as before flatten a shade kinda miffed not bad but panel wash now nah that just went out the window.4 points
-
OEFFAG D.III – THE STARS OF THE WORKSHOP The time has come to introduce the key subject of this workshop – the aircraft. Both miniatures being built will represent the Austro-Hungarian Albatros D.III Oeffag, known in Poland simply as the Oeffag D.III. This was a licensed version of the German Albatros D.III, manufactured in Austria. The two models I am working on correspond to the final production version of this fighter, designated as series 253. Development of the Oeffag D.III The origins of this aircraft trace back to the Albatros D.II, which was the first to be produced in the Austro-Hungarian Empire by the Oeffag company. From that point on, the two allied powers took slightly different paths in fighter development. The Germans, maintaining similar engine power, focused on reducing the aircraft’s weight. Meanwhile, the Austrians continuously reinforced the airframe while also developing their own Austro-Daimler engines. As a result, the final version of the Oeffag D.III, the series 253, achieved an impressive 225 hp. In this way, the "student" surpassed the "master" – the Austrian Oeffag D.III outperformed the German Albatros, even its later D.Va variant. It quickly became the Austro-Hungarian Empire’s best fighter, proving its effectiveness in combat. During the Great War, it was flown by the monarchy’s top aces, such as Godwin Brumowski (35 victories), Benno Fiala (26 victories), and Frank Linke-Crawford (27 victories). Polish Pilots on the Oeffag D.III Many Polish pilots served in the Austro-Hungarian Air Service, flying the Oeffag D.III: Flik 3/J: Stefan Stec (7 victories, though only 3 confirmed), Stanisław Tomicki (killed in combat against Camels of No. 45 Squadron), Michał Solski, Franciszek Peter (6 victories, an Austrian who considered himself Polish). Flik 61/J: Antoni Skiślewicz, Henryk Skoczdopole (shot down in combat against Spads), Eugeniusz Roland (an important figure in Polish interwar aviation). Flik 9/J: Stanisław Bogusz. Flik 41/J: Maryan Gaweł, Henryk Szeliga. Flik 42/J: Zygmunt Kostrzewski, Jan Ryba. Flik 68/J: Kajetan Kosiński (shot down by Canadian ace Gerald Alfred Birks). Flik 48: Wiktor Zimmerman, likely the first Polish pilot to fly the Oeffag. The Oeffag D.III in Poland After regaining independence, Poland inherited a substantial amount of aircraft from its former occupiers. However, most of these planes were outdated or in poor condition. The urgent shortage of fighters forced Poland to seek aircraft from various sources. One such source was the former Austro-Hungarian aviation industry, where Poland had established contacts. The collapsed monarchy was in desperate need of funds, which enabled the signing of a contract for 38 Oeffag D.III series 253 fighters and 67 spare engines. The main beneficiary of this transaction was the 7th Fighter Squadron "Tadeusz Kościuszko", followed later by the 13th Fighter Squadron. The first fighters arrived in the 7th Squadron in July 1919. From autumn 1919 to spring 1920, the squadron was entirely equipped with Oeffag D.III fighters, a rare feat among Polish units. The availability of serviceable aircraft allowed the squadron to conduct combat operations for over six months without significant interruptions. Starting in April 1920, the unit began receiving Italian Ansaldo A.1 Balilla fighters, which gradually replaced the worn-out Oeffags. However, both aircraft types remained in service until the ceasefire in October 1920. Squadron Colors and Markings The squadron was divided into two flights: "Pułaski" Flight – aircraft with red-painted noses. "Kościuszko" Flight – aircraft with blue-painted noses. However, photos suggest that some Oeffags flew without painted engine covers. The Stars of My Workshop – Oeffag D.III "5" and "2" ➡ Oeffag D.III 253.218, fuselage number "5" Flown by Capt. Merian C. Cooper. This was Cooper’s second Oeffag, as his first was destroyed during an airshow celebrating the anniversary of Lwów’s liberation. Green fuselage, wings covered in Austrian "swirl" camouflage, red nose ("Pułaski" Flight), later with a white chevron for better visibility. Underside of the wings in natural fabric color, squadron emblem on the fuselage, and the number "5" repeated on the upper and lower wings. Initially had uncovered wheels, later fitted with wheel covers. ➡ Oeffag D.III 253, fuselage number "2" Flown by Capt. Edmund C. Corsi, leader of the "Kościuszko" Flight. Fuselage left in natural plywood color, wings identical to "5". Number "2" repeated on the wings, squadron emblem on the fuselage, wheels without covers. Metallic engine covers and reinforcements. What Period Am I Representing? The models I am building depict these aircraft as they appeared in May and June 1920, when they were deployed to Kyiv as part of a detached flight tasked with covering air raids on Dnieper River crossings. Soon after, both aircraft met their fate – but that is a story for future workshop updates. During the hot summer days, pilots removed the engine covers, altering the appearance of the aircraft – a detail I will include in my models. Historical Sources Profiles and information are drawn from: Tomasz J. Kopański, "7 Eskadra Myśliwska im. Tadeusza Kościuszki 1918-1921" Tomasz J. Kopański, "Ostatni lot bojowy kapitana Coopera" Peter Schiemer, "Die Albatros (Oeffag) – Jagdflugzeuge der k.u.k. Luftfahrtruppen" Tomasz Goworek, "Pierwsze samoloty myśliwskie lotnictwa polskiego" In the upcoming parts of this workshop, we will take a closer look at the fate of these aircraft and their pilots. That’s all for today – until next time! Best regards, Lukasz4 points
-

PZL P.1 prototype 1929, scale 1/32
Kagemusha and 3 others reacted to Marcin_Matejko for a topic
Thank you very much for taking the time to watch my struggles with building this model 😀 There will be no continuation. The end 😉4 points -
ICM Gladiator Mk.1 - 87 Sqn RAF 1937
williamj and 2 others reacted to Hubert Boillot for a topic
Nice work, Iain. The collector ring colors are notoriously difficult to nail. I’d try to reinforce the presence and randomness of the bluing - but I am not sure I would personally be able to achive a result as good as yours. Hubert3 points -
1/32 Praga E-114M Air Baby - Scratchbuild
Martinnfb and 2 others reacted to johnie hopper for a topic
Starting work on the cabin canopy3 points -

Mals Way goes Civilan, never done a ship before.
Alex and 2 others reacted to Mal_Belford for a topic
Back to building. Tamiya washes, Brown, Grey, black. Then drybrush with oils, mixed to get right tone, Green, Raw Sienna, Olive Green and white on a palette to get the desired lighter green for em winches....yep works for me.3 points -
Hawker Hurricane 1/12 scale scratch build
vvwse4 and 2 others reacted to hurribomber for a topic
The black fuse list plaque is made from a piece of the black Guinness beer can sheet metal that I carved with a needle.😁3 points -
Hawker Hurricane 1/12 scale scratch build
Starfighter and 2 others reacted to hurribomber for a topic
Well-the teeth must go to the dentist once more...l.o.l.3 points -
Hawker Hurricane 1/12 scale scratch build
Starfighter and 2 others reacted to hurribomber for a topic
Thank you all for the kind words. Next, I start with the handwheel for the elevator trim tab.3 points -
Just received the kit from Sprue Brothers (a very reasonable $75). I haven't built any KH LSP's so I didn't know what to expect but I was pleasantly surprised. It's surprisingly well detailed. An especially nice cockpit, in many areas, it compares well to the Aeries resin set. It does have some issues (as do pretty much all kits, minus Tamiya's latest stuff) but none of them insurmountable, even for a caveman like me. Gonna need to add some details, hopefully the Aeries cockpit fits well and I'll need to work on the flaps since they are designed to be installed in the raised position but in 99% of the time in RL, they were left lowered. The only real challenge are the rivets. KH went with recessed divots, while the real thing has pronounced rivets, especially on the fuselage. To be honest, looking at the kit parts, they don't look that bad. Initially, I am thinking about using a mix of Archer decals and .010mm solder balls (as I did on my KH UH-60L Blackhawk build) for the fuselage and leaving the wings alone and horizontal stabs alone. We'll see how it goes. Thanks to all for the info you guys provided, you convinced me to pull the trigger on this kit. If anyone's looking for a new project and wants something besides yet another Spitfire or grey jet, do yourself a favor and check this one out.3 points
-
Painted the camera compartment, trolley, small parts. Assembled the fuselage. Everything came together without problems. Photo compartment can be made open if desired.3 points
-
Coming along slowly got a bit of chipping done last night.The stand I built today had all the wood of course(lyptus,black oak,red oak and 3/16 plywood) scraps just had to buy wingnuts.3 points
-
Italeri F-104G Belgian air force, target tow
F`s are my favs and one other reacted to Grunticus for a topic
The Starfighter makes me reminisce abut times long gone by, like the 32nd TFS Phantom did. I remember well hearing these howling while they taxied at Volkel, and how they streaked throught the sky many times a day over the village I grew up in, and the mass fly-over at Deelen AFB, when a group of 40 of them streaked the field at very low altitude. It was the farewell flight of the F-104 in the Dutch air force. Oh No!..Anyway, I already built a Dutch TF-104G a few years ago, but frankly the Dutch cammo looks boring. Since I am a sucker for SEA cammo, and since I found one with really colorful distractions to the standard scheme I decided to build this one as a Belgian Lockheed C2 seated target towing F-104G. My previous Starfighter: And now this machine. I will have to scratch-build the Secapem type 250 containers. I have found two great inspirational builds here and here ( the latter of my subject machine). @Madmax Sean did such a fantastic job on the wheel wells that I want to try and come close to that result. Just amazing! I've ordered the Daco book, the three Daco decal sheets, Reskit Eduard Brassin wheels and the Aires cockpit (boy-o-boy will it fit or has it shrunk to 1/144 in storage?) Well, it's a start 😎 Let's see how it compares to the Aires seat. Addendum: Italeri provide these two A4 sized fantastic decal sheets with this kit. The quality looks amazing! The only miss I see are the too dark Greek roundels. They even provide country-specific languages. Apparently a cockpit was referred to as "Stuurhut" (Steering-hut) in Belgium 😁 The scheme (with changes for my specific subject): Cheers, Leon2 points -
Some sad news today, as Mike Swinburne has just informed me that LSP member Ronald Spencer (OldTroll) passed away earlier this month. Please join me in offering our collective condolences to his friends and family. Vale Ron. Kev2 points
-

Happy Birthday Hubert
Hubert Boillot and one other reacted to mozart for a topic
Hubert, great to see you here! Have a wonderful anniversaire mon ami!2 points -

Happy Birthday Hubert
Hubert Boillot and one other reacted to BloorwestSiR for a topic
Happy birthday Hubert!2 points -
Yo Jay, CONGRATS on reaching this huge milestone, Cripes a' Mighty is looking mighty indeed! A modeling tour de force, you and Peter Castle are leading the charge on the 3D front and it is absolutely glorious to watch, cannot wait for the next installments to see you work your magic on the empennage. - T2 points
-
It starts... After long measuring, side gun mounts are ready. Basic shape of engine bulk is finished too. Now I have to buy epoxy putty for final shaping.2 points
-

Antwerp(Hoboken) convention
thierry laurent and one other reacted to Erwin for a topic
...2 points -
Italeri 1/32 Macchi Mc.202 Folgore
JayW and one other reacted to geedubelyer for a topic
The master of understatement Brilliant work John. What I am in awe of is the neatness and precision of your work. Even in unforgiving macro your work is faultless. Inspirational2 points -
If your aim is to preserve any metallic shine in the original finish, then avoid acrylic lacquer clears and grab some water-based stuff. I currently use Alclad's Aqua Gloss, but there are others available. By the way, this tip comes from Scott Taylor, the proprietor of SMS paints, who manufactures a superb range of acrylic lacquer paints. He says that the solvents in acrylic lacquer paints will affect the orientation of the reflective particulate in the metal paint, dulling it. Water-based clears don't have this effect, and to that end, Scott is developing one to add to his range. (And for the record, Tamiya X-22 is not a water-based clear, but an alcohol-based one, and will have a similar negative effect.) Kev2 points
-

1/18 Scale P-51B 3D Print Build
CODY and one other reacted to Oldbaldguy for a topic
For some reason, this model does not get my pulse to thumpin’ like the Corsair did, but, Good Lord, Jay, this is epic in every sense of the word. It might even be too much in that there is no way anyone who has not followed along here on LSP can ever appreciate what you have done - there is too much perfection to see and we simply are too big to see it all anyway. Could you have done this were you an ordinary man on the street and not an engineer?2 points -

Humor?
D.B. Andrus and one other reacted to Martinnfb for a topic
2 points -
2 points
-

*** Finished *** 1/32 Airscale Boulton Paul Defiant Mk.1 "Test build"
Greg W and one other reacted to Tolga ULGUR for a topic
I am still waiting for the decals. Turkish Customs tripped me . Customs confiscated the customized code letter decals So, a small upate for today2 points -
https://www.detailandscale.com/meetup/t-28-trojan Maybe some other reason ??2 points
-
And finished: "At the toblerone line" The Toblerone line is real. Nowadays it is a hiking trail in Switzerland, but in WW2 it was a formidable defense line towards Germany. It earned it's nickname - you gues it - from the shape of the dragon teeth constructed there. They really look like the famous Toblerone chocolate bars. Enjoy! - dutik2 points
-
Started assembly from the nose compartment of the camera. I assembled the wing, the trolley and prepared small parts.2 points
-

What a Lark! Sud Aviation Alouette II - Finished!
Mal_Belford and one other reacted to MikeC for a topic
Well I've made a start. A read-through of the instructions confirmed my suspicions that a modular approach would suit this kit, and the first module is unsurprisingly the cabin unit. So no change with this kit, we start in the cockpit. The seats have moulded-in seat harnesses, representing said harnesses fastened and tightened. For the three rear seats, I decided the representation was good enough: I could live with this, given that if the aircraft was flown with these seats empty, their harnesses would be fastened - loose harnesses being a flight safety hazard, of course. These seats are fiddly to assemble as they consist of the "bench" (they were actually canvas on a tubular frame if I've interpreted photos correctly) to which is added the two side struts: the locations are not the most positive, but provided it's left to set it works. The front seats were a different matter, as the harnesses were more likely to be undone when on the ground. So the first job was to scrape off the harness ... ... then add the support frames. Can you see the problem here? The back and bottom of the seats are open, but in fact the photos I have show a filled-in back covering the frame. (Alas I can't post said photos here due to copyright, but a quick Google should turn some up for you). I'll have a think about how I do that while the glue sets properly. In the meantime, I ordered up two sets of generic RAF seat belts, then made a start on the rest of the cockpit, adding the collective controls and the instrument panel. Firstly, on reflection, I removed the "add-on" on the right, as it does not seem to appear except in later years. Some sort of nav instrument? Secondly, I decided that I will probably use the panel decal supplied in the kit, but may see if I can scratch something up from the spares box. Thirdly, I reflected that there would be some filler needed in this model. But I also made a start on the skid undercarriage. The kit supplies a pair of wheels, which were sometimes fitted to Army Air Corps (AAC) examples; but not to to my subject. However, the mountings were present on the real thing (presumably the wheels were a relatively easy optional fit if needed). So it was a simple matter of a couple of snips, some filing, and some drilling, to proceed from this ... ...to this. And that's where we are so far.2 points -
Thank you Kev, Alain and Ernest for your messages. @Philbucknall: thank you very much for your advice on the AK RC Markers, which saved my life! It's really comfortable to be able to retouch very precisely and quickly thanks to these Markers. A great discovery for me. The red, green and yellow position lights and the headlight: NMF + MRP clear paint + UV resin. U/C + wheel (Eduard) : External emergency sight (metal needle for cleaning printer heads) : Landing flaps : Probe Pitot : Tailwheel : Mirror on windshield (Molotov pen): Antenna wire : The inevitable tailwheel pin that broke under the weight of the P-47. I replaced it with a Ø1.2mm syringe needle! General view of the underside of the Jug :2 points
-
Overview of the sprues . There are 9 frames in the set ( one more frame with a stand will be , in my case it is not present ).2 points