Leaderboard
Popular Content
Showing content with the highest reputation on 07/04/2025 in all areas
-

F-108 Rapier.....it's here.
scvrobeson and 12 others reacted to Dandiego for a topic
First print in 1:32 scale. 8.5 inches so far. Dan13 points -
I received notice the 1/32 kit was shipping while on the road, was pleasantly surprised to find it in the mail on return. Initial impression is extremely positive, having built three fisher SPADS before the fire as a benchmark, this one has extreme potential for a great build. It's next on the bench, having to work a bunch of other "gottados" before I can get to it, but the overused term "buy with confidence" seems to apply. TT modelworks has really gone out on a limb with this project, and so far I have had nothing but a positive experience! More later as I get to it...10 points
-
F-108 Rapier.....it's here.
KiwiZac and 8 others reacted to Serkan Sen for a topic
I understand this unpleasant issue, Dan. I'm sure it's not a printer problem but rather something that happens due to the physics of the resin. I had to spend a significant amount of time finding a solution for such warped and distorted prints. I realized that this occurs when the part has a very long open cross-section in the Z-direction. My solution was to use supporting structures or temporary ribs/surfaces: I always use Elegoo printers. Currently, I have a Mars 3 and a Saturn 3 Ultra in use, and a Mars 4 Ultra unboxed. I must admit that the old Mars 3 has better quality than the Saturn 3 Ultra. However, I used the Saturn 3 Ultra to print all YF-12A fuselage parts, pushing it to its limits in all X, Y, and Z dimensions. There were misalignments at few z positions but the overall result was impressive: Serkan9 points -

MDC + Revell car door Hawker Typhoon kit bash
Landrotten Highlander and 7 others reacted to mozart for a topic
Thanks once again Dennis and Alan, much appreciated. Found this useful reference pic last night: and whilst I had the Tiffy upside down in the jig I thought I’d test the fit of the lower parts of the Sabre. The aft end of the scoop couldn’t fit because I hadn’t cut enough of the fuselage underside away so it was out with a sharp knife and razor saw for some delicate surgery. Needs a lot of tidying up, as do the wing roots, but it’s now more promising:8 points -

Digital HARM shooter FINISHED
thierry laurent and 6 others reacted to blackbetty for a topic
pretty hard to take pics where the whole thing is on them7 points -

Dragon Bf110E - Wolfgang Falck
Dennis7423 and 5 others reacted to denders for a topic
Thanks, Ernest! I've been slowly working on the little bits.6 points -

1:32nd scale Caudron G.3 (Anzani engine)
patricksparks and 5 others reacted to sandbagger for a topic
Hi all, Subtle weathering applied. Flory Models Dark Dirt clay wash and sealed with Tamiya Semi-Gloss (X35). Now it's onto pre-rigging, Mike6 points -
F-108 Rapier.....it's here.
Serkan Sen and 4 others reacted to Dandiego for a topic
More printed parts. 17 inches long, 18 more to go. Ejection seats need to be reprinted, not a good print. Dan5 points -
My 1/32 kit has some very clear canopy parts. I am glad it comes with two sets. There are canopy frames included and it appears it will not be so difficult to assemble. I am too curious to hear from some of the expert model makers on techniques how to assemble the kit. Very light model considering the size of the beast but it has some super cool details. i am sure Caracal will upscale the 1/72 decal to fit the kit. Talk to TTModelworks in Houston last week and he is pedal to the metal packing and mailing kits. I got mine hand delivered and the dude is a super cool fellow!5 points
-
8 Ball
HB252 and 4 others reacted to blackbetty for a topic
if anybody has pics of the jumpseat in the cockpit that would be great i found that two tanks from the ancient revell Nakajima kit can be converted to the radar pod i will use HVARs leftover from Pauls panther kit i drew/cut the decals (you can see the hubcap decal on the right) Ernies build over on LSM gives some details. i will keep the bombbay closed, so i dont have to source parafrags stay tuned5 points -
Digital HARM shooter FINISHED
thierry laurent and 4 others reacted to blackbetty for a topic
finally finished it and was taking pics immediately before i start braking off the static dischargers or the pitot (broke that one instantly)5 points -

1/32 Hasegawa Grumman Hellcat F6F-3
Martinnfb and 4 others reacted to Tolga ULGUR for a topic
Some more progress5 points -
8 Ball
HB252 and 3 others reacted to blackbetty for a topic
since i started doing scale models again i thought i would concentrate on modern jets, but due to some other subjects becomming availible i started to do props too. first Korean war subjects, now WW 2 stuff too. i have a Liberator, a B-17, a Mistel and this i want to do a Marine PBJ because i love the blue/blue/white cammo and lotsa guns i have some reference, but there are not many pics of these birds, maybe due to the short period thes were in action there was a set from profimodeler that is oop, but i think i can do without it, the decals are wrong anyway4 points -

KopeckyScaleModels
scvrobeson and 3 others reacted to CruZz for a topic
Hello, some news for you guys.... F-16 Barak conversion sets are restock. 32039 Blk 40 48020 Blk 30 48021 Blk 40 F-16 horizontal stabilizers are restocked also... 32036 32038 One new thing about them, the dischargers are 3D printed now. and one new set: 32063 B-17 Bomb bay doors are now available. (for those who dont need complete bomb bay) Thank you for your support! Cheers, JAN4 points -
1/32 Hasegawa Grumman Hellcat F6F-3
Martinnfb and 3 others reacted to Tolga ULGUR for a topic
Painting is almost complete4 points -
Congratulations! Outstanding modelling all the way! Also, the thread is both enjoyable and informative. And now I'd like to see (the model and two years of work on it deserve it) some "pro" style photographs. Big camera and natural light... Please! Juraj3 points
-
1/700 USS Nimitz and USS Pharris
patricksparks and 2 others reacted to denders for a topic
This gets worked on occasionally. I've been building the aircraft because I have two of the hangar deck doors open and I want to put some aircraft in there. There won't be lights inside, but If someone looks through or shines a flashlight into it, I want them to see something. These aircraft will probably be on the flight deck, but I'm only using two of them, so I thought it would be easier to start with the EKA-3s. I should have painted a primer instead of just going with white to start.3 points -
Currently printing next fuselage section with intakes on my filament printer. 25 hour print. Nose cone and ejection seats are printing in resin. 12 hour print. Won't see anything new until tomorrow. Dan3 points
-
This afternoon has been a bit of a head-scratcher involving the undercarriage and covers. Peter's wonderfully detailed u/c legs are a MUST for me, but I initially encountered a slight problem with using them alongside the other MDC parts. The parts that Peter has supplied to me are the main oleo plus an actuating arm: but the MDC u/c parts have the same, though less detailed, actuating arm. There is also a smaller arm which, on the Airscale offering is at the wrong angle to fit correctly into the MDC wheel well. So after much thought and trial fits, I have reluctantly cut off the "Airscale arm" at the indicated point: Not a lot is visible of the detailed parts so I'm ok with what I've had to do, but I'm slightly worried about the strength of the u/c structure; it's already quite a weighty model so I'll have to make sure that the oleo is firmly glued in place to take the brunt of the weight. But there's another difficulty too, the Airscale main wheel well covers, so detailed and beautifully rivetted, are considerably larger than the MDC ones: This is a shame but I'm afraid I'll have to use the original MDC ones, fortunately it appears that the Airscale oleos fit well with them: Next!!3 points
-
1/32 Hasegawa Grumman Hellcat F6F-3
Martinnfb and 2 others reacted to Tolga ULGUR for a topic
A few progress3 points -
Last evening and today is when I got to enjoy the fruits of my two-year labor. Buckle up - I have many pictures to show. First, before I proceeded to fuselage join, there was the exterior rear-view mirror, and the pitot mast. These items were easy to Rhino design, and printing was straight forward. Take a look: I am pleased with the mirror, and it is not as wimpy as the mirrors I made for Miss Velma quite a while back. Never-the-less it is just one more item that begs to be broken off. This model is just "festooned" with fragile parts that are easily broken off. Handling it presents the constant risk of breaking something. It's nerve-racking. When done, I will display it and leave it alone! BTW, you are going to see in all these pictures that the Malcolm hood is in various positions. I do that just to show off. I am so proud that the hood can move, I just have to show that it can. 🥰 And speaking of fragile parts that beg to be broken off - the pitot mast: 3D printed of course. The early P-51's had a long mast like you see here. The -D has a much shorter mast. Why? And then - I just flat ran out of things to do before fuselage join. So fuselage join: What a huge Mustang! Look how it dominates my messy modeling table. It bumps up against everything - my foam wing tip protectors were vital! My heart was racing. I was careful as a heart surgeon doing this join, and my 3D printed round support tool was helpful maintaining a (fairly stable at best) upright stance. It was just such a position where the landing gear post breakage catastrophe occurred a month or so ago. Perilous moments for sure, but no problem this time. Once joined, I could bond on the main gear wheels/tires with flats properly oriented. And then it was on to the MLG strut fairings, or strut gear doors, which I have been patiently waiting for for a very long time. They are part of the signature look of the P-51. This is what I wanted: My Rhino MLG door layout, with deadly accurate kinematic geometry, taken directly from the engineering drawings. Needed to assure the gear doors are hanging as they should. Here are the parts (for the LH side), which have been waiting a long time: Installation of the RH door was straight forward, although very delicate work. But the LH door - I had long ago broken off one of the clevis lugs inside the wing which position the top of the door. So I had to jury-rig a couple of crude locator tools to help. And here are the results: The above picture includes the uber-scary repair of the LH gear strut, broken off last month in the most calamitous mistake of the entire build - a build that had plenty of calamities. I can make out the repair, but I hope nobody else can. I am happy with the gear strut fairings. And for new-comers, this Mustang has mismatched tires. On purpose. Also - that last picture shows the results of the big rake angle adventure, which took up lots of oxygen in this thread, and was a many-days-long hand-wringing affair. I think we have a correct rake angle here; let's hope it stays that way.... Once those doors were installed, this model was 99% complete. Lacking only these: Those bomb racks are from Model Monkey - I ordered them along with the rudder pedals and WM seat quite a while back. These racks are beautiful, and appear quite dimensionally accurate - I think I am going to use them, and you will see them installed next post. I am undecided whether or not to make 75 gallon tanks for this kite. But for now - let me flood the zone shamelessly with Cripes a' Mighty pictures: That, ladies and gentlemen, is a 3D printed 1/18 scale P-51B - a two-year effort. She is not perfect by any means, but by god she is dimensionally correct in all respects. Hope you like what you see. Next post will be about the bomb racks, and then I think it will be time for an RFI. Thanks all of you for supporting my effort on Cripes A Mighty.3 points
-

New Spitfire from Kotare
monthebiff and one other reacted to Kagemusha for a topic
Full profile of N3071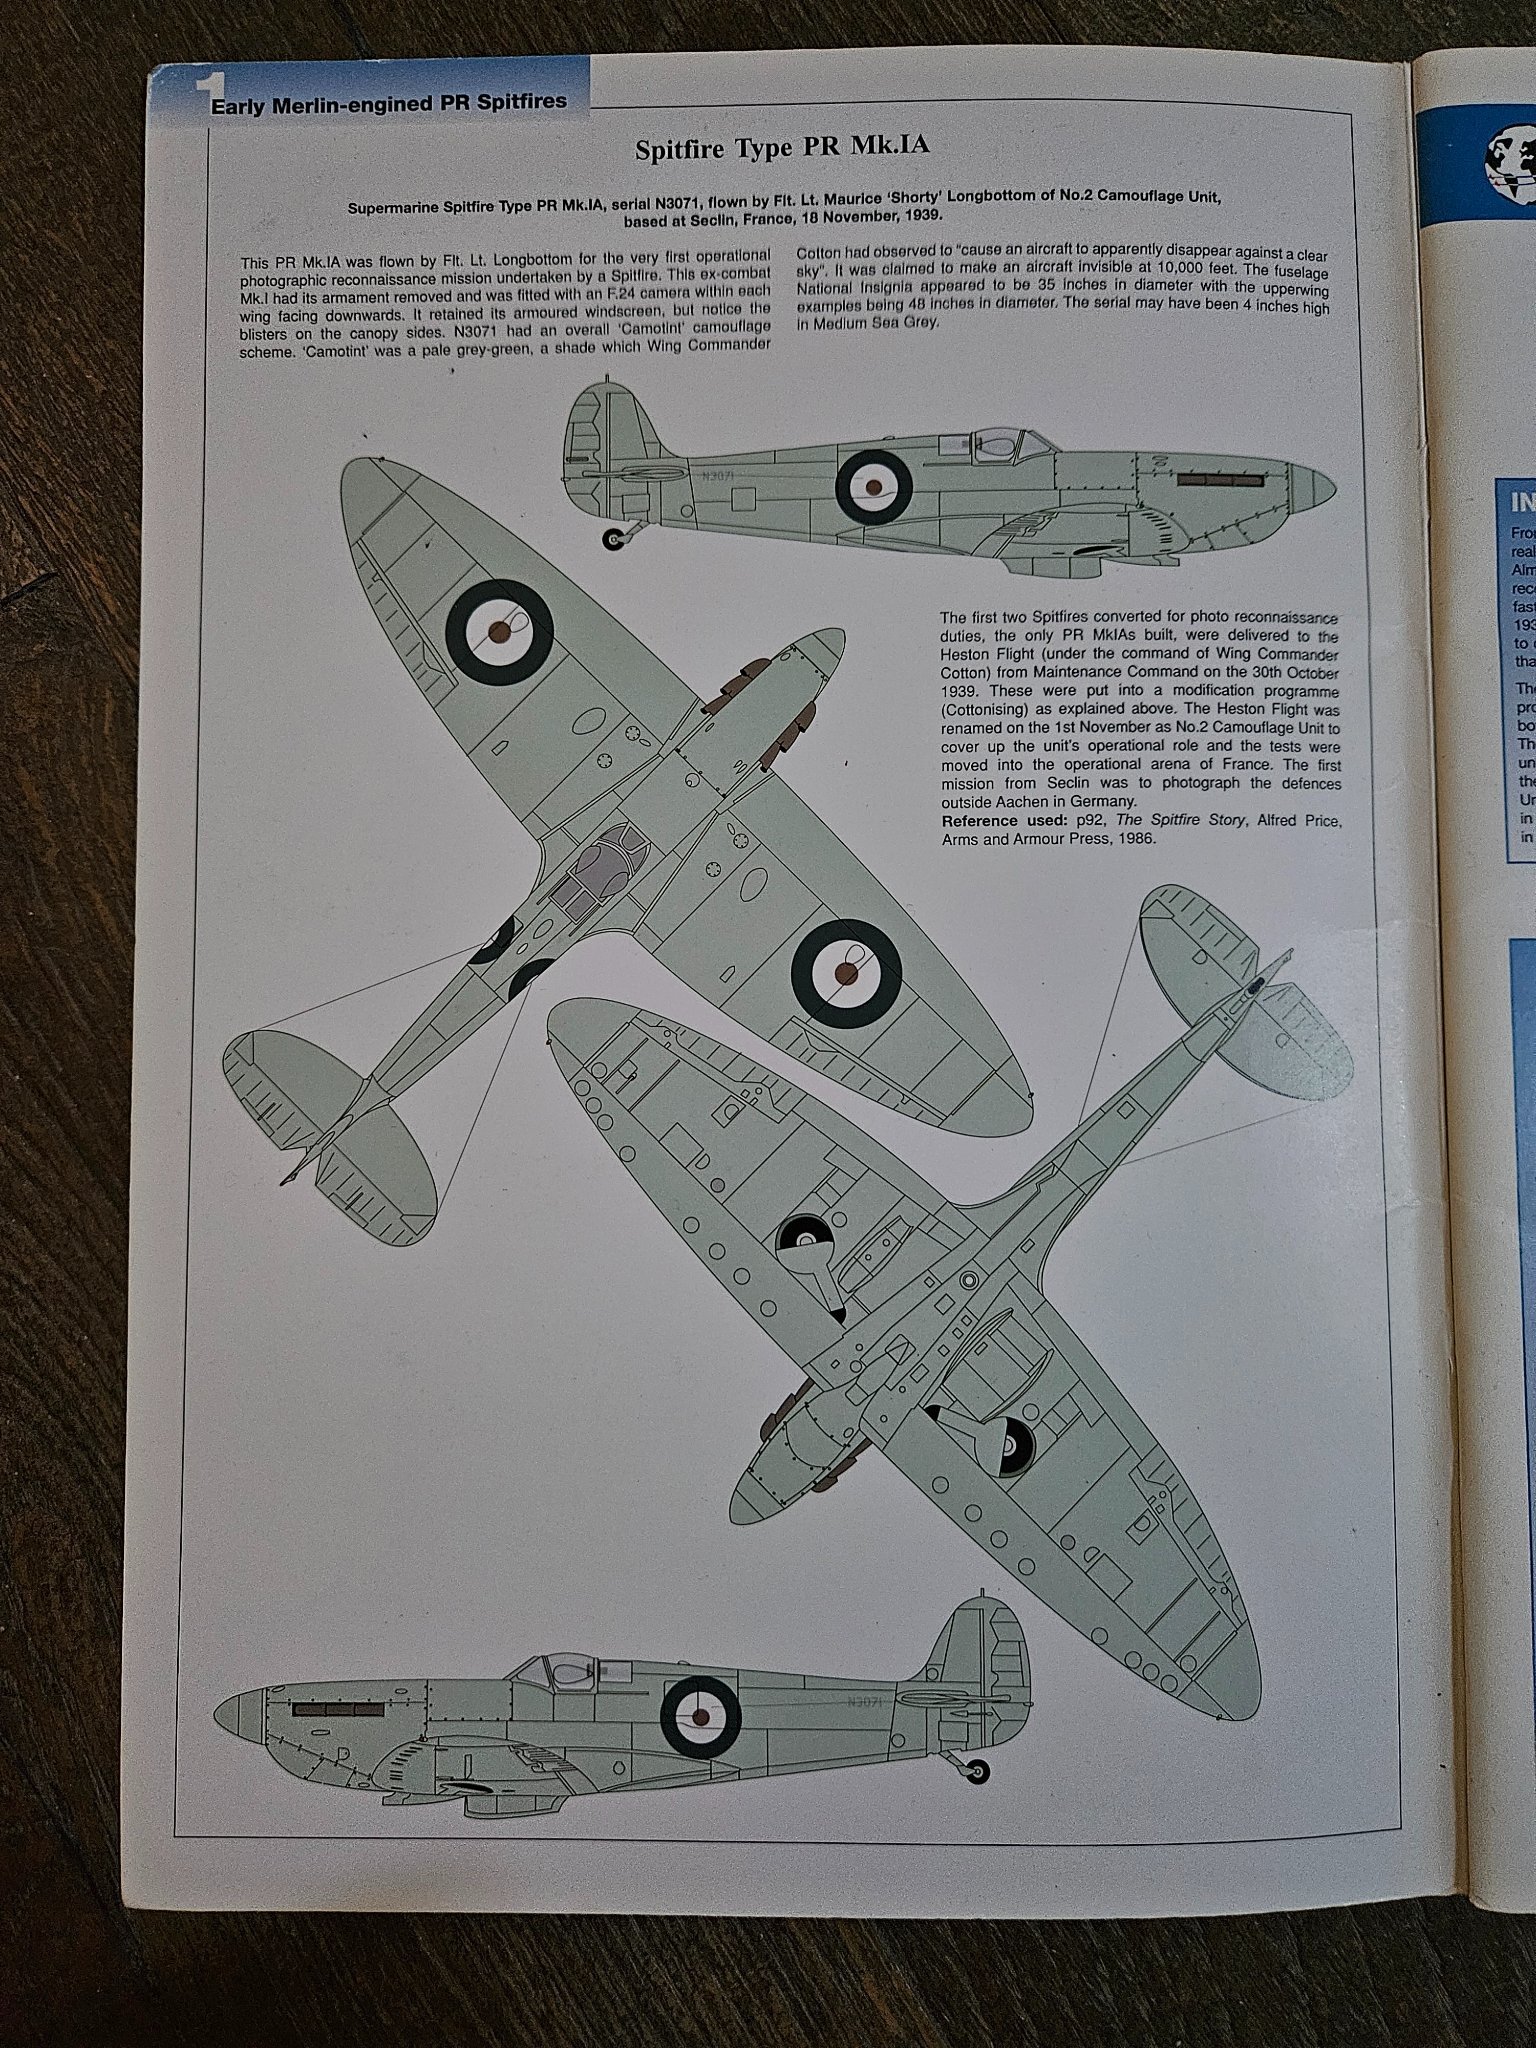 2 points
 -

8 Ball
Out2gtcha and one other reacted to Mal_Belford for a topic
Cool, also that kit will be huge when finnished. Thats one of the reasons i only do single engine aircraft. would love to try but no due glasscabinets i have. So instead follow others then, looking forward to see the start and progress.2 points -

El Corsair Grande, Numero Quatro
Mal_Belford and one other reacted to David Hansen for a topic
Well, the time has arrived to (cautiously) begin painting the Big Blue Corsair... As mentioned before, this is my custom mix for ANA 623 Gloss Sea Blue, made from Tamiya Sea Blue, Flat Blue, White, Deck Tan, and Super Clear. These photos were taken shortly after the model was painted, and some of the gloss has been lost. This is partly because of the underlying flat primer (acrylics shrink a lot as they cure) and because i think i did not dump in as much Super Clear as i normally do (i'm running low). In case you were wondering, i masked off the formation and identification lights using (i think?) Tamiya tape and my trusty punch and die set. It might have been 3M 2093 but now i can't remember. The reason i masked off the wing, is partly because the wings on the real plane arrived at the factory pre-painted and marked. Also, this is a large model and it takes a while to cover the surfaces area and multiple batches of the paint need to be mixed up. If there is any minor variance between batches, separating the two along a panel line i think will mitigate the mismatch. I will mask off and paint the left wing the same way. This model is also the first test drive of the One Man Army insignia and stencil mask set. I decided to begin on the lower right wing, and my initial experience laying down the mask has been problematic. I think it's operator error, in terms of selecting the transfer tape. 3M 2093 Blue is just too dark and you can't really see the insignia through the tape. Not only that, but the location of the star and bar marking on Corsair wings is very specific. I did the best i could, but it felt a lot like pinning the tail on the Donkey. And that fuel vent mast didn't help, either!! This is *also* a test of Tamiya Insignia White, LP-35. In the bottle it looks like a very light grey, sort of like FS 36622 or ANA Light Aircraft Grey. However, according to Dana Bell's books Insignia White is actually a 50-50 blend of plain white and light aircraft grey. I was reluctant to use it on my 48th and 72 scale models because it looked too dark and grubby, relative to the blues. However, after viewing results somebody else got on their Airfix Hellcat build, i thought i would try it. As you can see here, it really does not look dirty or grey at all. Up next i need to apply the Insignia Blue surround. I made a dogs breakfast of the paint mask trying to get it in position, so i had to cut it into smaller pieces in order to coax everything in place. It's done with the Mk 1 eyeball and the disc may not look perfectly round when done....but that's why we started with the undersides. -d-2 points -
Great stuff Tolga.2 points
-
Nice! Order Placed2 points
-

1/32 Hasegawa Grumman Hellcat F6F-3
Martinnfb and one other reacted to jeroen_R90S for a topic
+1!2 points -

3D printing file for 1/72 Liebherr LTM 11200-9.1 mobile crane
Shoggz and one other reacted to Aladdin Model for a topic
Hi guys, This is a 3D printing file of a non LSP model but I don't know in which forum category to post this one, admin please feel free to move it to the correct location. We just released a 1/72 Liebherr LTM 11200-9.1 mobile crane for 3D printing, and it's fully workable. For those interested, please visit this page: https://www.aladdinmodel.com/product-page/1-72-liebherr-ltm-11200-9-1 Best, Steve2 points -
Spot on Pete and my Defiant library grows. ASR Defiants kept company with ASR Lysanders, ASR Walrus and ASR Ansons. Golly!2 points
-
Hi Firefly! It’s USD 70.00 for the 1/32 model plus tax and shipping. Stefano2 points
-
That looks really nice.2 points
-
Well, what I do know, is that every Brit here will be obligated to purchase every Mark (Marque?) that Kotare provides. As a Yank, I want one. PRU blue, with guns. If Kotare spranged a P-51B, I could see getting a few.2 points
-
The PR G/PR VII (not to be confused with the HF VII, very different beasts) plus its development the PR XIII retained the 8 x .303 armament, and the fighter-type windscreen, as they were intended for tactical reconnaissance. The "FR" designation only came into use a but later, I think. Most PR Spits were without armament, being designed for strategic reconnaissance.2 points
-
F-108 Rapier.....it's here.
turboprop4 and one other reacted to Dandiego for a topic
Here are some screen shots of the STL files. This is going to be amazing. This will be a slow process for me as I am not a computer whiz. I need to separate the components and get them ready to print. Dan2 points -

I have been asleep at the wheel (or joy stick). Do 17Z-2 in 1/32
thierry laurent and one other reacted to ssculptor for a topic
Yeah, so its a toy. If it is more or less true to scale I am satisfied. If it looks like a duck, it quacks like a duck, it poops like a duck, to me it is a duck. When I started making models during War 2 a kit consisted of rectangular blocks of wood (soft balsa if one was lucky), plans of dubious accuracy, printod on paper insignia and a package of casine glue in powder form. Kit cost 10 cents. I used dad's old razor blades. I am still operating in that frame of mind. So I am easy to please. Sculptor2 points -
F-108 Rapier.....it's here.
turboprop4 and one other reacted to Dandiego for a topic
Chad has sent me some of the first F-108 files. Currently printing fuselage cockpit sections. Photos when it is done. Dan2 points -

Humor?
Jack and one other reacted to geedubelyer for a topic
I think my brain is somewhere else2 points -
it's not the end of the world, just frustrating.. there are many places where it is too thick but I have nearly solved that with a full rebuild of the internal surfaces using a much simpler method.. the fin tip was too thin so the whole fin has been redesigned as I couldn't just reshape it - we are talking tenths of a mm, but rules are rules the chin can't be done as I designed it - i already split it off at panel lines as it was too difficult to assemble as was (sliding the wing belly into the nose with a cockpit sat on it), but the radiator shroud inside it can't be done as I want it so thats a head scratcher.. the fin post was too thick in total so risk of sink marks but I can redo that now I have a new fin the prop boss mount on the forward fuselage left a dead angle in the mould that meant the part wouldn't come out with a separate chin, so that will need to be another part the cockpit around the IP and door must be 0.5mm, they don't like it, but I won that one but still need to make transition changes to the thicker full part skin ..I have exploded all the surfaces and have started the rebuild, you can just see the split of the chin - this is a natural panel break, but the fit needs to be bob on thing is, this is all stuff you learn once, so i am hoping I cut my teeth with this and then I can knock up a kit a week after that Peter2 points
-

Trumpeter A-4E VA-164 (29 June: Endgame)
JayW and one other reacted to easixpedro for a topic
So my cobbled together Zuni pods were kicking my rear-end. The decals for the yellow stripes weee an abject failure. Masks failed me too. Next up was chucking ‘em in a drill and painting them that way. Have never done that before and it worked a treat! FYI, it’s tough to squeeze a drill, while holding a brush nearby and take a halfway decent pic! And here they are in the LAU-10s and the starboard side. As an aside, Shrikes can have a white or black nose cone. The color was a quick reference as to which type of radar it would track - AAA or SAM radars. I don’t remember which of course, but that’s the reason for the colors Next up is remaking the UHF antenna that is behind the cockpit. Here’s Trumpeter’s offering…it’s a bit on the thick side…I’ll remake it from styrene instead. More soon, -Peter2 points -
1:32nd scale Caudron G.3 (Anzani engine)
Trak-Tor and one other reacted to sandbagger for a topic
Hi all, Just a few things to show. The wood effect has been applied to the tail booms and struts. Tamiya Dark Yellow (XF60) base coat with brushed Windsor&Newton Griffin Alkyd oil paint (Burnt Umber). The upper surfaces of the wings, tailplane and elevators have been painted. As have the two fin/rudders. These will have Aviattic Weave Effect Linen decal (ATT32044) applied later in the build. Now to repeat the masking and painting on the underside surfaces !! Mike2 points -
Mals Way goes Maritime, Arado 196A-3
Out2gtcha reacted to Mal_Belford for a topic
Allright, finnished a build yesterday First Timer Modelship wich also can be found here in NoN LSP Works section So now continue with the Maritime theme, Modelkit, well picture needs no presentation, got it second hand on eBay, part sealed in bags. Will use AM this time wich i do not do often at all, so this time go all in with AM, all insignias and markings will be painted, also some scratch. Yes....here it is and here goes. First things first reset the workplace. Nice boxart. Some reference books and all AM that ill use. And the build officially have started1 point -
Yoooo! Happy Birthday Martin! Enjoy Bro!! Alfonso1 point
-
Happy birthday man!!1 point
-

Das Werk 1:16 75mm Pak 40 anti-tank gun
TankBuster reacted to LSP_K2 for a topic
Base now given a couple treatments of triple-thick poly spray (Varathane semi-gloss, real good stuff). Once thoroughly dry I'll begin groundwork and trim. I may also order a Model Monkey nameplate for it.1 point -

New Spitfire from Kotare
CRAZY IVAN5 reacted to fastterry for a topic
Interesting thing, to me, is sales numbers. We're always wondering how many kits you have to sell to be a success. Airfix let slip that they had sold 20,000+ of the 1/24 Spitfire VIII & IX and now Kotare believe there is a market for 2,000 1/32 PR Spits. Just as a matter of interest I wonder how many Mk 1s they have sold. I have just built the Mk 1a(mid), have pre-ordered the K-4 and will also get the Hurricane when it comes online but as nice as the PR types are they don't have any offensive weaponry(ie I only build fighters). TRF1 point -
For those that care to know, I discovered why the rims have the six extra holes, it’s so that either six spoke or eight spoke wheels can be bolted to it. Once you look at the geometry, that becomes perfectly clear.1 point
-
I redid the wings and tail and dry fit them. It’s such a sculpture! probably at 20 hours now1 point
-
2000 copies will be produced /Niels1 point
-
So, finally got the flag decals, now I'll have to work on that on the Pharris. I'm planning on having the rearmost hangar bay doors of Nimitz open on each side. While I'm not going to light the hangar bay, I wanted to have aircraft there to see when peering through. So, I'm building aircraft now, so I have the aircraft to put in the hangar deck before I put the flight deck on. Lots more tiny pieces. I've only started on the F-14s. Then there are A-7Es, A-6Es/KA-6Ds, E-2Cs, EA-6Bs, SH-3Hs, S-3As, and EA-3Bs. Most of the F-14s with wings spread will probably not be used.1 point
-
It's getting there. A clear flat or semi-flat coat. Some additional rigging along with a U.S. Flag. Oh yeah, a helicopter too.1 point