

F`s are my favs
-
Posts
1,220 -
Joined
-
Last visited
-
Days Won
14
Content Type
Profiles
Forums
Events
Posts posted by F`s are my favs
-
-
It says "4 weeks later..."
") gotta be a bug. 10x for the flashbacks, I remember some of the pictures I used as a refference were downloaded directly from the google results, and it took me some time to realize they were indeed from here...
gotta be a bug. 10x for the flashbacks, I remember some of the pictures I used as a refference were downloaded directly from the google results, and it took me some time to realize they were indeed from here...
-
Oh yes, another Strike Eagle. I just checked those Kopecky resin details... no words, man, they are awesome... good luck with the knobs and switches
 now, I figured out what you meant with ''fly off into each other''. I couldn't believe all of them are separate pieces at first. This is gonna be madness, at least they are not as much as in a legacy plane cockpit. Btw very nice masking and black shading of the side consoles. It would be nice to scratch something like imitations for the labels of each instrument/knob... I remember I did it that way, and it worked well, so if I remember justice - the main IPs are quite large and spacious - there was just enough space to add some labels. If you choose to do it - do it before adding any switch/know, of course.
 ") Another hint - paint the front cowling at the same time, so they both are with the same/color/weathering/treatment. And, Happy modeling!
Another hint - paint the front cowling at the same time, so they both are with the same/color/weathering/treatment. And, Happy modeling!
-
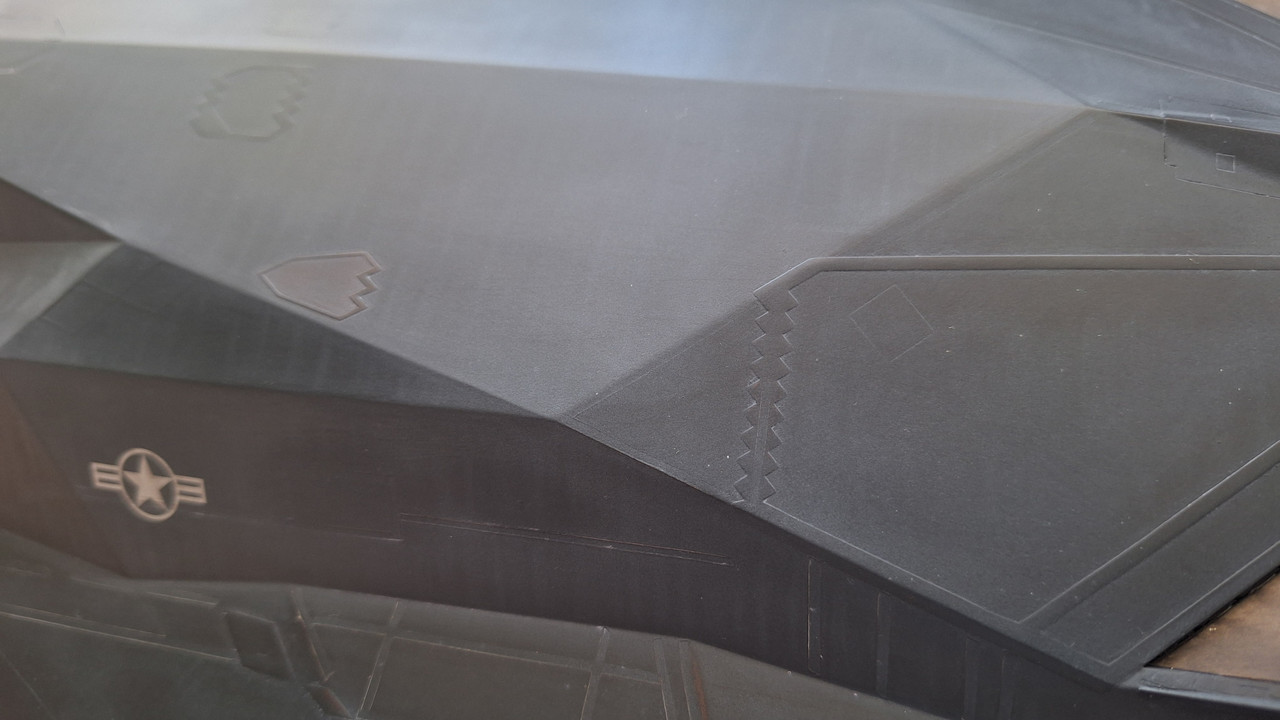
The bottom fuselage with the fuel/oil leaks - dry and ready:
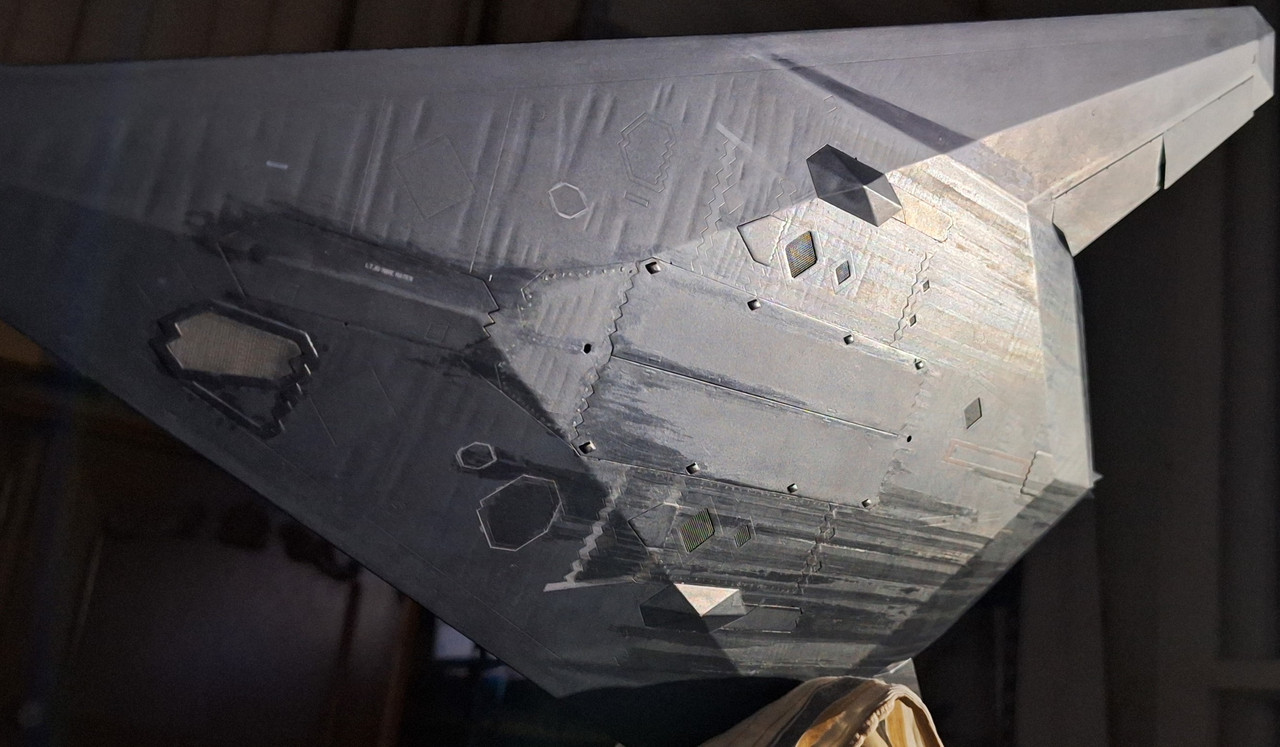
On to the top fuselage - here are some moments from the second stage weathering - matte coat as a filter (transparent overall, but with a little bit of blue) + salt and water to enhance the white lines:
(PS: the next one is with white flashlight... the whites really stand out, but they were not as extreme as they look like)
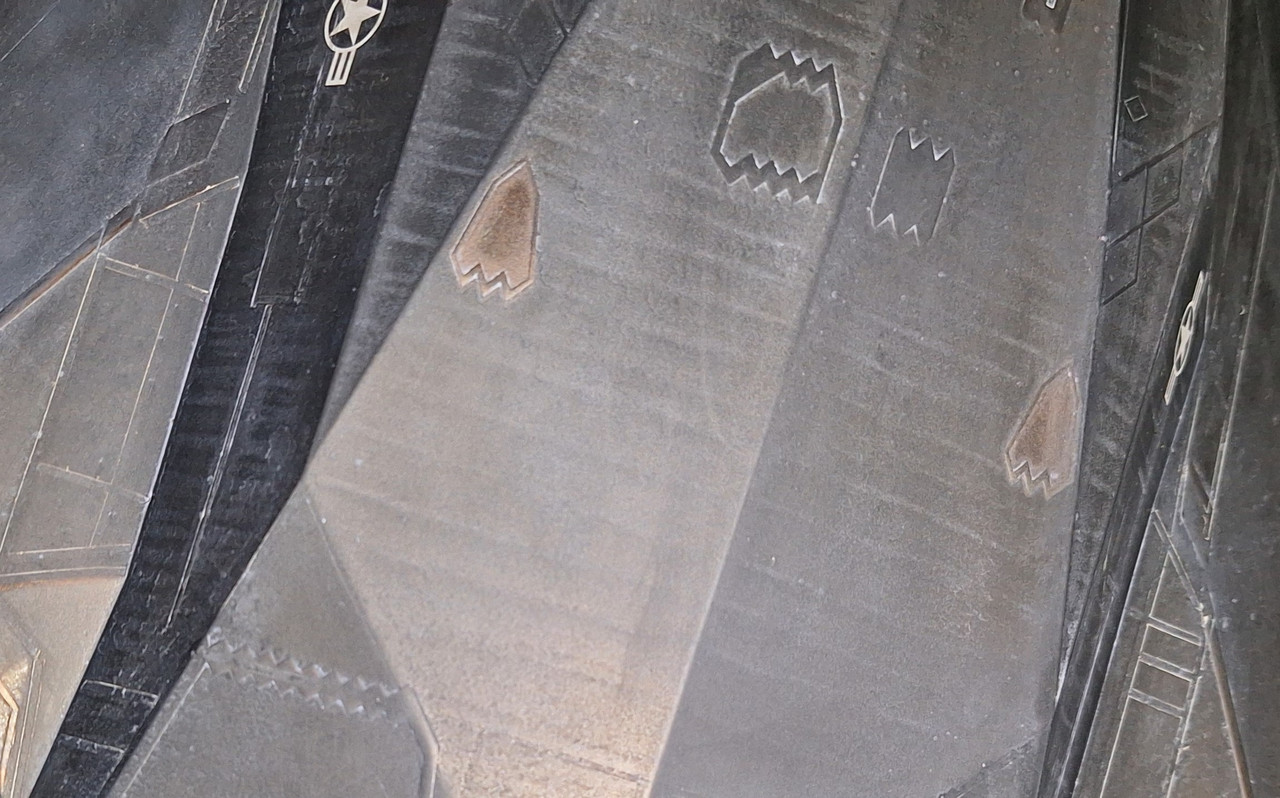
Then the third and final stage is the final coat - a mix of around 70% matte and 30% satin lacquer. Then fuel/oil leaks with pure satin lacuqer (as on the bottom), and the final ''stains'' with oil paints, i.e. in the exhausts, traces along the canopy... maybe a couple more things. I wanted to keep a rather ''clean'' overall look though.
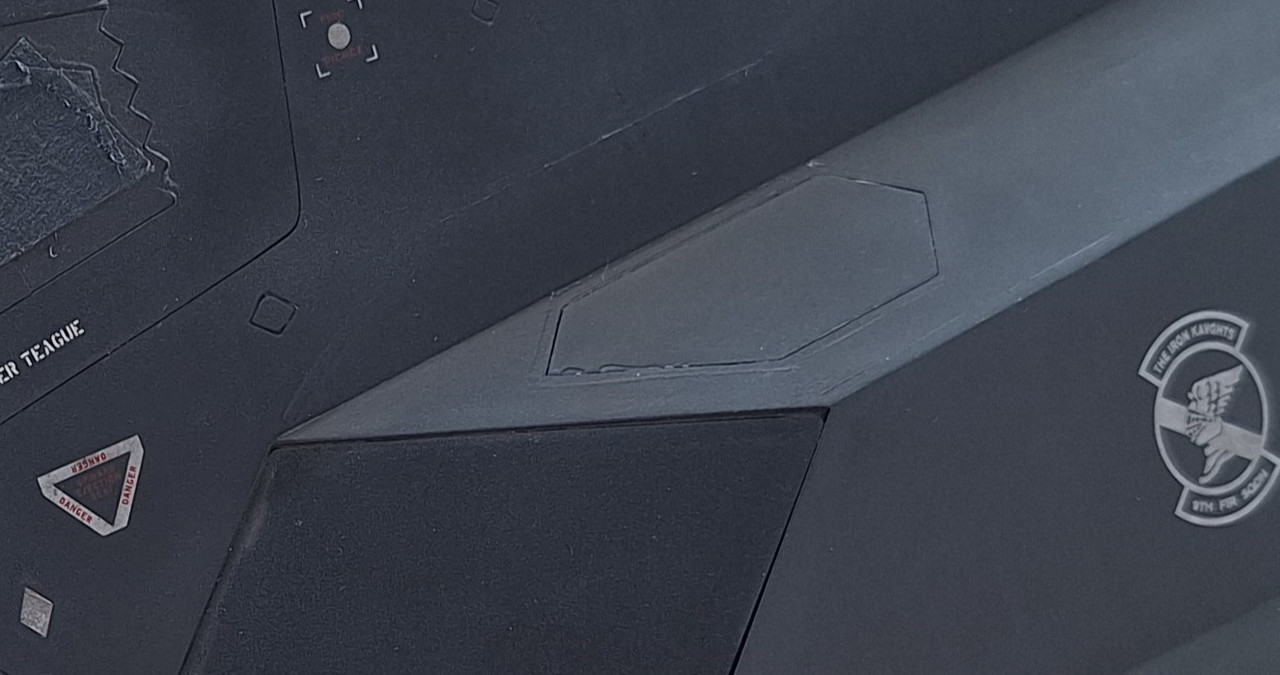
Then, the addition of the last components - the HUD and the oxigen line to the console in the cockpit, the intake grilles, and I removed the masks... and it is almost nighttime.
Yet, I did a short video, it's low-res, but it's almost no daylight left.
The oil paints are very very thin and subtle, so they should dry very fast as well. I almost can't believe, but I think it is ready.
-
Nice! Happy to see this. And yeah, time certainly flies fast.
The cabinet and the lights are Amazing, not to mention the combo of models - just lovely! Btw this Jetmads company also intriguied me quite a lot when I found out they would make the F-22... hopefully for real, and soon.
As I'm thinking about it now, it's probably more than a year since they announced the F-22 project - do you know about anything new on that topic...
- chuck540z3 and Dadeo911
-
 1
1
-
 1
1
-
Awesome stuff, awesome shapes! The foil wrapping impressed me quite a bit,
and I have some questions - 1) what kind of sandpaper do you use for the sanding? (I suppose these pics are after sanding) - is it water sanding or just norma but with a very fine grit? And 2) - do you have a special ''punching'' set to punch each bolt/rivet individually, or is it some kind of a DIY tool?... I doubt it is a standard circular riveter.
And maybe another question - I see some areas where two aluminum panels seem they have slightly overlapped edges - is it on purpose like that (it was like that on the real plane) or is it just a ''safety margin'' to not risk exposing (along the panel junctions) the surface underneath. Tu in advance
-
-
The MLG is ready for touchdown... almost.
So, all this:
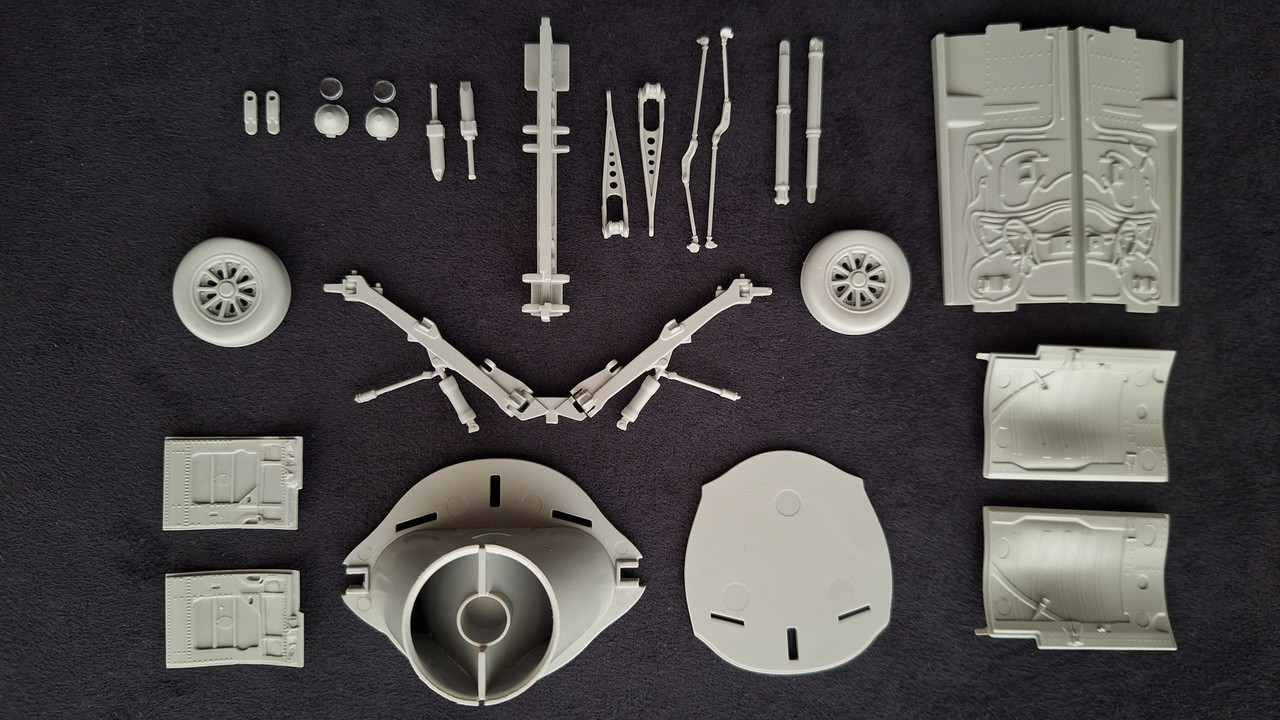
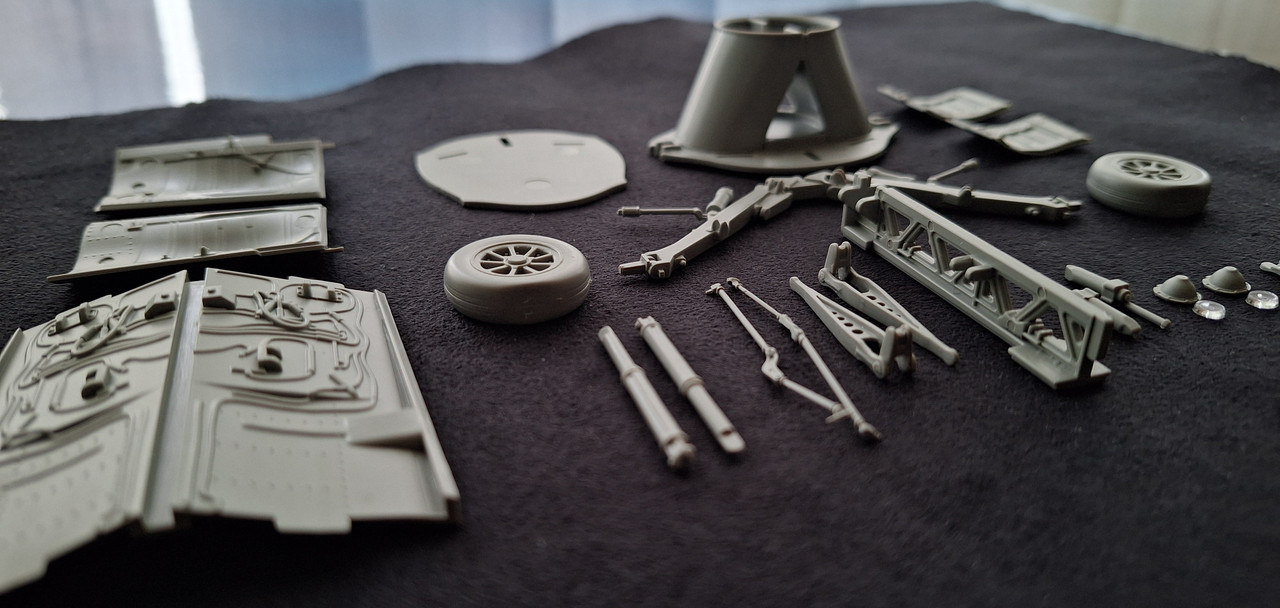
...transformed into that:
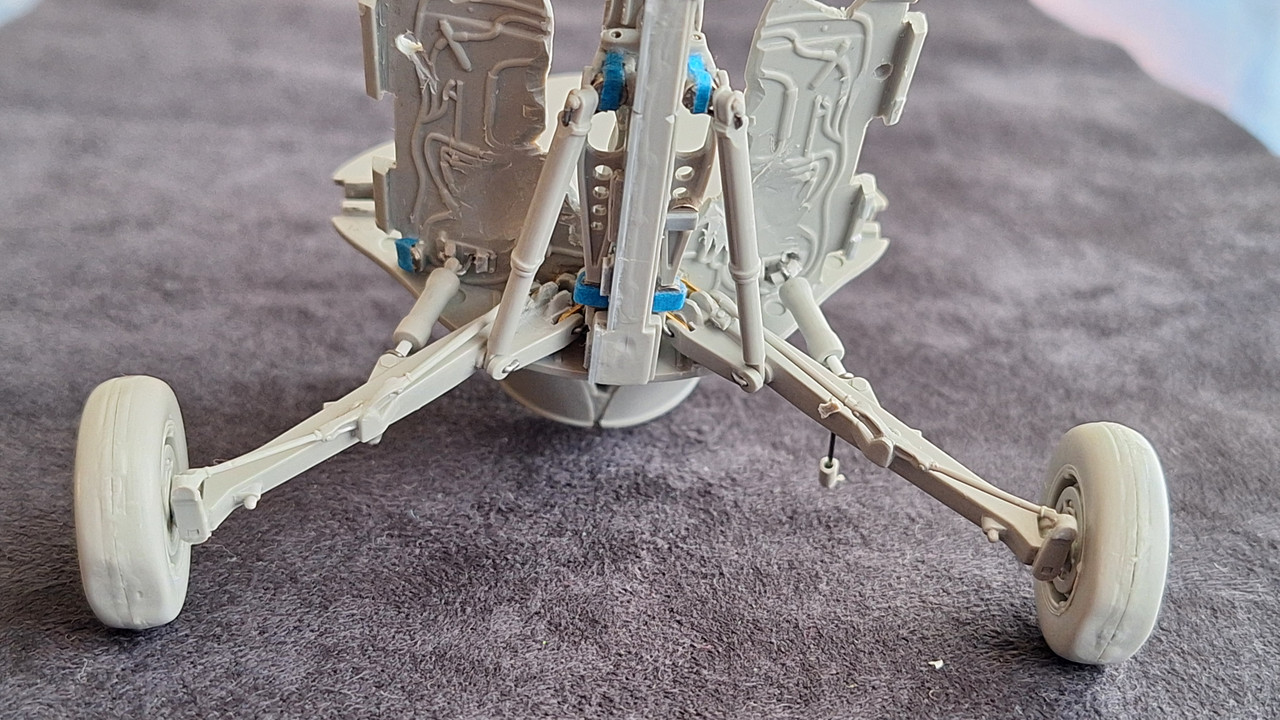


I think Ive beaten my record for for magnets - 38 for this MLG.
There are 8 on the fuselage halves that stay hidden. This is due to the piano hinges that are impossible to replicate even in this scale. Of course, the movement doesn't even get close to reality, but my point was only to make it functionable. I don't even plan to add wires and stuff in the wheel wells... maybe only the break fluid lines along the main struts... Next up - painting...
-
Amazing Tomcat! From 1 to 10, I give it a solid 10! The weathering plays a major role for that.
Now I see some little things that are not perfect - 1) there is a seamline visible at the tail end, where the top and bottom half of the fuselage are glued - along the fuel damping tubes and sensors. And 2) the flat bottom area of all wheels seems it does not accept the flat surface underneath properly - there are some gaps with light visible along the sides. I deal with this very easily just by pacing the model on a perfectly flat surface like yours, then putting a (let's say 400 grit) long flat piece of sandpaper right underneath a tire, and hold the tire with one hand very strong, while moving the piece of paper just a couple of times... it just sands off the little imperfections right away, and all the light gaps disapear. Moreover, the stress in the pylon struts is much less, as the weight of the model is distributed evenly over the entire ''flat'' spots of the tires, not just on one edge or another.
 But that's it... I can't find anything else...
-
-
Thx all!
John, I just found a tutorial about this twisting wires method, and did some initial trials... and didn't like the outcome...
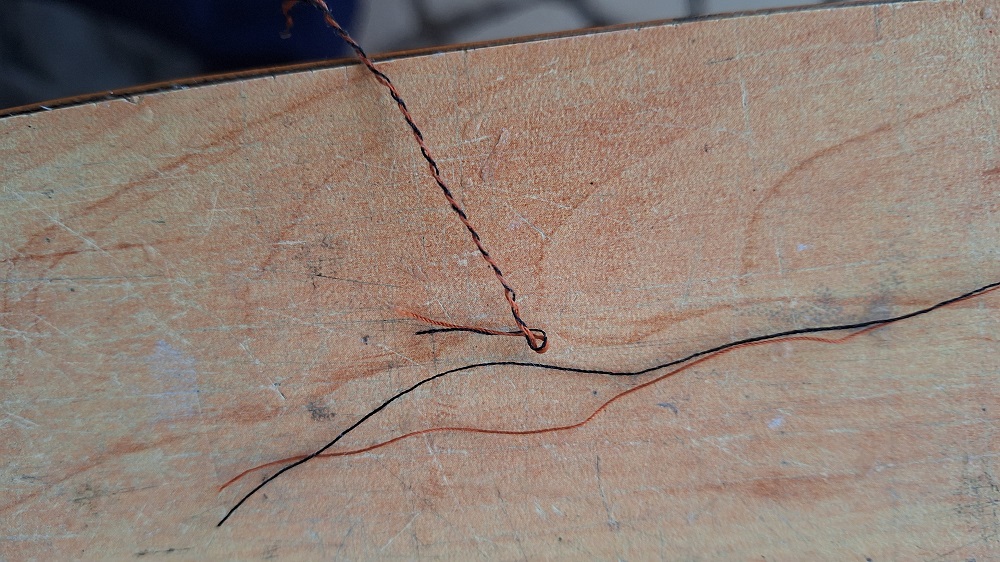
It just untwists and twists all along, cause the idividual pieces of wire were stored in small reels and there is a lot of ''natural tension'' in each wire... This is after a coat of lacquer. My plan is to try to secure both ends as stretched as possible, then coat them with a 2-componenet epoxy instead of just lacquer... Then I'd like to see how the original handles would look like with just thin decal stripes used as wrapping paper... kinda sounds easier than the twisting method, but right now I'm on some MLG adventures...
Realism - 0%, yet the goal is just to make them retractable/funcitonal.
- Anthony in NZ, Azgaron, Fanes and 3 others
-
6
-
Thanks much for the idea! Sure I'm gonna try this decal method, I even think I have the perfect decal stripes. Btw I found a video and gave this method a go - with the twisted painted threads.
It's more difficult though... the results are not satisfactory. I might prioritize the decal stripes...
-
Awesome! Btw is this aperture an exception from the clean-looking silhouette...
@O.W, a fabulous collection you have there! -
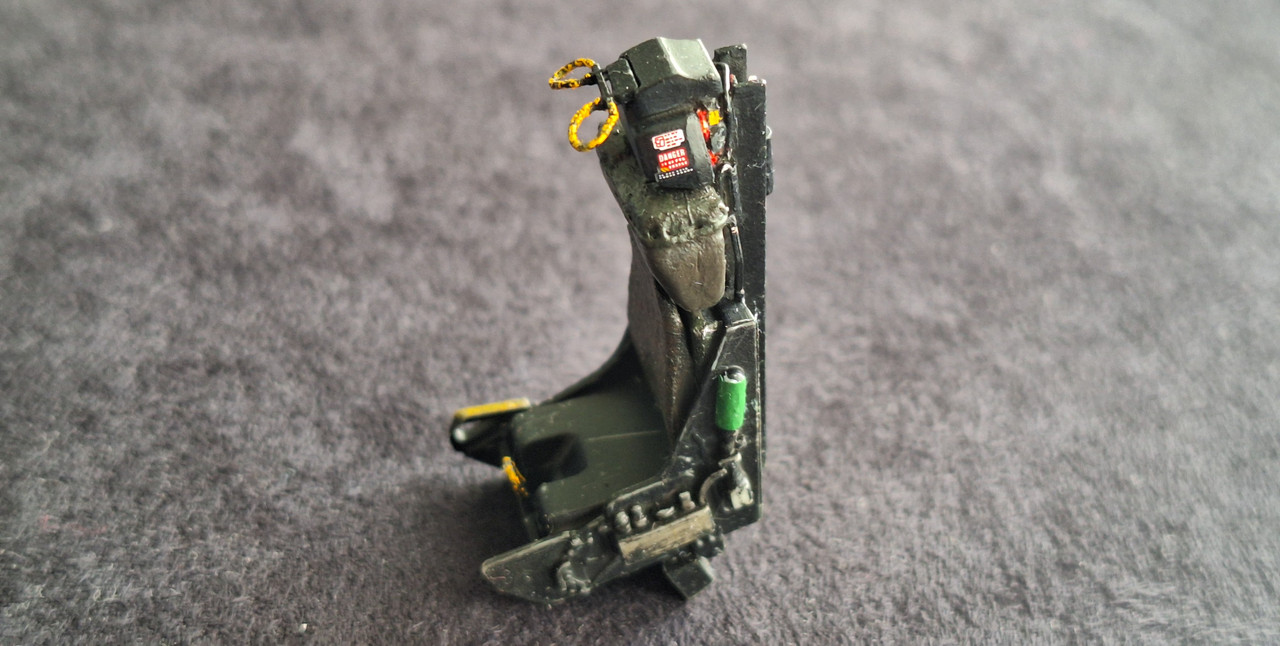
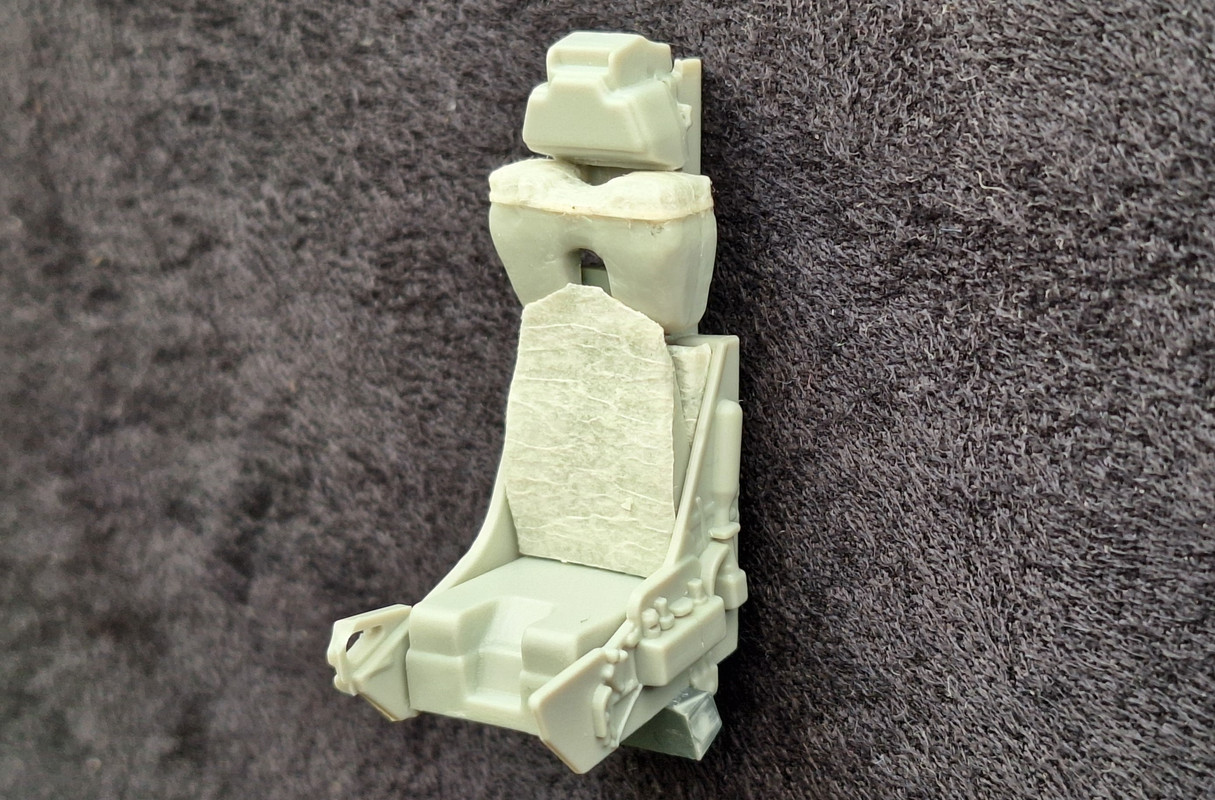
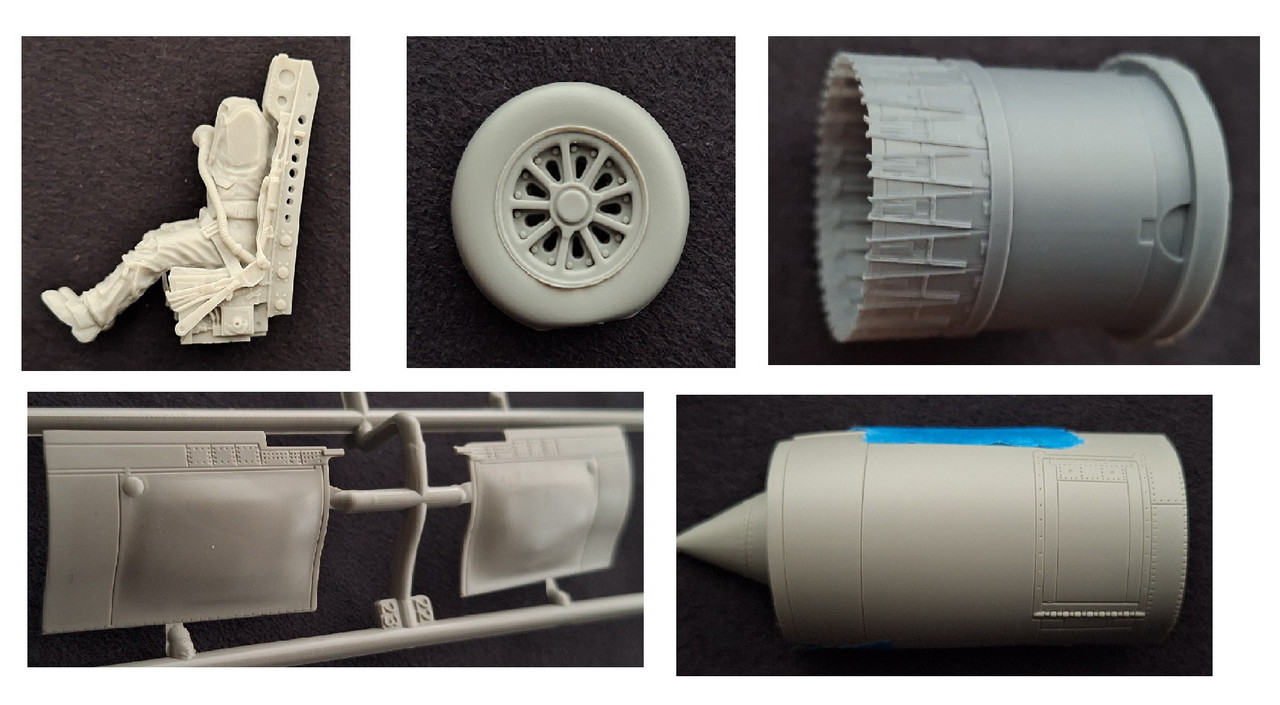
The seat - firstly, black, then the main colors, + gloss:
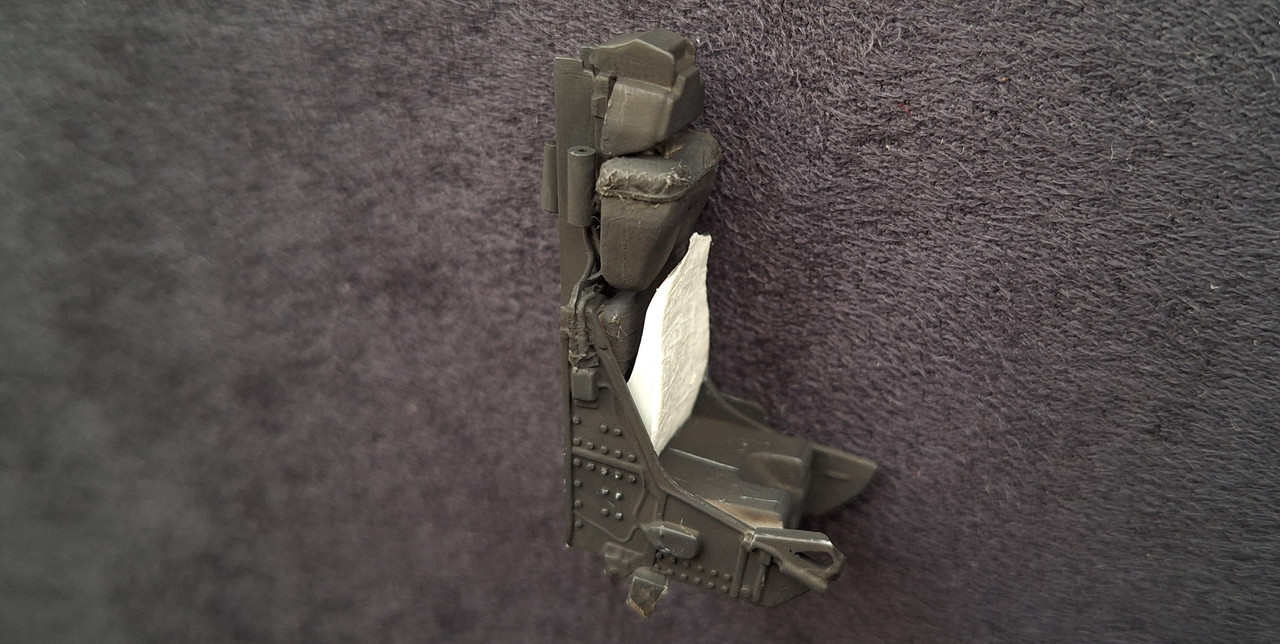
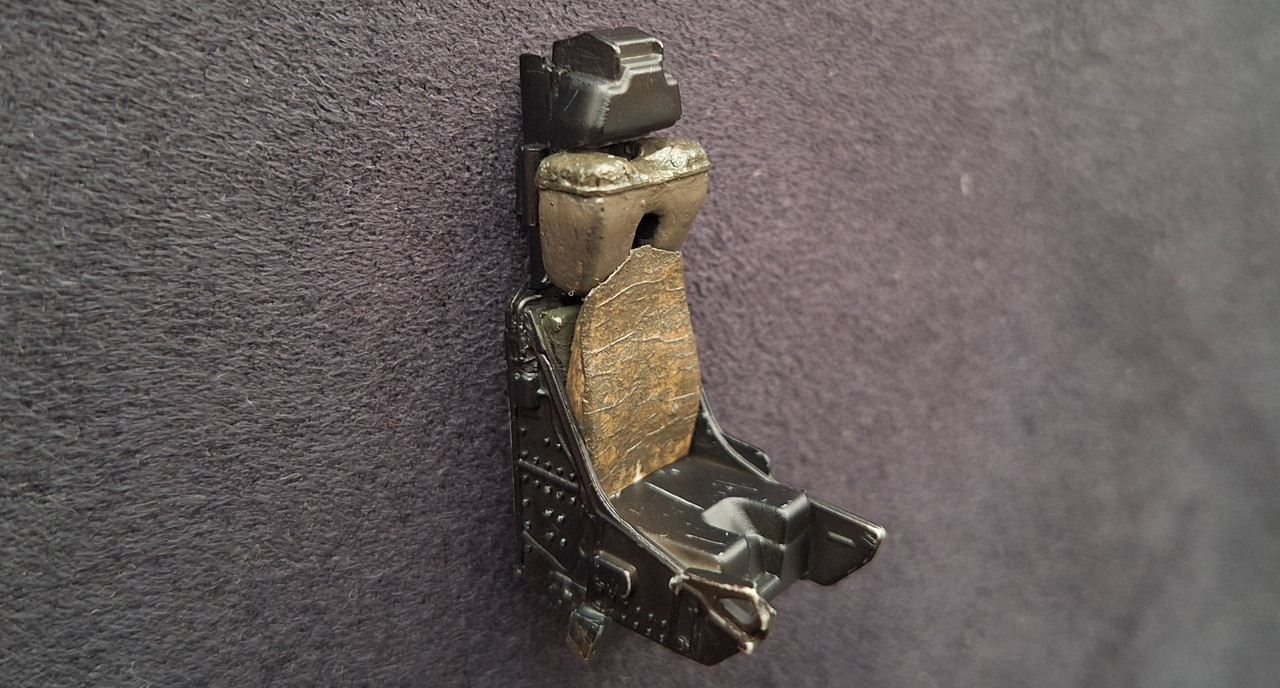
Then decals, and the other colors; then, satin + weathering ever so slightly. I know I couldn't do the yellow/black pattern of the ejection handles justly, but these are very very closeup images as well. And I think it is ready.
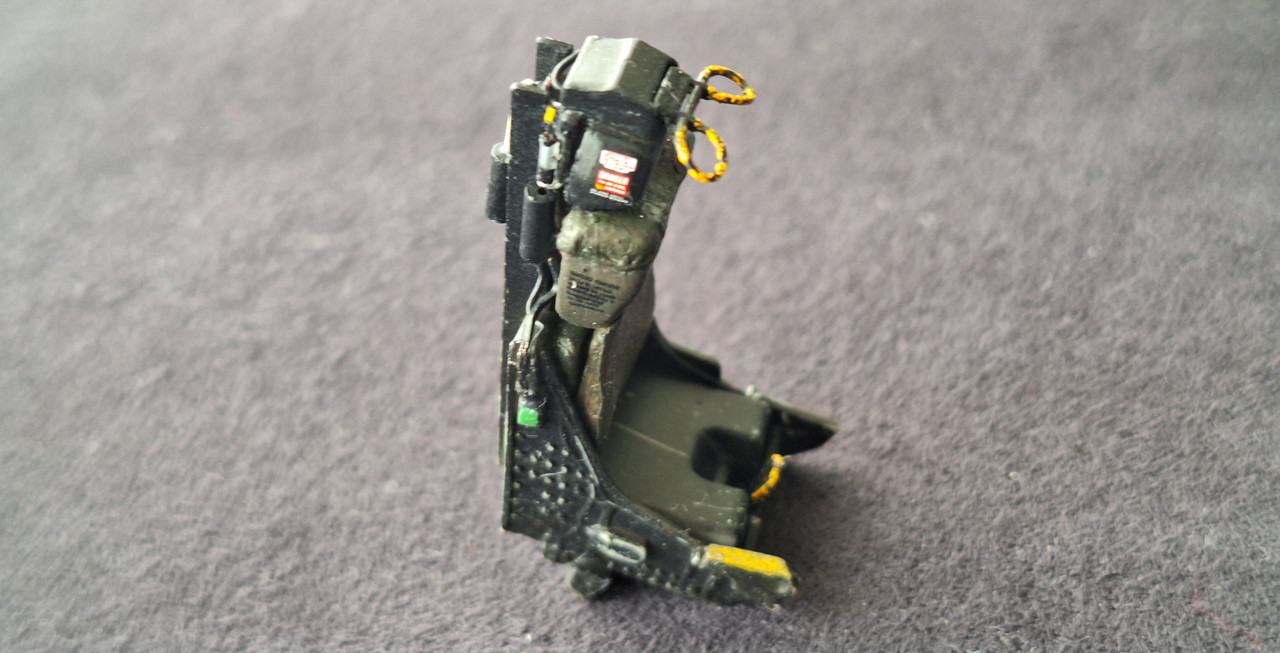
Here a quick testfit...

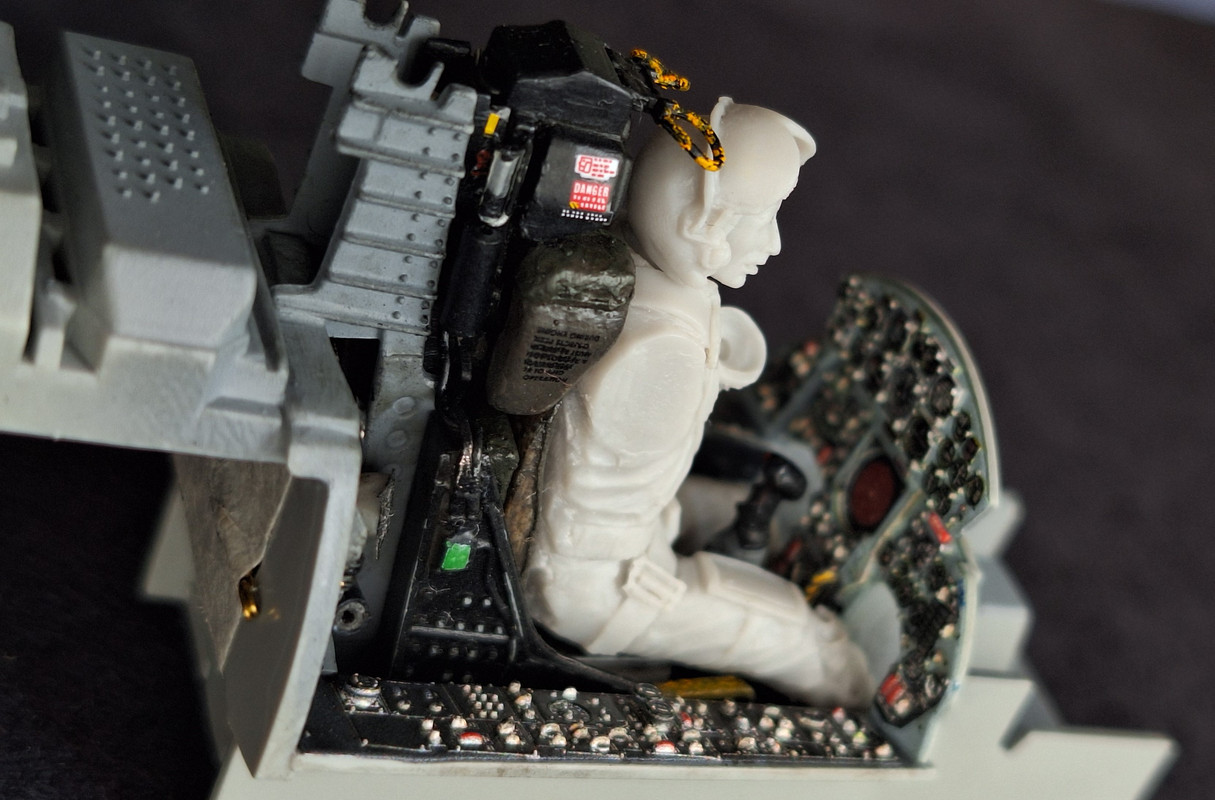
I might not use the PE belts, as I managed to separate the figure from very low and they stayed almost intact. Not sure yet... but the cockpit is just about ready.
- denders, blackbetty, scvrobeson and 15 others
-
18
-
-
Oh, this is going to be fantastic!
Of course those dents in the plastic are something so simple and realistic, and (if you ask me) always required. Why people are affraid of ''abusing'' the plastic while we all use knives, saw blades, cutters, etc. throughout the process?
Not to metion what the rivetting/rescribing tools do to the plastic. Some realistic indentations (according to photos) are always a nice touch, at least in this scale. Btw, aren't some panel lines missing near the exhaust/nozzle area - is it right after sanding maybe?
-
10x for the tip, Oldbaldguy. I already have some good high-res pics of the MB seat, yet I'll check out the website for sure.
Richie, the ''new'' seat is just perfect now... the main colors are on, now it's all about detailing, decals, and final touches.
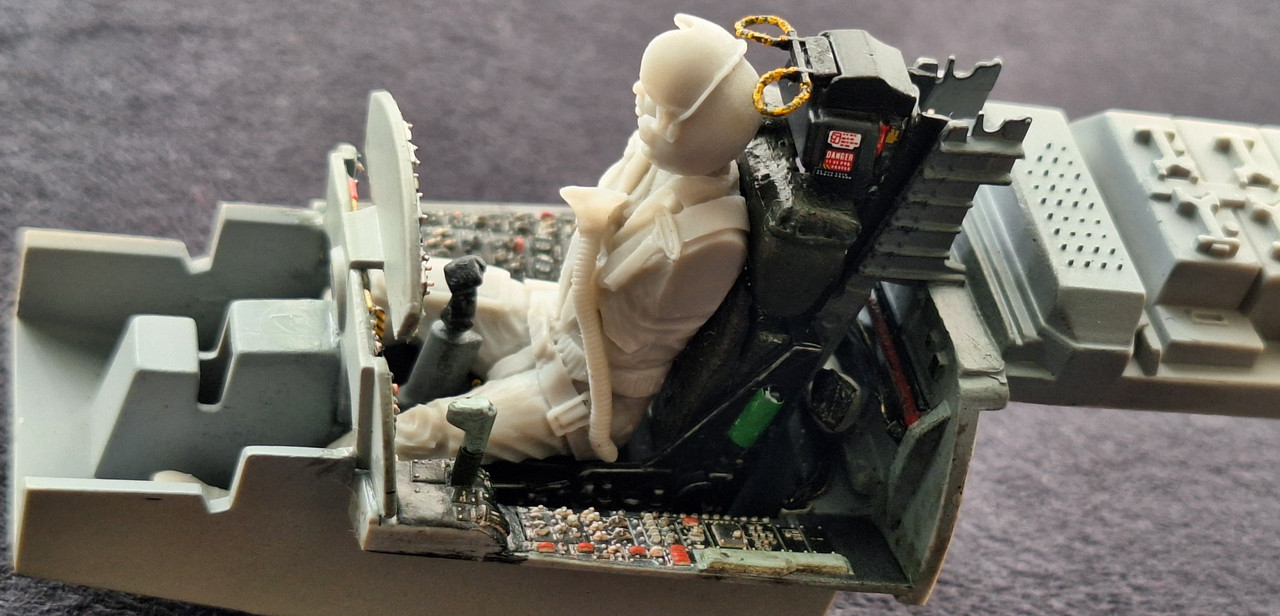
Also, the IPs and the cockpit tub are ready and... what to say...
this Thing is gorgeous on so many levels...

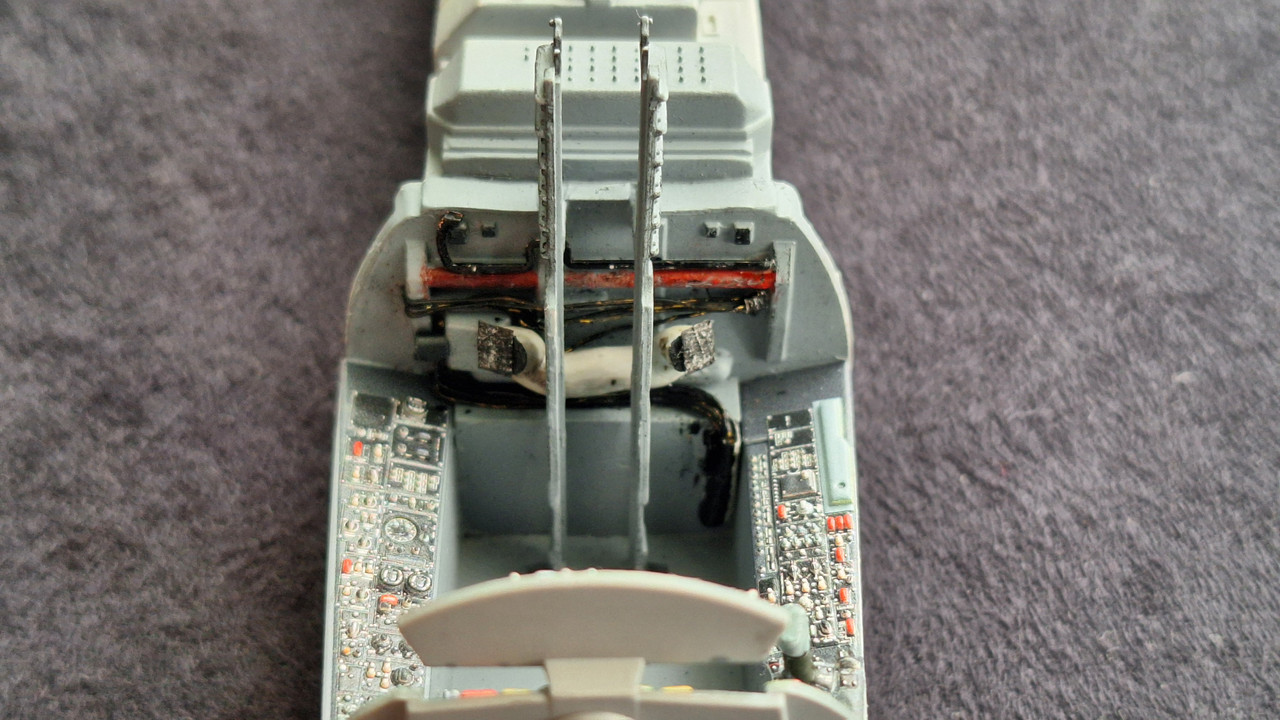
I can't believe they even included (on the left-hand side) an ''image'' with the white contours of the plane and the loadout selection with something that really appears like green lights... About the radar screen - unitially I thought the white particles are dust that can easily be removed, but it's actually pattern imitation.
This 3D decal thing is wicked evil! Still, there are a few other items to include like levers and switches, but I'll do it when it is more safe, later in the build.
- denders, Azgaron, scvrobeson and 14 others
-
17
-
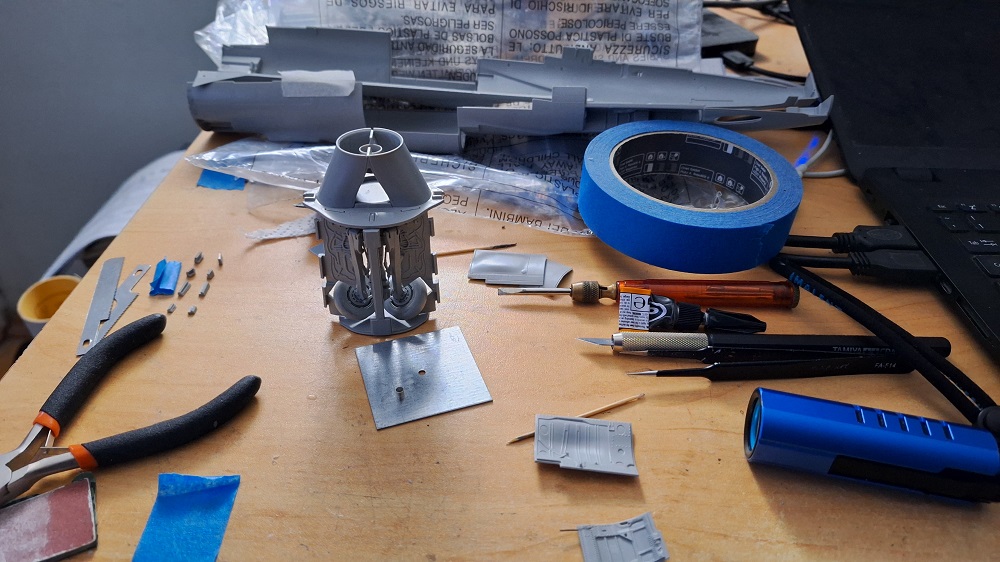
Just a quick up - it went well.
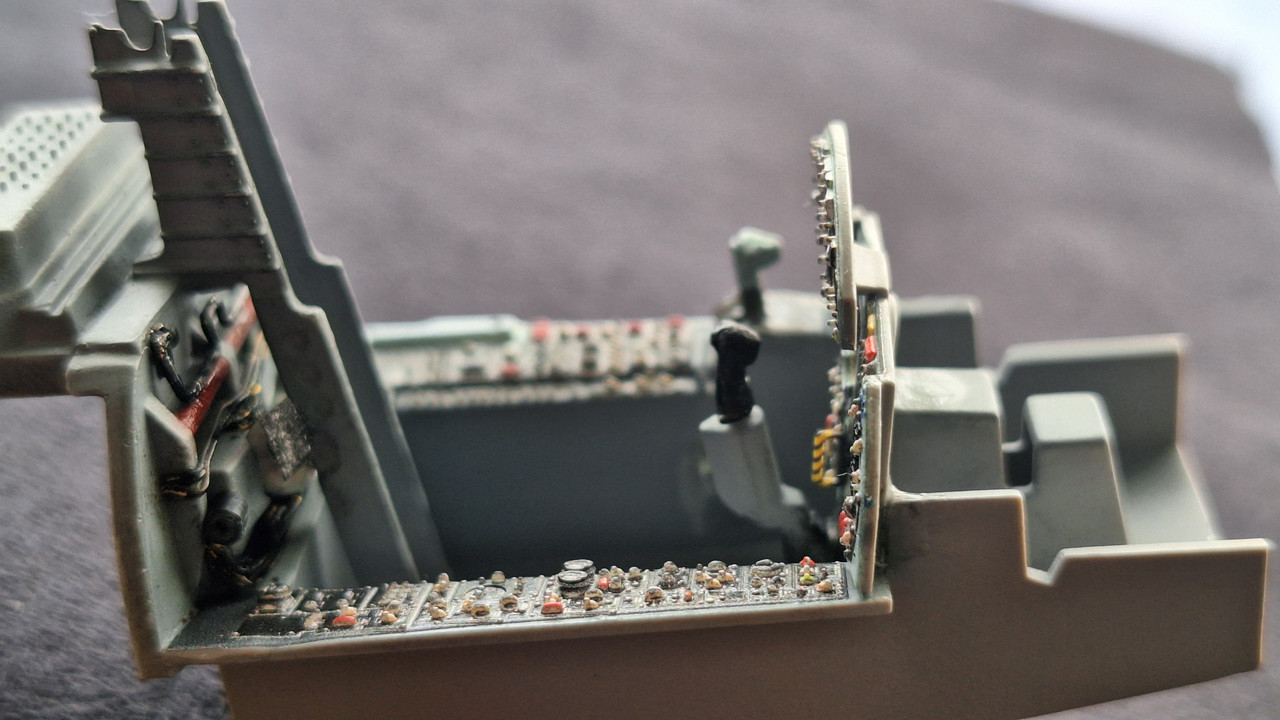
I'm gonna use the MB seat from the kit, with quite some mods/improvements, while the Lockheed seat separated decently well, and stayed in one piece. I'll keep it as a spare part, no idea for what model. So, on to the next page - here is the fit I'm happy with:
The seat is heavily modified and not ready yet. It needs wires, pistons... but first - instrument panels and 3D decals.
- geedubelyer, Uilleann, LSP_Kevin and 19 others
-
22
-
-
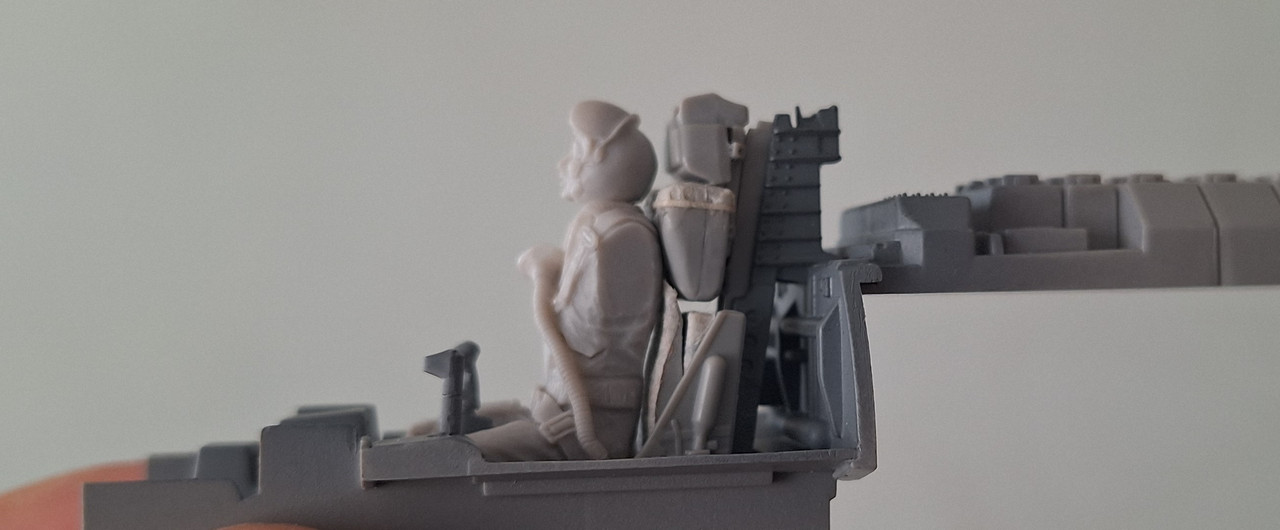
a-ha, got it now.
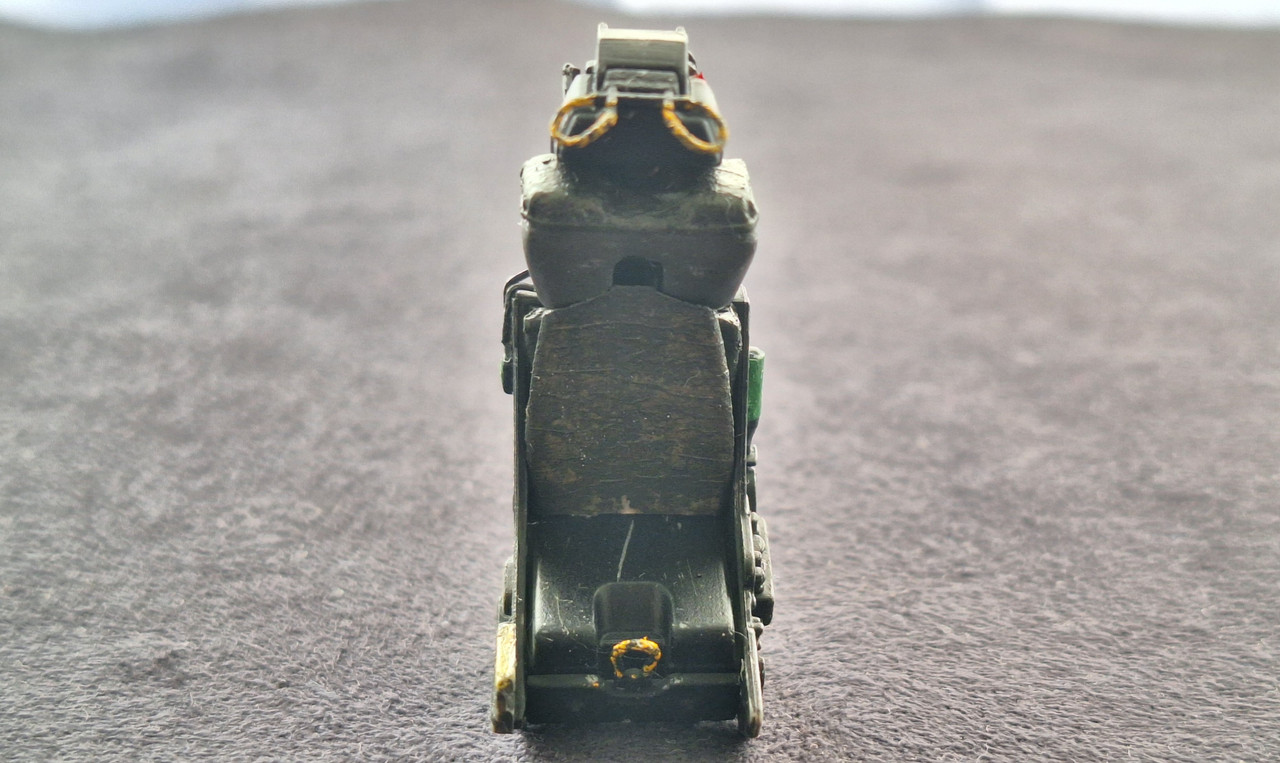
Hm, I don't know if the height of an ejection seat is adjustable, even on modern seats. All the pics I come across about this topic are all the same - they all show the headrest (at least) in the exact same position in regard to the ''6-ribbed parts from the rear bulkhead''.
Btw here is what bothers me - when looked from a distance, check out how beautifully aligned everything is, from the HUD and the front cowling to the canopy locking mechanism, and everything looks at an equal distance/a couple of inches from the canopy.
I see this is the MB seat, plus the round ejection handles contribute to ''busy'' that area even more. There will be a decently large ''empty space'' if I leave it like that - here with the blue circle...
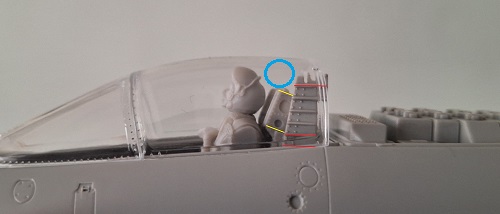
This makes me think that the MB seat is a better choice, especially with the big round handles on the top, and the headrest itself is ever so slightly bulkier that the Lockheed seat. In combination with the PE belts, I think it will get very close to the resin seat in terms of details. And I will detail/jazz it up additionally.
- blackbetty, Uilleann, Dragon and 3 others
-
6
-
22 minutes ago, geedubelyer said:
Could the misalignment be attributed to height adjustment of the seat?
Either the seat should go up a bit, or the pilot figure should go down a bit.
But as they are molded as a single piece - when I move the seat up - the helmet of the pilot sticks too much and the canopy can't close. The misalignment is 3-4 mm., which is quite noticeable.
-
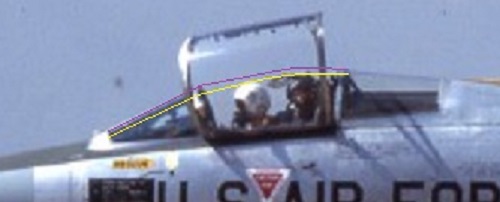
Awesome pic, Jari, TU. I still can't believe this intake has no moving parts and yet, it flew at Mach 2....

Btw I'm fighting with the resin seat/pilot now... there is something out of scale, and I think it is the seat. Here is how it looks like in a testfit with the canopy and the rear rails that do a ''connectiom'' between the seat launch rails and the rear bulkhead of the cockpit... the long pieces with the six ribs at the top. Check out the alignment I highlighted in red lines (from the plane side) and yellow lines (from the seat side).
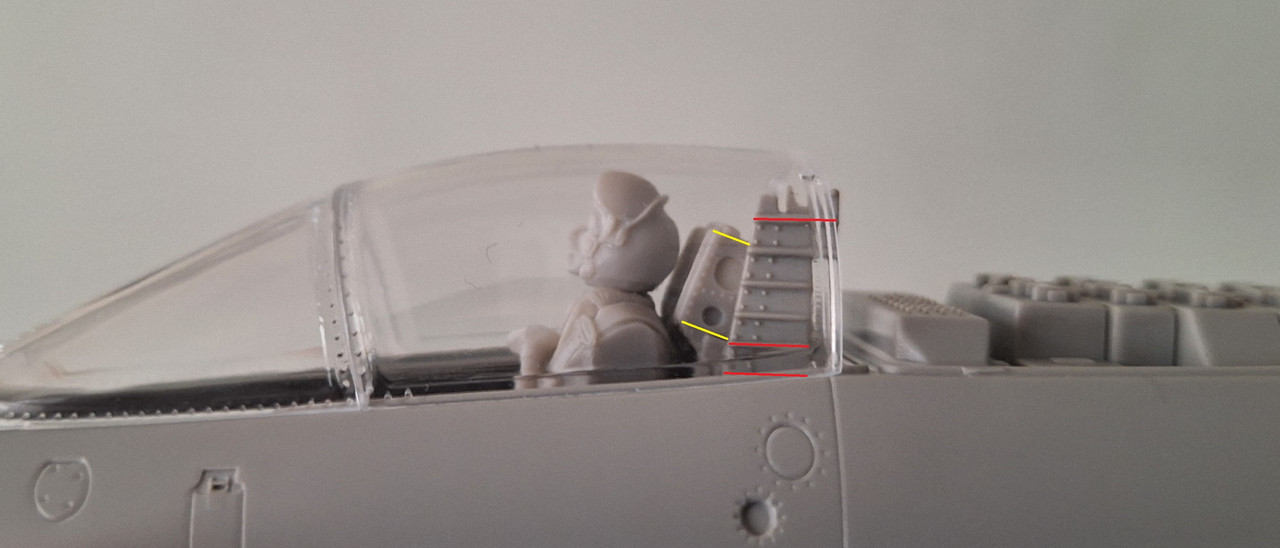
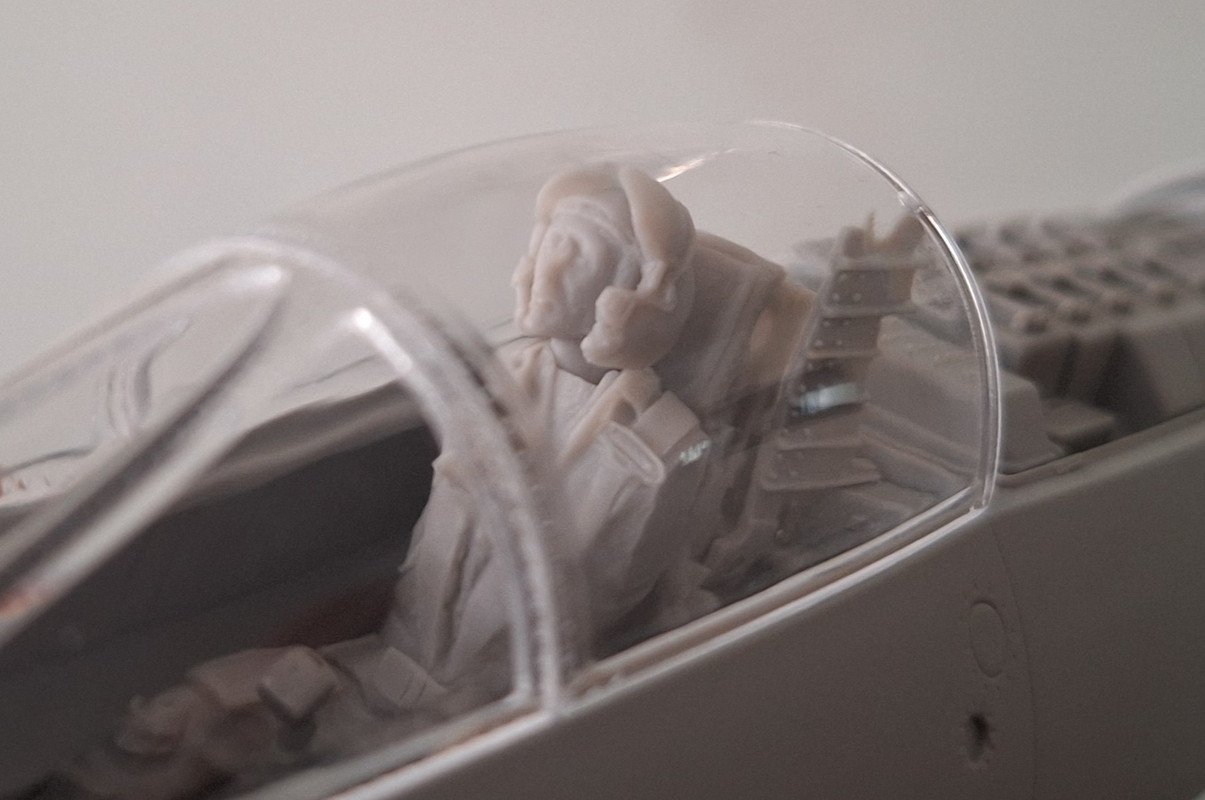
Well, on every single pic of the plane with the Lockheed seat that I find - the alignment is like this:
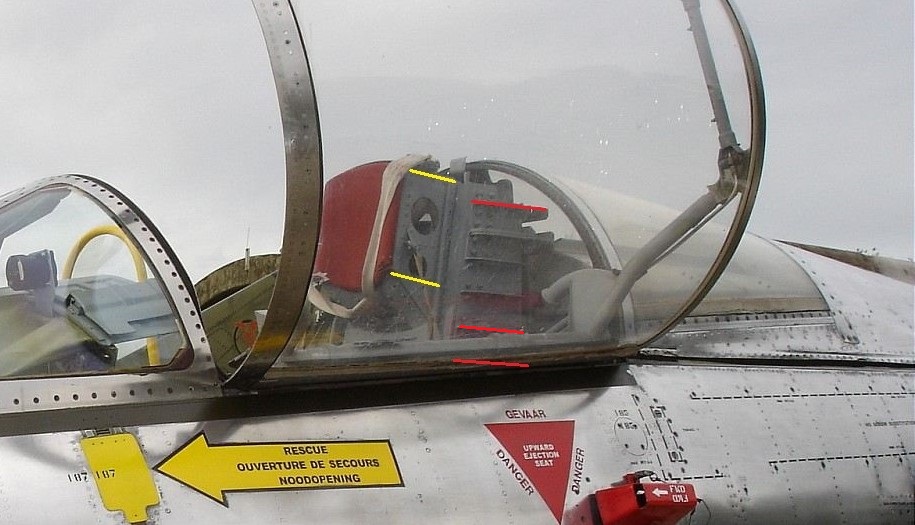
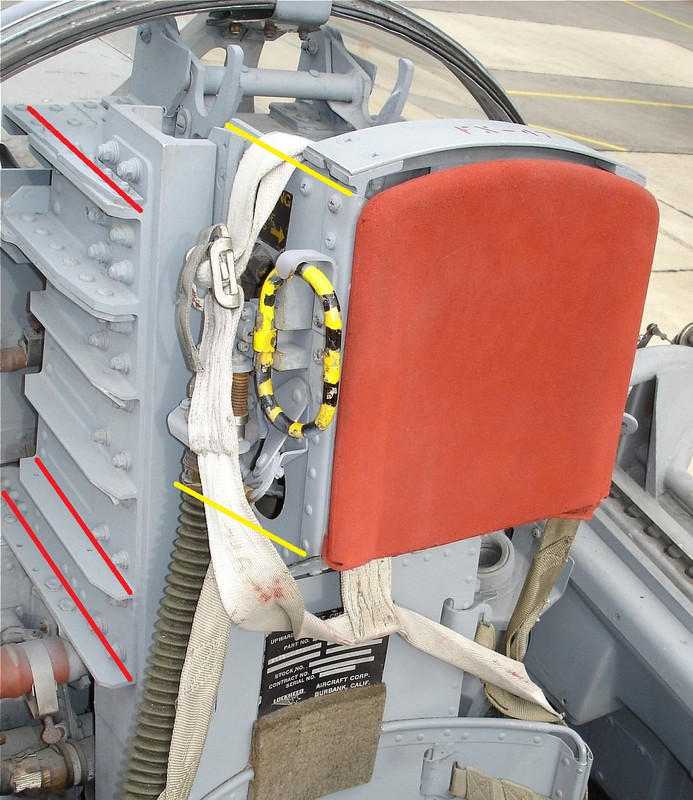
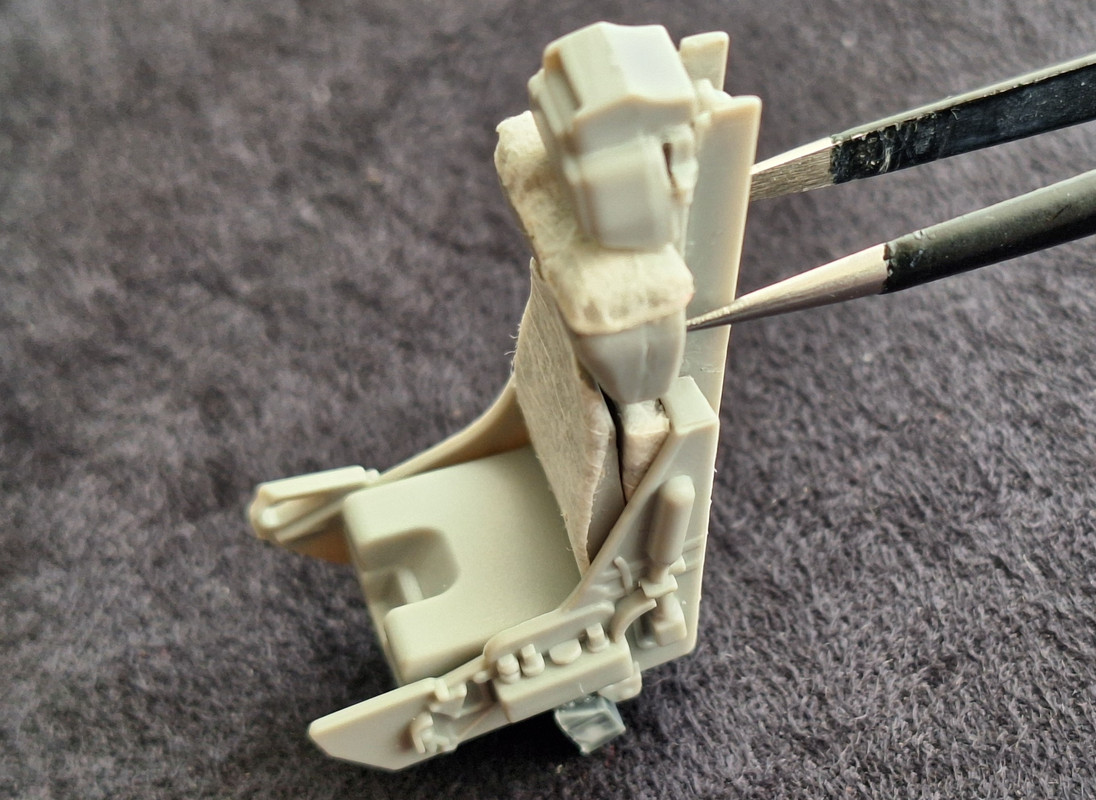
The uppermost (yellow) flat line of the seat must be slightly above or the uppermost (red) line/rib of the 6-ribbed piece. There is just no way around... there is no room to play with the position of the seat up and down, as it is cast together with the pilot figure, and the helmet bumps into the canopy (this is the highest possible position in my pics from the testfit above). I can't move the 6-ribbed pieces either... they are made to fit perfectly with the rest of the pieces and the tube along the canopy framing. Meanwhile, I quickly assembled the MK seat from the kit just to give it a go, and everything fits perfectly. So, I'm considering to try to separate the pilot figure from the seat somehow... and if everything goes beatifully, I'll just glue them back by fitting the pilot lower than before. Eventually, if something cracks and breaks in multiple pieces, I may still end up using the OOB MK seat.
But no way to leave the things like that. I want to make the cockpit look small, busy and cramped, like on the pics, and there should be no big ''void'' spaces between the seat area and the top of the canopy.
- themongoose, Grunticus and Azgaron
-
3
-
-
So, did I get this right - is this the right config, for example, for airframe 65-12750?
- the Lockheed seat (let's say before the update with the MB seat)
 ;
;
- the spoked tire rims;
- the nozzle with the thinner feathers;
- the bulged front MLG door;
- the intake cowlings with the squared APU doors;
- plus the anti-collision light on the top fuselage.
-
Yep, thx very much for the photos, Kagemusha. I also reviewed the website that MikeC shared... and I almost downloaded all the photos of the Luke AFB Starfighters.
I'll pick a specific airframe later in the build, but so far I'm happy that there are options. I'm after a rather clean build - with just the two fuel pods on the wing tips. Here is what makes me wonder the most now:
- the front/larger doors of the MLG - they look not completely closed (in closed position) - is it normal like that, or maybe it's just luck (to find photos taken at this specific moment during the closing of the wheel well door)?
- Also, as far as I understand, the cones and the air intake lips are black on all the photos I came across - were all the planes from the variant with ''black intakes'' indeed, or is it just luck to find such images only?
- And right behind the canopy (also on all photos), along the centerline on the top, there is something like a ''small'' yellow-ish panel - is it some sort of a provision for something, or what is it?
- The arresting hook - was it standard for all the planes from the variant (G's at Luke AFB)?
- About the ejection seat - I found info that it was possible that the G planes were produced with the Lockheed seat (C2, or Type 2 maybe?!) and later retrofitted with the Martin Baker seat. If this is true, can I keep the seat for the resin casting as it is? (although it appears a bit smaller when testfitted in the plastic rails on the rear bulkhead).
Thank you all for the insight!

F-117A Nighthawk, 1/32, In-flight mode
in Ready for Inspection
Posted · Edited by F`s are my favs
So here is the WIP, the weathering is ready, and it is finally ready: