

Gelerth
-
Posts
171 -
Joined
-
Last visited
-
Days Won
5
Content Type
Profiles
Forums
Events
Posts posted by Gelerth
-
-
9 hours ago, Subodai said:
Really liking this so far, lots of tonal variation in the paintjob already! great work
")
Thank you.
33 minutes ago, scvrobeson said:Excellent! Which paints did you use for the camo?
Matt
Hey Matt,
I used AK Real Colors:
RC239 - light blue
RC234 - darker blue
RC239 - grey
Here is the final effect (pictures are a little bit too dark vs real)

.
 .
.
.

-
On 7/13/2020 at 8:19 PM, Stokey Pete said:
Looking great.
Thanks
First 2 colors done - here I'm really pleased with result - can't wait for last one.
 .
.
.
- Lothar, scvrobeson, Lenny320 and 5 others
-
 8
8
-
I've painted with dedicated colors and to be honest, I'm not satisfied.
All looks dull and insipid, especially bottom part:

Additionally top and bottom colors are very similar, not sure if this suppose to be like this:

.

Only top looks quite ok:
Need to paint some details like metal parts near exhaust:

-
On 7/13/2020 at 10:25 PM, alain11 said:
hi
metal gear legs , are only a recasting of the kit parts , they don't bring any improvement ... keep in mind that the main gear legs , are different on the C version , Italieri provides parts for the E version
Alain
True, total waste of money, but it's just my opinion. Lucky I get few sets on some sale so it doesn't hurt so much my wallet.
Anyway, work continues. Flaps in place:

.
Working on air intakes:

.

I was not planning to put ladder, but I forgot to cover those nasty fuselage holes.
After gluing canopy I realised that now it's too late. I would not risk damage of canopy from inside by fumes so I've paint ladder and will attach it:
.

All pieces in place - ready for preshading:

-
Starting preshading:

.

And few hours later done:

.

- scvrobeson, HerculesPA_2, Crew Dog and 2 others
-
5
-
I finished pylons and wheels:

.

And finally I closed canopy (but I think I cracked something). And of course air intake fancy parts are in place:

After that presiding was just a pleasure:

-
10 hours ago, MikeMaben said:
Very nice detail


Thank you Mike
I've glued the fuselage - bottom is quite nice:

However top is not - with large gaps:

.

And this is worst:

So putting, sanding all again and in the meantime engine and cart:

.

.

Got struts from SAC, and well, I'm not too happy. Metal is quite soft, you can easily bend most of the parts:

-
Another project started some time ago - waiting to be finished.
So in total I have 3 birds on workbench ;-)
I will add some Sidewinders from Eduard, Pitot from Master, SAC undercarriage, wheels from Eduard as well as Zoom set:
Starting with seat, wheel bays and intakes:

.

.

This time I will load only 2x AIM-9B Sidewinders, 2x1300L Fuel tanks and 1x Matra missile.

.

.

In the meantime I replaces ugly guns with piece of needle:

And cockpit with Eduard's zoom:
.

.

So far so good...1
-
Cockpit time baby:

.

.

.

Trumpy left a small hole here, I've drilled it a little bit and I will put some lens here:

Front fuselage part glued and attached:
Had some problems with windshield, HUD was sitting too high, had to cut it a little bit and somehow windshield was glued in place:

To the payload I will add fire bombs Mk.77:

And painted:

And ready:

- Dutch Man, scvrobeson, Crew Dog and 4 others
-
7
-
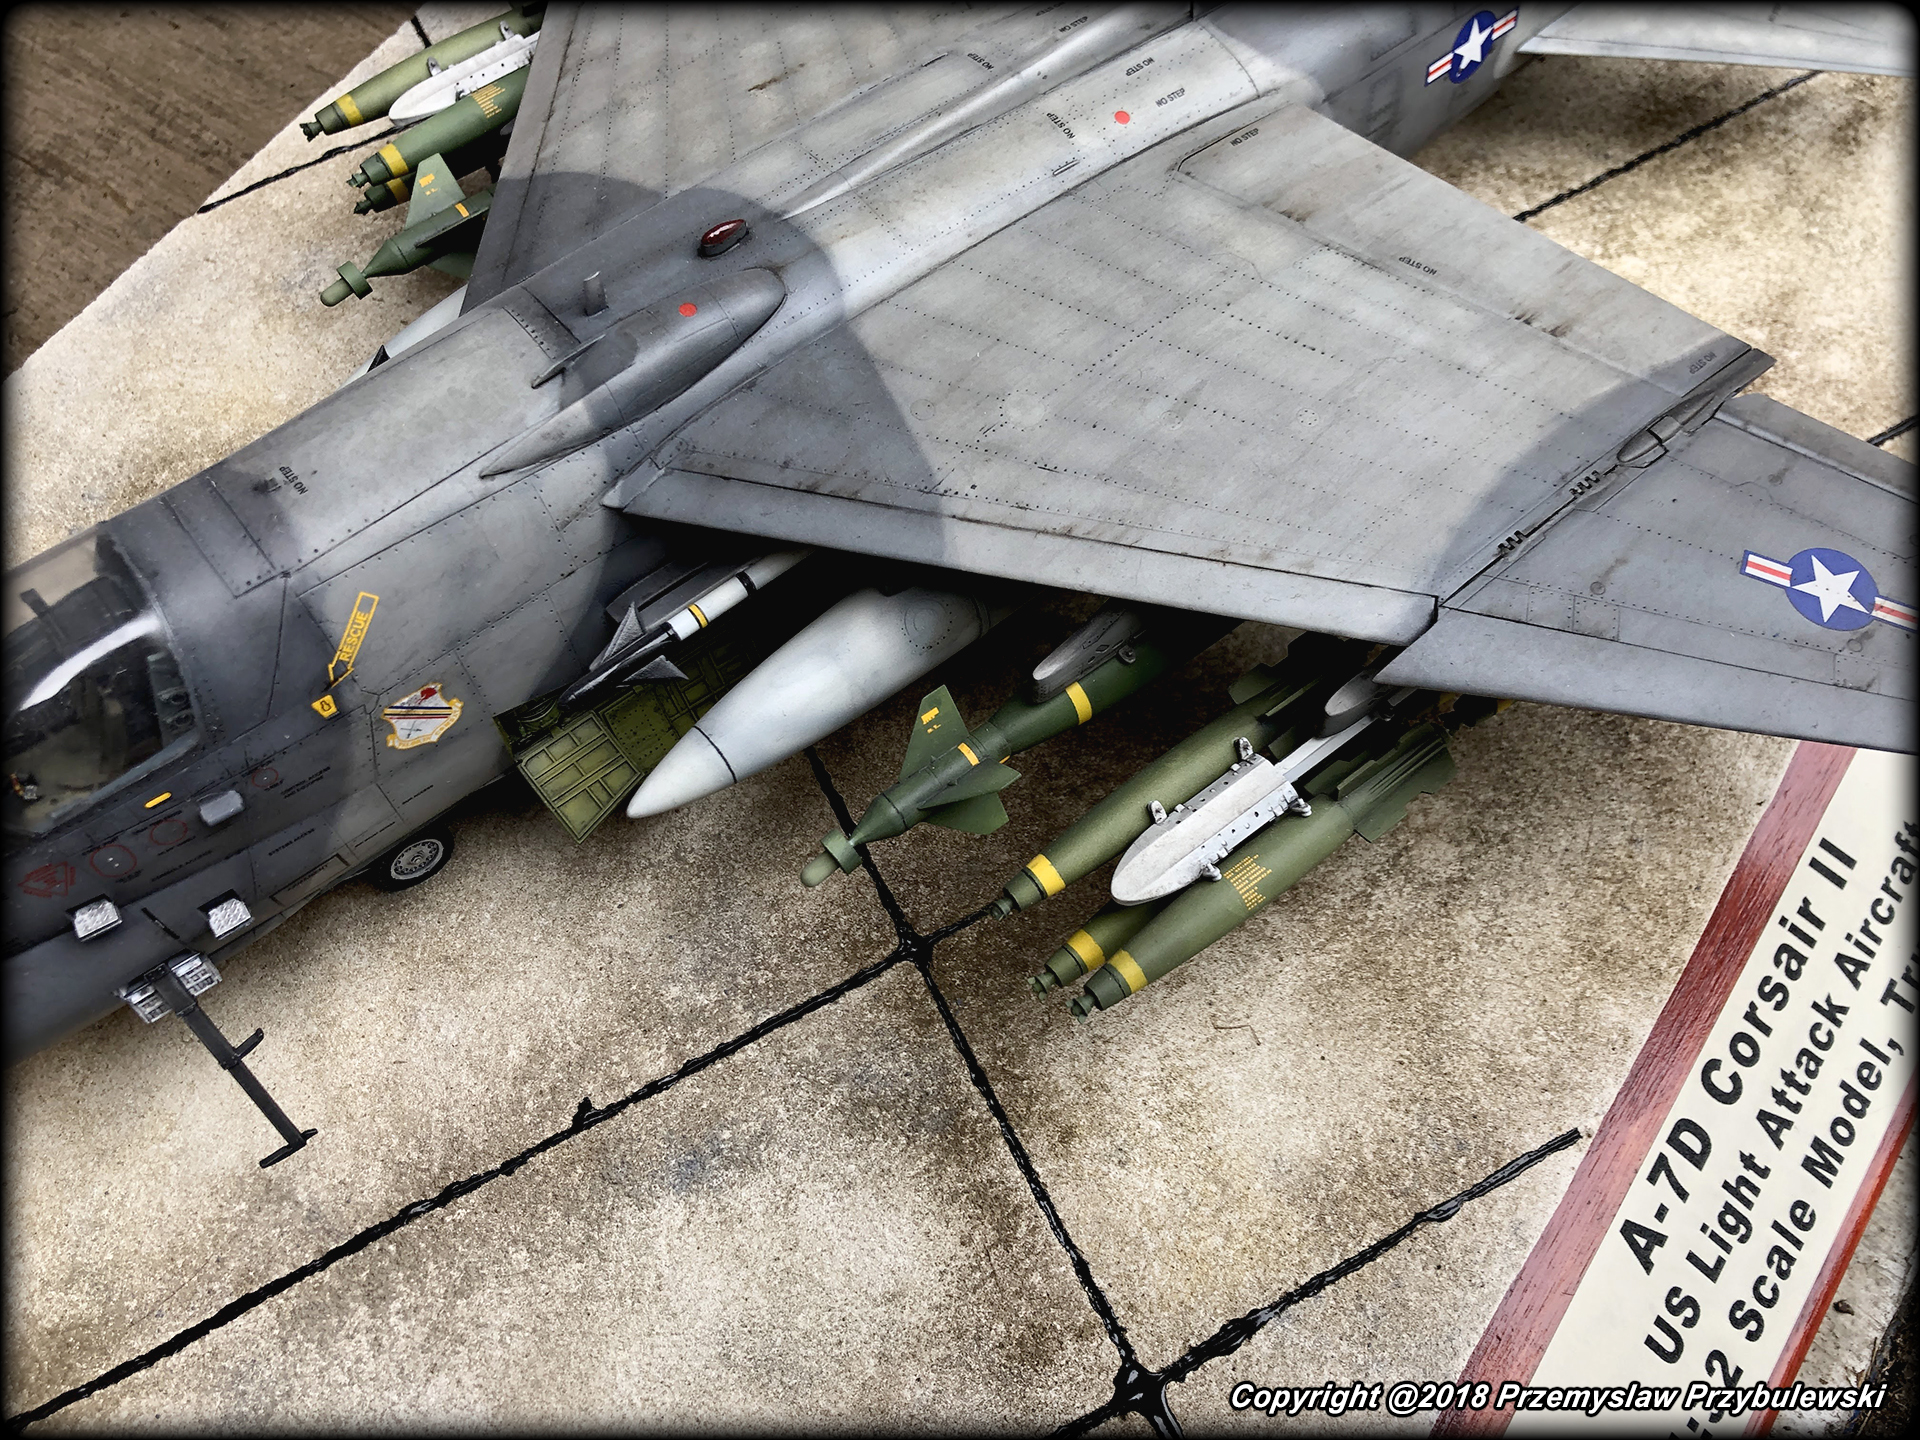
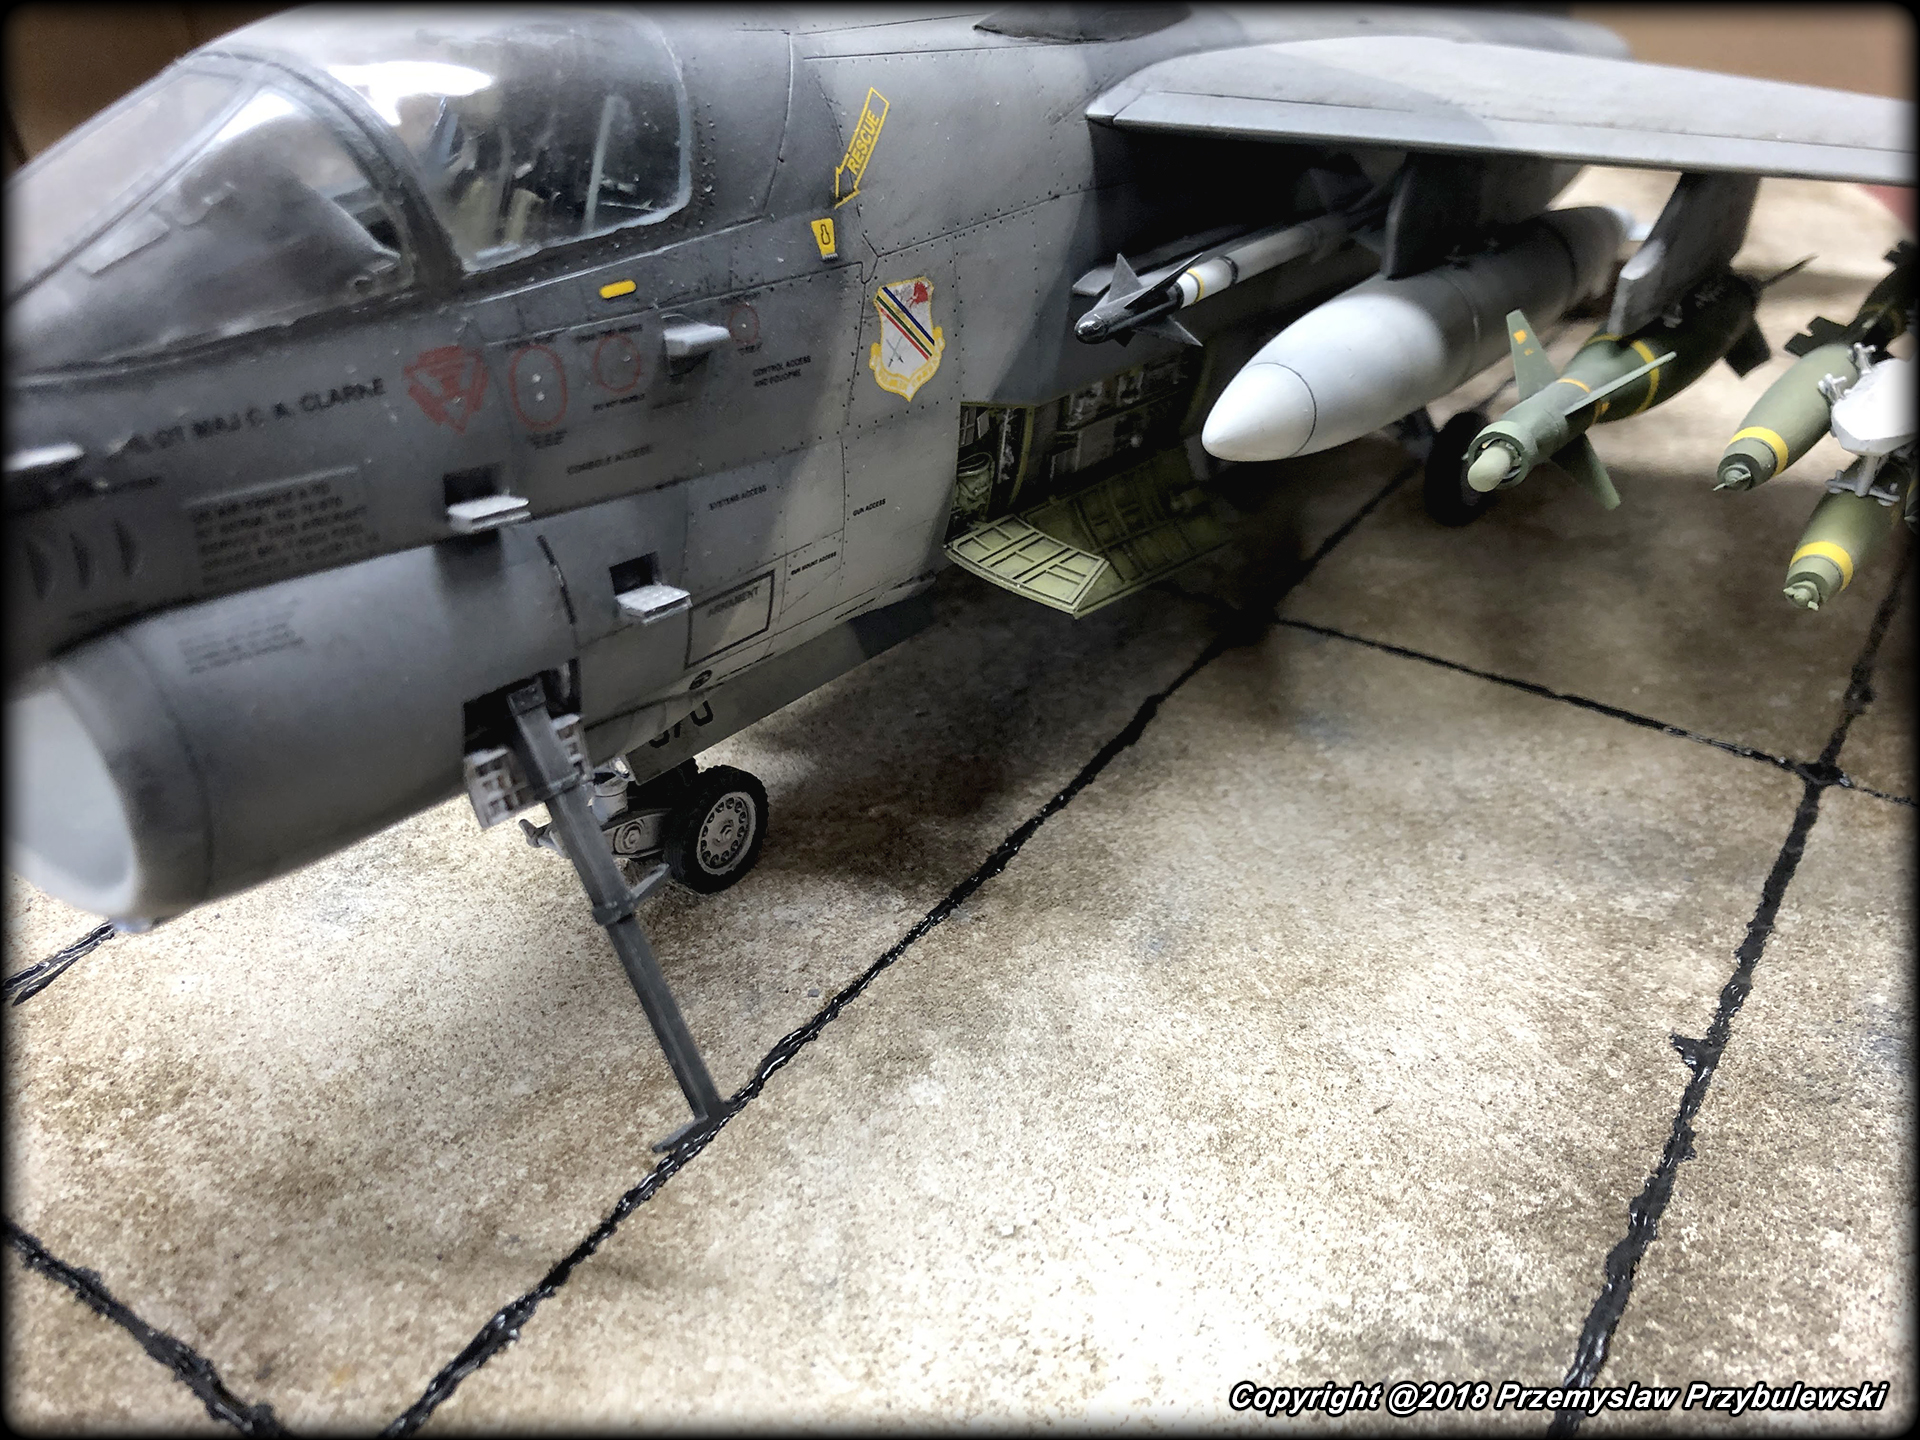
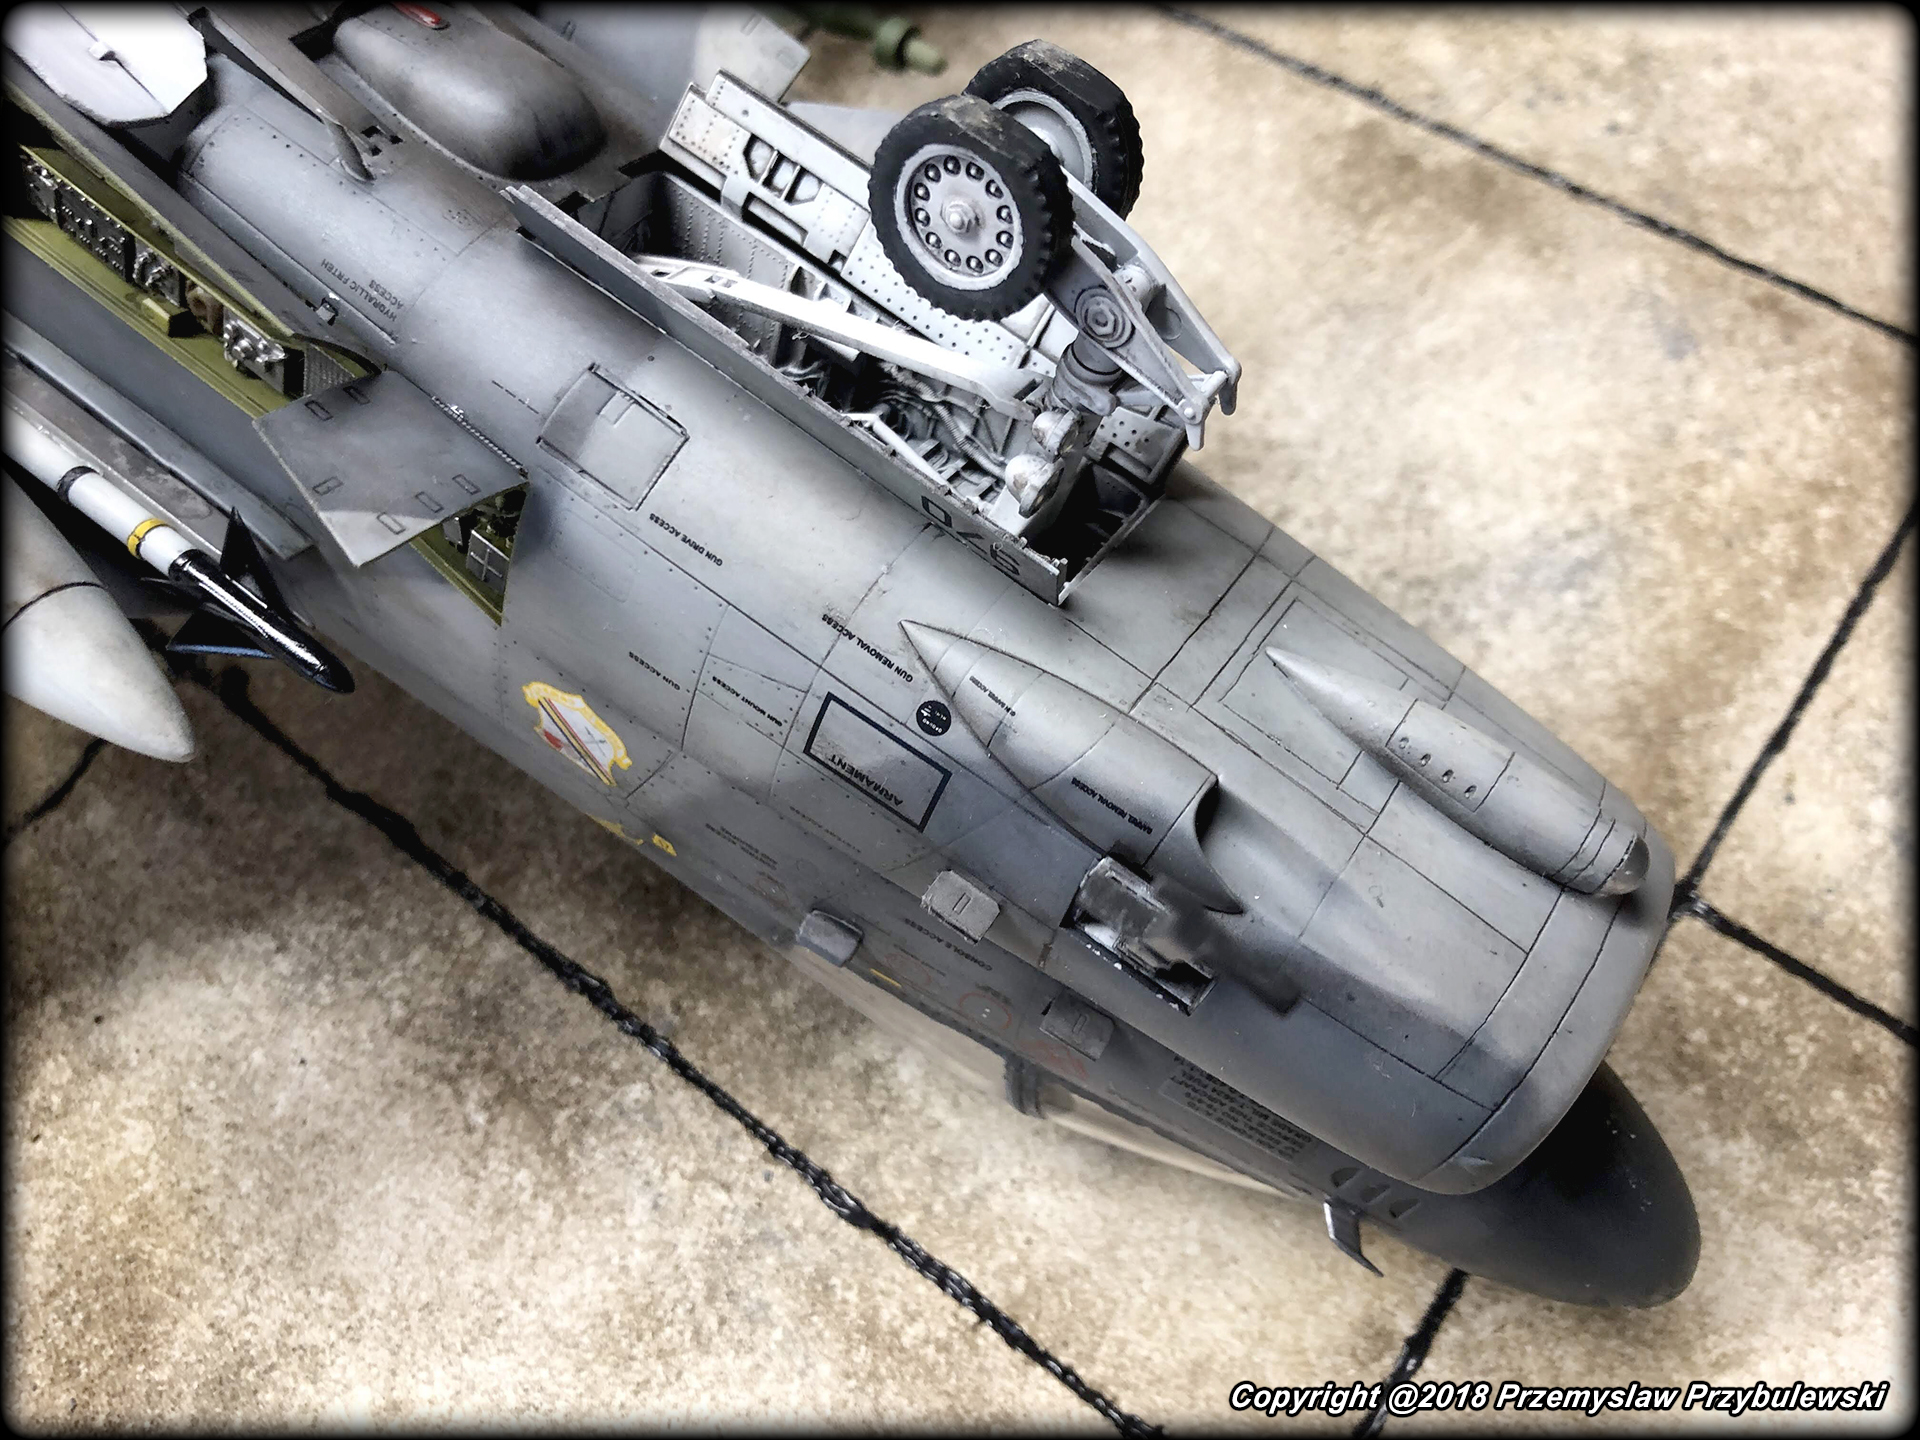
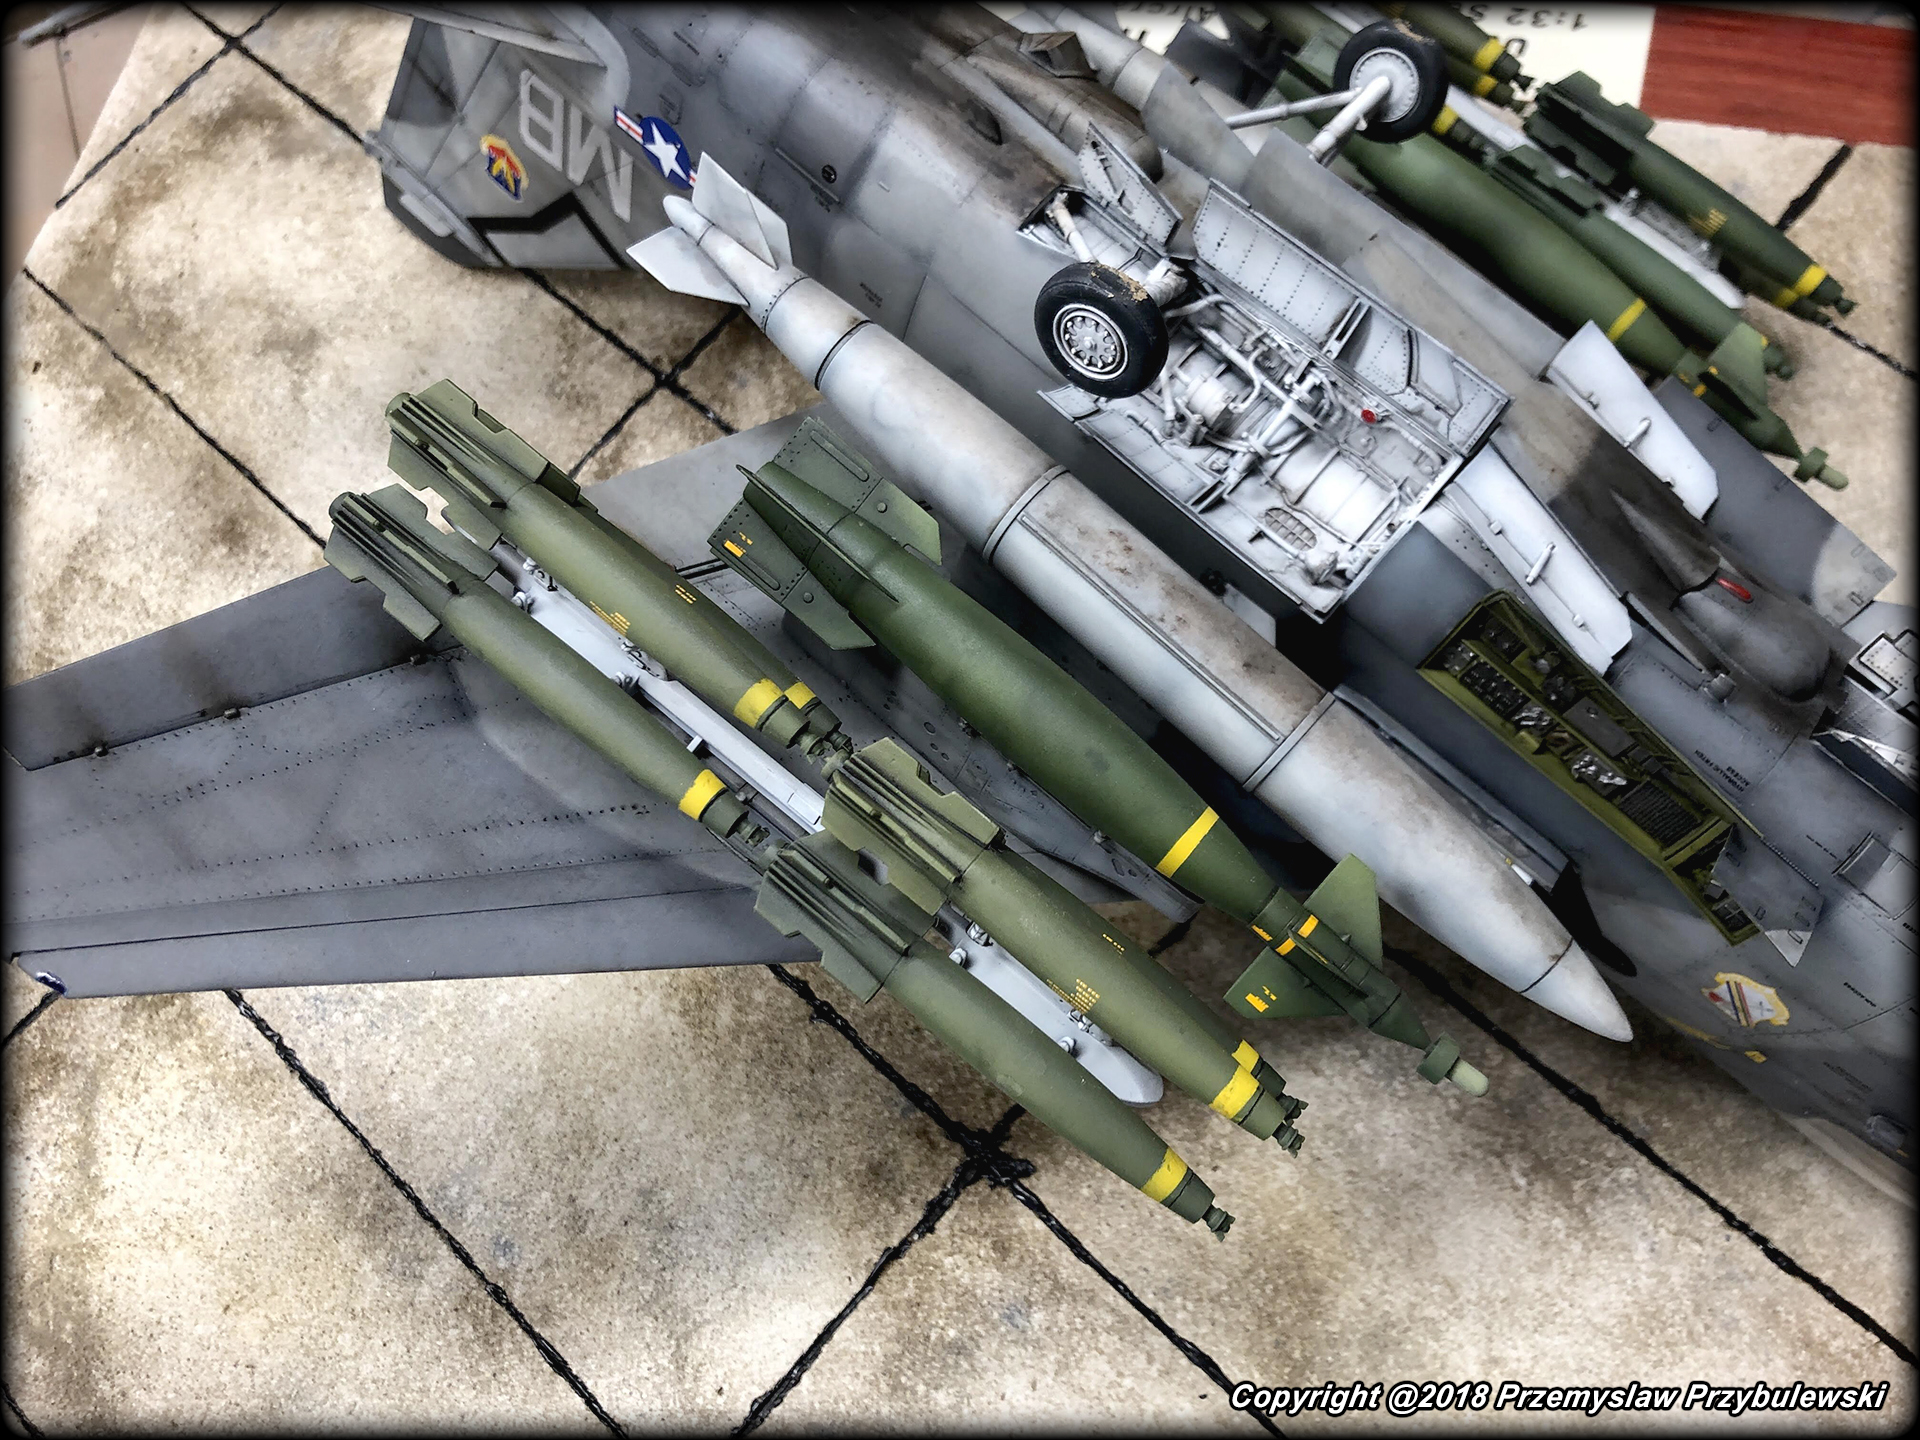
I finished payload:

And closing fuselage:

.

Cockpit in place:

.
 .
.
.

Gun bay:

And ready for preshading:

Wolfpack's JDAMs - medium quality.

I've planned to put them on BRU-57 from Reskit. If you planning to get one - than don't. I have some missiles and other stuff from Reskit and those are ok, BRU is very poor in my opinion and not worth the money (about 55PLN, 10GBP, 13EUR). You can see the print marks, moulds are badly engineered and there is a lot of cutting and cleaning. And of course fit is not good. I was quite dissappointed.
And my printed GBU-38s:

-
3 hours ago, Crew Dog said:
Such a shame that motor is going to be hidden, you did an absolute phenomenal job on it! Question: is this the baseline AV-8B, or one of the other variants Trumpeter released?
Thank you Crew Dog.
This is Trumpeter 02286 - AV-8B Harrier II Plus.
I think it was based on 02229 AV-8B Harrier II
But I'm not sure what are the differences. -
Aftermarket exhaust - nice details, good quality:

Minor imperfection:

Comparison kits nozzle vs Aires:

Anyway, I've got cockpit to do. Nice crisp details:

And few hours later:

In the meantime, I'm preparing place for cockit. Big plus to Tamiya fo providing nose weight:

Gluing also, rear part of fuselage and bottom part of wings, lucky fit is very good so no putty required:

.

I've recently bought some real colors paints, and since I have a lot of Tamiya paints on rack and no place for new, I had to figure out how to store another few (dozens) of jars.
I decided to keep them on rotary stand. It is designed to fit my shelves system - similar to hobbyzone but bigger 20x20x40cm (8"x8"x16").
This is first layer for 12-18 jars, there will be 3 layers and 2 stands in shelf so in total it can hold 108 jars:

-
21 hours ago, Robthepom said:
looking great so far, cant wait to see more progress. I just finished my Harrier and looking at it now on the cabinet, its a great model.
You did a really good job on the bomb load, i binned most of the bombs, the fit was terrible
Thank you Robthepom.
8 hours ago, Collin said:Do you have to build the engine on these trump Harrier kits? Of is there a shortcut not doing so because you can’t see it finished on the completed model?
Cheers
Collin
I do not think so. You would need just a front piece of intake with fan as this piece is visible and it's holding front piece of fuselage.
Exhaust parts can be fitted to fuselage. -
Waiting for some parts for F-16, I decided to reanimate project which was started some time ago. Actually I was suprised when I checked tho initial photo dates: December 2013.
I've put this model to box for a while and almost 7 years passed, so I think it would be nice to finish it.
First some photos takes in other era:
 .
.
.

.

.

Mostly out of the box with only Aires cockpit and some bombs/missiles.
But first thing first - engine.
Nice, but won't be visible at all, so it was time to play with some Alclads:

.

.

And fitted:

Next adding more parts:

.

.

.

I can't recall why I did all the bombs, missiles and everything what was in the box but there is a lot of this.
Harrier has take only few of them, but it would be pity not to have so more option then simple fuel tanks, Mavericks and Sidewinders.
I decided to do much more:
2x AIM-9L Sidewinder
2x Mk.117
2x AGM-65E Maverick (Eduard)
3x Mk.83 regular fin
2x Mk.82 Snakeye
6x BSU-49 + 2x TER
2x GBU-12
2x Mk.77 (Aerobonus) + 1xTER (Eduard)
2x Fuel Tanks
1x AN/AAQ-25

Thank you for watching. New update soon...- blackbetty, Kagemusha, Dutch Man and 4 others
-
7
-
I fit the wheel bays somehow but it leaves a small gap:

I used the kits screws and a fair amount of CA glue:

Rear view:

.

Now to front bay. Kit vs aftermarket:

I've painted it as later it will be difficult to access all areas:

Prepared to glue:

Fitted quite well, but...

I had some problems with closing fuselage halves - resin was too high, had to cut some:

And already with front part of intake and a lot of putty:

Comparison with CMK intake which is one big part. Nice fuselage details but wheel well is not too detailed:
 .
.
.

.

've been working on gun and gun bay:

.

.

- HerculesPA_2, Derek B, scvrobeson and 3 others
-
6
-
-
Updated first post as photos disappeared.
Slowly but progressing. Added some wires to the engine:

And primed:

.

I've started resin wheel bays fit.
The part is big block, to fit it the existing engine wall, I had to cut it. Problem is that on the other side there is an air inlet:

.

The kit's parts have also the small "wings" to screw them to lower fuselage - I cut them away to use on resin.
I replaced part (which was cut from resin) with a piece of kit's inlet:

However resin do not fit well on width, length and shape:

.

In the meantime, I've painted some piece of internal fuselage - no of it will be visible, but I just could not leave it like this:

.

- Anthony in NZ, Lothar, scvrobeson and 3 others
-
6
-
Another recently completed build - I just realized that it was completed even before Nighthawk.
Almost Out of the Box - I replaced cockpit and wheel bay from those from Aires.
Some scratch for gun.
Rather dirty.
.
.
.
.
.
.
.
.
.
.
.
.
.
.
.
- Hartmann352, Rocat, Daniel Leduc and 4 others
-
7
-
-
I recently finished a long build of Su-25 (long as in the meantime model landed in the box couple of times) and was wondering what next. I took me couple of days to decide and take out model which I got very long time ago. It was my second purchase of 1:32 birds, I gave around 50 bucks for it, so it was rather a bargain.
So here it is my F-16C/CJ Block 50 from Tamiya.
Apart from model itself, I'm planning to use:
- Aires Cockpit Set
- Aires Wheel Bay
- Aires Exhaust nozzles
- Wheelliant Wheels
- M61 gun from Master- CMK intake (not sure about this one)
- Eduard Canopy Masks
- Master Piot and AoA
- Master Static Discharges
- ResKit BRU-57 (probably)Additionally I have some
- Wolfpack's JDAMs
- Wolfpack's JSOWs- Eduard's B and C AMRAAMs
- Eduard's Sidewinders
I would like to do an Aggressor scheme but they rarely are full loaded, so I have problem here - will se later.
Due to COVID-19 I'm still waiting for some of above, so it will be long build.
As of now, I've started with fuel tanks, HARMs and pylons:
.

.

And as I will have aftermarket exhaust I will put engine on service cart.
.

Glued engine:

.

Now I will add some wiring to engine. -
BIG thanks to all of you - it was the hardest plane to paint. I was wondering all the time, it is ok, it is enough? Should I add some something else, or more.
I'm really happy that you like it.
-
A lot of time passed since my last post here, I promise I'll try to be more active.
Since my MiG-23, I finished 4 birds, I'll present one of them here, next will post in a few days.
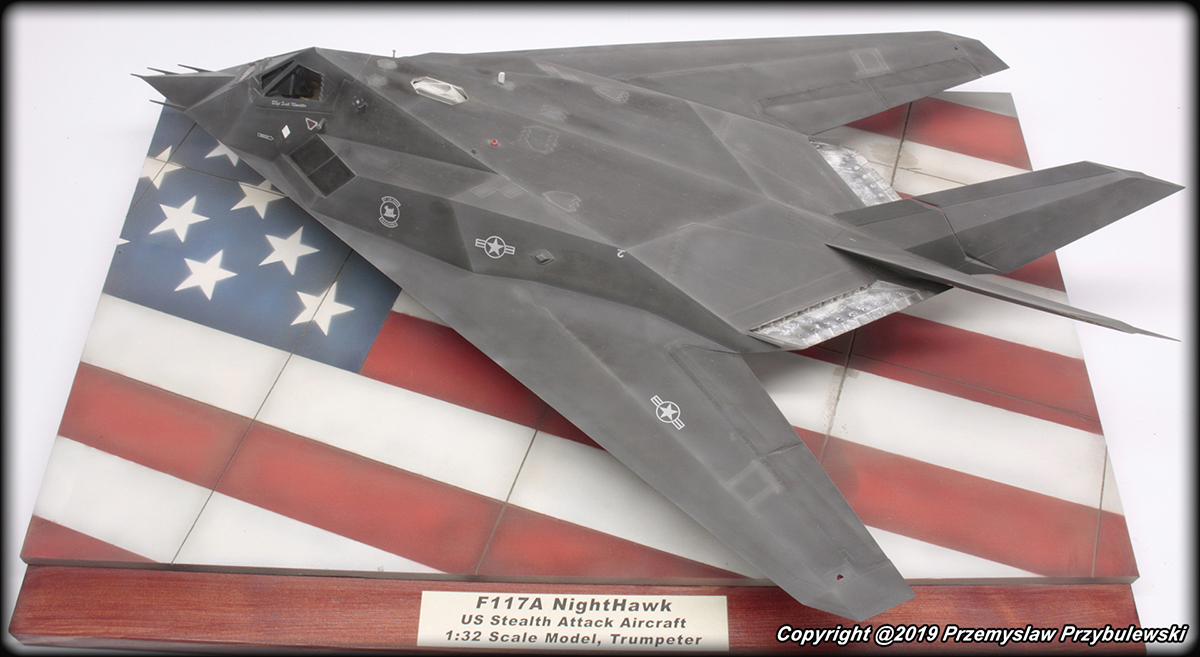
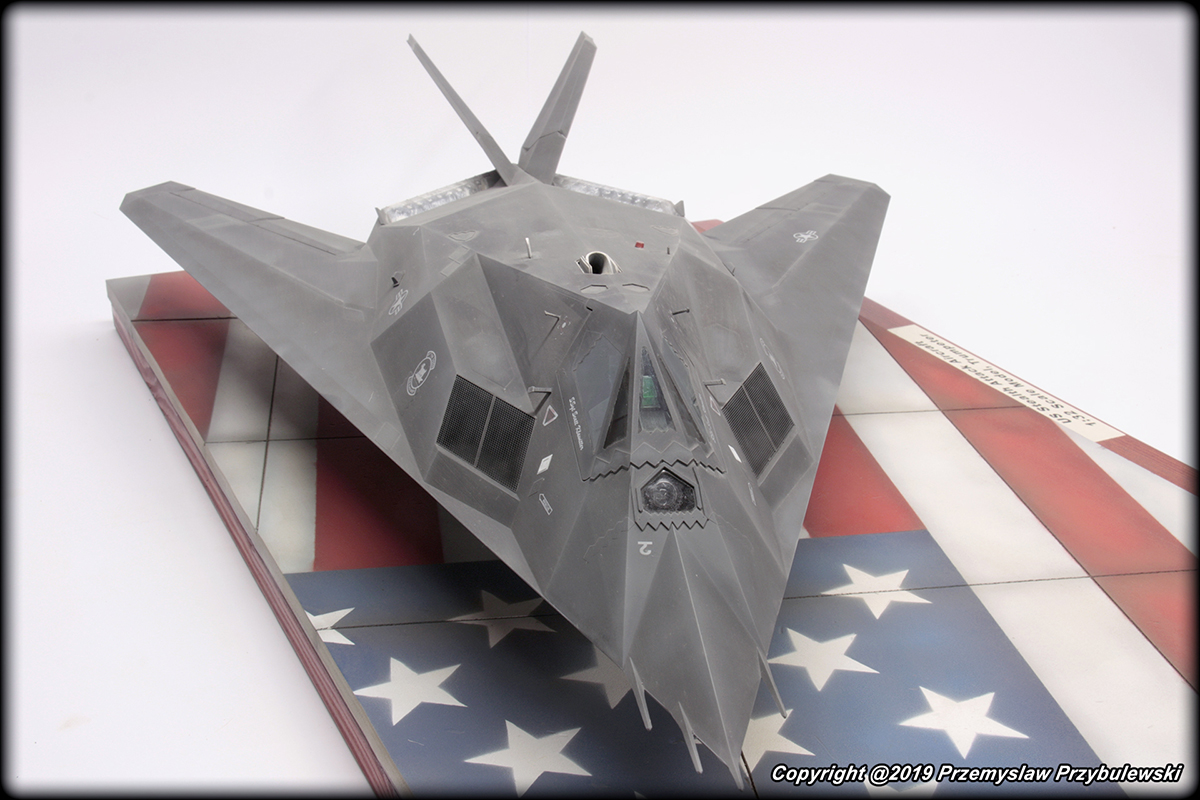
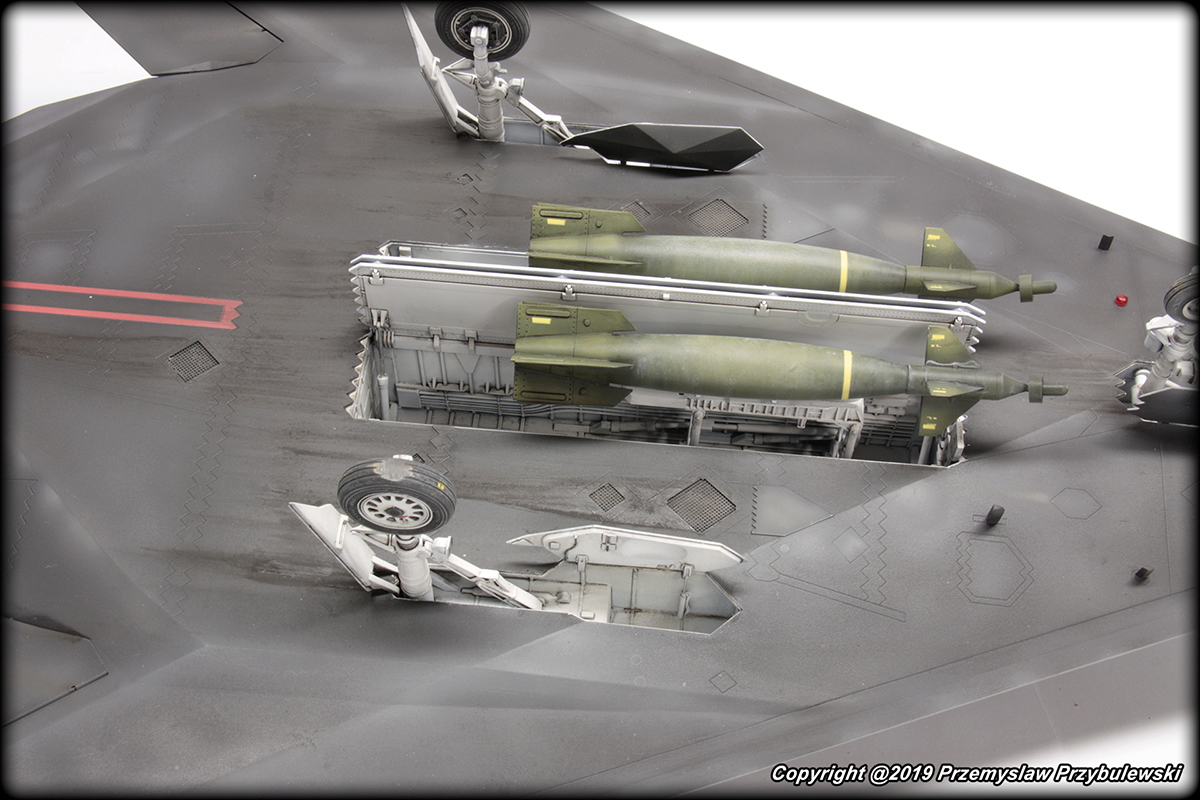
My Nighthawk was made almost Out of the box, I've changed only wheels for Eduard ones.
Base was inspired by last flight box by Academy.
Biggest problem was with exhaust painting, I did some research, but it is so hard to find a decent photos, so it is my vision of exhaust.
Watch and comment - and please, be gentle.
.
.
.
.
.
.
.
.
.
.
.
.
.
.
.
.
.
- blackbetty, Uilleann, Old Dog and 24 others
-
27
-
I did similar for my Su-25 base but plaster not resin and in various shapes as I'm not sure what combination use.
-


[W] F-16C/CJ Block 50 - Tamiya 1:32
in Works in Progress
Posted
Thanks Matt - This is my 4th model painted with AK RC. First was Tor/Tunguska complex but I used there only one color - Russian green.
I mostly used Tamiya so far, but I was tired of constant lack of dedicated colors - I had mix them by myself. It was always problem with accuracy and quantity.
Besides AK can be mixed with Tamiya lacquer thinner and they give quod quality surface. Dries quick, resistant to masking tape and bluetack.
More expensive then Tamiya but paint is very thick, I was not able to use it straight from jar - I had to mix with 3-4 parts of thinner.
IMHO - very good paints - smell different then Tamiya but not too agressive.