
Greg W
-
Posts
1,148 -
Joined
-
Last visited
-
Days Won
5
Content Type
Profiles
Forums
Events
Posts posted by Greg W
-
-
How's the availability stateside now?
I have seen a couple of online retailers taking preorders but there was no indication of when they are going to be able to fulfill them.
Anyone got the lowdown?
-
Wow, that looks good Rick!
Fantastic job!
-
38 minutes ago, BloorwestSiR said:
@Greg W, I checked the stash and I still have the lower cowl from the Alley Cat PR XI conversion. Even though it's designed for the Tamiya kit the fit still requires some work.
I won't be using it as I'm doing a PR XIX so if you want that, it's yours for the postage.
You would still need the AIMs set for the rest but it may make it easier to use on the Tamiya kit.
Carl
Thank you so much Carl!
PM inbound...
-
2 hours ago, thierry laurent said:
Hi,
I did not check that but the opposite (Alley Cat parts made for the Tamiya kit on the Revell) and can confirm there are nose and lower rear fuselage (tail wheel area) shape and cross section differences preventing a drop fit. Nothing is impossible but this will ask for some noticeable work. So I'm sure the problem is comparable for your scenario.
Ha! Maybe we should swap sets?
-
I have a Tamiya Mk IXc Spitfire and would like to know if the AIMS PR XI Spitfire conversion set for the Revell Mk IX, works well with the Tamiya kit?
The AIMS conversion looks like a very high quality set. I'm sure there is a lot that is usable but I am curious to see if anybody has test fitted the vac canopy and resin lower nose section in particular to the Tamiya Spit.
Greg
-
On 2/24/2024 at 3:17 PM, Anthony in NZ said:
Oh Greg! Now we're talking mate!
I absolutely LOVE the FA.2, probably my fav variant Harrier ever. I am still in disbelief there is still no decent kit of this generation harrier available in 1/32....anyhoo, I digress.
Nice clean work so far my friend, I will be 'glued'to this one for sure....awesome start. Man that's going to be impressive in 1/24!
Cheers Anthony
Ha! I see what you did there.
Anthony, we were so close to having Sea Harriers in 1/32, my finger was itching to press a buy button. Grab some tissue before watching the video below...
alas, this project has not yet seen the light of day.
-
On 2/22/2024 at 2:14 PM, Out2gtcha said:
Lovely work so far for sure.
Thanks Brian, nice to have you check in.
14 hours ago, chaos07 said:Nice! Superb clean work so far - looking forward to your progress.
Ok, very good! Thank you
21 hours ago, Bonkin said:Looking forward to following along with this. I have both the GR3 and SHAR FRS1 kits in my own stash and always figured I'd build both at the same time. I've always preferred the look of the FRS2 though. Sadly it looks like Heritage Aviation Models Ltd is no longer trading so unless someone else has the original moulds and/or is willing to sell the conversion kit I expect it will be very hard for others to do the same.
Maybe we can drive some interest toward a sympathetic aftermarket outfit after all? Seems like it is worth a try. Thank you very much for showing interest in my attempt at the conversion.
To those following along, I plan on diving into the build after I finish my Airfix 1/24 109. Actually, I am going to take my Hasegawa eggplane to the 2024 IPMS Nats, so that is also in front of this too.
So far, my prime example for this project, is the excellent WIP by ChrisE:
So good to have all of you add to the fun! I have to keep my ADHD in check to keep me from dropping everything and starting on this!
Later, friends
-
20 hours ago, AnthonyWan said:
Following with interest...
Is that Heritage Aviation conversion set still available?

Unfortunately no, the Heritage Aviation products are not available anymore.
Model Monkey? Big Tim? Care to try your hand at a nose and fuselage extension for this kit? Maybe? Please? Ha! Lets make some noise and see if our aftermarket friends will come to the rescue!
-
10 hours ago, Biggles87 said:
Not in a scale I build but I’ve always considered the F/A 2 to be the best looking of the Harrier series so I’ll follow please.
John
I am really stoked to do this and it will be great to have you follow along.
I have been tempted by the 1:48 Kittyhawk FA.2 but now that I have the unubtainium Heritage Aviation parts my ambition to build the big kits can be exercised. Im not sure which is easier to build though! I guess now its go big or go home...
-
Maybe we could come up with a list of LSP kits that were on the market when LSP started up, that still hold up today as good quality, no fuss builds and participating group builders could choose from that?
-
6 minutes ago, LSP_Kevin said:
Very neat work, Greg! I had no idea Flory had ventured into 3D printing.
Kev
Thank you Kevin.
Yes, he also does a set of nozzles for this kit too, which I have and they are a big improvement over the kit parts.
- LSP_Kevin and geedubelyer
-
 2
2
-
I hope this little blurb helps fellow FA.2 buffs.
FYI, Flightpath has introduced newly revised FRS.1 upgrades that have many useful parts for this project, like better landing gear and a host of useful items.
Check it out:
https://davidjparkins.com/product-category/flightpath/124th-aircraft-detail-sets-and-display-items/
-
-
-

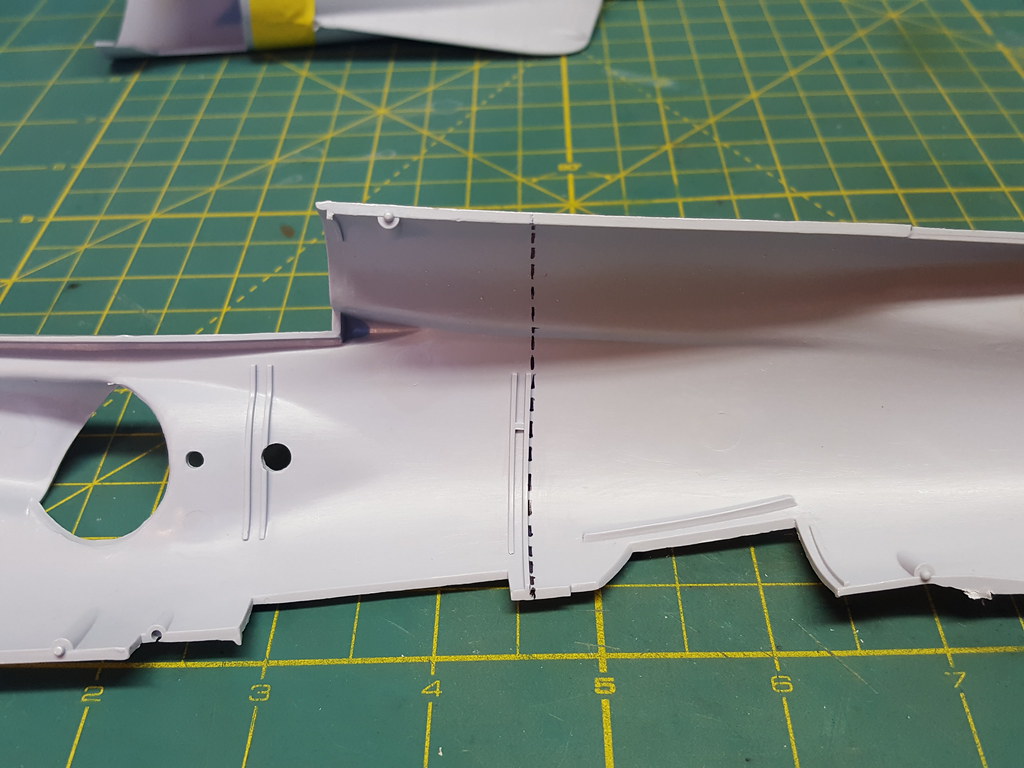
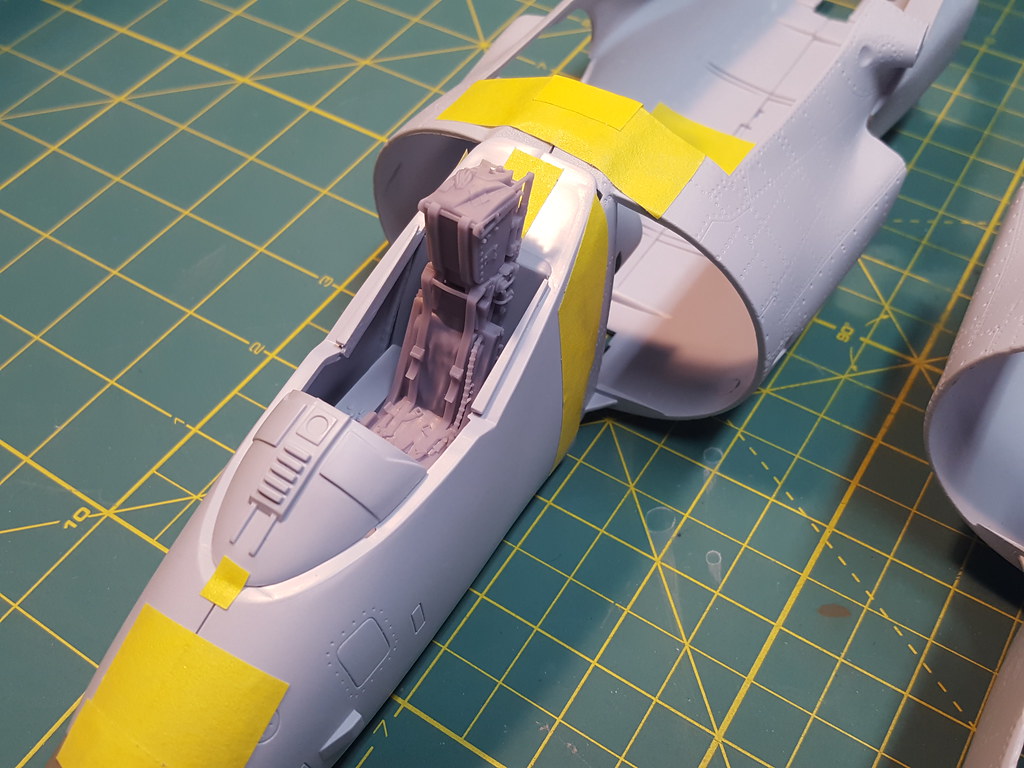
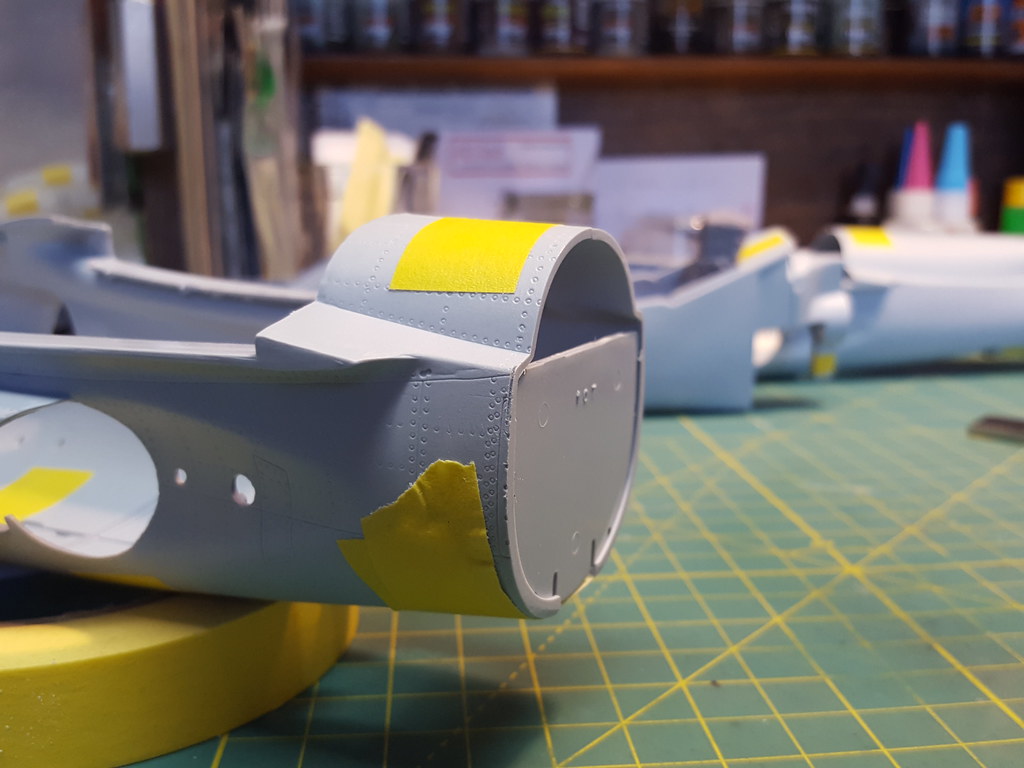
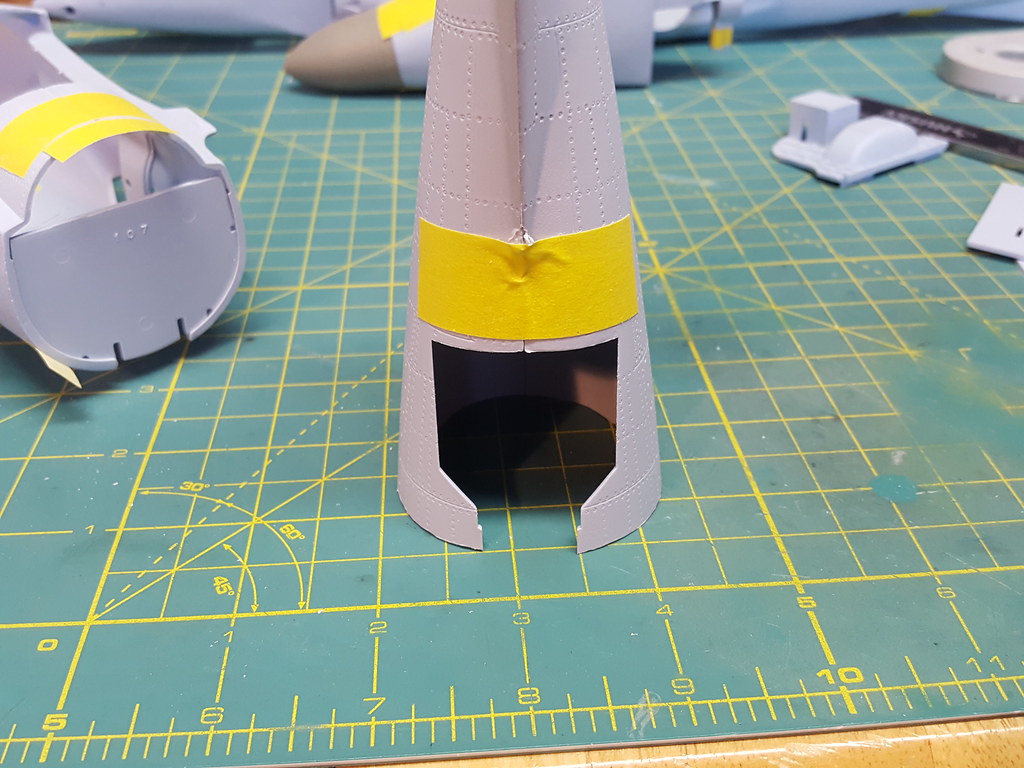
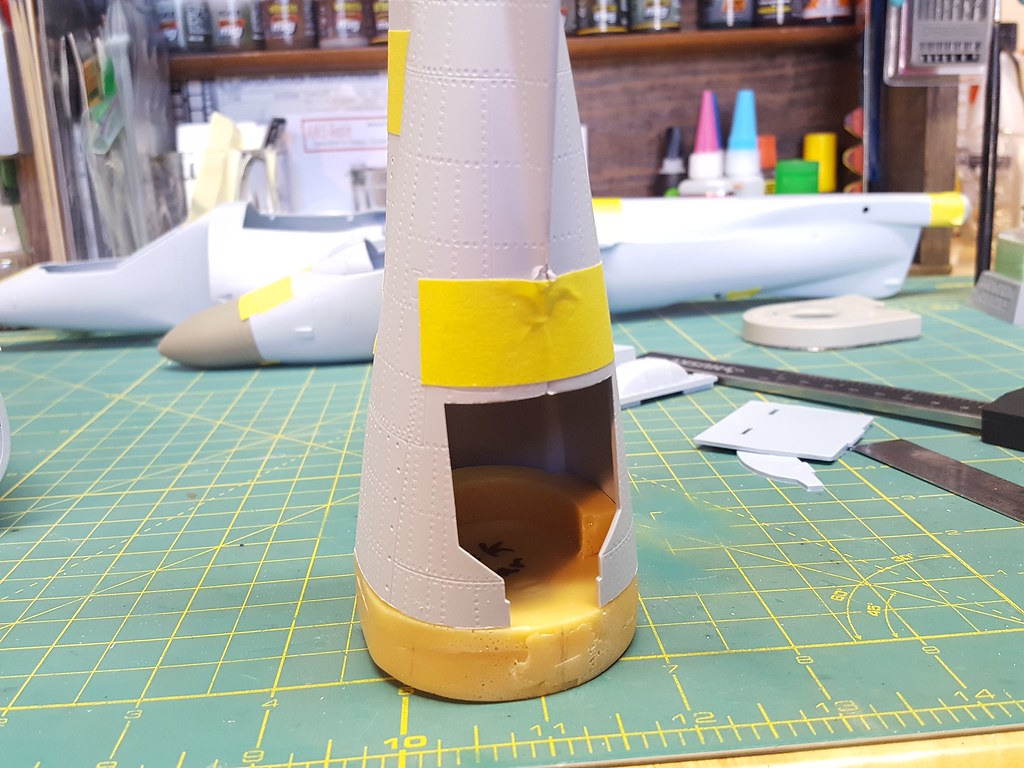
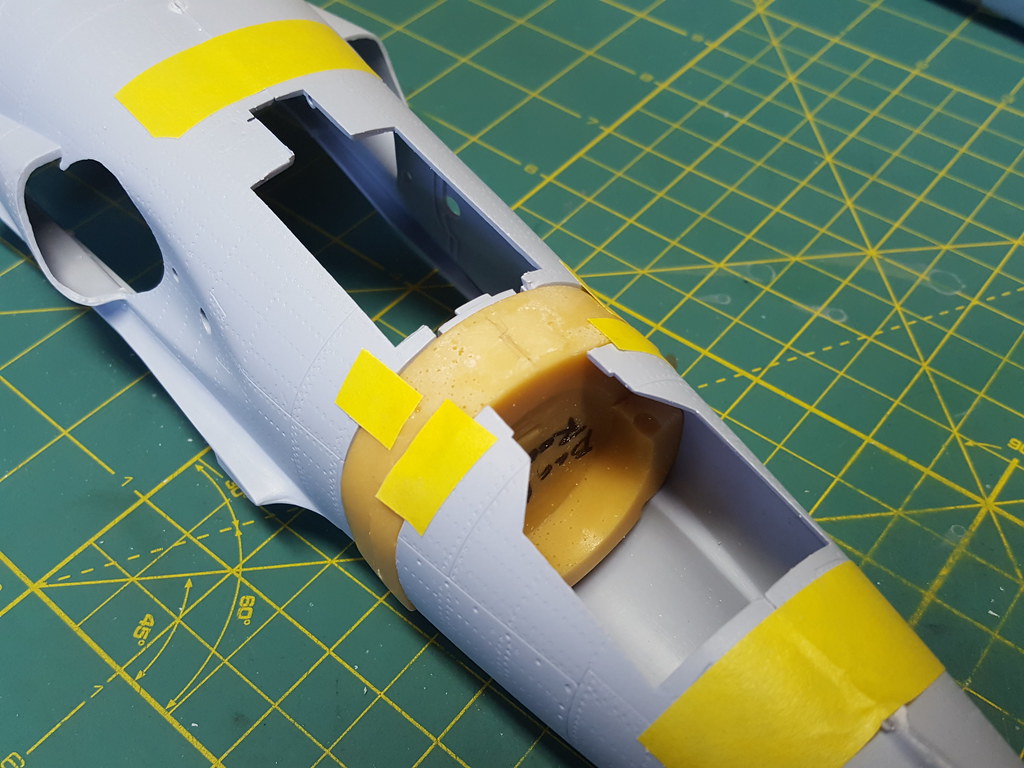
This is the fuselage extension plug. Initially, I had only a general idea of where it should be placed.
The real 1:1 fuselage extension is 13 3/4" wide. The HA resin part is just over 9/16" wide.
The cut in the fuselage is made just behind the rear bulkhead of the main gear well.
In order for my HA resin plug to fit, some resin needed to be removed from the bottom of the forward facing interior protrusion, which extends over the wheel well. In other words, it was fouling on the two tabs marked in red.


Cut on the dotted line...


- Shoggz, Anthony in NZ, geedubelyer and 4 others
-
7
-

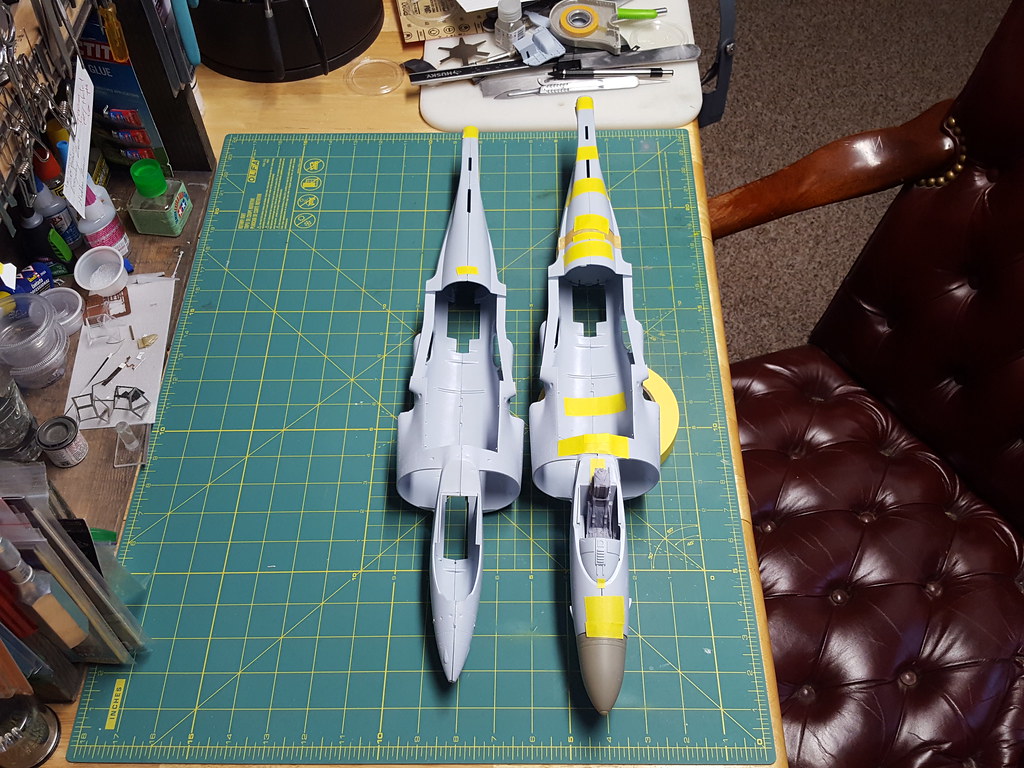
Ok, this eventually will be a WIP but at the moment, it is a little side project to satisfy the curiosity of myself and some interested fellow modelers.
I have been gathering kits, reference and aftermarket so I can make 1/24 FRS.1 and FA.2 Sea Harriers.
Our fellow LSP member gunpowder, provided me with The Heritage Aviation FA.2 resin nose and fuselage extension. I did not receive any instructions with the conversion parts, so the question that came up for discussion was, where precisely does one make the cut for the fuselage plug?
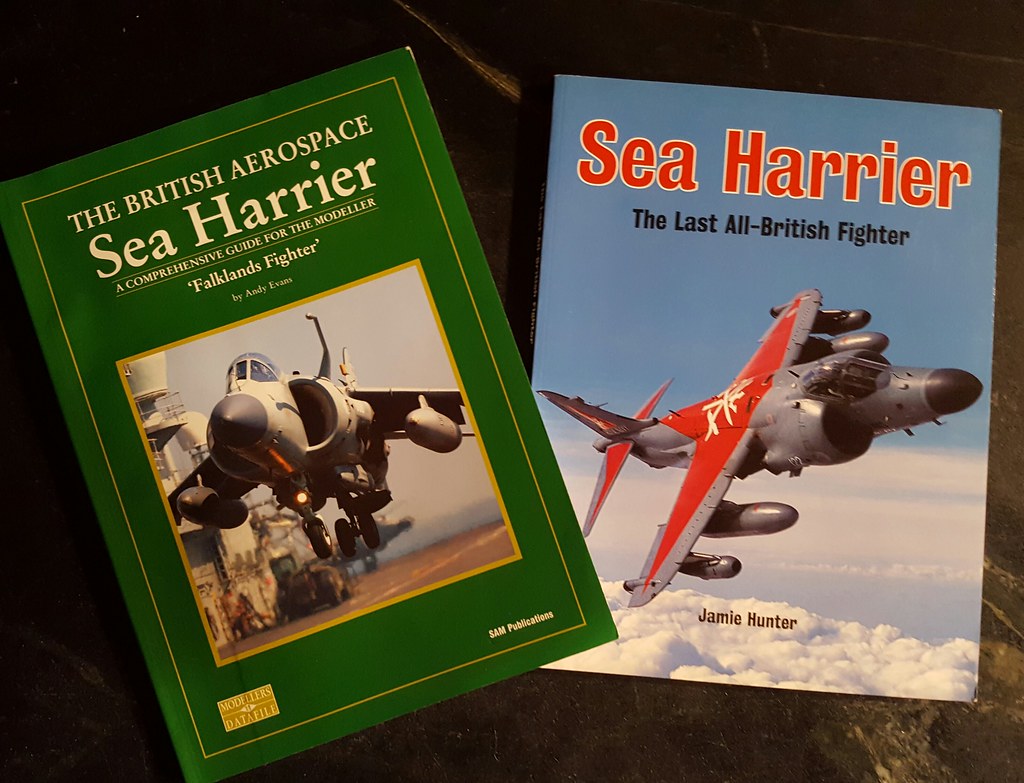
The information needed was found in the two books below and this post is for those that are interested in doing the same conversion, if they are able to aquire the Heritage Aviation parts or use 3D printed parts, in order to convert the Airfix FRS.1 into the FA.2
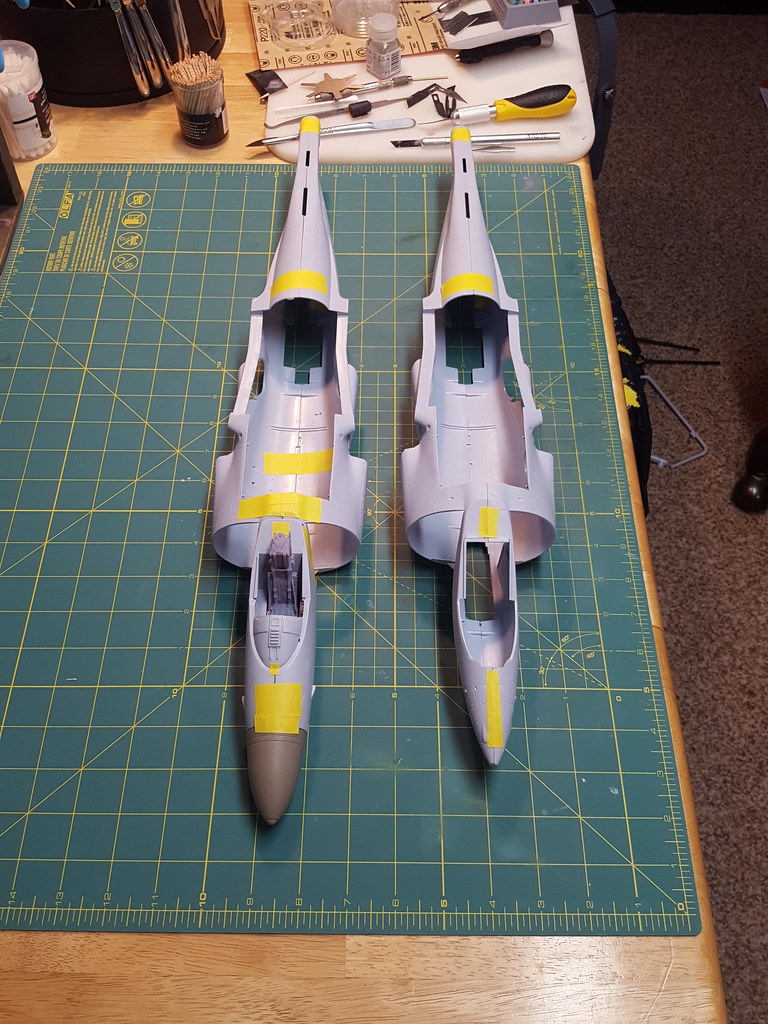
The Airfix FRS.1 kit is really the GR.1/GR.3 kit, with additional sprues that includes a new tooled FRS.1 forward fuselage section. The modeler has to cut the GR nose off and graft on the Sea Harrier parts.
Below you can see GR.1/GR.3 fuse (bottom) next to the modified kit parts. The Heritage Aviation resin nose has been added to the FRS.1 forward fuselage and the ejection seat is a 3D printed part from Flory Models.


-
1 minute ago, Kagemusha said:
No, it was never released.
Nuts.
Thanks Kage, that saves me from continuing to try and track it down.
-

Was this set released? I would dearly like to have one but it is not clear to me that it ever saw the light of day.
I sent two emails to Wolfpack but did not get a response from either one.
Any information would be very much appreciated.
Thanks, Greg
-
On 3/4/2023 at 12:44 AM, Dpgsbody55 said:
Impressive work so far. I like the thinned down cowl too. Now the vents in the gun cowl just need to match.

Cheers,
Michael
Thank you Michael!
Here you go, a in progress shot for ya. Man that's a extreme close up, I must have bumped the model since the front cowl seems high.

This opening is proving to be tricky.

Sorry for the very late response, quite pleased to have you stop by and comment!
Good night internet, must... work... tomorrow.........
-
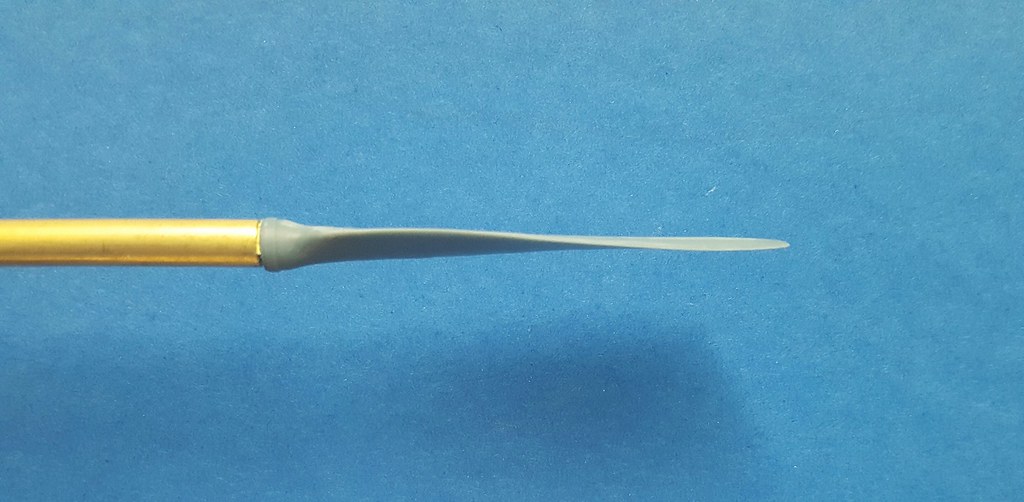
The beautiful Airscale 3D printed propeller set.
I am so pleased that Peter did this. I think this kit needs it as much as the wheel wells because what comes in the box is so poor.
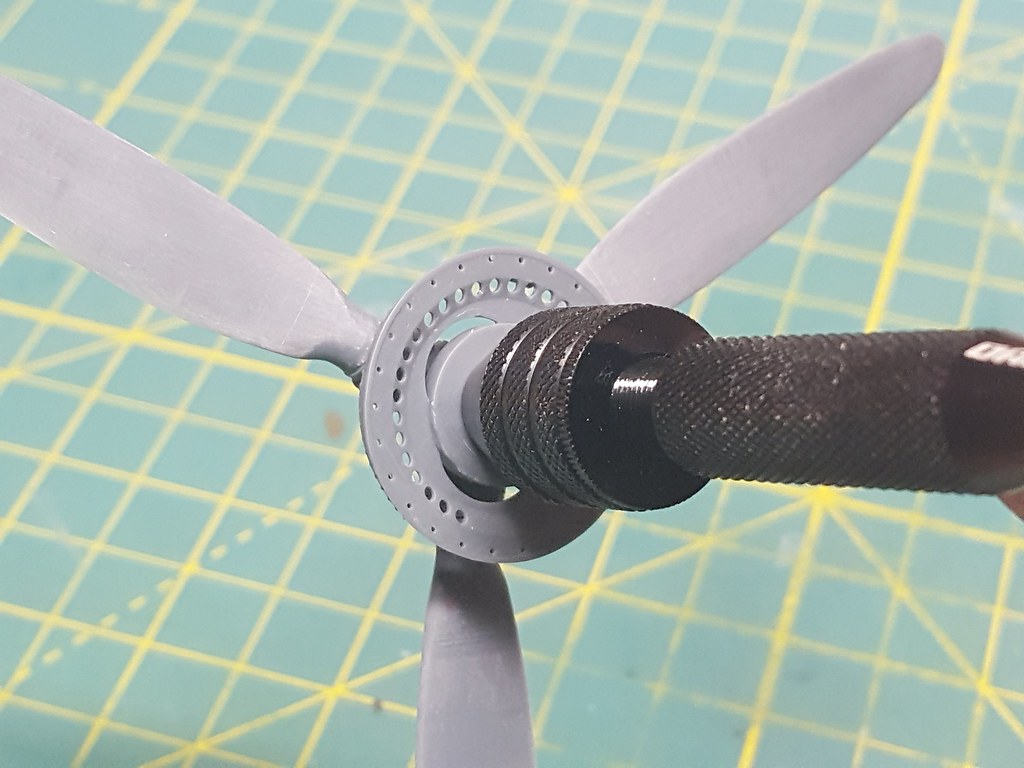
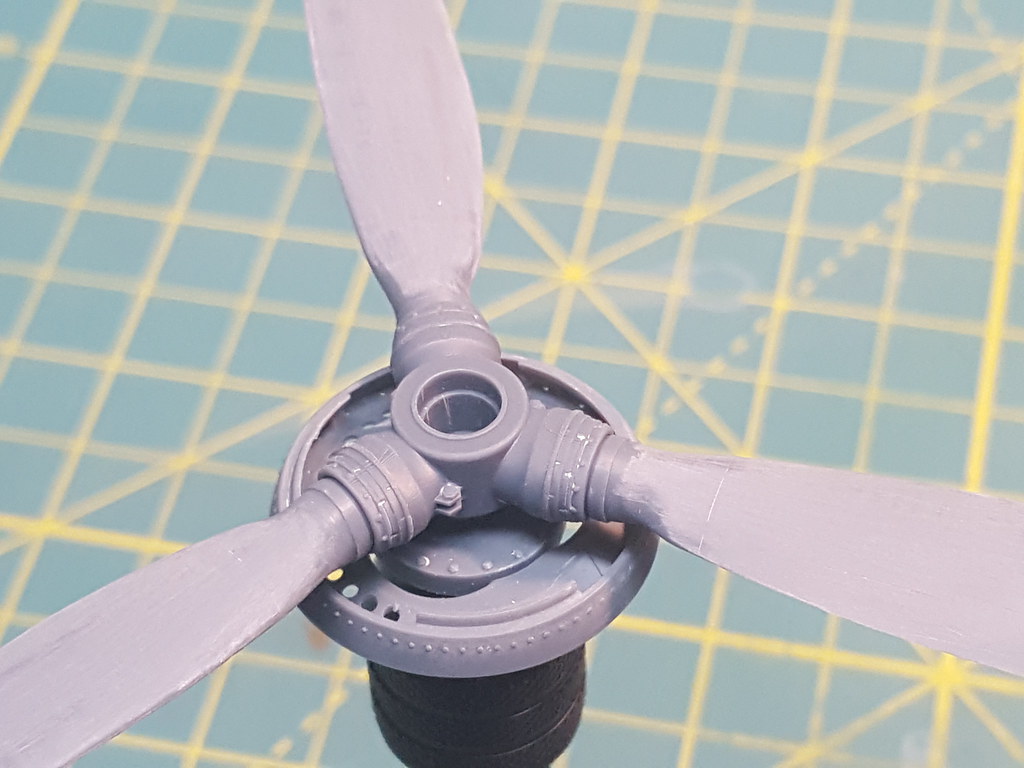

Check out the dynamic shapes of the blades.
Leading edge:

Trailing edge:
The blades are keyed and align perfectly when mounted to the hub, a jig is not needed.
-
Aber barrels for the wing cannons.


- Bonkin, Anthony in NZ, Elger and 3 others
-
6
-
Airscale offers a set of very nice 3D printed wheel wells for this kit. Although I had glued the wings together before they were revealed to the buying public, I happily bought a set and quickly figured out a way to integrate them into the model. The whole affair was a lot less work than scratch building my own.

I cut out the area in red from the bottom wing half, leaving the large tab at the wing root undisturbed, so it would remain a strong attachment point.

The resulting gaps from the saw were filled with plastic strip and sanded smooth.

I chose this area because the radiator housing hides some of the surgery.
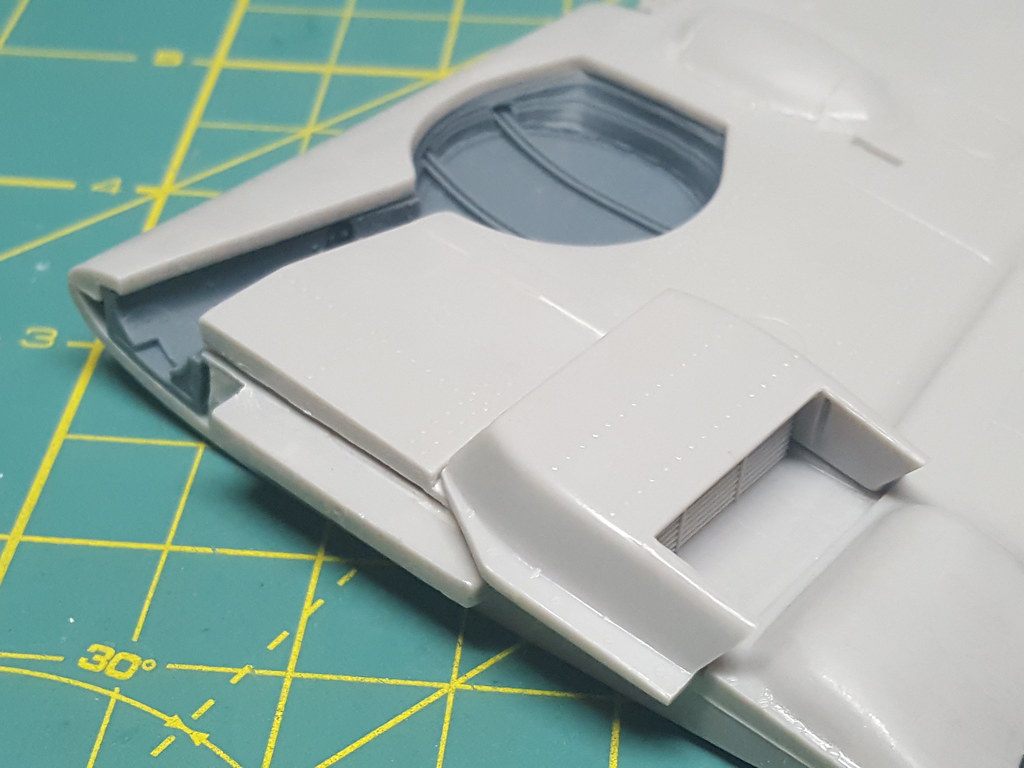
The kit radiator faces just don't cut it. They have very soft detail that on my kit, looks to be incompletely molded. I nabbed some from a Trumpeter 109 kit in my stash and shaped them to fit.

-
-
I have used some of the profile scrapers made by Shimomura Alec, extensively.
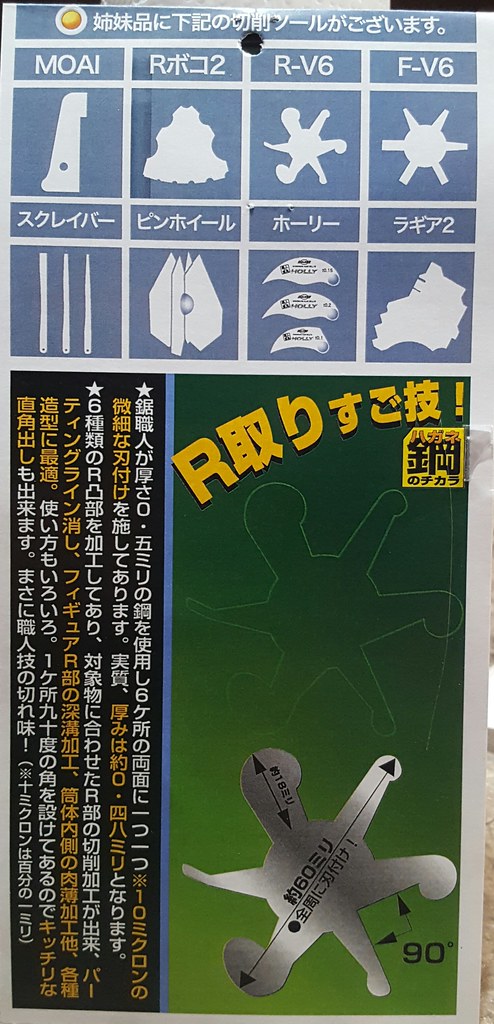

The versions I have in my toolbox:

Often, I use the R-V6 to scrape away unwanted detail from the inside of a cockpit or remove ejector pin marks on curved surfaces.
Sometimes though, adjacent profiles will prevent access to confined areas.

My workaround was to order a second R-V6 and separate the individual profiles with a cut off wheel mounted to my Dremel.

Each stalk can then be put in a X-Zacto handle.


For my North American compatriots, if interested, HobbyZone USA carries many of the Alec modeling tools:
https://www.hobbyzone.biz/tool.shtml
Worth a look I think.
Greg
- John Stambaugh, JeepsGunsTanks, chukw and 7 others
-
8
-
 2
2


Are the repackaged AK Real Color paints available in the U.S.A. yet?
in Painting & Finishing
Posted
Hi Paul, here is a little more information via YouTube: