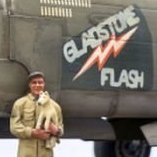
ChuckD Posted November 29, 2023 Posted November 29, 2023 Hi, all. After cleansing my palate and clearing a few lingerers from the shelf of doom, I'm back with another fairly large project... and no, it's not another big twin. If you've seen many of my posts over the last few years, I like to recreate historical photographs to the best of my ability. With this project, I'm going to try something a little more ambitious to include some figures and at least some basic groundwork. Inspired by @Effik's awesome F4U-1 build, I decided to crack open the box and get going on a project that's been simmering for a while. I want to recreate this photo... ... from this series of photos taken at Turtle Bay in Espiritu Santo in July 1943. I wanted to do this one for a couple reasons. First, I've never done a model with the red surround on the national insignia. I understand why it had a fairly short service history, but I always thought it was visually very striking. I've seen some modelers portray this airplane with light blue surrounds, but if this photo series was, in fact, taken in July of 1943 (and that seems to be the consistent theme), it sits smack-dab in the middle of the ~6 week period when red surrounds would have been used. Second, the sand and coral dust blown back along the fuselage is fascinating and should prove challenging to recreate. There are a few other interesting observations as well: the top cowl flaps are fixed closed and there's an odd patch of discoloration just forward of the cockpit that doesn't look like the usual fuel staining found there. Wondering what color that might have been. Also, a film crew is visible to the right in the 3rd photo; I'm not sure what was going on that day, but this a/c and pilot seem to be the subject of some interest. That said, I've got what I have on hand organized and ready to go: I've also got a few things on order that will enhance the build, though I'm not going for all-out perfection and nth degree super detailing. My goal with this project is to recreate the vibe and the feeling of the photo, not correct an out of place rivet or obsess over the perfect shade of salmon pink primer. In the mail are: - Barracudacast plain tread wheels - Anyz canopy frame - Quinta studio cockpit interior - Black dog resin figure for the pilot I've also got a set of cockpit placards from Airscale to gussy the interior up a bit if there are places the Quinta set is lacking. I'm going to have to sculpt the ground crew standing on the wing, so that ought to prove interesting, but that's future me's problem. As the Quinta set won't be here for a few days, and I don't want to just sit idle, I'm going to get started on the engine and maybe the wing sections first. More to come! geedubelyer, Starfighter Jock, Fanes and 14 others 17
JeepsGunsTanks Posted November 29, 2023 Posted November 29, 2023 This sounds like a great project. Espirito Santa was a French holding. We took over and turned into a fairly large base. The fighter strip was a few miles north of the main base, I suspect because fighter pilots were rowdy and had sticky fingers. The island was a low population Coconut or Pineapple plantation. We used this base during the Solomons as a rest and refit area and a holding area for replacement aircraft and men. There is where Greg Boyington was when he reformed VMF-214 after it was disbanded after the Guadalcanal was secured. It was within range of fighters of the Canal. Today it's a resort island, with good Scuba, since its one of the places we just dumped gear in the Lagoon at the end of the war. There is an amazing blue hole near the fighter strip, I wonder if the men living there found it. D.B. Andrus and Madmax 2
Oldbaldguy Posted November 29, 2023 Posted November 29, 2023 Hmmm. Something weird going on here. That light colored patch looks like it was sprayed/painted on and it is odd that it is very apparent in B&W but doesn’t seem to be there at all in the colorized photo. In the first couple of photos, the crew chief is wearing a fatigue shirt and cover but in the one with the film crew the guy is shirt and hatless, so I’m guessing a re enactment for some newsreel footage. And that must have been one heckuva mud/coral puddle he taxied thru.
ARay87 Posted November 30, 2023 Posted November 30, 2023 https://missingmarines.com/virgil-g-ray/ Some info on the pilot in that picture. Will watch the build with interest. MikeMaben 1
MikeMaben Posted November 30, 2023 Posted November 30, 2023 Interesting project Chuck. Cleaned up pix , thot it might help ? Have fun Madmax, Martinnfb, themongoose and 2 others 5
Madmax Posted November 30, 2023 Posted November 30, 2023 Lovely idea Chuck, keen to see how you do it! Cheers, Sean
mywifehatesmodels Posted November 30, 2023 Posted November 30, 2023 Looking forward to this one! John
ChuckD Posted November 30, 2023 Author Posted November 30, 2023 10 hours ago, MikeMaben said: Interesting project Chuck. Cleaned up pix , thot it might help ? Have fun Thanks, Mike! I do appreciate it. Anything to provide more and clearer information to the scene is helpful! I spent yesterday getting the engine around. I added the spark plug wiring and other assorted oil plumbing. As always, the photographs make the dirt and oil speckling look far more pronounced than it is to the naked eye. And the data plate is a close approximate from the spares bin. All in all though, despite how much the ignition wiring fought me, I'm very happy with how it turned out. The forward cowling got a little love too. And the two dry fit together. The Quinta cockpit set is supposed to arrive today, so I should be able to get moving on the build proper today or tomorrow. Landrotten Highlander, Shoggz, Starfighter Jock and 24 others 27
JeepsGunsTanks Posted November 30, 2023 Posted November 30, 2023 That R-2800 looks amazing!! ChuckD 1
jep1210 Posted November 30, 2023 Posted November 30, 2023 Great weathering so far. Looking forward to this build ChuckD 1
Jaro Posted December 1, 2023 Posted December 1, 2023 Spectacular! I'll follow your thread for sure! ChuckD 1
Dpgsbody55 Posted December 2, 2023 Posted December 2, 2023 Very impressive motor so far. Cheers, Michael ChuckD 1
ChuckD Posted December 2, 2023 Author Posted December 2, 2023 Boy howdy, there is nothing like spending an entire day adding miles... ...and miles... ...and miles... ...and miles... ...and miles... ... and miles... ...of wiring and linkages... just so that you can close up the fuselage and never see any of it ever again. C'est la hobby, I suppose. Anyway, as you can see, I've made quite a bit of progress on the cockpit. At this point, it's roughly base coated and the lovely Quinta set has been (mostly) added. I have obviously not yet done any weathering or anything, so it's pretty underwhelming at this point. The next step will be to touch up the base coat, paint the newly-added wiring and such, then gloss, wash, weather, etc. I'm not going to cover much of the actual build process of the kit itself - certainly not as in depth as I went on my A-20G a few months ago - because this kit has had roughly a half a million build threads devoted to its several iterations over the years. So, I shan't belabor that point, but as I get along and reach milestones, I'll post updates. I did receive the Black Dog figure kit and the paints I need to achieve the salmon primer, so we're moving forward there. I can't really start roughing in the figures until I at least get the wings under the fuselage. To combat my gnat-like attention span, I'm going to shift my focus from the a/c to the figures and groundwork as soon as I get the wings in place. I'm concerned that if I finish the a/c in entirety, I'll be too tempted to move on to something else and never actually finish the dio idea. Anyhoo, no more modeling for me today, my brain is fried. themongoose, LSP_Kevin, Biggles87 and 13 others 16
Recommended Posts
Create an account or sign in to comment
You need to be a member in order to leave a comment
Create an account
Sign up for a new account in our community. It's easy!
Register a new accountSign in
Already have an account? Sign in here.
Sign In Now