
ChuckD
-
Posts
914 -
Joined
-
Last visited
-
Days Won
9
Reputation Activity
-

 ChuckD got a reaction from Greg W in A Birdcage in Turtle Bay - An F4U-1 Diorama
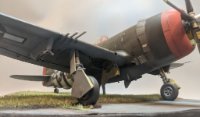
Hi, all. Back with a small update. Progress has been kinda slow this week as I've been busy with work, stuff with my kiddo, and I've been under the weather. I think for the diorama, I'm not going to attach the a/c to the base. The odds of the dio traveling outside my model room (before it makes its final trip to the dumpster after I'm cold and in the dirt) is near zero, so it shouldn't much matter if the plane and base are detachable. With that in mind, I'm taking some time to detail things on the under side of the plane that would never be seen if attached to the base.
The Corsair has quite a bit of plumbing running through the wheel wells, so I tried to simulate that here. I also opened the lightening holes on the bottom of the spar to run plumbing in there. I'm still searching for photos of the gear bay forward of the spar though. There has to be plumbing in there for the main hydraulic actuator and other sundries. So far, all the sources I've found have come up dry. I've got amazing photos of the bay aft of the spar (thank you again, @Dana Bell!), but the search continues for a good look forward of the spar.
I had to add the door actuators so that I could plumb them properly without the doors being in place. Fortunately, the doors can be added after the fact with no issue. The only downside is that, until the gear is slotted in place, they become load bearing when the assembly is placed right side up. You can already see that the actuator on the right has started to weaken.
It's amazing how helpful it is to use lead wire. It's so much more friendly to use than even soft copper or brass.
Anyway, that's it for now. Next up will be a similar treatment to the other wheel well, then assembling the main gear. On the plus side, I just learned that my new company closes down over the holidays, so I get an unexpected paid week off between the holidays! With nothing else planned, that should allow for some pretty decent progress to wind out the year.
-
 ChuckD got a reaction from Madmax in A Birdcage in Turtle Bay - An F4U-1 Diorama
Hi, all. Back with a small update. Progress has been kinda slow this week as I've been busy with work, stuff with my kiddo, and I've been under the weather. I think for the diorama, I'm not going to attach the a/c to the base. The odds of the dio traveling outside my model room (before it makes its final trip to the dumpster after I'm cold and in the dirt) is near zero, so it shouldn't much matter if the plane and base are detachable. With that in mind, I'm taking some time to detail things on the under side of the plane that would never be seen if attached to the base.
The Corsair has quite a bit of plumbing running through the wheel wells, so I tried to simulate that here. I also opened the lightening holes on the bottom of the spar to run plumbing in there. I'm still searching for photos of the gear bay forward of the spar though. There has to be plumbing in there for the main hydraulic actuator and other sundries. So far, all the sources I've found have come up dry. I've got amazing photos of the bay aft of the spar (thank you again, @Dana Bell!), but the search continues for a good look forward of the spar.
I had to add the door actuators so that I could plumb them properly without the doors being in place. Fortunately, the doors can be added after the fact with no issue. The only downside is that, until the gear is slotted in place, they become load bearing when the assembly is placed right side up. You can already see that the actuator on the right has started to weaken.
It's amazing how helpful it is to use lead wire. It's so much more friendly to use than even soft copper or brass.
Anyway, that's it for now. Next up will be a similar treatment to the other wheel well, then assembling the main gear. On the plus side, I just learned that my new company closes down over the holidays, so I get an unexpected paid week off between the holidays! With nothing else planned, that should allow for some pretty decent progress to wind out the year.
-
 ChuckD got a reaction from Rocat in A Birdcage in Turtle Bay - An F4U-1 Diorama
Hi, all. Back with a small update. Progress has been kinda slow this week as I've been busy with work, stuff with my kiddo, and I've been under the weather. I think for the diorama, I'm not going to attach the a/c to the base. The odds of the dio traveling outside my model room (before it makes its final trip to the dumpster after I'm cold and in the dirt) is near zero, so it shouldn't much matter if the plane and base are detachable. With that in mind, I'm taking some time to detail things on the under side of the plane that would never be seen if attached to the base.
The Corsair has quite a bit of plumbing running through the wheel wells, so I tried to simulate that here. I also opened the lightening holes on the bottom of the spar to run plumbing in there. I'm still searching for photos of the gear bay forward of the spar though. There has to be plumbing in there for the main hydraulic actuator and other sundries. So far, all the sources I've found have come up dry. I've got amazing photos of the bay aft of the spar (thank you again, @Dana Bell!), but the search continues for a good look forward of the spar.
I had to add the door actuators so that I could plumb them properly without the doors being in place. Fortunately, the doors can be added after the fact with no issue. The only downside is that, until the gear is slotted in place, they become load bearing when the assembly is placed right side up. You can already see that the actuator on the right has started to weaken.
It's amazing how helpful it is to use lead wire. It's so much more friendly to use than even soft copper or brass.
Anyway, that's it for now. Next up will be a similar treatment to the other wheel well, then assembling the main gear. On the plus side, I just learned that my new company closes down over the holidays, so I get an unexpected paid week off between the holidays! With nothing else planned, that should allow for some pretty decent progress to wind out the year.
-
 ChuckD got a reaction from TAG in A Birdcage in Turtle Bay - An F4U-1 Diorama
Hi, all. Back with a small update. Progress has been kinda slow this week as I've been busy with work, stuff with my kiddo, and I've been under the weather. I think for the diorama, I'm not going to attach the a/c to the base. The odds of the dio traveling outside my model room (before it makes its final trip to the dumpster after I'm cold and in the dirt) is near zero, so it shouldn't much matter if the plane and base are detachable. With that in mind, I'm taking some time to detail things on the under side of the plane that would never be seen if attached to the base.
The Corsair has quite a bit of plumbing running through the wheel wells, so I tried to simulate that here. I also opened the lightening holes on the bottom of the spar to run plumbing in there. I'm still searching for photos of the gear bay forward of the spar though. There has to be plumbing in there for the main hydraulic actuator and other sundries. So far, all the sources I've found have come up dry. I've got amazing photos of the bay aft of the spar (thank you again, @Dana Bell!), but the search continues for a good look forward of the spar.
I had to add the door actuators so that I could plumb them properly without the doors being in place. Fortunately, the doors can be added after the fact with no issue. The only downside is that, until the gear is slotted in place, they become load bearing when the assembly is placed right side up. You can already see that the actuator on the right has started to weaken.
It's amazing how helpful it is to use lead wire. It's so much more friendly to use than even soft copper or brass.
Anyway, that's it for now. Next up will be a similar treatment to the other wheel well, then assembling the main gear. On the plus side, I just learned that my new company closes down over the holidays, so I get an unexpected paid week off between the holidays! With nothing else planned, that should allow for some pretty decent progress to wind out the year.
-
 ChuckD got a reaction from Grunticus in A Birdcage in Turtle Bay - An F4U-1 Diorama
Hi, all. Back with a small update. Progress has been kinda slow this week as I've been busy with work, stuff with my kiddo, and I've been under the weather. I think for the diorama, I'm not going to attach the a/c to the base. The odds of the dio traveling outside my model room (before it makes its final trip to the dumpster after I'm cold and in the dirt) is near zero, so it shouldn't much matter if the plane and base are detachable. With that in mind, I'm taking some time to detail things on the under side of the plane that would never be seen if attached to the base.
The Corsair has quite a bit of plumbing running through the wheel wells, so I tried to simulate that here. I also opened the lightening holes on the bottom of the spar to run plumbing in there. I'm still searching for photos of the gear bay forward of the spar though. There has to be plumbing in there for the main hydraulic actuator and other sundries. So far, all the sources I've found have come up dry. I've got amazing photos of the bay aft of the spar (thank you again, @Dana Bell!), but the search continues for a good look forward of the spar.
I had to add the door actuators so that I could plumb them properly without the doors being in place. Fortunately, the doors can be added after the fact with no issue. The only downside is that, until the gear is slotted in place, they become load bearing when the assembly is placed right side up. You can already see that the actuator on the right has started to weaken.
It's amazing how helpful it is to use lead wire. It's so much more friendly to use than even soft copper or brass.
Anyway, that's it for now. Next up will be a similar treatment to the other wheel well, then assembling the main gear. On the plus side, I just learned that my new company closes down over the holidays, so I get an unexpected paid week off between the holidays! With nothing else planned, that should allow for some pretty decent progress to wind out the year.
-
 ChuckD got a reaction from coogrfan in Not For Everyone…
Revell has/had the 1:144 scale round bridge Fletcher for years. The premium edition comes with a full Pontos set of etched and turned brass. These are my end results of the premium edition kit.
https://postimg.cc/gallery/DLrdR7r
-
 ChuckD got a reaction from Biggles87 in A Birdcage in Turtle Bay - An F4U-1 Diorama
Hi, all. Back with a small update. Progress has been kinda slow this week as I've been busy with work, stuff with my kiddo, and I've been under the weather. I think for the diorama, I'm not going to attach the a/c to the base. The odds of the dio traveling outside my model room (before it makes its final trip to the dumpster after I'm cold and in the dirt) is near zero, so it shouldn't much matter if the plane and base are detachable. With that in mind, I'm taking some time to detail things on the under side of the plane that would never be seen if attached to the base.
The Corsair has quite a bit of plumbing running through the wheel wells, so I tried to simulate that here. I also opened the lightening holes on the bottom of the spar to run plumbing in there. I'm still searching for photos of the gear bay forward of the spar though. There has to be plumbing in there for the main hydraulic actuator and other sundries. So far, all the sources I've found have come up dry. I've got amazing photos of the bay aft of the spar (thank you again, @Dana Bell!), but the search continues for a good look forward of the spar.
I had to add the door actuators so that I could plumb them properly without the doors being in place. Fortunately, the doors can be added after the fact with no issue. The only downside is that, until the gear is slotted in place, they become load bearing when the assembly is placed right side up. You can already see that the actuator on the right has started to weaken.
It's amazing how helpful it is to use lead wire. It's so much more friendly to use than even soft copper or brass.
Anyway, that's it for now. Next up will be a similar treatment to the other wheel well, then assembling the main gear. On the plus side, I just learned that my new company closes down over the holidays, so I get an unexpected paid week off between the holidays! With nothing else planned, that should allow for some pretty decent progress to wind out the year.
-
 ChuckD got a reaction from aircommando130 in Nichimo 1/20 Cessna 172 "Juliet" Scratchbuilt overhead console
What a cool build. I've often thought of recreating some of the chickenhawks I used to fly. Too bad this kit is so hard to find.
Back when I was flying a lot, my FBO had a C-172N on the line (N6370D) that was just beat. Inside and outside, it was scratched, dented, cracked, and torn up. But man, did that airplane ever want to fly. It'd hop off the ground in a heartbeat, fly like a dream, and landed as smooth as glass. The line guys at the FBO started calling her "the hooker with a heart of gold." She wasn't much to look at, but she really knew her trade.
-
 ChuckD got a reaction from GMK in A Birdcage in Turtle Bay - An F4U-1 Diorama
Hi, all. Back with a small update. Progress has been kinda slow this week as I've been busy with work, stuff with my kiddo, and I've been under the weather. I think for the diorama, I'm not going to attach the a/c to the base. The odds of the dio traveling outside my model room (before it makes its final trip to the dumpster after I'm cold and in the dirt) is near zero, so it shouldn't much matter if the plane and base are detachable. With that in mind, I'm taking some time to detail things on the under side of the plane that would never be seen if attached to the base.
The Corsair has quite a bit of plumbing running through the wheel wells, so I tried to simulate that here. I also opened the lightening holes on the bottom of the spar to run plumbing in there. I'm still searching for photos of the gear bay forward of the spar though. There has to be plumbing in there for the main hydraulic actuator and other sundries. So far, all the sources I've found have come up dry. I've got amazing photos of the bay aft of the spar (thank you again, @Dana Bell!), but the search continues for a good look forward of the spar.
I had to add the door actuators so that I could plumb them properly without the doors being in place. Fortunately, the doors can be added after the fact with no issue. The only downside is that, until the gear is slotted in place, they become load bearing when the assembly is placed right side up. You can already see that the actuator on the right has started to weaken.
It's amazing how helpful it is to use lead wire. It's so much more friendly to use than even soft copper or brass.
Anyway, that's it for now. Next up will be a similar treatment to the other wheel well, then assembling the main gear. On the plus side, I just learned that my new company closes down over the holidays, so I get an unexpected paid week off between the holidays! With nothing else planned, that should allow for some pretty decent progress to wind out the year.
-
 ChuckD got a reaction from Paulpk in VMSB-233 SBD-3 Dauntless at Guadalcanal
Hi, all. I'm trying to clear my shelf of doom as much as possible before the end of the year and this was my 2nd candidate - an A6M2 Zero being my first. This represents a VMSB-233 SBD-3 Dauntless at Guadalcanal. Beat up, tired, but holding the line against the Imperial Japanese fleet.
Paints are MRP, weathering is a combination of oils, enamels, airbrushing, and sponge chipping.
Hope you enjoy!
-
 ChuckD got a reaction from Fanes in A Birdcage in Turtle Bay - An F4U-1 Diorama
Hi, all. Back with a small update. Progress has been kinda slow this week as I've been busy with work, stuff with my kiddo, and I've been under the weather. I think for the diorama, I'm not going to attach the a/c to the base. The odds of the dio traveling outside my model room (before it makes its final trip to the dumpster after I'm cold and in the dirt) is near zero, so it shouldn't much matter if the plane and base are detachable. With that in mind, I'm taking some time to detail things on the under side of the plane that would never be seen if attached to the base.
The Corsair has quite a bit of plumbing running through the wheel wells, so I tried to simulate that here. I also opened the lightening holes on the bottom of the spar to run plumbing in there. I'm still searching for photos of the gear bay forward of the spar though. There has to be plumbing in there for the main hydraulic actuator and other sundries. So far, all the sources I've found have come up dry. I've got amazing photos of the bay aft of the spar (thank you again, @Dana Bell!), but the search continues for a good look forward of the spar.
I had to add the door actuators so that I could plumb them properly without the doors being in place. Fortunately, the doors can be added after the fact with no issue. The only downside is that, until the gear is slotted in place, they become load bearing when the assembly is placed right side up. You can already see that the actuator on the right has started to weaken.
It's amazing how helpful it is to use lead wire. It's so much more friendly to use than even soft copper or brass.
Anyway, that's it for now. Next up will be a similar treatment to the other wheel well, then assembling the main gear. On the plus side, I just learned that my new company closes down over the holidays, so I get an unexpected paid week off between the holidays! With nothing else planned, that should allow for some pretty decent progress to wind out the year.
-
 ChuckD got a reaction from Shoggz in A Birdcage in Turtle Bay - An F4U-1 Diorama
Hi, all. Back with a small update. Progress has been kinda slow this week as I've been busy with work, stuff with my kiddo, and I've been under the weather. I think for the diorama, I'm not going to attach the a/c to the base. The odds of the dio traveling outside my model room (before it makes its final trip to the dumpster after I'm cold and in the dirt) is near zero, so it shouldn't much matter if the plane and base are detachable. With that in mind, I'm taking some time to detail things on the under side of the plane that would never be seen if attached to the base.
The Corsair has quite a bit of plumbing running through the wheel wells, so I tried to simulate that here. I also opened the lightening holes on the bottom of the spar to run plumbing in there. I'm still searching for photos of the gear bay forward of the spar though. There has to be plumbing in there for the main hydraulic actuator and other sundries. So far, all the sources I've found have come up dry. I've got amazing photos of the bay aft of the spar (thank you again, @Dana Bell!), but the search continues for a good look forward of the spar.
I had to add the door actuators so that I could plumb them properly without the doors being in place. Fortunately, the doors can be added after the fact with no issue. The only downside is that, until the gear is slotted in place, they become load bearing when the assembly is placed right side up. You can already see that the actuator on the right has started to weaken.
It's amazing how helpful it is to use lead wire. It's so much more friendly to use than even soft copper or brass.
Anyway, that's it for now. Next up will be a similar treatment to the other wheel well, then assembling the main gear. On the plus side, I just learned that my new company closes down over the holidays, so I get an unexpected paid week off between the holidays! With nothing else planned, that should allow for some pretty decent progress to wind out the year.
-
 ChuckD got a reaction from Phantom2 in Not For Everyone…
Revell has/had the 1:144 scale round bridge Fletcher for years. The premium edition comes with a full Pontos set of etched and turned brass. These are my end results of the premium edition kit.
https://postimg.cc/gallery/DLrdR7r
-
 ChuckD got a reaction from patricksparks in A Birdcage in Turtle Bay - An F4U-1 Diorama
Hi, all. Back with a small update. Progress has been kinda slow this week as I've been busy with work, stuff with my kiddo, and I've been under the weather. I think for the diorama, I'm not going to attach the a/c to the base. The odds of the dio traveling outside my model room (before it makes its final trip to the dumpster after I'm cold and in the dirt) is near zero, so it shouldn't much matter if the plane and base are detachable. With that in mind, I'm taking some time to detail things on the under side of the plane that would never be seen if attached to the base.
The Corsair has quite a bit of plumbing running through the wheel wells, so I tried to simulate that here. I also opened the lightening holes on the bottom of the spar to run plumbing in there. I'm still searching for photos of the gear bay forward of the spar though. There has to be plumbing in there for the main hydraulic actuator and other sundries. So far, all the sources I've found have come up dry. I've got amazing photos of the bay aft of the spar (thank you again, @Dana Bell!), but the search continues for a good look forward of the spar.
I had to add the door actuators so that I could plumb them properly without the doors being in place. Fortunately, the doors can be added after the fact with no issue. The only downside is that, until the gear is slotted in place, they become load bearing when the assembly is placed right side up. You can already see that the actuator on the right has started to weaken.
It's amazing how helpful it is to use lead wire. It's so much more friendly to use than even soft copper or brass.
Anyway, that's it for now. Next up will be a similar treatment to the other wheel well, then assembling the main gear. On the plus side, I just learned that my new company closes down over the holidays, so I get an unexpected paid week off between the holidays! With nothing else planned, that should allow for some pretty decent progress to wind out the year.
-
 ChuckD got a reaction from themongoose in A Birdcage in Turtle Bay - An F4U-1 Diorama
Hi, all. Back with a small update. Progress has been kinda slow this week as I've been busy with work, stuff with my kiddo, and I've been under the weather. I think for the diorama, I'm not going to attach the a/c to the base. The odds of the dio traveling outside my model room (before it makes its final trip to the dumpster after I'm cold and in the dirt) is near zero, so it shouldn't much matter if the plane and base are detachable. With that in mind, I'm taking some time to detail things on the under side of the plane that would never be seen if attached to the base.
The Corsair has quite a bit of plumbing running through the wheel wells, so I tried to simulate that here. I also opened the lightening holes on the bottom of the spar to run plumbing in there. I'm still searching for photos of the gear bay forward of the spar though. There has to be plumbing in there for the main hydraulic actuator and other sundries. So far, all the sources I've found have come up dry. I've got amazing photos of the bay aft of the spar (thank you again, @Dana Bell!), but the search continues for a good look forward of the spar.
I had to add the door actuators so that I could plumb them properly without the doors being in place. Fortunately, the doors can be added after the fact with no issue. The only downside is that, until the gear is slotted in place, they become load bearing when the assembly is placed right side up. You can already see that the actuator on the right has started to weaken.
It's amazing how helpful it is to use lead wire. It's so much more friendly to use than even soft copper or brass.
Anyway, that's it for now. Next up will be a similar treatment to the other wheel well, then assembling the main gear. On the plus side, I just learned that my new company closes down over the holidays, so I get an unexpected paid week off between the holidays! With nothing else planned, that should allow for some pretty decent progress to wind out the year.
-
 ChuckD got a reaction from HB252 in A Birdcage in Turtle Bay - An F4U-1 Diorama
Hi, all. Back with a small update. Progress has been kinda slow this week as I've been busy with work, stuff with my kiddo, and I've been under the weather. I think for the diorama, I'm not going to attach the a/c to the base. The odds of the dio traveling outside my model room (before it makes its final trip to the dumpster after I'm cold and in the dirt) is near zero, so it shouldn't much matter if the plane and base are detachable. With that in mind, I'm taking some time to detail things on the under side of the plane that would never be seen if attached to the base.
The Corsair has quite a bit of plumbing running through the wheel wells, so I tried to simulate that here. I also opened the lightening holes on the bottom of the spar to run plumbing in there. I'm still searching for photos of the gear bay forward of the spar though. There has to be plumbing in there for the main hydraulic actuator and other sundries. So far, all the sources I've found have come up dry. I've got amazing photos of the bay aft of the spar (thank you again, @Dana Bell!), but the search continues for a good look forward of the spar.
I had to add the door actuators so that I could plumb them properly without the doors being in place. Fortunately, the doors can be added after the fact with no issue. The only downside is that, until the gear is slotted in place, they become load bearing when the assembly is placed right side up. You can already see that the actuator on the right has started to weaken.
It's amazing how helpful it is to use lead wire. It's so much more friendly to use than even soft copper or brass.
Anyway, that's it for now. Next up will be a similar treatment to the other wheel well, then assembling the main gear. On the plus side, I just learned that my new company closes down over the holidays, so I get an unexpected paid week off between the holidays! With nothing else planned, that should allow for some pretty decent progress to wind out the year.
-
 ChuckD got a reaction from MikeMaben in A Birdcage in Turtle Bay - An F4U-1 Diorama
Hi, all. Back with a small update. Progress has been kinda slow this week as I've been busy with work, stuff with my kiddo, and I've been under the weather. I think for the diorama, I'm not going to attach the a/c to the base. The odds of the dio traveling outside my model room (before it makes its final trip to the dumpster after I'm cold and in the dirt) is near zero, so it shouldn't much matter if the plane and base are detachable. With that in mind, I'm taking some time to detail things on the under side of the plane that would never be seen if attached to the base.
The Corsair has quite a bit of plumbing running through the wheel wells, so I tried to simulate that here. I also opened the lightening holes on the bottom of the spar to run plumbing in there. I'm still searching for photos of the gear bay forward of the spar though. There has to be plumbing in there for the main hydraulic actuator and other sundries. So far, all the sources I've found have come up dry. I've got amazing photos of the bay aft of the spar (thank you again, @Dana Bell!), but the search continues for a good look forward of the spar.
I had to add the door actuators so that I could plumb them properly without the doors being in place. Fortunately, the doors can be added after the fact with no issue. The only downside is that, until the gear is slotted in place, they become load bearing when the assembly is placed right side up. You can already see that the actuator on the right has started to weaken.
It's amazing how helpful it is to use lead wire. It's so much more friendly to use than even soft copper or brass.
Anyway, that's it for now. Next up will be a similar treatment to the other wheel well, then assembling the main gear. On the plus side, I just learned that my new company closes down over the holidays, so I get an unexpected paid week off between the holidays! With nothing else planned, that should allow for some pretty decent progress to wind out the year.
-
 ChuckD got a reaction from Martinnfb in A Birdcage in Turtle Bay - An F4U-1 Diorama
Hi, all. Back with a small update. Progress has been kinda slow this week as I've been busy with work, stuff with my kiddo, and I've been under the weather. I think for the diorama, I'm not going to attach the a/c to the base. The odds of the dio traveling outside my model room (before it makes its final trip to the dumpster after I'm cold and in the dirt) is near zero, so it shouldn't much matter if the plane and base are detachable. With that in mind, I'm taking some time to detail things on the under side of the plane that would never be seen if attached to the base.
The Corsair has quite a bit of plumbing running through the wheel wells, so I tried to simulate that here. I also opened the lightening holes on the bottom of the spar to run plumbing in there. I'm still searching for photos of the gear bay forward of the spar though. There has to be plumbing in there for the main hydraulic actuator and other sundries. So far, all the sources I've found have come up dry. I've got amazing photos of the bay aft of the spar (thank you again, @Dana Bell!), but the search continues for a good look forward of the spar.
I had to add the door actuators so that I could plumb them properly without the doors being in place. Fortunately, the doors can be added after the fact with no issue. The only downside is that, until the gear is slotted in place, they become load bearing when the assembly is placed right side up. You can already see that the actuator on the right has started to weaken.
It's amazing how helpful it is to use lead wire. It's so much more friendly to use than even soft copper or brass.
Anyway, that's it for now. Next up will be a similar treatment to the other wheel well, then assembling the main gear. On the plus side, I just learned that my new company closes down over the holidays, so I get an unexpected paid week off between the holidays! With nothing else planned, that should allow for some pretty decent progress to wind out the year.
-
 ChuckD got a reaction from Dpgsbody55 in A Birdcage in Turtle Bay - An F4U-1 Diorama
Hi, all. Back with a small update. Progress has been kinda slow this week as I've been busy with work, stuff with my kiddo, and I've been under the weather. I think for the diorama, I'm not going to attach the a/c to the base. The odds of the dio traveling outside my model room (before it makes its final trip to the dumpster after I'm cold and in the dirt) is near zero, so it shouldn't much matter if the plane and base are detachable. With that in mind, I'm taking some time to detail things on the under side of the plane that would never be seen if attached to the base.
The Corsair has quite a bit of plumbing running through the wheel wells, so I tried to simulate that here. I also opened the lightening holes on the bottom of the spar to run plumbing in there. I'm still searching for photos of the gear bay forward of the spar though. There has to be plumbing in there for the main hydraulic actuator and other sundries. So far, all the sources I've found have come up dry. I've got amazing photos of the bay aft of the spar (thank you again, @Dana Bell!), but the search continues for a good look forward of the spar.
I had to add the door actuators so that I could plumb them properly without the doors being in place. Fortunately, the doors can be added after the fact with no issue. The only downside is that, until the gear is slotted in place, they become load bearing when the assembly is placed right side up. You can already see that the actuator on the right has started to weaken.
It's amazing how helpful it is to use lead wire. It's so much more friendly to use than even soft copper or brass.
Anyway, that's it for now. Next up will be a similar treatment to the other wheel well, then assembling the main gear. On the plus side, I just learned that my new company closes down over the holidays, so I get an unexpected paid week off between the holidays! With nothing else planned, that should allow for some pretty decent progress to wind out the year.
-
 ChuckD got a reaction from ARay87 in A Birdcage in Turtle Bay - An F4U-1 Diorama
Hi, all. Back with a small update. Progress has been kinda slow this week as I've been busy with work, stuff with my kiddo, and I've been under the weather. I think for the diorama, I'm not going to attach the a/c to the base. The odds of the dio traveling outside my model room (before it makes its final trip to the dumpster after I'm cold and in the dirt) is near zero, so it shouldn't much matter if the plane and base are detachable. With that in mind, I'm taking some time to detail things on the under side of the plane that would never be seen if attached to the base.
The Corsair has quite a bit of plumbing running through the wheel wells, so I tried to simulate that here. I also opened the lightening holes on the bottom of the spar to run plumbing in there. I'm still searching for photos of the gear bay forward of the spar though. There has to be plumbing in there for the main hydraulic actuator and other sundries. So far, all the sources I've found have come up dry. I've got amazing photos of the bay aft of the spar (thank you again, @Dana Bell!), but the search continues for a good look forward of the spar.
I had to add the door actuators so that I could plumb them properly without the doors being in place. Fortunately, the doors can be added after the fact with no issue. The only downside is that, until the gear is slotted in place, they become load bearing when the assembly is placed right side up. You can already see that the actuator on the right has started to weaken.
It's amazing how helpful it is to use lead wire. It's so much more friendly to use than even soft copper or brass.
Anyway, that's it for now. Next up will be a similar treatment to the other wheel well, then assembling the main gear. On the plus side, I just learned that my new company closes down over the holidays, so I get an unexpected paid week off between the holidays! With nothing else planned, that should allow for some pretty decent progress to wind out the year.
-
 ChuckD got a reaction from scvrobeson in A Birdcage in Turtle Bay - An F4U-1 Diorama
Hi, all. Back with a small update. Progress has been kinda slow this week as I've been busy with work, stuff with my kiddo, and I've been under the weather. I think for the diorama, I'm not going to attach the a/c to the base. The odds of the dio traveling outside my model room (before it makes its final trip to the dumpster after I'm cold and in the dirt) is near zero, so it shouldn't much matter if the plane and base are detachable. With that in mind, I'm taking some time to detail things on the under side of the plane that would never be seen if attached to the base.
The Corsair has quite a bit of plumbing running through the wheel wells, so I tried to simulate that here. I also opened the lightening holes on the bottom of the spar to run plumbing in there. I'm still searching for photos of the gear bay forward of the spar though. There has to be plumbing in there for the main hydraulic actuator and other sundries. So far, all the sources I've found have come up dry. I've got amazing photos of the bay aft of the spar (thank you again, @Dana Bell!), but the search continues for a good look forward of the spar.
I had to add the door actuators so that I could plumb them properly without the doors being in place. Fortunately, the doors can be added after the fact with no issue. The only downside is that, until the gear is slotted in place, they become load bearing when the assembly is placed right side up. You can already see that the actuator on the right has started to weaken.
It's amazing how helpful it is to use lead wire. It's so much more friendly to use than even soft copper or brass.
Anyway, that's it for now. Next up will be a similar treatment to the other wheel well, then assembling the main gear. On the plus side, I just learned that my new company closes down over the holidays, so I get an unexpected paid week off between the holidays! With nothing else planned, that should allow for some pretty decent progress to wind out the year.
-
 ChuckD got a reaction from Christa in Not For Everyone…
Revell has/had the 1:144 scale round bridge Fletcher for years. The premium edition comes with a full Pontos set of etched and turned brass. These are my end results of the premium edition kit.
https://postimg.cc/gallery/DLrdR7r
-
 ChuckD got a reaction from John1 in Nichimo 1/20 Cessna 172 "Juliet" Scratchbuilt overhead console
What a cool build. I've often thought of recreating some of the chickenhawks I used to fly. Too bad this kit is so hard to find.
Back when I was flying a lot, my FBO had a C-172N on the line (N6370D) that was just beat. Inside and outside, it was scratched, dented, cracked, and torn up. But man, did that airplane ever want to fly. It'd hop off the ground in a heartbeat, fly like a dream, and landed as smooth as glass. The line guys at the FBO started calling her "the hooker with a heart of gold." She wasn't much to look at, but she really knew her trade.
-
 ChuckD got a reaction from Uncarina in HKM A-20J/K in progress
I agree with all the sentiments above. I was jazzed about the A-26, but never bought one due to its many issues. The B-24's issues don't bother me as much, but I'm part way through the HB kit now and probably wouldn't bother with a new tool kit regardless of perfection. One massive Liberator is enough for me.
Back on the topic of A-20s, it would be awesome if HKM came up with a way to combine the two kits so you could build a gunship with the individual exhaust cowls. I'd buy the G kit and a cowl sprue any day, but right now I don't see a way to build a G with the individual cowls without buying both kits and bashing them together.
-
ChuckD got a reaction from Greg W in A Birdcage in Turtle Bay - An F4U-1 Diorama
Thanks, that's definitely a great mindset for this hobby. I like to think I strike a balance of detailing where it's visible vs time and effort wasted on something I'll never see. At least, I strike enough of a balance for my tastes and I respect everyone else's artistic license to detail as their heart guides too.
For me, this hobby is the confluence of my passion for history and my desire to do things with my hands. It also satisfies an artistic creative drive too. So in the end, it's very cathartic for me. I took the week after Thanksgiving off and spent it in the model room listening to jazz and building away. As a bonus, I was, for the first time in 13 years, able to turn off notifications on my phone and ignore work emails.
It was probably the the closest I have ever come to true zen enlightenment.