

BlackCanopy
-
Posts
91 -
Joined
-
Last visited
Content Type
Profiles
Forums
Events
Posts posted by BlackCanopy
-
-
It comes with the scale, I think.
A monolithic chunk of plastic, however perfectly printed and masterfully painted, will never be up there in the same league with Pete's marvelously handcrafted mixed media assemblies, at least in 18th scale. A strong ingredient to the exceptional realism shown here, after all, is the use of similar materials as in the original machine.
A less obvious factor would be the naturally occuring 'simplification' of parts, that comes with direct hand eye coordination while building them, instead of zooming into a milky(ly?) illuminated rectangle, and thereby loosing all sense of scale.
Well, I guess I really had to try and find an explanation...

-
-
-
Depending on what filters are used when taking monochromatic photographs (of the chemical sort), the wavelengths reflected from different color surfaces can be enhanced or suppressed, resulting in darker or lighter representations of those colors in the final picture. So there is really no way of telling colors from old B&W pictures, other than guessing that the sky was propably blue. Whether the grass was green too, you will not be able to tell, it could've been yellow or brownish ;-)
If you want to show nice white clouds before a dark sky, put on an orange filter, as a result of which all red, orange and yellow colors in your picture are going to be represented in very bright hues. If you filter out the shorter wavelenghts instead, blue will become a very light gray, while red is going to be almost black.
Add to that the different surface quality of different colors (sometimes caused by more or less layers of paint), which results in different reflection grades, which very much *might* have caused a black stripe on a horizontal stabilizer, viewed from a steep angle as in the above picture, to appear lighter than the adjacient color of blue(?). It's complicated.
For the above reasons, it would be very cumbersome to make a test, as suggested by Kurok, with a digital camera in B&W mode. Unless you are really a specialist in those things (or your camera has this kind of sophisticated software), you will propably not know according to what principles the algorithms of your camera (or software) are turning colors into fifty (hopefully more) shades of gray.

Great representation of a damn fine bird here, whatever its true colors really were!
Cheers,
joerg
- CANicoll and Tolga ULGUR
-
 2
2
-
thanks again & I welcome anything like this to be pointed out as I can correct it - in this case via a new etch file to PPD

What, you seriously gonna change this?!? Apparently I'm the king of them rivet counting nitpickers who like to point out minor "irregularities" in other peoples work! ...

And I hope it's not too late for the file swap...
Your bird will fly! (If nothing more)
-
Ha Pete, gotcha!
I spot a grave divergence in your PE IP from the original, wheras in the second row of instrument holes (from the left) the second hole (from the bottom) has this extension in the lefthand bottom corner, which should not be attached to this hole, but to the other one, namely the first hole from the bottom and vice versa. You got it all wrong, got it?

((to the clattering sound of knitting))
A+
Joerg
-
As I write this I'm looking at the Revell D sitting on a base just a few feet away and having watched the YouTube film with interest I can tell you that Revell really did capture the look of the D remarkably well. I'm glad I built it!
Can I humbly suggest some (many!) RFI-shots, to share the experience?

The "factory fresh" appearance of your model, without any unit markings or—let's face it: often crude and poorly designed nose art brushwork—is rarely seen: No distractions from the basic elegance of this plane.
Oh, I just love Mustangs ... (i'm not alone in this, I know)
tnx
Joerg
-
The offset applies to the entire vertical fin, not just the DFF.
Now that you mention it, that seems quite obvious to be the case, otherwise, how would it have worked on planes without the dorsal fin.
;-)
It's also true that the offset is barely visible, as there is no indicator (such as a panel line or similar) to mark the centre line in the area where the fin meets the fuselage...
Thanks for your response, btw...
-
Smart progress Quang!
To further complicate things a bit: I seem to remember that the tail fin on Mustangs had a slight offset from centre line to the port side (about one degree or such when viewed from above) in order to compensate for the angular momentum (?) of the powerful Merlin engine. I'm sure, there are experts here to provide the actual data and even some pics, for I have none.

Cheers,
Joerg
-
Oh, I just love them Mustangs.
And yours is apparently coming along very nicely, Mr. Cosby!
Did you encounter any problem with the fit of the windscreen? As many other builds have run into bumps in that area, you seem to have avoided them, judging from the pics.
Any preemptive fiddling on your part, there?
Best regards,
Joerg
-
Unbelievable, Mr. Budee!
(I surely know the expression to sound "old" in reference to your build).
--
Alas, it must be a real disappointment to see your modeling marvels with just the nacked eye: All this intricately fine detail vanishing due to the natural limitations of the human retinae.
--
Not too many models out there, looking even better through magnifiying lenses, I suppose.
 Joerg
Joerg -
The Eduard Exterior set has some nice rivet detail on the cross members.
Quick question(s): Could, or do these interfere with the proper sit and alignment of the cowling panels (so that you have to compensate by removing plastic before installing the PE parts), or do you plan to let the panels permanently off, anyway?
Spectacular painting prowess ...
hats off,
Joerg
-
I would be the least talented with a brush. Reckon after the first attempt I'd get relegated to potato peeling.
Impossible Mr. Hepplestone, you could not beat these guys for their hand eye coordination (I mean the total lack thereof):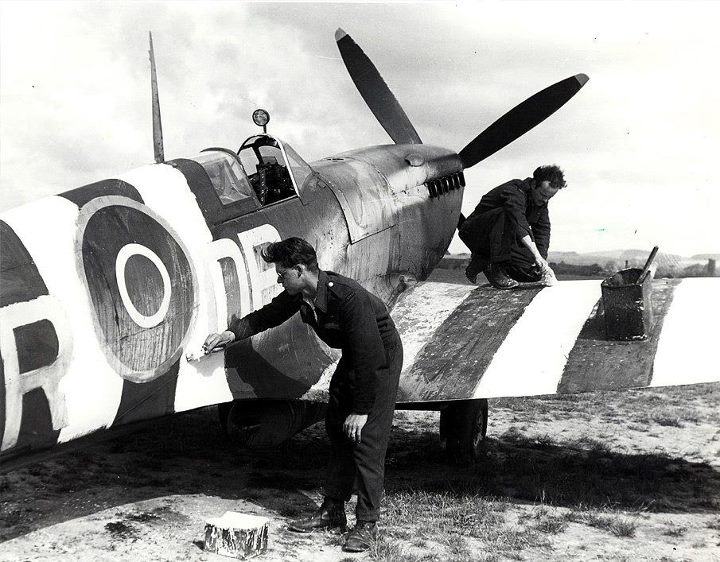 To be fair, the assumption must be that they were given 5 minutes per crate, no more!Hopefully, the pilot was not too much concerned with appearances, it could have dampened his skills a bit.;-)
- Fooesboy and TimHepplestone
-
2
-
This is such a beautiful bird.
The only downside of the IAR is the lack of variation when it comes to painting schemes...
- Rick Griewski and Iain
-
2
-
Thanks Joerg, I wouldn't say its all straightforward. There's a lot of trial and error involved, you just don't get to see it ;-)
The plug for the canopy was initially made from 'Das Pronto White Clay'.
When dry, it was shaped roughly (and very easily) with a knife, files and sandpaper.
It was then puttied with some IMPA one-component fine filler, (several layers until the desired shape)
The filler is sanded to get the fine surface for the plug.
Lastly, it was painted with Mr. Color 1200 gray surfacer and polished to get the smooth surface.
Cheers: Kent
Thank you very much for the "How to"-instructions!
Of course there is no mention of the required talent to get the compound curvature and the general shape of the canopy right.
-
-
That's Ok Tim , some did use tape , some were even applied
at the factory.
And even for those stripes that were applied in the field, you have to consider the possibility that 'all men ar not equally talented' with a brush.
--
The most talented of all would be people like Jean Luc, who can replicate shoddy paintwork in such a perfect manner on a scale model...
How did you do it? Ripped tape?
Salutations
Joerg
-
BTW, one suggestion if I may. I note that there are a few 1/18 scale Merlin Engine kits out there and if you could use your skill to pack one of these babies into this project, you might actually match or exceed the Spitfire. Ok, maybe not match it, but darn close!
Second that!
Love your chosen subject, Peter!
-
Outside the context of this thread, I would bet a lot of stuff on this picture showing the remnants of a real aircraft, collecting dust somewhere in a museum.
Simply Fantastic.
Joerg
-
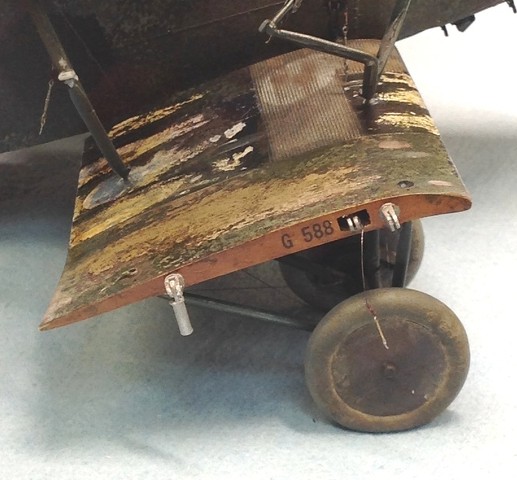
This must be one of the most realistic replications of a heavily used aircraft skin in scale modelling.
Especially love your presentation, where in some pictures, you cannot tell instantly what is reference pic and what is model surface.
Perfection. Chapeau.
-
Small, reddish brown repair patches, crude yellow serial numbers on every major panel and – most intriguing – lighter instead of darkened panel lines and boltheads. Not to speak of the generally faded and washed out appearance of the colours. It *could* challenge some broadly held assumptions about how to properly represent weathered aircraft in scale modelling...

Have those demarcation lines actually been painted by brush, perhaps with some wet-in-wet technique or even drybrushed? Or are they airbrushed and just rubbed down? I find myself in total ignorance about the appliance of paintjobs on these aircraft during the war.
Anyway, a trove of detail, thanks for sharing, Chuck!
- chuck540z3 and Kais
-
2
-
Haha!
The guys from maintenance crew were clearly NOT expected to bring ANY prior knowledge to their work with these birds. The whole User-Manual was just printed on the machine!
I bet you read all this stuff, while applying the decals, Richie, and now you could immediately start to work on Phantoms.
--
Full respect for your endurance, here's hoping you won't go blind...
Joerg
-
-
Right now I'm leaning toward an early Mk IX in order to avoid big black and white invasion stripes, which I generally dislike.
Funny that, as to me those planes look "naked" without them.
In terms of sheer visual interest and graphic design, only planes with invasion stripes came near to be a match to the multicolored flea-bitten flying circus of the late war Luftwaffe.


1/18 P51C Mustang "Lopes Hope the 3rd"
in Works in Progress
Posted
Dear Peter
Instead of just adding another heap of praise, I would suggest that the fabric of this cloth-clad-thingy (on the right hand) seems to be waaaaaaay overscale to my eye!
To defend my heresy, I would mention that your thread has produced enough knitting-experts on LSP (myself included); And now you have finally presented an opportunity for us to "criticize" your work: That thing looks like it was made out of the extra scratchy, hairy wool used by my grandma for knitting my underpants! Take this, ha!
Pleeeze, would you consider to apply some silk instead... ?:o)