

Durangokid
-
Posts
465 -
Joined
-
Last visited
-
Days Won
2
Content Type
Profiles
Forums
Events
Posts posted by Durangokid
-
-
I could have swore you were taking black and white photos until I saw some color in the back ground on one of them. I'm thinking this is a lot harder to do than it looks.
Really cool project...
Bryan
- Fancherello and Martinnfb
-
 1
1
-
 1
1
-
-
I'm convinced you have an engineering degree! The tolerances on the joins between the panels alone is just incredible. I can't wrap my mind around how you do that, especially on a complex 3D shape like the spinner.
Do you have a special process on how to bend the metal pipes to shape? I struggle with this no matter what type of metal I use. I can use soldering wire as it is easy to bend but I sometimes will end up damaging them with my tweezers if I need to reshape. I don't have much luck using stronger wire because if I don't get the angles perfect, it becomes nearly impossible to reshape. I don't see any of these issues on all the piping you have done. Any advice would be appreciated and sorry if you have already explained it previously.
I always look forward to your updates...
Bryan
-
-
MRP or Mr. Color but whatever you buy, get some Mr. Color leveling thinner. You can mix it with just about anything and it makes just about everything spray like a dream. The only thing with the lacquer type paints is you need some type of ventilation, I couldn't imagine spraying them without my booth.
I use Vallejo for brush painting and it really improved my skills.
Hope this gives you something to think about and it's always nice to see some new peeps...
Bryan
-
I'm not crazy about rubber wheels myself but they sure do look nice in the photos. Not having the seam down the middle helps too. I say the more aftermarket the merrier...
Bryan
- LSP_Kevin, Harold and D.B. Andrus
-
3
-
-
4 hours ago, Starfighter said:
Well, I would not consider building one of these on the same quality level as you and Bryan 'easy' - it's a challenge for sure. I'll probably do the splintered Marines N one day in the future... or I'll try at least!
Oh I would love to see that!
- Marcel111 and Starfighter
-
2
-
-
I'm really getting down to the last little pesky things. I actually like putting a lot of effort into weapons but I'm getting in a hurry to start my new AH-1Z. So I took a day to focus on just the weapons so I can do them some justice.
I had a AMS Tacts pod but my copy was badly warped. I tried to straighten it out but I just kept making it worse. The front probes that come with the kit were in perfect condition so I figured I would just make the body part. I couldn't find a tube that would work, they were either too big or too small, but I finally found a sprue gate from my Academy Hornet kit that was the perfect size. I cut thin strips of plastic, wrapped them around the body and glued them in place with a tiny about of extra thin to represent the metal bands that go around the body. When they dried i cut the strip ends and drilled tiny holes for the rivets. After the body was done I glued the AMS tip on which fit perfectly. I was dreading trying to do this but it came out fairly nice and it wasn't that difficult at all.
After paint:
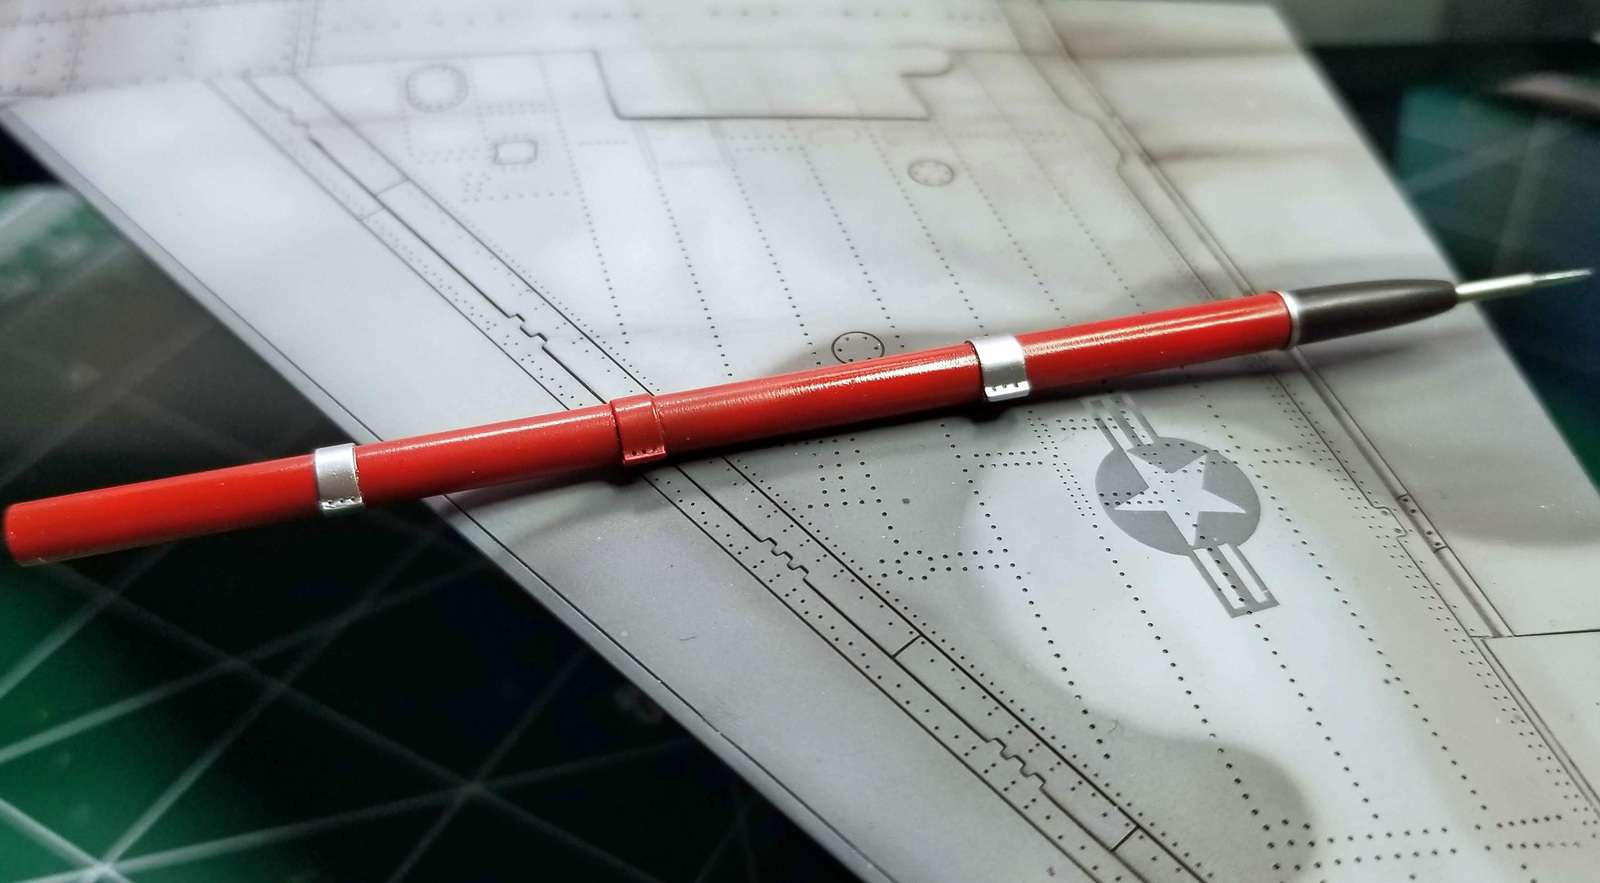
Here it is with the AMS body and my finished one. I'm not knocking AMS, i love his stuff, mine just got warped somehow.
This ALQ-167 pod is from Wolfpack if I remember correctly. It's fairly nice but doesn't come with decals so I cobbled a few together from other kits. Most of the ones I've seen on these jets are nice and shiny with little decals anyway. I painted it with Mr. Color blue lightened with white.
Here is the fantastic Zacto Aim-9m. I can't say enough about this sidewinder, it is hands down the best I have seen. It doesn't come with decals but I have a bunch of those lying around.
Here is the final load out:
Some more small details. The light that goes on top of the tail is different on the A version. Luckily the tab underneath Tamiya's light looks the part so I just turned it over, cleaned it up and removed the other side. Easy peasy...
\
Added the GPS...
Man I am so close to being done!
Bryan
-
-
Looks like they may be in stock on their website. I'm tempted to get some...
-
-
1 hour ago, seiran01 said:
Sierra Hotel exhaust, hands down - beautiful detail, AND correct diameter. They were in stock on the SH website a few days ago when I was on there, for both revell and tamiya kits
I 2nd that! I will go with Sierra Hotel on my next build for sure. I have some of their other items and they are all fantastic. I did a lot of research on the cans and everyone that had SH said there were the correct size. I just wish they had more products and kept them in stock. I'm looking forward to your build Top...
Bryan
- Vandy 1 VX 4, MGySgt0372 and Out2gtcha
-
3
-
-
So I was gonna do the future dip but I thought I would try Tamiya's polishes first. It worked really well, good enough where I don't wan't to go through the hassle of the future dip. I'm being a bit lazy but I'm so close to the end I can taste it.
Here it is with the frames touched up.
I also completed a few more tasks including the exhaust ring. I first painted a heavy coat of Alclad Aluminum before adding a light coat of Alclad gold titanium. I was trying to get that light goldish shade these have. I used 12,000 grit sanding sheet to lightly remove the gold tint for that worn look. Lastly I painted Mr Color clear blue. I ended up sanding the blue a bit since I thought it looked a little to heavy. It's a bit bright and may need to be toned down a bit, I can't make up my mind on that one. My camera, or most likely the lens, washes out the photos. It's difficult to capture the detail that I can see in person.
Here is a few photos of things coming together...
Thanks for stopping by fellas, almost done!
Bryan
-
16 hours ago, MGySgt0372 said:
I want to see more, Durangokid! You do some awesome work & i'm about to start my Tamiya F-4J. Thanks!
Semper Fi,
Masterguns
Thanks brother! I was waiting for the new decals from AOA and they should be here any time. Then I'll be starting back up...
Semper Fi!
-
I received mine and I am amazed at the level of surface detail, it really looks incredible and I think even Tamiya couldn't have done a better job. I've done some test fitting with the larger parts and so far everything lines up nicely. I would start it now but I need to finish up my F-16A first so it doesn't end up back on the self of nearly finished. I'm a huge fan of the AH-1Z so I can't wait to get started.
Bryan
-
Hey guys I'm back from Texas so I'm getting back to work on this. Big thank you to everyone's idea's and offers of replacement canopies. That's one of the things I really like about this forum, we are like a team here always helping each other out. That says a lot about out modeling community!
So I was going to strip down the canopy with leveling thinner which I knew wouldn't damage the clear part but would totally strip the paint. I figured I could at least try to salvage it before going to the back up which would require my long sanding process. I took everyone's advice and let it soak in windex and with a lot of elbow grease, I was able to get nearly all of the tape off. However, no matter how much I scrubbed I couldn't get some last remaining residue off. So I took a q-tip dipped in goo gone and carefully rubbed the residue while being careful not to touch the painted areas. It worked like a charm and everything came right off. The good part is the windex didn't take off any of the paint like the goo gone started to do. There are a few areas to touch up where the goo gone took off the paint on the first try. The canopy isn't as nice as it was before so I may dip it in future and then flat coat the frame after it dries. I put a lot of effort sanding my canopies so it's kind of a bummer it doesn't look as good as before but at least I don't have to try and match the paint.
Anyway here are the after photos of the canopy;
I painted the wheels and finished up the main landing gear...
Thanks again for all the suggestions and special thanks to dsahling1 and Chris for the replacement canopy offer!
Bryan
-
I hate it when I get down to the last few things to do and have a mini disaster. I don't know what happened with the canopy but the tamiya tape fused itself to the surface. I've used the tape cutouts with the kit before and this never happened so I'm at a loss. I did future my canopy as I always do but it had been drying for at least a month before I applied the tape. I used regular tamiya tape to cover the areas not covered by the cutouts and it came off just fine. I tried using Goo Gone but that did little to help not to mention it started removing paint with all the scrubbing. Oh well, not that big of a deal as I have other canopies or I can attempt to salvage this one. The only bad thing is matching the paint since I mixed colors to get the shade I wanted. Either way I hope to get it close to the original paint.
I've also applied a flat coat and did some more weathering. I was able to get the exhaust toned down but I'm still not crazy about it. Nothing to make me want to start over though...
Toned down the exhaust.
My camera skills leave a lot to be desired and these images seem washed out a bit. The weathering doesn't show up as it looks in person.
So not a whole lot left to do but I'm off to Texas for a week so it will have to wait!
Thanks for all the nice comments fellas!
Bryan
-
8 hours ago, Grissom said:
Love your work, Bryan. The F-16 is my favourite fast-jet and I really like the way you're detailing many of the kit parts, rather than simply shoe-horning aftermarket resin accessories into it. Have to ask you - is that the KASL exhaust you're using or have you tweaked the kit parts? Also really good to see Mike Reed chime in - I'm also a big fan of his F-16 projects on Zone-Five.
Thanks Grissom! That's actually the kit exhaust. The only thing I did was to slightly thin the very end of the pedals, otherwise it's all stock. Tamiya did a nice job, too bad they stopped making the thunderbirds version.
It was nice to hear from Mike, now he just needs to build us something.
 40 minutes ago, Marcel111 said:
Hey Bryan, apologies for the late-in-the-game interjection. I know that can be super irritating, thought you were still tinkering around. You could just introduce some hard line demarcation here and there.
Anyhow, digging the model all round!
Marcel
Hey Marcel, I was totally kidding. Hope it came across otherwise. I always appreciate you input...

-
2 hours ago, Marcel111 said:
One other thing, seems to me the camo pattern on those NSAWC birds is originally hard-edge but may become soft-edge as touch-ups are applied.
Cheers,
Marcel
Oh now you tell me!
 haha. I had a hard time figuring what to do since some pics I swore looked hard edge while others looked soft. I was having a hard time with my airbrush too which had never been a problem before. I'm going to do the Topgun F-16B which is hard edge for sure. I have the Steel Beach paper masks for that one which I will cut out on tamiya tape with my shiny new silhouette machine.
I think I'm gonna use some clear smoke to diffuse and darken the exhaust then apply semi gloss flat. It's hard to tell in this pic but that what I did with this panel.
- blackbetty, Lenny320 and Out2gtcha
-
3
-
3 hours ago, themongoose said:
“I forgot to post photos of the exhaust. I think it's a bit too gold looking so I still have some work to do. Do you guys think the color is off“
i looked at alot of these when doing mine. Looking through my Falcon book I don’t see anything this gold. Assuming the pic is capturing it accurately.
Yeah, this is what I was looking at replicating. There are a lot that look this way but I still have some work to do.
Doing some work on the landing gear bays...
Thanks for stopping by...
Bryan
- Starfighter, LSP_Kevin, blackbetty and 3 others
-
6
-
I had to cobble decals from 4 sets to match what I needed. Some of them were too light but a super thin coat of grey brought them all together. Still to light but better then before.
This one is from Fightertown F/A-18 sheet. Yes I broke off the tail probe like I have done with every other F-16 I've built.
I forgot to post photos of the exhaust. I think it's a bit too gold looking so I still have some work to do. Do you guys think the color is off?
The kit comes with an extra pedal part and of coarse I glue the wrong one on (the one without decals). I had to pry it off and glue the correct one on but luckily it didn't mess anything up.
- Lenny320, Out2gtcha, Anthony in NZ and 4 others
-
7
1/32 trumpeter AV8B Harrier
in Ready for Inspection
Posted
Amazing work of art! One of those builds I could spend hours looking at.
Bryan