
Smokey
-
Posts
422 -
Joined
-
Last visited
Reputation Activity
-

 Smokey got a reaction from Sturmbock in Make the others jealous
This showed up a couple days ago. Dan
-

-
 Smokey got a reaction from coogrfan in Make the others jealous
This showed up a couple days ago. Dan
-
 Smokey got a reaction from Kagemusha in Make the others jealous
This showed up a couple days ago. Dan
-
 Smokey got a reaction from jeroen_R90S in Make the others jealous
This showed up a couple days ago. Dan
-
 Smokey got a reaction from Uncarina in Make the others jealous
This showed up a couple days ago. Dan
-
 Smokey reacted to Greg W in New book on scratch building model aircraft, due to be released in 2024
Here's a heads up on a book I stumbled across called Aircraft Modelling: Conversions, Scratchbuilding and Superdetailing.
Link to where I discovered it.
Have any of you heard tell of of it?
It is listed as a pre-order, slated for release in April 2024.
Description from Amazon:
"Aircraft Modelling presents a distinguished line-up of master modellers to guide you through the essential aspects of advanced plastic modelling. Via a combination of immaculate photographs, step-by-step instructions, friendly advice, and easy-to-follow techniques, you will be shown how to convert, modify, and superdetail kits, how to model resin and vacuform parts and kits, and even how to scratchbuild entire models. This book will not only greatly improve your modelling skills and efficiency, it will encourage you to push your boundaries, to engage your imagination, and to create models that will go on to inspire others.
Table of Contents
Acknowledgements; Preface; Introduction; Conversions; Resin/Vacuform Models; Scratchbuilding – Claudio Luchina; Super-detailing; Conclusion; Internet Resources; Index"
-
Smokey reacted to Rod Bettencourt in TBD-1 Devastator VT-3 Midway
The Douglas TBD-1 Devastator was the US Navy’s premier torpedo bomber when hostilities broke out on December 7th 1941. Six months later it was completely obsolete and removed from combat operations. The subject of my build is from the USS Yorktown VT-3 aircraft (0303) crewed by Harry Corl and ARM3 Lloyd Childers. One the morning of the 4th at approximately 1200hrs Petty Officer Childers spotted smoke 25 miles away to the starboard. Machinist/pilot Harry Corl was able to get the squadron skipper Lt Cdr Massey attention. The skipper made a course correction to head for the nearest carrier (Hiryu). It was reported that at this time the squadron was jumped by approximately 30 Zeros. VT-3 was lucky enough to have 4 F4F Wildcats with them to help fend off the attackers. After what I could only imagine as an agonizing 20-minute slow approach, they were able to release 5 torpedoes. Corl and Childers 0303 had been badly shot up on the approach and the only way to keep airborne was to jettison their torpedo.
The following is from Machinist WO/Pilot Harry Corl Mission report date 6-15-42:
The free gun had jammed during the fight. Childers, Arm3, my gunner used .45 automatic during the 10 minutes of the attack. Childers was hit in the right ankle causing a compound fracture of the same. He received two hits in his left leg above the knee no broken bones in that leg. I arrived at the Yorktown at 1425 circled it twice and saw that there was no chance of getting aboard. (Yorktown was bombed by Hiryu Vals) So I proceeded over the Enterprise. I attempted to land aboard, but discovered I did not have enough tab control on the elevator to keep the nose up. I landed in the water head and to the starboard of the carrier alongside the destroyer USS Monaghan. The time of the landing was 1510.
Ensign Harry Corl was KIA(VT-3 TBF-1) 25 August 1942.
Lloyd Childers survived the war and became a Marine Aviator and retired as a Lt Col.
This is the Trumpeter 1/32 TBD-1 Devastator from VT-3 USS Yorktown on June 4th 1942 Midway. I added Air Scale products such as the Photo Etch, propeller set, wheels and the single .30cal machine gun. I highly recommend their products. I did bits of scratch building such as adding cockpit wiring, relief tube, two internal windscreen braces (removed the molded on external windscreen braces), wingfold braces and leather pad for the bombardier under the pilots area. I used AK real color for the light grey bottom Model master Blue/grey for the top and AK for the interior green for the crew areas. I have seen some debate on-line about this, what color? But for me seeing the pics of sunken TBD’s aircraft from the discovery of the USS Lexington at the battle of Coral Sea. Interior green is also stated in TBD’s Devastators in action book(The Old One). Another debate is whether what squadrons carried the twin .30’s. It is very obvious that VT-8 for sure had them and I have seen some documentation that VT-6 (USS Enterprise) may have also had them. After many hours of research, I came to the conclusion that VT-3 only had the single.30. I came to this by listening to several recorded interviews With Mr. Lloyd Childers. And in the end, there is just no conclusive proof they carried the twins. I also used Hawaiian Air Depot masks for the A/C numbers and the insignias. I had previously bought the Gold Medal decal but figured painting over the corrugation would be far easier then decals. But I am glad I purchased it because they come with aircraft data. If anyone has seen what Trumpeter did with their data decals….well.
Rod
WIP Pics
-
Smokey reacted to ChuckD in A Birdcage in Turtle Bay - An F4U-1 Diorama
Years ago, I was on a road trip with some buddies of mine when we got stuck in an hours-long traffic jam in Chicago. We crept forward, inch by inch, baking in the hot July sun. Inevitably, we started bitching and complaining when one guy, the driver, piped up and said something that stuck with me all these years later. "Hey, as long as we're moving, we're making progress."
And so it is.
We are moving and, thus, are making progress. Though, I'll admit, we're not exactly headed the direction I was thinking we were. I guess I should know better than to say things like "I'm just about done with the figures!" (to paraphrase)
As I started to get serious about placing the figures, I realized that I'd originally placed the pilot too far aft when roughing him in. I think the general consensus here is that these photos were taken just after Lt. Ray returned from a flight, not as he's boarding up to leave. He taxied up, popped off his chute harness, and - probably to the benefit of the camera men - clambered down left side of the aircraft.
You can see his right foot is almost directly behind the forward canopy and his left hand is on the weirdly-painted patch on the fuselage.
While my resin figure isn't bent over at quite the angle Lt. Ray was, it still actually fits pretty closely in the more correct position...
... all except for the hands. The hands will make or break a figure, in my opinion. So, off they go. I chopped them off with a fine razor saw and recessed the area inside the cuff with a rotary tool. This will hopefully allow me to sculpt fairly realistic hands that appear to be coming out of a sleeve, rather than butting up against it.
I drilled out a small hole and added some wire. I'll use this to rough in the angle I need for proper hand placement, then as a base for the putty to grab on to. I've never tried to sculpt hands before so this could get really interesting. I'll work on that slowly over the course of the week. I'm back to work now (boo), so modeling time is catch-as-catch-can.
I also got annoyed with the fact that the angle of the feet on the crew chief wouldn't allow for him to stand upright on the wing roughly where the chief was in the photo. Given the angle of the wing while on the ground, the figure kept falling over and to place him such that he stayed put required me to put him in weird places. Sure, in the end, I could probably have super glued him to the wing and wiped my hands of it, but he would have likely had a perpetual Michael Jackson-esque forward lean to him and that would have looked bad.
So, out came the trusty sword of exact zero and off went the feet. Same deal here, holes, wire, proper angles aaaand...
Ta-da! He stays nicely in place on his own two feet (no super glue required) and he's more or less where the crew chief was in the reference photo.
What I haven't mentioned yet is that I burned an entire new year's eve day (and a blade on my cutter) building a couple palm trees and prepping the base. Here's a teaser shot of the work in progress. I've got more work to do on the pictured tree and whole second tree in the works too.
That's it for now, but stay tuned for all the fun and excitement of the adventures to come. Join us as we explore:
Irrevocable f-ups in hand sculpting! "Did the Marines really accept pilots with 11 fingers?" Figure painting from your nightmares! "His eye appears to be running down his cheek. " Palm trees that apparently can't support their own weight! "It fell on the plane again." And more!
-
 Smokey got a reaction from Derek B in F104 G Starfighter USAF
If you need a MB seat how is this?
EDU632048 1:32 Eduard Brassin F-104 Starfighter MB.7 Ejection Seat (ITA kit) - Sprue Brothers Models LLC
-
 Smokey got a reaction from firefly7 in F104 G Starfighter USAF
If you need a MB seat how is this?
EDU632048 1:32 Eduard Brassin F-104 Starfighter MB.7 Ejection Seat (ITA kit) - Sprue Brothers Models LLC
-
 Smokey got a reaction from MikeC in F104 G Starfighter USAF
If you need a MB seat how is this?
EDU632048 1:32 Eduard Brassin F-104 Starfighter MB.7 Ejection Seat (ITA kit) - Sprue Brothers Models LLC
-
 Smokey got a reaction from BiggTim in 1/32 F-105 Question
Thanks everyone. Big thanks to LSF_Ray. I do think that was the company I was thinking of. I do have almost everything that Reskit has put out so far for the F-105. By what David posted of under development from Reskit might have to leave the beast in the box until they come out with the intake for this kit. It would be nice if they would do a cockpit canopy set for it to correct the shape. Also want to thank the moderator for moving this to the correct spot.
-
Smokey reacted to ChuckD in A Birdcage in Turtle Bay - An F4U-1 Diorama
So, it's apparently time for me to buy a lottery ticket.
No sooner had I stuck a piece of tape over the Quinta IP, than this happened.
I was trying to mix up a lighter color of green to use for dry brushing when I squeezed my ancient Vallejo white juuuuust a bit too hard. Man I got lucky; not an errant speck on the unmasked areas.
Anyway, after recovering from that, I went on to finish the cockpit today. The interior is lightly chipped via the sponge method, then dirtied up a bit with oils and enamels. The results of the Quinta set and painted wires are really nice.
Where the tail wheel would toss up debris and dirt, I splashed dark enamel washes along with some lighter mud tones using the speckling method.
Again, the speckling is not nearly as pronounced to the naked eye. If I had more brain power, I'd get really good with model photography but I only have so much bandwidth and I already spend enough of my days in front of a computer anyway. So, I'll live with my phone doing it's consumer-friendly best and over-emphasizing the speckling.
The results of the wiring below the IP are pretty solid and I'm happy with them. They can't be seen much when it's all together, but it still adds quite a bit of visual interest.
And, with that it was time to close up the fuse! This is always a fun milestone of any airplane build. Don't tell anyone, but it's starting to look like a Corsair already.
The roundish body of the corsair swallows most of the detail I spent yesterday building. :/
And that's it for now. I'm back to work tomorrow, so I suspect updates will slow down quite a bit, but the next steps are to add the firewall, exhausts and engine. Then it'll be on to the tail wheel assembly and the wings!
-
Smokey reacted to Pete Fleischmann in Make the others jealous
Iwata Custom Micron added to the gun cabinet
-
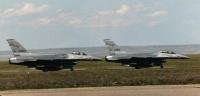
Smokey reacted to RichieB in 1/32 F-16C 'Flogger' - In flight and lit up
Well here we go again, this time I'm indulging in a Tamiya kit. Much as I like the challenge of upgrading the delights of Revell's offerings, sometimes you just want something a little less demanding. Such as the Tamiya F-16C which judging by all the accounts I've read, is a superb kit. Squirrelled away in my stash is the Thunderbirds offering which allows an earlier Blk32 aircraft which differs from the mainstream Blk50 kit by having the P&W engine, normal (small) shock inlet, lightweight gear with the original wheels and flat MLG doors. However, as it is the Thunderbirds kit it also does not come with weapons and some of the pylon details which I will need for my chosen subject.
I've always liked aggressor schemes (who doesn't!), in fact anything that gets away from monotone (grey) colour schemes and there is no doubting that the 64AGRS based out of Nellis has some of the most interesting schemes around. I'm pretty much a fan of all the schemes but for this one I've plumbed for the 'Flogger' scheme as pictured on the lead aircraft below. Crucially, the Thunderbirds kit comes with early sidewinder rails which is right for the era I'm looking at i.e. pre-AMRAAM.
(USAF)
Now I don't want to make it too easy so this will be an in-flight display and I will be adding lights to this one as well but most of the kit will be out of the box. Except for the engine exhaust which comes courtesy of ResKit (love their stuff). Oh and some ResKit winders, will probably need an ALQ-188 and ACMI pod as well. Maybe some cockpit enhancements from Quinta and might treat myself to some goodies from Kopecky who does loads of goodies for the F-16. Yeah, pretty much out of the box.
Right, so where do we start.
With the intake of course. That's the thing with adding lights, you can't build it in the order Tamiya would like you to. Because you need to add things like wires and batteries you also need to plan the layout of how you will connect it altogether noting that once you close a section up, that's it - no more access. The F-16 has some nav lights on each side of the intake. These can be added by drilling out a small hole and adding a very small LED. To avoid light overspill (a real problem with bright LEDs) a silver foil backing is used. The outside will be first painted black to kill light overspill. Luckily the actual intake has a small enough gap for the wires to go past and feed back into the fuselage.
Another tight spot for lighting is the tail where the F-16 has a large anti-col beacon at the top and a smaller light at the base. Again, a small white LED was used with silver foil to limit overspill. The clear part sits on top of the LED and the wires run down the back of the rudder. I had to do this as this was a second hand kit and the tail had already been glued together.
In addition, the started kit had also had the base of the fin cut off in anticipation of reworking to an F-16A by the previous owner. I therefore needed to reinstate the original base using a thick piece of card as a strut to provide some strength. In addition to the wire, a thin fibre optic wire was run from the LED light down the base of the rudder and out of the base of the tail.
Interestingly, I'm pretty sure Tamiya had plans to add their own lighting kit to this model. The wing tip photo below shows a groove carved into the inside of the wing which leads to the point where the wing nav lights are and the design of that clear part is definitely with lighting in mind. I know because I was going to do the same to fit the lighting I had in mind. Thank you Tamiya for making that part of the kit construction slightly easier!
Well its a start. I should point out that progress is inversely proportional to the many demands of family and life in general so please be patient. We will get there in the end.
-
Smokey reacted to Eli Raphael in B-24 decal set interest....
Hi guys,
Been thinking of printing a short run of Ds & H/J decals.
I will be making for personal use Strawberry ***** that can easily be included with others too.
Dennis suggested Lady Be Good, so that is the second one to be made.
If any of you would like others to be made, please let me know.
Thanks....
ER
-
Smokey reacted to Brett M in Trumpeter 1/32 F-105G Wild Weasel - Nose gear bay time…finally
Back from the dead! Or, well, I have more time now that summer is closing and I'm not renovating all of our landscaping! Not a big update, but sharing some progress.
I'm still trundling along with the Wild Weasel, and as usual, it's slow for me. Below is the Aires front wheel bay that I've been on working on the past week. Painted, detailed, washed and flat coated. Hopefully somewhat representing a F-105G and how dirty it may have been on deployment to Korat during Vietnam. After this, I should be ready to button it up in the fuselage, along with the cockpit and front half of the engine. The fun part, this probably won't ever be seen once the 105 is done and on it's wheels....but at least I'll have these shots to prove it!
Thanks to Bulldog 09 over on ARC (not sure if you're here too) for the detail shots I found they had taken and posted
Feel free to critique.....macro shots are great for showing every flaw!
-
Smokey reacted to Hawaiian Air Depot in New products from Hawaiian Air Depot: 1/32 TBD Midway Paint Mask Downloadable Files and 1/24 Spitfire Mk. IX Styrene Cockpit Parts Downloadable Files
We're excited to announce our first set of downloadable digital designs for the new Trumpeter 1/32 TBD-1 Devastator. My Dad worked for TWA, and as a kid I got to meet George Gay, so we have to start with the Devastators from Torpedo 8. We're also cinema fans, so we based our designs on the TBD markings visible in John Ford's Midway footage.
The set features markings for Gay's T-14, Waldron's T-16, as well as T-3, T-5, T-7, and T-13: all the TBDs we can identify in Ford's footage. The download includes all the various insignia, all the plane numbers, prop tips, wing walkways, and masks for the bomb aiming and fuselage windows, which somehow Trumpeter doesn't include on their canopy mask sheet.
Stay tuned for more Devastator mask sets-- Coral Sea/Wake TBDs, and masks to paint up whichever Yellow Wing you want. After that, we'll do a TBD Styrene Sheet Metal set that will let you cut your own parts to update the bomb aiming doors to the later design seen on Midway TBDs. Also featured are unique plywood torpedo fins clear in Ford's footage.
The other new release is our next Styrene Sheet Metal set: downloadable files to sweeten up the cockpit of the 1/24 Airfix Spitfire Mk. IX . The highlights of this set are laminated assemblies to create a much finer throttle (real scale slots for the throttle levers) and a center pylon release lever. Our understanding is all wartime Spitfires with a center bomb/fuel tank pylon (Mk. V and later) had the lever, but the Airfix kit doesn't include one. In addition, parts to detail the gunsight mount, compass mount, floor, and sidewall details are also included.
Visit hawaiianairdepot.com for details. Thanks!
-
Smokey reacted to Kagemusha in 1/32 Douglas TBD-1 Devastator by Trumpeter - TBD-1A in October 2023!
TBD-1A
Hawaiian Air Depot have some masks on the way, some very interesting links on this page, and link to vendors post page.
-
Smokey reacted to LSP_K2 in 2-1/2 ton USAAF fuel truck
This will be one of at least two entries for me in Madison next year. It's a sweetheart of a kit and even I can't screw it up (maybe). I'll also be doing a Pro Modeler 1:48 bomb lift, but that may or may not be entered into the contest directly, I'm still debating that.
-
Smokey reacted to Alain Gadbois in Any UFO fans around here?
Hi all!
Just stumbled upon this watching a video on new AMT Round 2 new kits:
at 2:21. Isn’t that cool or what!
Here’s the complete video, with other new or retooled Star Wars, Star Trek kits among others.
Alain
-
Smokey reacted to TimW in Trumpeter TBD-1 Devastator
Made some significant progress...then found out the interior should be Bronze Green....oops. So did some creative touch ups/dry brushing. It'll have to do...
-
Smokey reacted to TimW in Trumpeter TBD-1 Devastator
OK...been waiting for freaking ever for this kit...
I had to start it. Yeah, I know, there will probably be some sweet AM coming down the pike but I'm too impatient! Besides, the kit detail is actually not that bad.
So here goes... will be using the GMM decal set for a Coral Sea aircraft.
Added some piping/stuff to the bombardier's position. Yeah, won't really be visible but I'll know it's there!!! And a scratch built relief tube for the pilot--how could they leave that out?
-
 Smokey got a reaction from Christoffer Lindelav in Tiger I
Here is my latest project. All the tanks that look interesting have steel wheels on them. I did find AFV modeler does a mid-production upgrade kit but still have to tackle the steel wheel issue. Not sure if Trumpeter ones would work from a king tiger. From what I have been reading it seems like it is a nightmare trying to figure out all the differences between early, mid and late production ones. Dan