desmojen Posted July 20, 2014 Share Posted July 20, 2014 Like pretty much every other Spit-thusiast in the world, when I saw Revell were working on a new tool early Spitfire I was pretty pleased. Revell's newer releases have tended to be pretty good kits, and always great value for money. With the only other options all being either old, or rehashed old kits, this had to be a good thing. Then some pictures appeared online. Oh dear, the 'new kit hand wringing team' went into overdrive. Poor levels of detail, bits moulded back to front, and bizarre mistakes abounded it seemed. My own personal take was a little subdued. I thought the surface detail looked a bit scary, and immediately spotted the back to front instrument panel. So we waited for more info. Then there was a built up 'test shot' courtesy of Revell's test shot builder guy. My reaction to that build was hmmmm, it looks ok but parts of it are not very nice. Once the kit became widely available, the aforementioned hand wringing team went into hyperdrive. I'm sure those of you who are interested are familiar with it all. It did put me off, I won't lie. Then David Parker built it (there's always one) and I thought it looked ok, so I bought one. Having looked at it with my own eyes, and hands, I decided to put a few photos and thoughts up to help anyone who might be undecided on the kit's relative merits. So here goes. Caveat time I guess. I am not a rivet counter, not by any means. These comparisons are all based on the Tamiya 1/32 Spitfire kit, which I have seen no real criticism of. I am also very enthusiastic about Spitfires, I've built a shed load of them over the years, and as such I am quite sensitive to the shape of the things. Ok, lets get on with it Size and shapes. I started with some wings, here I have taped a Tamiya upper wing to the Revell lower wing. In all of these pics, the Revell parts are the light coloured plastic. Photos can be a bit hard to appreciate, so you will have to take my word for it as well but you can easily see that these parts are nigh on identical. The Tamiya wing surface would fit the Revell part if you wanted it to. Not much more to say there, but the missing flaps and ailerons make it hard to see how close they really are. So I taped two upper wings together... The leading edges line up perfectly, even the cranked section is like a mirror image. The trailing edges are almost there too, the Tamiya part being marginally wider in chord. We are talking 0.5mm at most here, although it isn't uniform along the span. The aileron cut out looks deeper, but that it an optical illusion caused by the thickness of the two uppers not wanting to sit together. So wing wise, the Revell kit is plenty close enough in span and chord to be called accurate. But span and chord are only half the story, because Revell have done something a bit wierd underneath. It's hard to describe, and to photograph, but I'll try. Look at the lower line of the centre section. Right from the rear of the wing root, it sweeps downwards until roughly in line with the undercarriage bays where it starts to curve back upwards. Then it straightens out to leave quite a sharp and narrow leading edge area on the lower wing part. Can you see it? Probably not, so here's a picture of a Tamiya one. Now can you see it? See how much flatter the whole area is, blending in to a nicely rounded leading edge. The Revell kit in comparison looks almost pregnant. But almost all of us make our models with the wheels down and display them parked, so it might not be too noticeable on a finished model. Detail wise, the wings have a plethora of errors and omissions. The radiator is not modelled well, the oil cooler is flat out wrong, being a later type than typically found on a MkII. There is a raised chunk on the leading edge joint near the middle guns which confuses me, no idea what that is meant to be. The rivet detail that looks so horrible in photos is not that bad in real life, being about on a par with something Trumpeter would do. There is probably more if I look really hard, but that will do for now. On to the fuselage then. Obviously, the Tamiya fuselage is a MkIX, but from fin post to firewall, they should be basically the same. Not bad. The depth is spot on, and the length is close. But not exactly the same... Much more obvious from above, the Revell kit is very slightly shorter; no more than about 1mm. This includes the cockpit opening, so our length difference is most likely in the rear part. I have to say though, I can't get excited about 1mm in this scale. What I do notice though is how fat the Revell fuselage is! Again hard to photograph, but notice how much more fuselage you can see beneath the cockpit on the Revell half, even excepting the door cutout, you can see the difference. This has carried through to the forward part, and left its mark in the form of quite a sharp edge on the fuel tank cover. The shadows show that the Tamiya part has a nice smooth constant curve where the Revell has more of a two corners thing going on. Again this is not going to be massively noticeable on a finished model, and will be easily addressed with sanding and maybe a touch of putty on my build. So overall not a bad effort really, I won't award a cigar but it will do The tail parts are pretty much straight swappable with the Tamiya ones, so no problems with the shape here. The surface detail is clumsy though, and for some reason Revell supply early tailplanes but late elevators The instructions detail the modification required but I can't help thinking it's a bit of an odd thing to do. Those of us with Tamiya kits to hand could use spare early parts direct from that kit, which would also address the heavy handed rivetting that the undersurface of the Revell tailplanes exhibit. On to some detail bits. This is where the Revell kit falls on its ass for me; in the main the detail might be just about good enough for 1/48 but it is a bit short of what most of us might reasonably expect of a new tool kit in 1/32. Here's a shot of the undercarriage legs and wheels. The Tamiya leg and wheel show just what a poor effort these are. I would find these unacceptable in 1/72........ Luckily I have some spare Tamiya ones, and resin wheels are easy to come by for those that don't, as are metal gear legs. My other shot is of the instrument panel. Revell seem to spotted that particular fubar and put it right, because my dashboard is the right way round. And actually very nicely moulded too. Ok, to summarise. This isn't meant to be a blow by blow 100% list of every little thing that isn't right. And not having built it I cannot comment on fit problems, although everything taped together nicely. I think this kit is ok. I paid less than £20 for it, and on that basis I'm happy enough. The shape issues are there for sure, but they aren't huge and David Parker proved to me that it will look ok when it's done. Personally I feel that Revell dropped the ball with the detailing. This kit simply isn't up to the standard of their recent releases, and quite frankly isn't up to the standard of most modern 1/48 kits. I know everyone will play the cost card - 'but it's only £20' well yes it is, but by the time the modeller has shelled out for a decent cockpit, resin control surfaces of the correct type, wheels, metal undercarriage, exhausts, propeller and spinner maybe, an aftermarket oil cooler, and probably radiator how much do you think it will have cost........ I'd be surprised if it were much less than a Tamiya kit then, especially if some decals are thrown into the mix as well. That said, I can't be the only one with loads of suitable spare parts from PCM and Tamiya kits. I will wait a bit and see what comes along for the radiator and oil cooler, and then I plan to build mine as a MkIa. As bad as all this might sound, this kit is still better than the horrific Hobbyboss MkV, and would actually build as a MkVa pretty much as it comes in the box. I doubt I'll build more than one, but I am not unduly unhappy with the kit, all things considered. I hope this has been of some interest or help to those of you who might have been thinking about buying one of these Cheers, Jen. Artful69, Sparzanza, Tony T and 10 others 13 Link to comment Share on other sites More sharing options...
Martinnfb Posted July 20, 2014 Share Posted July 20, 2014 Excellent write up , thanks. Finally somebody has brought factographic , non-emotional comparative review. Thanks again Martin Link to comment Share on other sites More sharing options...
dennismcc Posted July 20, 2014 Share Posted July 20, 2014 Nice review Jen, nice to see some photographic comparisons to the Tamiya kit, and from what I can see the kit should build up very nicely. Cheers Den Link to comment Share on other sites More sharing options...
Derek B Posted July 20, 2014 Share Posted July 20, 2014 Excellent work Jen I fully concur with your initial impressions. I am currently doing pretty much the same thing as you for the very same reasons, so we obviously think very much alike here (mine will be more in depth, but with the same aims in mind). Cheers Derek Artful69 1 Link to comment Share on other sites More sharing options...
LSP_Mike Posted July 20, 2014 Share Posted July 20, 2014 Welcome to the forums, and thank you for the very nice review. A nice practical side by side to illustrate what is where, and how it looks. Link to comment Share on other sites More sharing options...
desmojen Posted July 20, 2014 Author Share Posted July 20, 2014 Excellent work Jen I fully concur with your initial impressions. I am currently doing pretty much the same thing as you for the very same reasons, so we obviously think very much alike here (mine will be more in depth, but with the same aims in mind). Cheers Derek Yeah, I'm the first to admit that this is not an in depth blow by blow account. But if it helps anyone make up their mind then it has done its job Jen. Derek B and dmthamade 2 Link to comment Share on other sites More sharing options...
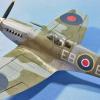
JamesHatch Posted July 20, 2014 Share Posted July 20, 2014 (edited) Mine built up pretty well Edited July 20, 2014 by JamesHatch Tony T, sandokan, Cees Broere and 3 others 6 Link to comment Share on other sites More sharing options...
Guest Peterpools Posted July 20, 2014 Share Posted July 20, 2014 Jen Very informative review and your comments are well taken. I've ordered the kit and when here will add the Spit to the stash for a bit, waiting for AM upgrade and parts to be released. Peter Link to comment Share on other sites More sharing options...
Sparzanza Posted July 20, 2014 Share Posted July 20, 2014 We need more pics of that, Hatchyboy! Link to comment Share on other sites More sharing options...
JamesHatch Posted July 20, 2014 Share Posted July 20, 2014 We need more pics of that, Hatchyboy! I wish! Watch out for a 'How to Build the Revell Spitfire' book from ADH and Brett Green in the next months. Thanks Jen for a reasoned look at the kit too. I had to make a scratch built instrument panel to replace the mirrored one in my test shot. Link to comment Share on other sites More sharing options...
Iain Posted July 20, 2014 Share Posted July 20, 2014 Gorgeous build James! Can I ask what the source of the figure is - he looks rather splendid! Iain Link to comment Share on other sites More sharing options...
desmojen Posted July 20, 2014 Author Share Posted July 20, 2014 I had not seen that James, very nice job and reinforces my point nicely Jen. Link to comment Share on other sites More sharing options...
dmthamade Posted July 20, 2014 Share Posted July 20, 2014 Yeah, I'm the first to admit that this is not an in depth blow by blow account. But if it helps anyone make up their mind then it has done its job Jen. I've almost pulled the trigger on a Tamiya Spit many times, but the way i build most would have ended up in the spares box. Couldn't see myself spending that much to have so much ending up as spares. This offering from Revell looks fine to me, will buy and build and enjoy it. Thanks for the intel, desmojen!! Don Tony T 1 Link to comment Share on other sites More sharing options...
JamesHatch Posted July 20, 2014 Share Posted July 20, 2014 (edited) I had not seen that James, very nice job and reinforces my point nicely Jen. Great kit to build @ Iain: that's a Wings Cockpit Figures item, loaned to me. I can't paint figures for crap. Edited July 20, 2014 by JamesHatch Iain 1 Link to comment Share on other sites More sharing options...
Simmo.b Posted July 20, 2014 Share Posted July 20, 2014 Nice build James!! And the figure is superb but I fear he would get a roasting from the C.O. for leaving his flaps down on the ground :-) Link to comment Share on other sites More sharing options...
Recommended Posts
Create an account or sign in to comment
You need to be a member in order to leave a comment
Create an account
Sign up for a new account in our community. It's easy!
Register a new accountSign in
Already have an account? Sign in here.
Sign In Now