
desmojen
-
Posts
66 -
Joined
-
Last visited
-
Days Won
1


-
 sandokan reacted to a post in a topic:
Tamiya Spitfire XVI
sandokan reacted to a post in a topic:
Tamiya Spitfire XVI
-
sandokan reacted to a post in a topic:
Tamiya Spitfire XVI
-
sandokan reacted to a post in a topic:
Tamiya Spitfire XVI
-
MikeC reacted to a post in a topic:
Tamiya Spitfire XVI
-
Uncarina reacted to a post in a topic:
Tamiya Spitfire XVI
-
LSP_Kevin reacted to a post in a topic:
Tamiya Spitfire XVI
-
Hi guys, If anyone stumbles across this, I'm afraid it ended up in the great plastic kit graveyard in the sky I did some more work on the texturing process, the main thing I drew from that less really is more- it really doesn't take much of a scrape to produce the rippling. Unfortunately I was having major problems with seams splitting and the actual plastic surface of the kit cracking. I had put the seam splitting down to the plastic cement aging, but when the surface started to go as well I realised that old glue couldn't be the cause. I have since experienced the same phenomenon with another kit that got stripped, and putting two and two together the conclusion was that the stripping medium had caused a partial break down of the plastic. This being so I decided that I didn't want to expend the effort that would be needed to finish the model with the risk of it crumbling away; so it was broken for spares. Some of those spares are earmarked for an upcoming build of the new Revell Spitfire IX, which I will post here when done. Thanks for all the interest, and sorry it has come to naught, Jen.
-
desmojen reacted to a post in a topic:
1/18 Spitfire Mk. XIVe - Race #80
-
MikeC reacted to a post in a topic:
Edgar Brooks Memorial Trophy
-
He used to work as an instrument fitter, but I think it's more than fair to suggest that his passion was the Spitfire and as such that would make a great basis for an award. Jen.
-
airscale reacted to a post in a topic:
1/18 Spitfire Mk. XIVe - Race #80
-
paul fisher reacted to a post in a topic:
Meteor T.7, G-BWMF
-
TonyT reacted to a post in a topic:
Meteor T.7, G-BWMF
-
Vehicle etch primer has some pretty strong chemicals in it, the likelihood is that the remnants of those attacked your relatively weak model paints. I'd like to humbly suggest that removing the tape while the paint is still wet will help, as you will not get that flaking of the edge at all. It's something I always do when I want a sharp edge, and I always did it when I used to paint full size cars as well. Jen.
-
I have amassed the bits and pieces to do the same build at some point. I'm still undecided whether to go for the unfinished finish or the fully painted scheme she wears now. I worked on the aircraft for a short while while the Yatesbury crew still owned her. Jen.
-
Hi Kev, thanks I don't see a problem as long as you mention the magazine, not trying to be pretentious but it's only fair. Thanks for the comments guys, much appreciated. Jen.
-
I thought some of you might like to see a few photos of my build of the Silver Wings PZL kit. It was built for, and has been featured in Airfix Model World magazine (October issue). I won't lie, it wasn't an easy build, but I can enjoy the challenge that was mastered, and am truly happy with the finished model. I added some rivet detail to the fuselage and a couple of very minor details in the cockpit, other than that it is as supplied by Silver Wings. Hope you enjoy the photos, Jen.
- 18 replies
-
- 19
-
-
I have nearly finished this kit as a review for a future issue of AMW magazine. This was just one of the problems I came up against during construction. I got around it by cutting the rear parts of the nosecone away. I thought to build it in the sequence suggested in the photo above, but you can't do it that way because the inlet manifolds are 'Y' shaped.... It was an incredibly frustrating and extremely challenging build all the way through, but ironically few of the challenges arise because of the scale or the chosen medium! Jen.
-
How can I go about getting details and potentially registering for the Kestrel engine kit? Jen.
-
The lozenge v camo thing depends on what you want to do. The restored real thing in the Smithsonian sports lozenge fabric (which was specially recreated just for that restoration) but there is some evidence that at some points in the early life of the aircraft it had the camo. if you can lay your hands on the Smithsonian book, there is some kick ass info in there Jen.
-
My holy grail, the C-130J. It wouldn't have to be big, in fact a really good small one would please me just as much! Jen.
-
Makes me feel a tad inadequate, I was positively joyous yesterday on receiving my W.12 (Christmas present from my husband). I'll be interested to know what the customs charge is from anyone getting the Felixstowe in the UK..... Jen.
-
Thanks for the comments everyone I've been busy taking two steps forward and three steps back on this since I last posted. I made a few mistakes, have learned a few things, and am sort of back where I started again! Before I go on, here is a picture of the stripping products, so that those of you who were directly interested in that part know exactly what to look for. On to my tribulations then....... I've never done this before, so it was always going to be a bit of a learning curve. The first mistake I made was treating the filling and sanding of the gun inserts as part of the texturing job. This was a mistake because they needed much more work, and a different type of sanding, which in turn obliterated the skin ripples around the inserts. I eventually got the inserts sorted, and decided I would re-apply the Mr Surfacer ripple maker, but before I did that I decided to fit some Master brass cannon barrels. While waiting for those to arrive, I kept looking at it, and decided that I wasn't happy with the bits I had scraped, they were simply too deep and looked more like dents than ripples. I spent a bit of time doing some more sanding, and added Mr Surfacer back into the dents to fill them in a bit. I think they are ok now, but the lesson learnt there is that you really don't need to scrape much away! When I got the Master bits, I quickly realised that the holes for the guns would need to be much enlarged for them to go in. Instead of having a stub to glue into the wing like the kit parts do, the Master parts continue at the same width. No problem thinks I, breaking out the big drill bits. Except it was a problem, because of the fragile brittle kit plastic (from the previous gluing). And also, the inside of the wing itself was getting in the way. Eventually, the wing insert broke, and basically fell out. In pieces A little rethink was in order. I now had barrels which were too big to go in the wing, and a wing with no insert to boot. In all fairness, the aircraft I plan to model had no guns anyway, I was only fitting the brass barrels because they are gorgeous. Luckily for me, I have another Tamiya Spitfire in the stash which is earmarked to become a MkXI. Thus, I was able to steal the cannon insert and the rounded blanking stubs from that kit. The photo shows the new insert in place, with two blanking stubs. Obviously there were only two stubs in my MkVIII kit, so I made a rough and ready mould from some hand kneadable two part silicone rubber I've got; then casted two more blanks. Once the glue has had a few days, I will fill and blend the new insert, then fit the blank ends. And then, I can start over on the texturing process! Jen.
-
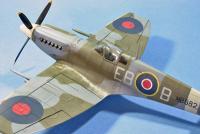
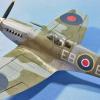
Hi all, Here's one I've finally got around to starting on properly. It's Tamiya's beautiful Spitfire XVI, which I bought from a friend as an unfinished project a year ago! How time flies, right? My friend had built the model and got to the stage of painting it when he became disaffected with it and put it up for sale. That's where I stepped in, and here's what I picked up... Doesn't look so bad does it? When looking closely though, all was not as it seems in this photo. Most of the build seams were quite visible under the silver paint, especially around the gun inserts, and in some areas the finish wasn't great. Quite apart from that, I wasn't really fussed for this scheme, it's nice of course but not something I wanted to do. I received the built model, and all (well most) of the as yet unused parts, the instructions, some A/M seatbelts, and a Lifelike decal sheet which included the paint scheme it came in. My plan from the start was to strip the paint and start over, the idea being that I'd get a quick Spitfire XVI out of it as I don't have to build it. When I tried to remove the paint though, it became evident that I wasn't going anywhere fast with this. Mr Muscle didn't touch the Tamiya laquer, and Mr Color thinner wasn't much better. Fast forward one year to a couple of weeks ago (not so quick then) when I saw AK Interactive released a paint stripper. I picked up a bottle this week, having also had a top tip at Telford that Revell Airbrush Cleaner was an effective paint remover. When I tried the AK stripper on the model it certainly worked. The paint pickled up like it does when you use real paint stripper, I thought I was home free! The bottle suggested scrubbing paint away with soap and water, so I dutifully took my pickled paint to the bathroom armed with my old modelling toothbrush to scrub away the paint. All was still not plain sailing though, because the paint had turned into a nasty sticky clag that collected on the toothbrush and stayed there! The final piece of this particular jigsaw was the aforementioned Revell airbrush cleaner. After I'd cleaned up the sticky mess from the model and the toothbrush (and sink!) I applied some cleaner on the model with an old paintbrush and the paint just melted away! So, the formula was found; first apply AK stripper and leave for a minute or two. Wipe this with some kitchen towel, some sticky yuk was removed. Attack sticky residual muck with paintbrush and Revell cleaner, wipe again = clean model! Here is the result. A clean Spitfire Ok, not perfect, but I didn't want to strip bits of the interior that I'd struggle to retouch so I defaulted to wet and dry around the cockpit aperture. There is still clean up to be done, I will run a scriber down all the panel lines to clear out the old paint, and there is the odd spot here and there that will need sanding. I will also use Mr Surfacer to address the seams where they are not quite right. Here is a photo trying to show the interior. It features all the Barracuda bits, and was very nicely done. While I had the Mr Surfacer out, I started on my grand plan for the model by addressing the leading edges of the wings. The Spitfire was a very high performance aircraft for its time, and one of the secrets to its performance was the smooth airflow on and around the wing. Part of the work that went into achieving this smooth airflow was the puttying and sanding of the entire wing forward of the main spar. That means that all the rivet detail forward of the main spar needed filling and sanding, much like a Mustang wing. One of the things I want to look at with this model is texture, something I think a larger model really needs to look convincing. One form of texture is something that a lot of modellers call oil canning, but the correct terminology is panting. This is where the aircraft skin becomes mildly rippled due to the stress and strain of flying. So, I made a start on this by applying the Mr Surfacer to all the rivet lines, but only to the rivets, like so.... The theory being that when I rub it down, a little plastic will be removed between the lines, and a little surfacer will be left along the lines, thus producing an ever so slightly rippled surface. In addition to this, although not visible in the photo, I scraped some plastic from selected areas to make deeper ripples here and there. This was concentrated in areas where ground crew might step, near the engine and some of the gun panels, and in a few more random areas. In theory, panting would be minimal in this area anyway as the skin was of a relatively heavy gauge. In practice though, photos of warbirds, with their glossy finishes reveal that some rippling does occur. Also visible in the photos, I have removed the rounded wingtips and fitted the clipped ones. This was complicated by the fact that the plastic in some areas of the kit has degraded somewhat, so I lost some plastic in this process which will now have to be built back up with CA filler. The same thing has happened to one of the gun inserts, but no material has been lost, it has just fractured. I removed the plastic guns since one of them was broken anyway, and will replace them with master brass barrels in due course. I will update as I go along, but this is something of a filler build so it won't happen overly quickly Jen. P.S. I am missing the right hand engine cowl panel, so if anyone has one spare I'd love to hear from you!
-
Revell 1/32 Spitfire Mk.IIa kit - Built as a 54 Sqn Spitfire Mk.Ia.
desmojen replied to Derek B's topic in Works in Progress
Fair play, that's coming out nicely. I would err on the side of stumping up £4 to Bob at MDC though! Jen. -
Sorry, I thought this started in Feb but now I realise it finishes in Feb. There is really no way I can get either of those kits done between now and February because I can't even start on a new big build until the new year. Whats the next GB going to be? Jen.