Search the Community
Showing results for tags 'REsin'.
-
Hello to all! I want to present on Your review information about the LSP products of the Metallic Details. Perhaps some of You will be interested in this. https://metallicdetails.com/ Detailing set for aircraft model F-35A (Italeri, 1/32) Jet nozzle for aircraft model F-35A (Italeri, 1/32) F-35A. Ejection seat (1/32) F-35. Seat belts (1/32) AH-64 Apache. Longbow radar (Academy, 1/35) Mi-24/Mi-35. Wheels set (1/35) B-24. Wheel bays (HobbyBoss, 1/32) B-24. Exterior (HobbyBoss, 1/32) B-24. Turbochargers (HobbyBoss, 1/32) Pratt & Whitney R-1830 (HobbyBoss, 1/32) Control handles. Part 2 for German aircraft models (1/32) FuG 218 Radar (1/32) Revi 16B Gunsight (1/32) Static dischargers (1/32) Tail support for Bf 109E (1/32) Tail support for Bf 109F, G (1/32) M18 gun pod with M134 Minigun (1/32) M65 rocket launcher (1/32) XM157 2.75 inch rocket launcher (1/32) XM158 2.75 inch rocket launcher (1/32) XM159 2.75 inch rocket launcher (1/32) Emerson Electric TAT-102 Turret for AH-1G Cobra (ICM, 1/32) Emerson Electric M28 Turret for AH-1G Cobra (ICM, 1/32) USAF seat belts part 1 (1/32) Bell AH-1G Cobra. Masks (ICM, 1/32) Bell AH-1G Cobra. Interior (ICM, 1/32) Bell AH-1G Cobra. Exterior (ICM, 1/32) M197 Gatling gun (ICM, 1/32) Yak-9. Landing gears (ICM, 1/32) Yak-9. Exhausts (ICM, 1/32) Gloster Gladiator. Cowling and engine (ICM, 1/32) Gloster Gladiator. Wheels (ICM, 1/32) Fiat CR.42 Falco Cowling and engine (ICM, 1/32) Fiat CR.42 Falco Propeller set (ICM, 1/32) Fiat A.74 (1/32) Arado Ar 196 Cowling and engine (1/32) Arado Ar 196 Propeller set (1/32) Pratt and Whitney R-2800 (1/32) Gnome-Rhone 14M (1/32) Gnome-Rhone 14K (1/32) Gnome-Rhone 14N (1/32) Bristol Taurus (1/32) Pratt & Whitney R-2800 late (1/32) Bristol Mercury (1/32) Ejection seat KK-1 (1/32) Ejection seat KK-2 (1/32) ASP-3N sight for MiG-15, MiG-17, La-15 (1/32) Ejection seat KM-1M (1/32) Ejection seat F16F Rafale (1/32) Spitfire Seat (1/32) Hurricane Seat (1/32) A-26 Invader Seats (1/32) B-26 Marauder Seats (1/32) Harrier GR.3, GR.7, GR.9 Ejection seat (1/32) Spitfire Mk.I-Mk.IX seat belts (1/32) RAF Hurricane seat belts (1/32) Mk.7 Ejection seat seat belts (1/32) USAF seat belts WWII (1/32) Japan seat belts WWII type 1 (1/32) Japan seat belts WWII type 2 (1/32) Japan seat belts WWII type 3 (1/32) Japan seat belts WWII type 4 (1/32) USSR seat belts WWII (1/32) MiG-21, MiG-23, MiG-25 seat belts (1/32) MiG-15/MiG-17. Seat belts (1/32) Mi-24 Seat belts (1/32) Martin-Baker Mk.10 Seat belts (1/32) Blackburn Buccaneer. Seat belts (1/32) Italian Seat belts WWII (1/32) Harrier GR.3, GR.7, GR.9 Seat belts (1/32) Thank You for Your attention!
- 92 replies
-
- 5
-

-
- italeri
- aftermarket
- (and 6 more)
-
Hey folks, here is the ILK Sherman build, first up some self made 3D corrections to some of the kit parts. Track: The kit supplied track not a common track for the Sherman, besides I like the look of the red meat T66 rubber chevrons. These went through a few redesigns as I tried using the kit end connectors and just designing the pads. I also tried using resin pins, both thoughts did not work in the end. The final design was all new pads, connectors and brass pins that I cut by hand! The resin pins gave the track too much stretch and as you know the Sherman has "live" track with no slack like the Russian T-34 style "dead" track. So pulling them tight with resin pins would leave too much gap between the links.
- 20 replies
-
- 16
-
-
In a departure from some of my usual larger scale builds, I decided to have a go at a full resin kit for the first time: enter Anigrand's 1/72nd scale B-32 Dominator. Designed as a back up to the B-29 project, the B-32 was a fall back option in case of the B-29 being a failure - which we now know it wasn't. Spooked by the complexity of the B-29, Consolidated were asked to simplify their initial design and dispense with the original plan for a fully pressurised fuselage and computerised gun turrets, which caused numerous delays and thus the B-32, despite now being a more traditional, simpler, design, actually entered service in the May of 1945, some time after the B-29. By September of the same year, and with the B-29 proving to be an excellent long range bomber, the B-32 was cancelled with only 118 airframes being completed. With the end of WWII, the US government felt there was no need for two heavy bomber programmes and all B-32s were consigned to the boneyards and all were scrapped by 1947. The B-32 holds the sad honour of being involved in the last combat of WWII when, on 18th August 1945, two Dominators on a reconnaissance sortie over Tokyo bay were attacked by Japanese fighters - well after the cessation of hostilities. Sadly, a gunner was killed in the fight and Sgt. Anthony Marchione was the last allied airman to lose his life in the conflict - although both B-32s returned safely to their base. The kit is in 1/72nd scale and produced by Anigrand and is full resin. I’d never done a resin kit before, so started with a little trepidation, but the moldings were exquisite and the fit excellent. Having read some reviews, other builders had struggled with warped parts and poor fit, but it seems I got lucky and mine was as straight as an arrow and construction only took a few hours - the joy of using CA glue! (Picture courtesy of Anigrand) Overall, I’m pleased with end result and I’m pleased to add ‘the forgotten bomber’ to my collection. Now for a 1/32nd scale version…! Tom
-
 At long last! (This thread could be subtitled: The lengths I'll go to to avoid a natural metal finish) Here is my rendition of P-38G s/n 43-2239 as it served in the 339th Fighter Squadron on Guadalcanal in early spring of 1943. According to Michael Claringbould in his book "Pacific Profiles, Volume 9," this aircraft was badly damaged after a forced-landing following an attack against a floatplane base at Faisi. The 339th ground crews towed it to the scrapyard where engineers from the 44th Fighter Squadron snatched it, brought it back to airworthy condition, and christened it "Old Ironsides." Apparently there was something of a kerfluffle between the two units as the 339th later tried to reclaim the aircraft - no word as to who came out on top, but the aircraft was used as a hack at least until mid-1944. From there, it fell off the radar and its final fate is ultimately unknown. Claringbould's book features a picture of the aircraft after it was named by the 44th FS, but I don't want to post it as I don't want to run afoul of copyright issues. In all my searches, I never found the second picture online anywhere and I suspect the original is in his personal collection. In any case, if you were following the build thread for this, you know what an adventure it has been. Most of that was due to my repeated, and uncharacteristic indecision. This started life as the Trumpeter P-38L kit and it was my intent to build an ETO bird in natural finish. But, I'd been sitting on the Grey Matter Figures backdate resin set forever and I knew if I didn't use it now, it'd go to waste. Aaaand, I like the looks of the pre-J models better anyway. So, with a little encouragement from @BiggTim, I decided to take the plunge and do the necessary surgery. I've never attempted anything so dramatic before and it was one heck of a project that involved quite a bit of surgery. You can check out the build thread for most of the details, but as you can see, this was no easy feat. While I'm very happy with the final results, I admit it is far from perfect. Some components, particularly in the cockpit, I just couldn't backdate as I didn't have it in me to scratch build complex parts like instrument panels, gunsights, and other sundries. That said, I'm quite pleased as this is as close as anyone is going to get to a pre-J model P-38 in 1/32 scale until Tamiya gets off their collective butts and upscales their kits (Dear Tamiya, I would buy several. Just saying.) Anyway, with this one done, I can now say I've done a heavy conversion (check that off the bucket list), and now I can focus on deep cleaning my model room to prepare for the arrival of the HKM A-20G. Enjoy the photos!
- 25 replies
-
- 41
-
-
- backdating
- p-38
- (and 2 more)
-
… and finding Scarlett. Hot on the heels of Amelia Earhart bust, here is my rendition of another legend of aviation: Lydia Litvyak , the female Soviet ace of WWII. I bought the second-hand resin bust at a modelling show a few year ago. It was half-painted. I scraped off the old paint ans started anew. I suspect the sculptor intended to depict the real-life Lydia Litvyak but under my brushes, she ended looking more like Scarlett Johansson. Ah well… Like the previous AE bust, it was entirely done with VallejoModel Color acrylics. Hope you like it. Cheers, Quang The REAL Lydia… The resin version…
- 7 replies
-
- 18
-
-
- lydia litvyak
- vvs
- (and 4 more)
-
 I will be picking up the kit box in an hour. Hopefully all parts will still be intact when I get it. I expect to be spending a fair amount of time looking over the parts and doing my best to smoothen them out in various ways, given the 3d-printed nature of this resin build with obviously uneven surfaces here and there. It was tempting to maybe try use metal foil on the model parts, but I sort of don't think I can make the model smooth enough, but I have yet to look at the parts myself, only having other people's photos on this subject matter. Hopefully I can get most the parts smooth enought to get to airbrush on metallic colors. I wrote "slow build" in the title, as I have some other builds going on as well, but I typically start working on new kits as I get them to evaluate them for myself and just try get things going. Paint scheme for this build (ideally): metalic paint (Vallejo metalic range of paints) Other remarks: I finally fixed my leaking air compressor, and so it turns out I had just a faulty air hose all along for the last few years occasionally using the compressor. The crack in the nice looking braided hose grew larger and larger by time, I couldn't find the source of the leak and it was all mysterious to me. How could the nice looking braided air hose fail me? Obviosuly the rubber part inside started to crack at some point, I had no idea. I found the leak by adding soap bubbles/soapy water around the compressor. Also in other news, I also finally think I figured out how to best airbrush on Vallejo primer paint. I typically dilute the Vallejo primer with thinner (for no good reason), however I always had issue with the paint drying inside my airbrush, presumably because having added thinner. Vallejo 'flow enhancer' acts as a retarder, and I should rely on a little of that instead of thinner I think, Also, in other news, for the first time I fully cleaned my airbrush, including bits of paint stuck in the needle canal, possibly contributing to the airbrush acting up from time to time, with reduced paint flow as if something was blocking the flow somewhere around the nozzle (unsure).
 -
EDIT: SINCE FUCKBUCKET SHUT DOWN ALL HOSTING THERE ARE NO PICS VISIBLE UNTILL PAGE 10. ANYONE INTERESTED CAN REQUEST THESE VIA PM FROM ME after the resin yak-23 i will go with something more complcated, the LEM Su-22 "Fitter" i collected some aftermarket as a resin seat, the static dischargers and a Su-25 pitot which will lend parts for the pitot it will be in Iraqi colours with an assymetric loadout from the Iran war (artwork from Tom Cooper under fair use) stay tuned...
- 172 replies
-
- 11
-
-
 Two days only, you can enjoy savings of up to 20% off on scale model accessories: - Resin spinners for Albatros D.V - Resin hubs (all types) - Soft rubber and resin wheels - Decal - Tote bags - Mugs with Proper Plane logo The discounts only last for 48 hours, so don't wait and grab something new for your collection today! Please use coupon code 544841 when checkout! www.ProperPlane.com
-
- 3
-
-
- proper plane
- resin
- (and 1 more)
-
Hi folks, Some days ago I got the LEM resin kit of the Ki-115. The kit is VERY nice: - Excellent shapes and seemingly accurate dimensions. It looks like they used the only set of detailed plans I know (also available on the web). - Good details with a fully riveted airframe - Nice level of detail - Excellent casting (I really had to look after them to find some very small air bubbles) The kit does not ask for a lot of improvements. Besides some basic improvements detailed hereunder, I recommend purchasing a set of RB belts as the kit has none. Directly, out of my head, I'm thinking at the following attention points: - The engine is correct but as for any other kit needs adding the wiring - The exhausts ends are not hollowed but they are so thin, I am not convinced it would have been possible to cast them otherwise. - The cockpit could have been a little bit more detailed. But this is essentially a classical matter of adding cables, wires and some missing details or elements here and there. The only point that annoys me is the floor as the full airframe had none! This is not terribly difficult to correct (just time-consuming) but could have been correct from the start (ten minutes of search on Google gave me a view of the actual structure). - Be prepared to add your own reinforcement parts for the seams between the wings, elevators and fuselage. Note that dry-fitting shows excellent assembly but simply butt-joining the parts with glue seems a little bit too risky to my eyes! - The kit has no instructions, just a CD with many pictures of the kit. So take your time to analyse things comprehensively. By the way, I got from the web copies of the instruction sheets of the 1/48 and 1/72 injected kits. This will help in assembling and painting. Last, the references about that plane are VERY limited. I have yet to find one good book dedicated to that plane. So, except some rare pictures from preserved airframes, the sources look to be quite limited. The old Monogram book from Mikesh has some elements but if somebody knows a good book about the plane, I would be interested in knowing it. Hope this helps. Thierry
-
 It’s finally time to get started on this. I’m really looking forward to it based on all the reviews I’ve read, here on LSP as well as other sites. This is going to be out of the box. I’ve spent too many months on single builds lately. This seems the perfect candidate as there really isn’t too much on the tweak list for the A3 and given it’s mixed media has PE and resin parts to really make it look sharp. Here’s the only Eastern Front option in the kit I did just the IP the other night...then found a build review that said the PE and panel is too wide and needs trimmed. Boy they were right, I spent 30-40 minutes trying to make it fit! Heres the kit for you guys that haven’t seen these Last night and Tonight I got started in earnest. Primed some parts, built the cockpit and added some alignment tabs to the fuselage. The IP has a purple tinge to it but it’s all supposed to be RLM66 which is a deep grey. Since this is OOB I mixed my 66 with PRU blue and got a decent match yet still maintaining the grey base color. I have not build a prop plane, let alone a German fighter in a long time (1 Corsair in the last 20 yrs) so I know nothing about these planes except that there seems to be a really strong following of these German fighters. Please don’t judge me on my ability to replicate these aircraft Ive left the seat out. I’m going to build it toward the end so it’s easier to cover up the cockpit for painting. I also noted the gun sight should be kept off till putting the halves together. I’d have broken it off a half dozen times already if it was on there.
- 38 replies
-
- 11
-
-
I may come to regret this, but after the intensity of finishing my AIMS conversion Bf110G4 in the "In the Pale Moonlight GB", I feel that I need a more "simple" build to get my head straight and before getting involved in the Multi-engined GB with my Anson. I bought this kit early last year and have been itching to build it ever since: The Fw44 Stieglitz (goldfinch) was one of the main training aircraft for the Luftwaffe in the 30s and 40s and was flown by Peter Spoden, a former Nachtjager and gentleman who I've been privileged to meet: It's the first full resin kit that I've built, so bit of a learning curve there, but it will be OOB apart from a few bits of wire in the cockpit. It comes with all the bits in plastic bags: packed by Celine! but as Geoff Coughlin noted in one of his reviews of a SW kit in Scale Modelling Now, the bits are randomly packaged. The instructions are a series of drawings: but there are no identifying numbers or sprues to give you a clue about what is what and where it goes. So my first evening was spent emptying everything out onto a table and basically trying to identify bits and sorting them into bags: It was a worthwhile exercise because I feel that I've got a bit of a handle on what's going to be needed. No decals provided but masks, which I prefer anyway so that's a plus. I hope to start the build very shortly. This is a rather good photograph, very clear around the engine, which is where I'm going to start!
- 109 replies
-
- 13
-
-
- silver wings
- resin
- (and 1 more)
-
Hello friends! Today we decided to tease you with our new project - a Continental 760x100 resin wheels. They are compatible for 1/32 scale models of different german planes - Albatros, Fokker D.VII, Pfalz and Roland. We are expecting they will be available in March 2019. https://properplane.com/index.php?route=product/product&path=62&product_id=114
- 3 replies
-
- 4
-
-
- proper plane
- wheel
- (and 3 more)
-
Place holder for the mo - but a statement of intent for this GB - with caveat that it may not be completed in time and I have other projects to get finished/progress with. Need to get the review of the HpH kit finished and posted (all photos now done) and then I'll make a start. Iain
-
Hi all, Today is the day. I'm officially going to call this build done! For the past one and a half year this build was in my mind. Lot's of fun, a lot of learning and a few mistakes made this a very rewarding experience. I couldn't wait to share some pictures with you guys so that's what I'm going to do. Maybe I'll write a little longer piece in the near future, but for now I'll let the pictures do the talking. Enjoy! Cheers, Wouter
- 38 replies
-
- 30
-
-
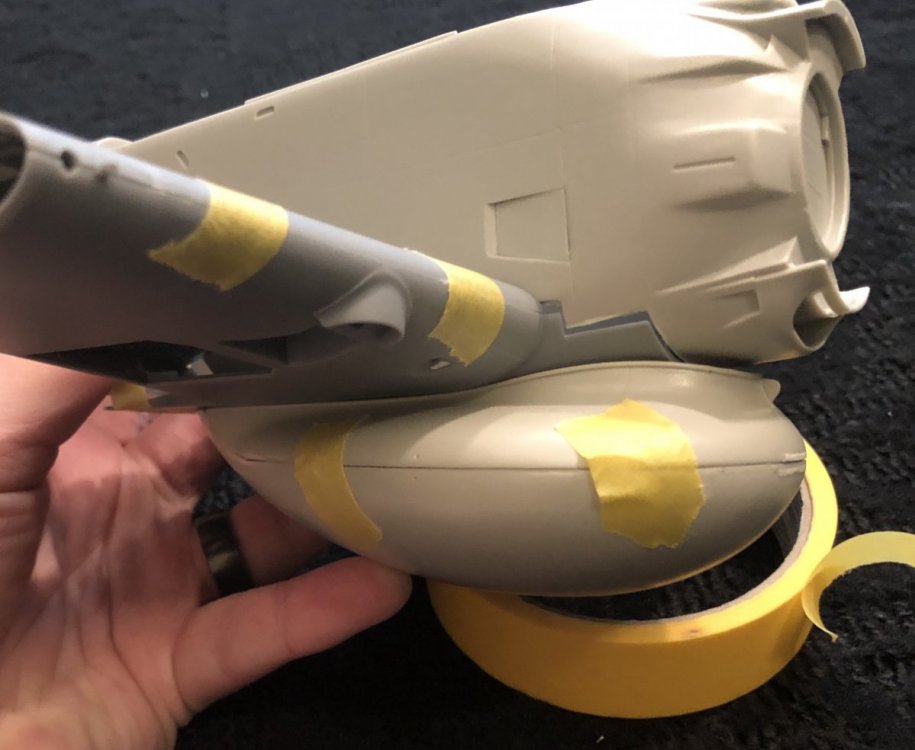
 Update 8/2/18 - work has begun! Normally I’d wait until I actually start working to write an in progress thread but I’m too excited to wait with this one. Fisher has not started shipping the AD-5W Guppy conversions just yet; decals haven’t arrived to them yet from Cartograf. Nevertheless Paul was kind enough to send the resin of the Guppy conversion my way so that I could get started. Initial dry fitting of major parts and the Trumpeter inner wings show near perfect fit. The massive Guppy radome is cast in two pieces to save weight and has “walls” fitting into the oil cooler recess of the trumpy lower wing to aid alignment. I trimmed the back end of these with sprue cutters to get perfect fit. The AD-5 will go in the fluorescent red scheme from Fisher’s decal sheet, but I will be fully arming it with two Tiny Tim rockets and a bunch of HVARs on the outer pylons. Maybe not technically accurate for the trainer scheme but there are photos of operational aircraft with that loadout and it looks too cool to pass on. Undecided on which Guppy scheme yet... This is going to be a fun project!!!
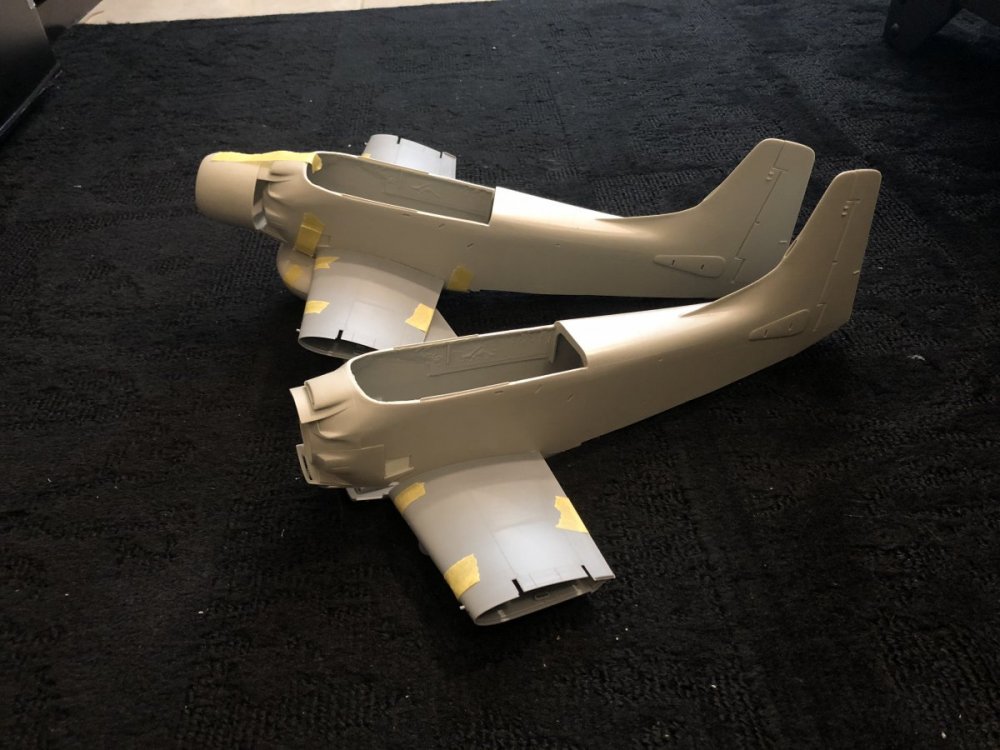
-
New from Sierra Hotel Models in 1/32 Scale... A-6A/E Intruder Exhausts:
-
since shipping parts half way ´round the globe for casting takes alot of time, i have put my corsair build for this GB on hold. unlikely i will be able to finish it on time. keeping with the Korean theme i have decided to take a shot at this: 02 by karl holubar, auf Flickr (posted under fair use) that being said, i have not been able to locate a pic of the real jet. it is supposed to be the counterpart of the famous "blue tail fly" (a panther made out of two battle damaged planes with the front part natural aluminum and the rear part blue). the "vice-versa" called plane was also made out of two wreks, only blue in front and silver in back. anyone know a pic? i have bought the fisher kit from a member on here and coudnt wait to start it. i have spent some time removing the (minimum) flash and am intrigued by the construction of the one-piece fuselage and wing parts 01 by karl holubar, auf Flickr
- 36 replies
-
- 12
-
-
Hello guys, I took these photos of a former VNAF Skyraider on display in Saigon. Incidentally the propeller blades on this plane are mounted backwards (back to front). Should they be mounted properly, I wouldn't have noticed this curious detail: a small angled 'ledge' running lengthwise on the trailing edge of the blade. Now that I know it's there, I can see it on several other Skyraider photos although it's hard to notice since the 'ledge' is located on the back of the propeller. Can you A-1 experts shed some light on this curious detail? Thank you Quang
-
This set gives the modeler a one piece resin cowl that improves the fidelity of the engraved details. Details that unfortunately are lost in the injection molding operation of kit production, and appear soft or faded out. No need to rescribe or loose detail during building. Easy one cut per fuselage half, along a natural panel line. Has locators to align perfectly. https://www.ebay.com/itm/302649852463?ssPageName=STRK:MESELX:IT&_trksid=p3984.m1558.l2649
-
So I picked up the Belcher Bits resin conversion for the Hasegawa F-5E to F-5A. It's got a pretty hefty fuselage in it. I've washed the parts and can't seem to get rid of the oily, glossy looking finish, on one side. I've tried to show this in the attached picture. The shine on the right side isn't the light, it's the resin. I used dawn dh sopa in warm water to wash them. I also tried sanding on one section of it to see if it was the surface finish. When I do that it gets dull but within an hour it is back to an oily look. has anyone run up against something similar and have a solution? Thanks in advance for the help!
-
Hi All, Here's my recently finished Avia B-135 from Planet Models, a resin kit, 1/48th scale, very easy to build. Yes, that's the one that probably took part in a B-24 kill on March 30th, 1944 over Sofia, Bulgaria. Hope you like it, best regards Hubert
- 9 replies
-
- 7
-
-
- Resin
- Plantet Models
- (and 2 more)
-
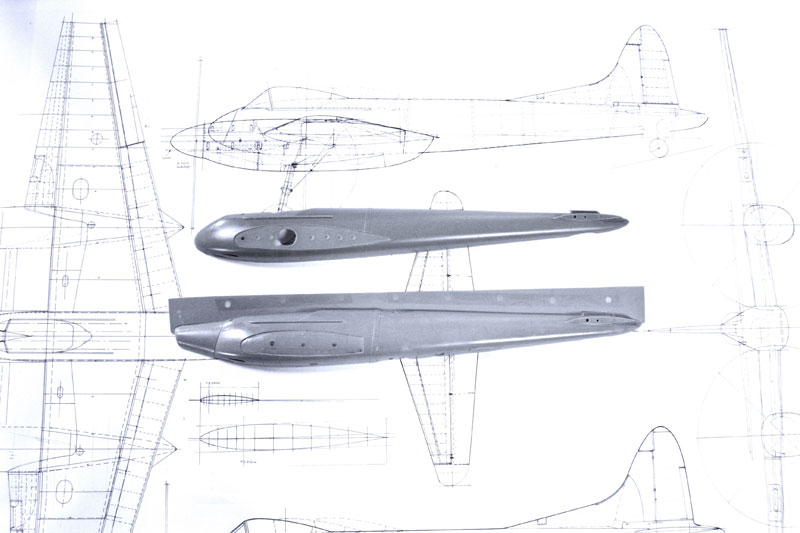
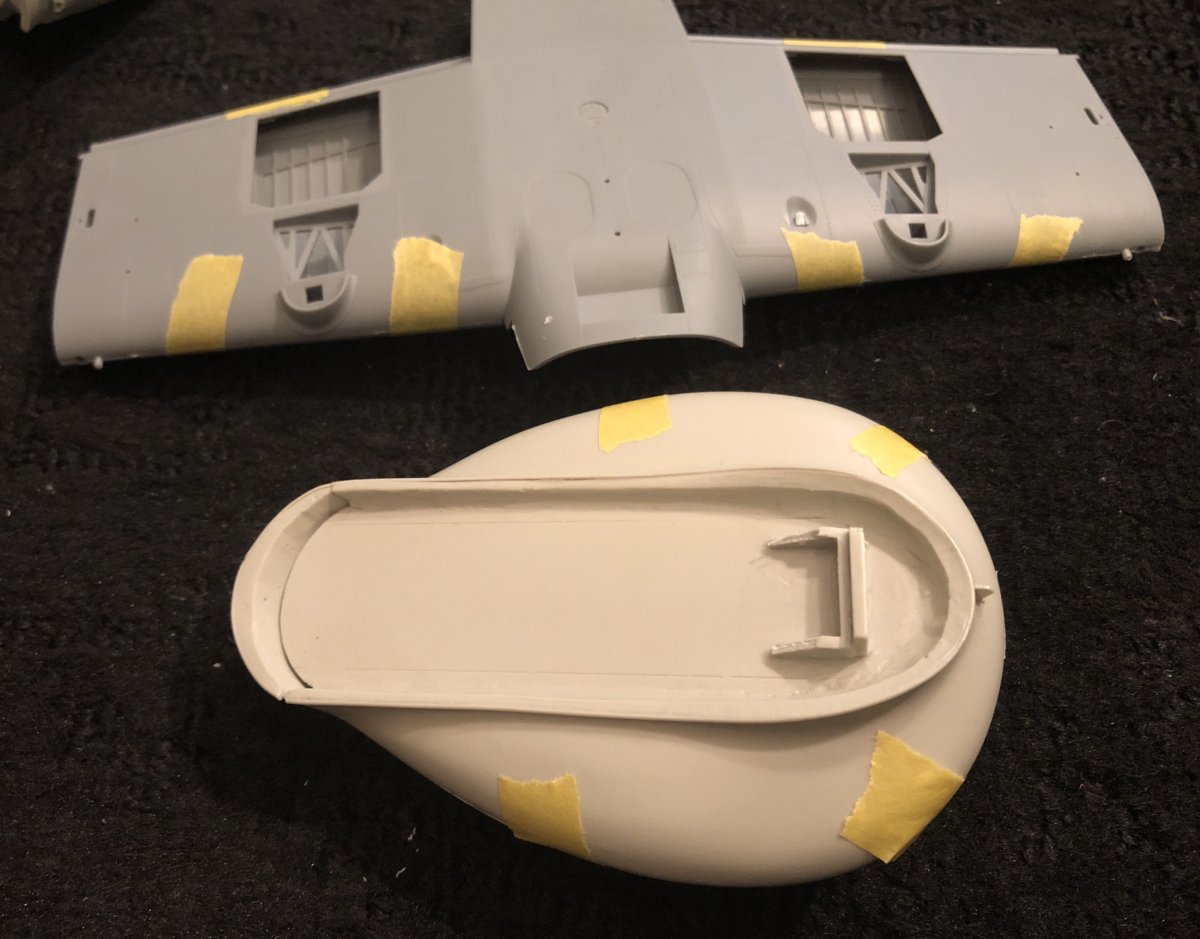
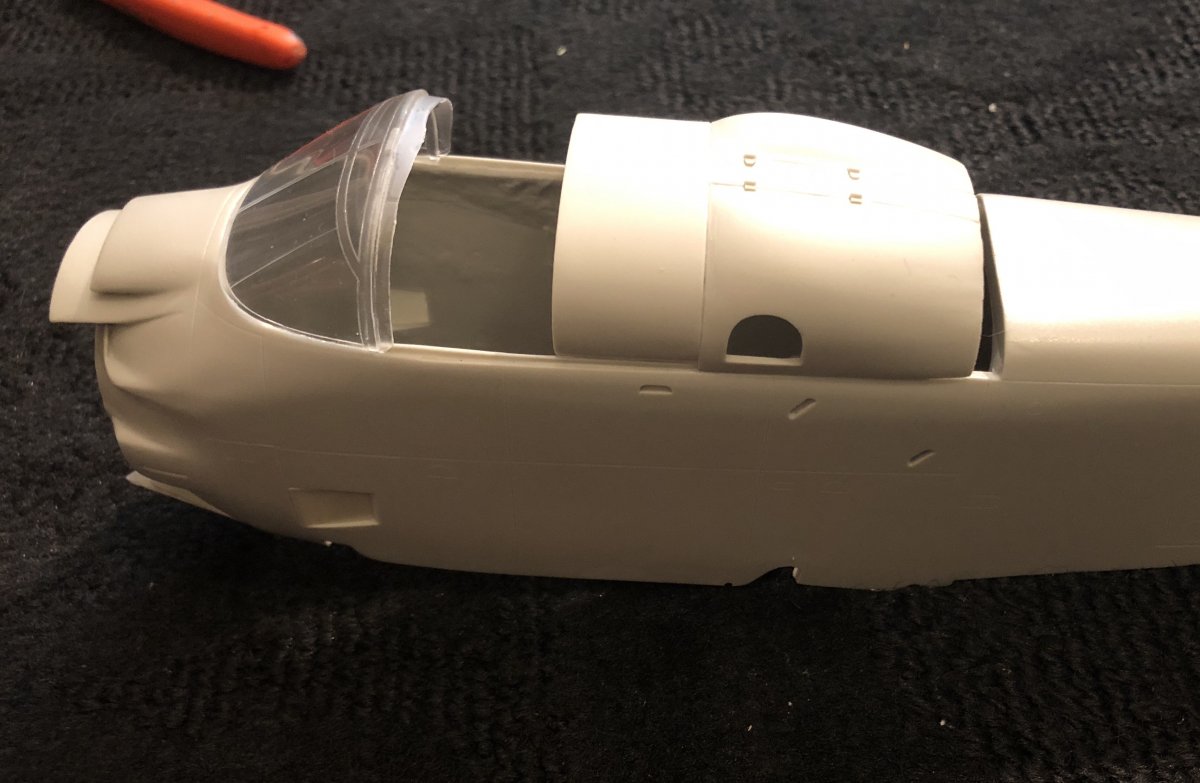
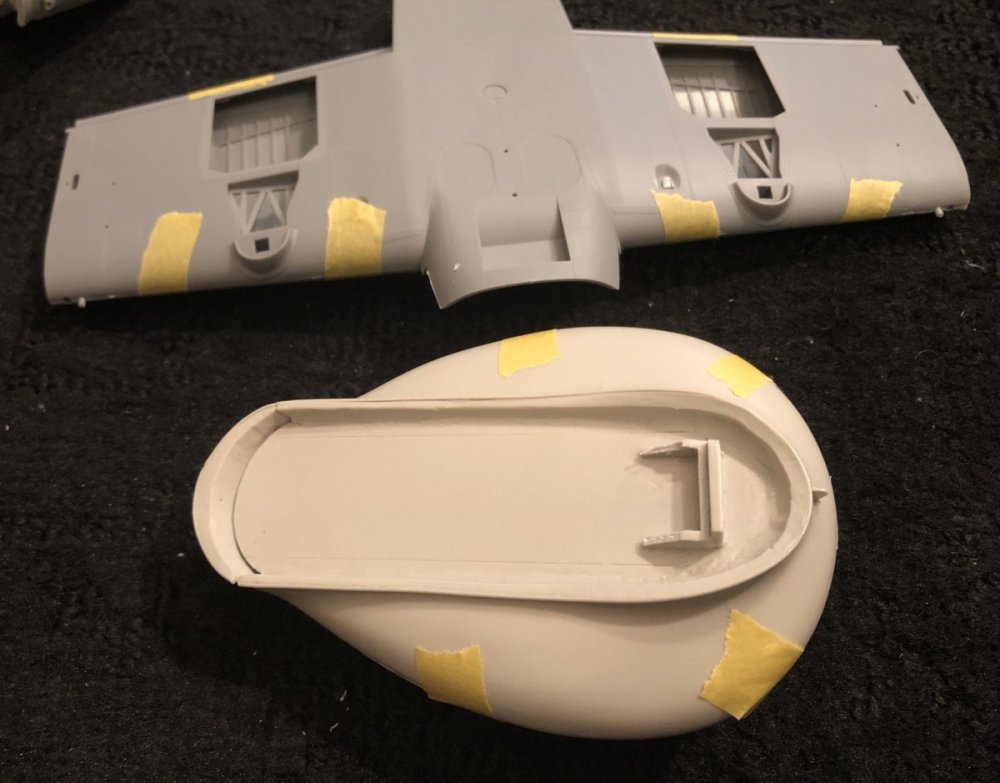
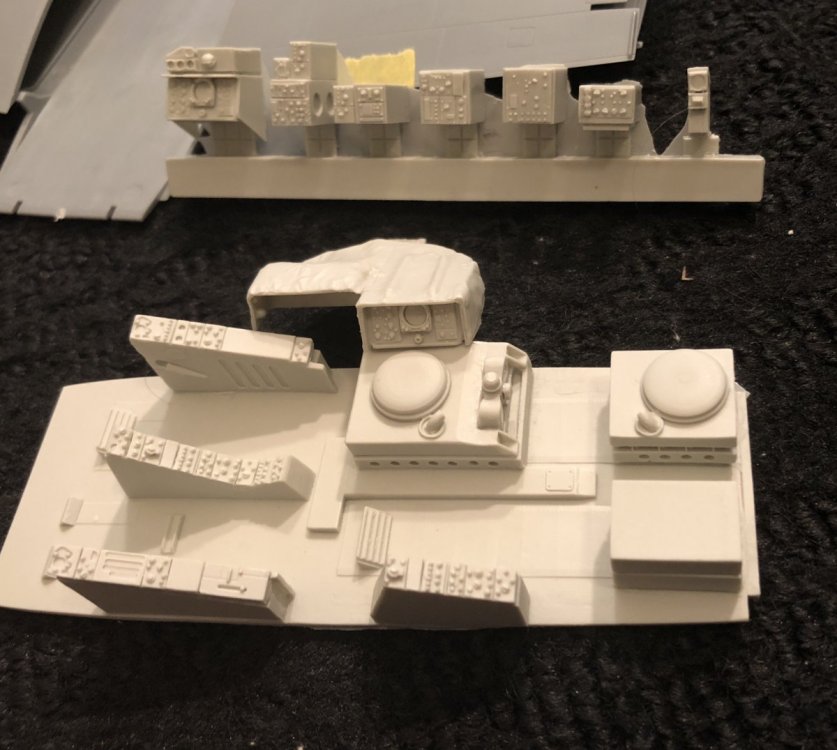
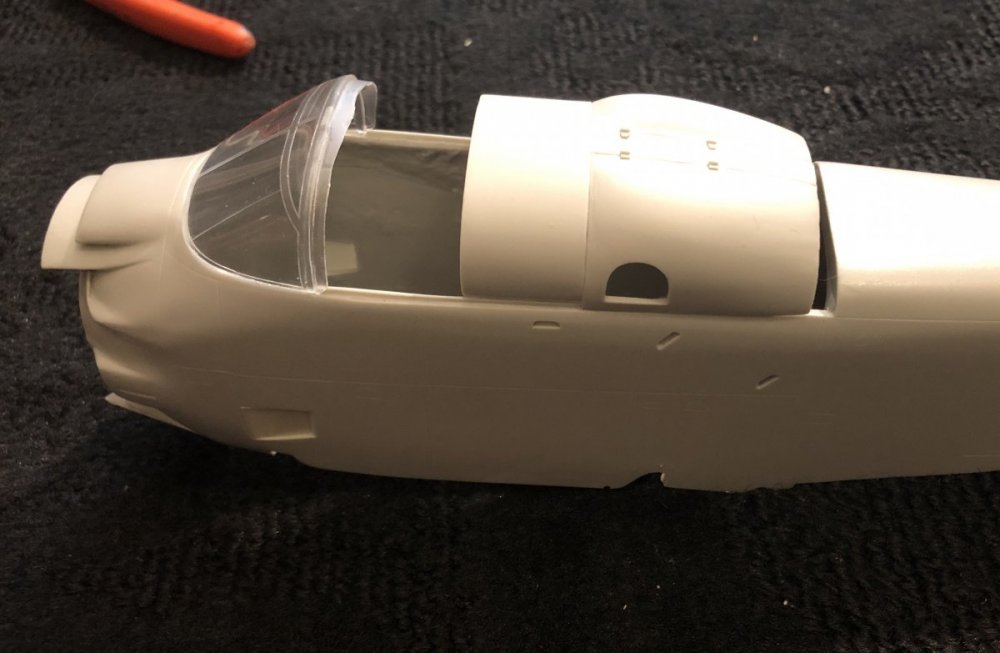
I had a bunch of different subjects that I could pick from to join this GB with. I have a Tamiya F-15E I started 20 years ago that currently seems to be a table... Another choice was the F-4G I started right around when I joined LSP. In the end, I decided on my first resin 1/32 kit, the Planet Models XF5U. There are a couple great builds of this kit on here from Brian and Eric and I used them as a reference in what I've done so far. I think I'm past the hard part of joining the fuselage halves together but left off there. The plan is to arm it and add some nose art which I think LSP Kevin will enjoy. Carl
- 77 replies
-
- 5
-
-
- Flying Pancake
- XF5U
- (and 2 more)
-
Hi everybody. I've a very interesting pics of a He-111p that's been downed. In the most part the wings are off and the engines sitting by the side. I really fancy having a go at creating the scene as it wont be a quarter of the size of the complete plane and I think would make an interesting dio. So my longwinded way of getting to my question is are there any am engines I could use? Research seems to point to Daimler Benz DB601A-1 but I cant find these. CMK do a DM601A and still available and Eduard did also (for the 109E's)but now discontinued. Are these suitable or are there any others I've overlooked? I've got all the cmk am with fuel cells, undercarriage and cockpit as well as Eduard etch sets and HGW belts and of course the Revell 1/32 He 11P!
-
 I was thinking of mixing some milliput(or similar epoxy putty), rolling it out into long thin strips, then laying these strips over the contact areas on resin kits. Instead of using CA or mixed liquid epoxy, use the milliput to bond the fuselage together. Basically sandwiching a very thin layer of milliput between the parts, then trimming off the excess before curing. Hopefully filling some gaps along the way. Anyone ever tried this? Any thoughts on pros and cons? Experienced milliputers... any suggestions? Thanks in advance! James B
 -
Finally it's done ! I've started it more than one year ago, but most of the time it stayed on my bench half built and untouched. I restarted it a few weeks ago, and was very happy to meet this model again. It was a pleasure to build for a resin kit, with a very good fit and a very few issue (maybe the only issues were my fault). The painting was not easy though, as i had to cut masks for everything, and the yellow wings also ask for a lot of masking. Yellow is definitely not an easy color to paint. It is almost translucent, and even the tiniest bit of dust is visible. The olive drab color is a mix with british dark earth and US olive drab, to get something a bit khaki. The white is also a mix to get something more creamy, and the yellow as well (pure yellow + a bit of orange). Of course it's straight of the box, except a few things, like the antennas, and of course the rigging. This aircraft is not the easiest to rig, especially just in front of the cockpit, as there is a very few space between the upperwing and the engine cowling. It's a bit like building a boat model in a bottle. The control cables are EZ line, the structure rigging is Prym flat elastic wire and the antennas are Uschi elastic wire. The turnbuckles are basically brass microtube cut to lenght, and they are not present everywhere as some rigging points were inside of the fuselage. Now i can jump on the next build to be finished, and i think it will be another Curtiss bird, as i have a P-36A about 75% build. Here is a link to the WIP thread : http://forum.largescaleplanes.com/index.php?showtopic=54237
- 30 replies
-
- 11
-