
ChuckD
-
Posts
914 -
Joined
-
Last visited
-
Days Won
9
Reputation Activity
-

 ChuckD got a reaction from Greg W in A Birdcage in Turtle Bay - An F4U-1 Diorama
Hi, all. After cleansing my palate and clearing a few lingerers from the shelf of doom, I'm back with another fairly large project... and no, it's not another big twin.
If you've seen many of my posts over the last few years, I like to recreate historical photographs to the best of my ability. With this project, I'm going to try something a little more ambitious to include some figures and at least some basic groundwork. Inspired by @Effik's awesome F4U-1 build, I decided to crack open the box and get going on a project that's been simmering for a while.
I want to recreate this photo...
... from this series of photos taken at Turtle Bay in Espiritu Santo in July 1943.
I wanted to do this one for a couple reasons. First, I've never done a model with the red surround on the national insignia. I understand why it had a fairly short service history, but I always thought it was visually very striking. I've seen some modelers portray this airplane with light blue surrounds, but if this photo series was, in fact, taken in July of 1943 (and that seems to be the consistent theme), it sits smack-dab in the middle of the ~6 week period when red surrounds would have been used.
Second, the sand and coral dust blown back along the fuselage is fascinating and should prove challenging to recreate. There are a few other interesting observations as well: the top cowl flaps are fixed closed and there's an odd patch of discoloration just forward of the cockpit that doesn't look like the usual fuel staining found there. Wondering what color that might have been. Also, a film crew is visible to the right in the 3rd photo; I'm not sure what was going on that day, but this a/c and pilot seem to be the subject of some interest.
That said, I've got what I have on hand organized and ready to go:
I've also got a few things on order that will enhance the build, though I'm not going for all-out perfection and nth degree super detailing. My goal with this project is to recreate the vibe and the feeling of the photo, not correct an out of place rivet or obsess over the perfect shade of salmon pink primer.
In the mail are:
- Barracudacast plain tread wheels
- Anyz canopy frame
- Quinta studio cockpit interior
- Black dog resin figure for the pilot
I've also got a set of cockpit placards from Airscale to gussy the interior up a bit if there are places the Quinta set is lacking. I'm going to have to sculpt the ground crew standing on the wing, so that ought to prove interesting, but that's future me's problem. As the Quinta set won't be here for a few days, and I don't want to just sit idle, I'm going to get started on the engine and maybe the wing sections first.
More to come!
-

 ChuckD got a reaction from Bill Cross in Col. Gregory "Pappy" Boyington
Back in my 20s, I got the opportunity to see a panel presentation put on by the Yankee Air Museum. The panel consisted of Chuck Yeager, Bud Anderson, and Gunther Rall. I later got to meet and shake hands with Anderson and Rall, but Yeager was charging so much for the privilege of coming near him, it put me off. Mr. Rall signed a copy of his book for me. It was loud and his hearing wasn't great, so I now have a copy of his book with an inscription from him that starts, "To Jeff..."
(Spoiler alert: My name isn't Jeff.)
-
 ChuckD got a reaction from chukw in Cry (HKM A-20G) Havoc and let the fly the decals of (miniature) war(planes)!
Chipping is done. Ended up using a brush exclusively as my silver pencil is a different color from the sponge chipping.
Again, shooting for a subtler chipping result than some of my previous efforts.
-
ChuckD got a reaction from chukw in Cry (HKM A-20G) Havoc and let the fly the decals of (miniature) war(planes)!
And now back to our regularly scheduled program.
I actually had to replace the squadron insignia as well. I masked it with a highly de-tacked piece of vinyl mask, and it still peeled off in places. So, off it went too, and now we are back to square two, as it were. The s/n stencil has been corrected and reapplied as well.
I also decided to start chipping. This is the first round with the sponge method. Next, I'll use a brush or silver pencil (likely both) and do some more deliberate hand chipping. None of the reference pics show heavy chipping, so I'll keep it to a subtle minimum.
-
 ChuckD got a reaction from nmayhew in A Birdcage in Turtle Bay - An F4U-1 Diorama
Thanks for sharing. If you think of the name of Bruce Campbell's book, let me know. I'd like to learn more. It is my impression too that, with the shoestring nature of the campaigns in the SW Pac, the pilots often flew whatever ship was available. Certainly some guys had assigned or "owned" planes, but my impression is that was the exception, rather than the rule.
Well, let's talk about that. Obviously, the colorized photo shows it in the early 2-tone scheme. The profile for it in Michael Claringbould's Pacific Profiles book also shows it as a 2-tone bird. My thought process was that, being an early ship in a training squadron, it was probably rotated to the training role once it was so weary as to not be useful in frontline service. Thus, it would likely still be in its original 2-tone camo scheme. However, in looking at the photos, I can definitely seen an argument that it is a 3-tone scheme with straight camo lines running along the longitudinal axis of the a/c with the demarcation between the dark blue and medium blue along the upper edge of the bar in the insignia.
What's the consensus here?
Upon further research it appears there likely will be no consensus. Many forum posts here and elsewhere with @Dana Bell's input lead me to believe this would be the 3 tone camo.
-
 ChuckD reacted to Effik in B-24D Lemon drop
WIth the dawn of next year i decided to crack on the another assembly ship.
And i decided to go with the Lemon drop.
Again we have our usual suspect in this scale. B-24D from hobby boss with all its flaws I will mend some of them with aftermarket solution.
For this build i will use HAD models decal set. Quickboos resin propellers, Eduard resin wheels, Interior and seat belt PE set. And Montex mask set.
Stay tuned for the updates.
-

-
-
ChuckD reacted to Kaeone57 in A Birdcage in Turtle Bay - An F4U-1 Diorama
Niiiiceee!!!! Hopefully in your rendering, she'll be a 3 toned as supposed to be but, do as you wish!!
-
ChuckD reacted to ARay87 in A Birdcage in Turtle Bay - An F4U-1 Diorama
Lt. Ray is (was) a direct relative of mine. I did a significant amount of research on him a couple years ago. If I recall, in one of Bruce Gamble's books he mentioned the picture is usually cited as another pilot, but that it is actually Virgil. I'll see if I can dig up the source for you. That said, the website I linked earlier has a close up of a pilot in the cockpit of the bird in question, and it sure looks like Virgil to me.
However, per my understanding, the Marine aviators in this campaign did not have assigned planes, and simply flew whatever was working. I completed my first model in 15-20 years as a gift for my father, of a different Birdcage Corsair that Virgil is pictured with on Espiritu Santo during his last tour.
-
ChuckD reacted to Dana Bell in A Birdcage in Turtle Bay - An F4U-1 Diorama
Hi Chuck,
The aircraft is definitely wearing the 3- (or 4-) toned camouflage. If you've seen my Birdcage Corsair book, the pattern is the scheme at the top of page 37.
Beautiful job on the model!
Cheers,
Dana
-
ChuckD reacted to jep1210 in A Birdcage in Turtle Bay - An F4U-1 Diorama
Man, this is turning out great.
-
ChuckD reacted to tomg in A Birdcage in Turtle Bay - An F4U-1 Diorama
Great work so far!! Gonna be nice and dirty.
FYI - I hope Spencer got his cake
-
ChuckD reacted to dennismcc in A Birdcage in Turtle Bay - An F4U-1 Diorama
Getting better and better
Cheers
Dennis
-
 ChuckD got a reaction from TAG in Col. Gregory "Pappy" Boyington
Back in my 20s, I got the opportunity to see a panel presentation put on by the Yankee Air Museum. The panel consisted of Chuck Yeager, Bud Anderson, and Gunther Rall. I later got to meet and shake hands with Anderson and Rall, but Yeager was charging so much for the privilege of coming near him, it put me off. Mr. Rall signed a copy of his book for me. It was loud and his hearing wasn't great, so I now have a copy of his book with an inscription from him that starts, "To Jeff..."
(Spoiler alert: My name isn't Jeff.)
-
 ChuckD got a reaction from Rocat in A Birdcage in Turtle Bay - An F4U-1 Diorama
So, it's apparently time for me to buy a lottery ticket.
No sooner had I stuck a piece of tape over the Quinta IP, than this happened.
I was trying to mix up a lighter color of green to use for dry brushing when I squeezed my ancient Vallejo white juuuuust a bit too hard. Man I got lucky; not an errant speck on the unmasked areas.
Anyway, after recovering from that, I went on to finish the cockpit today. The interior is lightly chipped via the sponge method, then dirtied up a bit with oils and enamels. The results of the Quinta set and painted wires are really nice.
Where the tail wheel would toss up debris and dirt, I splashed dark enamel washes along with some lighter mud tones using the speckling method.
Again, the speckling is not nearly as pronounced to the naked eye. If I had more brain power, I'd get really good with model photography but I only have so much bandwidth and I already spend enough of my days in front of a computer anyway. So, I'll live with my phone doing it's consumer-friendly best and over-emphasizing the speckling.
The results of the wiring below the IP are pretty solid and I'm happy with them. They can't be seen much when it's all together, but it still adds quite a bit of visual interest.
And, with that it was time to close up the fuse! This is always a fun milestone of any airplane build. Don't tell anyone, but it's starting to look like a Corsair already.
The roundish body of the corsair swallows most of the detail I spent yesterday building. :/
And that's it for now. I'm back to work tomorrow, so I suspect updates will slow down quite a bit, but the next steps are to add the firewall, exhausts and engine. Then it'll be on to the tail wheel assembly and the wings!
-
 ChuckD got a reaction from JerseyChris in Cry (HKM A-20G) Havoc and let the fly the decals of (miniature) war(planes)!
Hi, guys. It's been a little bit, but I've been far from idle. I just tend not to get too bogged down with photos of the various phases of interior painting... priming, base coating, detail, chipping, decals, filters, washes, dirt, etc.
So, here we go.
The Quickboost B-17 .50 barrel set came in. As you can see, the difference between the kit barrel and the QB barrel are night and day.
Borrowing from @leoasman, I thinned the back of the IP, drilled out the dial faces, put the decals on a cardstock backing piece and glued that to the back of the IP. Worked like a champ and I'm glad they posted their methods. Anyway, for spraying the flat coat, I masked the IP with silly putty. The decals are a mix of kit decals and some from an Aeroscale generic cockpit placard set that I had. The yellow framing around the six pack is just super thin tamiya tape strips.
The final product after pulling the putty.
A few shots of the interior at the end of the finish work. The MRP zinc chromate is a bit bright yellow, so I toned it down with oil washes, enamels, and speckling. In photos the speckling looks overdone, but in 1:1 scale, they're much more subtle and go a long way towards breaking up walls of color.
Again, Aeroscale decals.
Chipping was done with the sponge technique using Vallejo Model Air silver.
The cockpit roughed in.
The nose wheel well with lots of dirt and mud splashes.
The bomb bay deconstructed (and sans the actual bomb racks).
More Aeroscale decals. Before this gets buttoned up, I'll add a gunsight reflector from clear film.
Ye olde bombe racks. I went with natural finish for a little visual interest.
The upper deck above the bomb bay. Nothing aft of the three small radios is remotely visible, so I didn't do much painting here. If you wanted to add a bunch of details, it's a pretty awesome blank canvas.
The luggage rack.
Nose gear and rear ammo can.
The QB barrel installed (some more detail painting was done later as shown). The MGs are the weakest parts of the kit. If you're really concerned about the soft detail here, the Gaspatch M2 is going to be the way to go.
Ye olde bombes for said racks.
Assembling the nose well.
The bomb bay is assembled. Very little of the sides walls can be seen.
Dry fitting the turret while the glue on the bulkheads dries.
The cockpit assembled. One last shot before it's closed up and lost forever.
A quick shot to give an idea of how much is going to be visible once the canopy is put in place. Short answer is: Not much.
The turret.
Bomb bay after assembly.
Not much can be seen here. Fortunately, the part that can be seen is the QB barrel.
A milestone! The fuse went together pretty well. The little section between the nose and bomb bay is still the gap that requires the most physical strength to shore up. A lot of liquid superglue was the remedy for getting it to stick together. The plate that forms the base of the vertical stab fits reasonably well, though there's a gap on the left root. Nothing too bad though. The shot below is dry fit and the cemented gap is much smaller.
Next it's building the nose and tail feathers, then on to the engines. More to come!
-
ChuckD got a reaction from JerseyChris in Cry (HKM A-20G) Havoc and let the fly the decals of (miniature) war(planes)!
Hello, and welcome back!
Happy to report that there has been significant progress since the last update. I am super happy with this kit so far. I desperately hoping I'm not jinxing things, but so far, it's going together with Tamiya-like quality. The only issues I've encountered so far have more or less been of my own doing. My only complaints - very minor though they are - are that sometimes the instructions are so small, it's hard to see how parts go together. Again, very small complaint (pun fully intended).
After completing the nose gear, you move on to the nose gear well. I've only glued a few pieces together here.
Again, dry fit. This, however, allowed me to glue the supporting strut on the nose gear now that I was able to fully establish the proper angle.
Once the nose gear bay is done, the instructions have you install the cockpit section on top of it. I held off for now to ease painting. After that, you move on to the upper turret. This went together nicely and without any major surprises.
I did find that when I tried to install the turret glass, it wouldn't fit. With the forward portion positioned properly, there was interference that precented the rear portion from dropping onto the turret ring.
Sanding the two frame arms here and a little on the front of the turret ring allowed the glass to pop into place perfectly.
Perfection.
The rest of the turret went together flawlessly. Instructions have you install the gun barrels at the end of the turret build. This is, so far, the one place I can say I'm disappointed with the kit. HKM has had a history of underwhelming detail on their MG barrels and this kit is no exception as you'll see later. Suffice to say, I placed an order from Sprue Brothers today for the Quickboos B-17 .50 cal barrel kit.
Once the turret is done, you move on to building the bombs and racks. The PE here is nice and in the pics below the bombs are dry fit to the racks. Again, everything went together very very nicely.
From there, you move on to the bomb bay. The build itself is straight forward, but getting the left and right halves together is very challenging due to the number of attachment points.
My recommendation here is to fit all the parts onto one side piece, fit an end piece, fit the other side piece (aligning all the locating pins carefully), then doing the other end and top piece.
Once you get everything lined up, it more or less snaps into place.
With the bombs in place.
This is always a fun part of any a/c build - cutting the fuse halves off and getting them around.
As some reviews have noted, there are a decent number of ejector pins throughout. This is to be expected for pieces this big and for those of you triggered by EP marks, you may want to skip this thread for a while. I'm not going to address most of these as they'll be completely invisible once the final assembly is done. I included these photos for those of you who will address them and want to be prepared for what you'll be up against.
Most of the pin marks up front are obscured or covered by other parts, as you'll see.
On to the build... The cockpit is nicely detailed and the fit is flawless. Pretty much everything has a unique pin or recess that marks its location.
After completing the sidewall build, you move onto the rear fuselage. Instructions aren't super clear on where to install the framing for the turret (the holed piece in the top left of this photo), so I ended up installing it incorrectly. There are also three ejector pins that interfere with the fit of the sidewall piece, so I scraped them off and...
... viola! The sidewall piece is now installed correctly. And here, I've fixed the turret framing. Make sure it sits directly on top of the three vertical ribs as shown below.
With the right fuse done, we move onto the left. Some of the instructional drawings could use a revision as - at 1:1 scale - some of the lines overlap to the point of being very unclear. Just for the record H70 goes in the middle slot, H67 goes on the outboard slot.
Here's the left side of the fuse fully detailed and with included nose weight installed.
Moving onto the rear fuse, you repeat the turret framing and the and the lower side pieces. You add a few bulkheads and ancillary bits, then you're pretty much done. Most everything here is dry fit to aid in painting.
The last step before gluing the two fuse halves together is to build the lower gun. Again, this is one place where HKM is a bit underwhelming. You can see here the .50 for the belly and its barrel. If you're super concerned about details here, you might want to look into an aftermarket .50 and barrel. This will likely be invisible once the kit is fully realized, so I will settle for replacing the barrel with the QB set I ordered. But yeah... not HKM's finest work.
That said, the main fuse is complete and will be moved to the paint booth. I've pointed out a few week spots and negative points here and there, but I can't stress how nice this build has been so far. Everything fits cleanly and with a solid, positive, nearly click-together fit. The typical problem areas like wing roots, fuse halves, and cowlings are still on the horizon, so I'll reserve final judgment until I tackle those areas, but I'm cautiously optimistic.
Bottom line, if you're on the fence about this kit, just snag one. It's pretty phenomenal.
-
ChuckD got a reaction from JerseyChris in Cry (HKM A-20G) Havoc and let the fly the decals of (miniature) war(planes)!
Hi, everyone! Because I just can't stop building big twins for which I have precisely zero room, it's time to add the HKM A-20G Havoc to the display shelf! My SprueBrothers pre-order just arrived today (sans the promised mask set, which SB is already fixing) after several months' waiting. To say I'm excited for this kit is an understatement. I have a soft spot for SW Pacific gunships and when I heard that HKM was doing an A-20G, I vowed that it would be a bench clearer... and here we are.
My aim for this is to build the kit out of the box with the exception of the paint scheme and markings which will likely be custom done via my mask cutter. I will be doing something from the SW Pacific, but exactly what is yet to be decided. My super awesome wife bought me the Pacific Profiles A-20 volume for Father's day, so that should be here soon and will help me decide which aircraft I want to model.
I'm going to try to document pretty much every step as I go along so that those who follow in my footsteps may learn from my (admittedly often self-induced) mistakes.
Here's the box. Everything is nicely packed and arrived unharmed. Note the nose weights in the small bag stapled to the inner box (far left, just barely visible).
I like the way HKM seals their bags. The adhesive strip on a flap makes it easy to get at the sprues without having to cut everything out.
Everything is out, organized and ready to go. I'm not going to dive into detail on the sprue layout or molding quality as that's been covered in quite a few places in the run up to release.
Steps 1 and 2 have you build the cockpit. Here is the factory seat and PE seatbelt. The PE is nice and thin and, after annealing, sat nicely. Note that I think the lap belts are illustrated backwards in the instruction manual. I believe I have them placed correctly here with the square tip across the seat and the triangular anchor at the side of the seat. The instructions are a little small for the seatbelt PE, so take your time and test fit. It's not overly complex like an HGW set, so it's fairly straight forward, but for some reason, the way the instructions were laid out for the PE was hard for my brain to visualize.
Basic dry fit. I tend not to glue bulkheads together until I can see how they slot into the fuselage halves. Nothing like getting all the way through an interior build just to find that you glued them together incorrectly and now the interior parts don't fit into the attachment points of the fuselage.
The armor plate aft of the pilot. This part contained the only ejector pin marks that I've thus far felt compelled to cleanup. Ejector marks don't bother me too much if they're in an area that won't be seen after construction, so I don't bother cleaning them up. There are a few on the aft bulkhead behind the seat, but they'll be invisible, so there they shall stay.
And the doodads and whatsits behind the pilot's rear bulkhead.
Step three has you move on to the nose landing gear. It goes together well without any major fuss, though the fit of part H54 (the little knob sticking up off the side of the strut isn't super well illustrated in the instructions.
You can see it more clearly in these shots. On H54, there is a small cutout for a corresponding knob on the gear strut which wasn't obvious in the instructions until I got out my magnifying glass. Here you can see it in the proper position.
The nose landing gear fully assembled (but mostly dry fit).
The nose tire has very nice molding detail for the treads and sidewalls. The hub is keyed to the yoke so that the tire's flat spot (presumably) sits right where it'll need to. You can just see the flat spot on the bottom of the "axle" which provides the key in the photo below.
Here we have the instrument panel. A decal is provided for the instruments, so we'll see how that turns out. I've had mixed luck with decals over IPs in the past. If I were patient (I'm not), I would have waited on building this kit till I could get the aftermarket IP that... someone... (I forget) is coming out with soon. Outside of that, the molded detail is very nice and crisp and should paint up splendidly. I've left everything dry fit here so just in case the decal IP goes to hell in a handbasket, I can replace with aftermarket as necessary.
This pic also shows some of the detail molded onto the back of the seat... which will absolutely never be seen once the cockpit is together.
That's it for tonight. I'm pretty jazzed on this one, so I intend to move pretty quickly on it. Be sure to follow along!
-
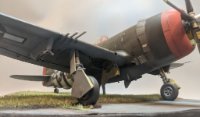
 ChuckD got a reaction from Brett M in A Birdcage in Turtle Bay - An F4U-1 Diorama
So, it's apparently time for me to buy a lottery ticket.
No sooner had I stuck a piece of tape over the Quinta IP, than this happened.
I was trying to mix up a lighter color of green to use for dry brushing when I squeezed my ancient Vallejo white juuuuust a bit too hard. Man I got lucky; not an errant speck on the unmasked areas.
Anyway, after recovering from that, I went on to finish the cockpit today. The interior is lightly chipped via the sponge method, then dirtied up a bit with oils and enamels. The results of the Quinta set and painted wires are really nice.
Where the tail wheel would toss up debris and dirt, I splashed dark enamel washes along with some lighter mud tones using the speckling method.
Again, the speckling is not nearly as pronounced to the naked eye. If I had more brain power, I'd get really good with model photography but I only have so much bandwidth and I already spend enough of my days in front of a computer anyway. So, I'll live with my phone doing it's consumer-friendly best and over-emphasizing the speckling.
The results of the wiring below the IP are pretty solid and I'm happy with them. They can't be seen much when it's all together, but it still adds quite a bit of visual interest.
And, with that it was time to close up the fuse! This is always a fun milestone of any airplane build. Don't tell anyone, but it's starting to look like a Corsair already.
The roundish body of the corsair swallows most of the detail I spent yesterday building. :/
And that's it for now. I'm back to work tomorrow, so I suspect updates will slow down quite a bit, but the next steps are to add the firewall, exhausts and engine. Then it'll be on to the tail wheel assembly and the wings!
-
 ChuckD got a reaction from BiggTim in Col. Gregory "Pappy" Boyington
Back in my 20s, I got the opportunity to see a panel presentation put on by the Yankee Air Museum. The panel consisted of Chuck Yeager, Bud Anderson, and Gunther Rall. I later got to meet and shake hands with Anderson and Rall, but Yeager was charging so much for the privilege of coming near him, it put me off. Mr. Rall signed a copy of his book for me. It was loud and his hearing wasn't great, so I now have a copy of his book with an inscription from him that starts, "To Jeff..."
(Spoiler alert: My name isn't Jeff.)
-
 ChuckD got a reaction from Uncarina in Col. Gregory "Pappy" Boyington
Back in my 20s, I got the opportunity to see a panel presentation put on by the Yankee Air Museum. The panel consisted of Chuck Yeager, Bud Anderson, and Gunther Rall. I later got to meet and shake hands with Anderson and Rall, but Yeager was charging so much for the privilege of coming near him, it put me off. Mr. Rall signed a copy of his book for me. It was loud and his hearing wasn't great, so I now have a copy of his book with an inscription from him that starts, "To Jeff..."
(Spoiler alert: My name isn't Jeff.)
-
 ChuckD got a reaction from Shoggz in Col. Gregory "Pappy" Boyington
Back in my 20s, I got the opportunity to see a panel presentation put on by the Yankee Air Museum. The panel consisted of Chuck Yeager, Bud Anderson, and Gunther Rall. I later got to meet and shake hands with Anderson and Rall, but Yeager was charging so much for the privilege of coming near him, it put me off. Mr. Rall signed a copy of his book for me. It was loud and his hearing wasn't great, so I now have a copy of his book with an inscription from him that starts, "To Jeff..."
(Spoiler alert: My name isn't Jeff.)
-
 ChuckD got a reaction from Furie in Col. Gregory "Pappy" Boyington
Back in my 20s, I got the opportunity to see a panel presentation put on by the Yankee Air Museum. The panel consisted of Chuck Yeager, Bud Anderson, and Gunther Rall. I later got to meet and shake hands with Anderson and Rall, but Yeager was charging so much for the privilege of coming near him, it put me off. Mr. Rall signed a copy of his book for me. It was loud and his hearing wasn't great, so I now have a copy of his book with an inscription from him that starts, "To Jeff..."
(Spoiler alert: My name isn't Jeff.)
-
 ChuckD got a reaction from coogrfan in Not For Everyone…
Revell has/had the 1:144 scale round bridge Fletcher for years. The premium edition comes with a full Pontos set of etched and turned brass. These are my end results of the premium edition kit.
https://postimg.cc/gallery/DLrdR7r