
ChuckD
-
Posts
914 -
Joined
-
Last visited
-
Days Won
9
Reputation Activity
-

 ChuckD reacted to dennismcc in A Birdcage in Turtle Bay - An F4U-1 Diorama
Fantastic work on that piping I struggle with brake lines !
Cheers
Dennis
-
ChuckD reacted to Bstarr3 in A Birdcage in Turtle Bay - An F4U-1 Diorama
Beautiful work! I wish I’d put in the effort to do plumbing on my gear bays. It always looks so good to get all that piping in there and you did a very clean job of it
-

-
ChuckD reacted to Jboldt007 in A Birdcage in Turtle Bay - An F4U-1 Diorama
super work on the cockpit - at least the corsairs had big cockpits - well, the later models anyway. One can see in them in the end at this scale. That crazy lobster colour looks spot on too. It is amazing how much controversy there is on the livery of these planes - it is hard to tell sometimes and in the pacific they got beat up really quick it seems to the point even with good photos it's hard to pin some thingws down. Bays with plumbing and wiring always get me hit and bothered- even if they are not that visible in the end - they are satisfying to 'kit bas'- thanks for posting - i'll be looking at this thread for my F4U-1A.
Like the comment on the 'sand mandala that the Buddhist monks' make and "throw out". My wife once said "why do you spend all this time on things that your daughters will one day probably send to the trash can?". To which i responded: "If by trash can you mean the Smithsonian... I take your point...".
-
 ChuckD got a reaction from Greg W in A Birdcage in Turtle Bay - An F4U-1 Diorama
Progress! wheel wells and wing roots are dine. No weathering yet, but a base coat is down.
No warranties express or implied on spelling, grammar, or diction due to wine consumption. 8|
-
 ChuckD got a reaction from Rocat in A Birdcage in Turtle Bay - An F4U-1 Diorama
Progress! wheel wells and wing roots are dine. No weathering yet, but a base coat is down.
No warranties express or implied on spelling, grammar, or diction due to wine consumption. 8|
-
 ChuckD got a reaction from Vandy 1 VX 4 in A Birdcage in Turtle Bay - An F4U-1 Diorama
Progress! wheel wells and wing roots are dine. No weathering yet, but a base coat is down.
No warranties express or implied on spelling, grammar, or diction due to wine consumption. 8|
-
ChuckD got a reaction from Greg W in A Birdcage in Turtle Bay - An F4U-1 Diorama
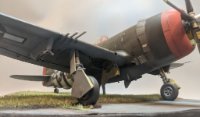
Hi, all. Back with a small update. Progress has been kinda slow this week as I've been busy with work, stuff with my kiddo, and I've been under the weather. I think for the diorama, I'm not going to attach the a/c to the base. The odds of the dio traveling outside my model room (before it makes its final trip to the dumpster after I'm cold and in the dirt) is near zero, so it shouldn't much matter if the plane and base are detachable. With that in mind, I'm taking some time to detail things on the under side of the plane that would never be seen if attached to the base.
The Corsair has quite a bit of plumbing running through the wheel wells, so I tried to simulate that here. I also opened the lightening holes on the bottom of the spar to run plumbing in there. I'm still searching for photos of the gear bay forward of the spar though. There has to be plumbing in there for the main hydraulic actuator and other sundries. So far, all the sources I've found have come up dry. I've got amazing photos of the bay aft of the spar (thank you again, @Dana Bell!), but the search continues for a good look forward of the spar.
I had to add the door actuators so that I could plumb them properly without the doors being in place. Fortunately, the doors can be added after the fact with no issue. The only downside is that, until the gear is slotted in place, they become load bearing when the assembly is placed right side up. You can already see that the actuator on the right has started to weaken.
It's amazing how helpful it is to use lead wire. It's so much more friendly to use than even soft copper or brass.
Anyway, that's it for now. Next up will be a similar treatment to the other wheel well, then assembling the main gear. On the plus side, I just learned that my new company closes down over the holidays, so I get an unexpected paid week off between the holidays! With nothing else planned, that should allow for some pretty decent progress to wind out the year.
-
 ChuckD got a reaction from Bstarr3 in A Birdcage in Turtle Bay - An F4U-1 Diorama
Progress! wheel wells and wing roots are dine. No weathering yet, but a base coat is down.
No warranties express or implied on spelling, grammar, or diction due to wine consumption. 8|
-
 ChuckD got a reaction from MikeMaben in A Birdcage in Turtle Bay - An F4U-1 Diorama
Progress! wheel wells and wing roots are dine. No weathering yet, but a base coat is down.
No warranties express or implied on spelling, grammar, or diction due to wine consumption. 8|
-
 ChuckD got a reaction from denders in A Birdcage in Turtle Bay - An F4U-1 Diorama
Progress! wheel wells and wing roots are dine. No weathering yet, but a base coat is down.
No warranties express or implied on spelling, grammar, or diction due to wine consumption. 8|
-
 ChuckD got a reaction from Grunticus in A Birdcage in Turtle Bay - An F4U-1 Diorama
Progress! wheel wells and wing roots are dine. No weathering yet, but a base coat is down.
No warranties express or implied on spelling, grammar, or diction due to wine consumption. 8|
-
 ChuckD got a reaction from Madmax in A Birdcage in Turtle Bay - An F4U-1 Diorama
Hi, all. Back with a small update. Progress has been kinda slow this week as I've been busy with work, stuff with my kiddo, and I've been under the weather. I think for the diorama, I'm not going to attach the a/c to the base. The odds of the dio traveling outside my model room (before it makes its final trip to the dumpster after I'm cold and in the dirt) is near zero, so it shouldn't much matter if the plane and base are detachable. With that in mind, I'm taking some time to detail things on the under side of the plane that would never be seen if attached to the base.
The Corsair has quite a bit of plumbing running through the wheel wells, so I tried to simulate that here. I also opened the lightening holes on the bottom of the spar to run plumbing in there. I'm still searching for photos of the gear bay forward of the spar though. There has to be plumbing in there for the main hydraulic actuator and other sundries. So far, all the sources I've found have come up dry. I've got amazing photos of the bay aft of the spar (thank you again, @Dana Bell!), but the search continues for a good look forward of the spar.
I had to add the door actuators so that I could plumb them properly without the doors being in place. Fortunately, the doors can be added after the fact with no issue. The only downside is that, until the gear is slotted in place, they become load bearing when the assembly is placed right side up. You can already see that the actuator on the right has started to weaken.
It's amazing how helpful it is to use lead wire. It's so much more friendly to use than even soft copper or brass.
Anyway, that's it for now. Next up will be a similar treatment to the other wheel well, then assembling the main gear. On the plus side, I just learned that my new company closes down over the holidays, so I get an unexpected paid week off between the holidays! With nothing else planned, that should allow for some pretty decent progress to wind out the year.
-
 ChuckD got a reaction from Brett M in A Birdcage in Turtle Bay - An F4U-1 Diorama
Progress! wheel wells and wing roots are dine. No weathering yet, but a base coat is down.
No warranties express or implied on spelling, grammar, or diction due to wine consumption. 8|
-
 ChuckD got a reaction from blackbetty in A Birdcage in Turtle Bay - An F4U-1 Diorama
Progress! wheel wells and wing roots are dine. No weathering yet, but a base coat is down.
No warranties express or implied on spelling, grammar, or diction due to wine consumption. 8|
-
 ChuckD got a reaction from Shoggz in A Birdcage in Turtle Bay - An F4U-1 Diorama
Progress! wheel wells and wing roots are dine. No weathering yet, but a base coat is down.
No warranties express or implied on spelling, grammar, or diction due to wine consumption. 8|
-
ChuckD got a reaction from Rocat in A Birdcage in Turtle Bay - An F4U-1 Diorama
Hi, all. Back with a small update. Progress has been kinda slow this week as I've been busy with work, stuff with my kiddo, and I've been under the weather. I think for the diorama, I'm not going to attach the a/c to the base. The odds of the dio traveling outside my model room (before it makes its final trip to the dumpster after I'm cold and in the dirt) is near zero, so it shouldn't much matter if the plane and base are detachable. With that in mind, I'm taking some time to detail things on the under side of the plane that would never be seen if attached to the base.
The Corsair has quite a bit of plumbing running through the wheel wells, so I tried to simulate that here. I also opened the lightening holes on the bottom of the spar to run plumbing in there. I'm still searching for photos of the gear bay forward of the spar though. There has to be plumbing in there for the main hydraulic actuator and other sundries. So far, all the sources I've found have come up dry. I've got amazing photos of the bay aft of the spar (thank you again, @Dana Bell!), but the search continues for a good look forward of the spar.
I had to add the door actuators so that I could plumb them properly without the doors being in place. Fortunately, the doors can be added after the fact with no issue. The only downside is that, until the gear is slotted in place, they become load bearing when the assembly is placed right side up. You can already see that the actuator on the right has started to weaken.
It's amazing how helpful it is to use lead wire. It's so much more friendly to use than even soft copper or brass.
Anyway, that's it for now. Next up will be a similar treatment to the other wheel well, then assembling the main gear. On the plus side, I just learned that my new company closes down over the holidays, so I get an unexpected paid week off between the holidays! With nothing else planned, that should allow for some pretty decent progress to wind out the year.
-
-
ChuckD reacted to Bstarr3 in Tamiya 1/32 Corsair "Birdcage"
This project is finally finished! Here are some finished pics.
-
 ChuckD got a reaction from coogrfan in Not For Everyone…
Revell has/had the 1:144 scale round bridge Fletcher for years. The premium edition comes with a full Pontos set of etched and turned brass. These are my end results of the premium edition kit.
https://postimg.cc/gallery/DLrdR7r
-
 ChuckD got a reaction from aircommando130 in Nichimo 1/20 Cessna 172 "Juliet" Scratchbuilt overhead console
What a cool build. I've often thought of recreating some of the chickenhawks I used to fly. Too bad this kit is so hard to find.
Back when I was flying a lot, my FBO had a C-172N on the line (N6370D) that was just beat. Inside and outside, it was scratched, dented, cracked, and torn up. But man, did that airplane ever want to fly. It'd hop off the ground in a heartbeat, fly like a dream, and landed as smooth as glass. The line guys at the FBO started calling her "the hooker with a heart of gold." She wasn't much to look at, but she really knew her trade.
-
ChuckD got a reaction from Rocat in A Birdcage in Turtle Bay - An F4U-1 Diorama
So, it's apparently time for me to buy a lottery ticket.
No sooner had I stuck a piece of tape over the Quinta IP, than this happened.
I was trying to mix up a lighter color of green to use for dry brushing when I squeezed my ancient Vallejo white juuuuust a bit too hard. Man I got lucky; not an errant speck on the unmasked areas.
Anyway, after recovering from that, I went on to finish the cockpit today. The interior is lightly chipped via the sponge method, then dirtied up a bit with oils and enamels. The results of the Quinta set and painted wires are really nice.
Where the tail wheel would toss up debris and dirt, I splashed dark enamel washes along with some lighter mud tones using the speckling method.
Again, the speckling is not nearly as pronounced to the naked eye. If I had more brain power, I'd get really good with model photography but I only have so much bandwidth and I already spend enough of my days in front of a computer anyway. So, I'll live with my phone doing it's consumer-friendly best and over-emphasizing the speckling.
The results of the wiring below the IP are pretty solid and I'm happy with them. They can't be seen much when it's all together, but it still adds quite a bit of visual interest.
And, with that it was time to close up the fuse! This is always a fun milestone of any airplane build. Don't tell anyone, but it's starting to look like a Corsair already.
The roundish body of the corsair swallows most of the detail I spent yesterday building. :/
And that's it for now. I'm back to work tomorrow, so I suspect updates will slow down quite a bit, but the next steps are to add the firewall, exhausts and engine. Then it'll be on to the tail wheel assembly and the wings!
-
ChuckD got a reaction from Rocat in A Birdcage in Turtle Bay - An F4U-1 Diorama
Thanks, Mike! I do appreciate it. Anything to provide more and clearer information to the scene is helpful!
I spent yesterday getting the engine around. I added the spark plug wiring and other assorted oil plumbing. As always, the photographs make the dirt and oil speckling look far more pronounced than it is to the naked eye. And the data plate is a close approximate from the spares bin. All in all though, despite how much the ignition wiring fought me, I'm very happy with how it turned out.
The forward cowling got a little love too.
And the two dry fit together.
The Quinta cockpit set is supposed to arrive today, so I should be able to get moving on the build proper today or tomorrow.
-
 ChuckD got a reaction from John1 in Nichimo 1/20 Cessna 172 "Juliet" Scratchbuilt overhead console
What a cool build. I've often thought of recreating some of the chickenhawks I used to fly. Too bad this kit is so hard to find.
Back when I was flying a lot, my FBO had a C-172N on the line (N6370D) that was just beat. Inside and outside, it was scratched, dented, cracked, and torn up. But man, did that airplane ever want to fly. It'd hop off the ground in a heartbeat, fly like a dream, and landed as smooth as glass. The line guys at the FBO started calling her "the hooker with a heart of gold." She wasn't much to look at, but she really knew her trade.
-

 ChuckD got a reaction from Uncarina in HKM A-20J/K in progress
Oh, I watched you work through that process. You deserve the highest commendation, but that's 100% more effort than I'd want to undertake. Just sell me a sprue, HKM.