
TwoHands
-
Posts
238 -
Joined
-
Last visited
Reputation Activity
-

 TwoHands reacted to Thunnus in Border 1/35 Fw 190A-6 Nowotny Double Chevron
Here is my finished Border 1/35 Fw 190A-6 painted in the markings of Walter Nowotny's Double Chevron. It was built mostly out-of-the-box since I couldn't find much in the way aftermarket for this kit at the time. Major markings were painted using custom cut masks. The kit was slightly modified to depict the inner landing gear door configuration. I left the upper gun cowling and two engine cowlings unglued so that the gun compartment and some of the engine can be viewed but the trade-off is that the joints aren't as tight as they could be if they were glued.
The complete build log can be found at the following link:
-
TwoHands reacted to Thunnus in Border 1/35 Fw 190A-6 Nowotny Double Chevron
Yes, you could be right.
Both the greens have patterns due to the spray texture which will disappear after a clear coat. There is no oil canning effect molded onto the model.
Thanks Woody!
I probably should have done a more comprehensive analysis of the chevron position before wiping it off but its too late now. Like Mike mentions, you could argue that I put the chevrons in the correct position. But without confirming measurements of the chevron in relation to the fuselage cross and the scale relation between the chevron and cross to the model, there are a lot of variables at play here. As for the masks of the markings, I used the Eagle Cal decal sheet 32-82, which has Nowotny's Double Chevron markings in 1/32 scale. I imported this decal sheet into AutoCAD, scaled them to 1/35 scale and then traced over them to produce the masks.
Here is a photo of the port side markings. I've drawn some guidelines to help visualize relative positioning between the cross and chevron by extending the straight horizontal lines of the fuselage cross forward through the chevron. It's clear that the chevron is lower on the fuselage relative to the cross.
But drawing the same type of guidelines on the photo of Nowotny's aircraft shows a very similar type of relative positioning between the chevron and the cross. I was actually pretty dang close!
Our eyes are automatically drawn to this type of non-symmetry and I think it set off subconscious alarm bells in my head because it didn't look right. The problem was compounded by referring to another reference... a profile drawing, in this case. You can see that the chevron has been centered along the midpoint of the fuselage cross, which is our typical assumption when it comes to markings but actually not correct in this particular case.
Being past the point of no return, the chevron will have to be re-painted. Based on my rough analysis, the previous chevron position was just a TAD too low and I'm going to use this opportunity to shift it slightly higher.
-
 TwoHands got a reaction from Grunticus in Anzys braided wires: which glue to use?
I have had some success with adding a drop of fast CA to the braid before I cut it and then glue in place with slow/black CA.
-
TwoHands reacted to JayW in 1/18 Scale Blue Box F4U-1A Corsair Modification
The wings - finally. I have done some homework on configuration, as the last couple of posts suggest. And frankly I am a bit overwhelmed. My mind is spinning because there are so many sub-projects to be done on the wings. So, keeping in mind any sequencing limitations, I kind of closed my eyes and threw a dart at it all, and came up with the leading edge.
First, lets look at this wing - first the upper surface:
Look at how big it is. Those are of course one inch squares on the mat. Kinda top level description of the plan, but there it is. The devil will be in the details.
The lower surface:
Note I have dremeled away some of the surface - due to HVAR ("Holy Moses" rockets) mounting points which -1A's did not have. They were proud of contour by a couple of hundredths of an inch, which not only had to be sanded away, but a couple of bays had to be modified to get rid of the rocket mounts altogether. .005 inch plastic skin (the "fabric") will cover; don't worry. At this point, I do not think I need to dremel away the wing where the "fabric" will be, other than that localized area around the rocket mounting points. I think I will simply overlay that area with .005 inch plastic, and hope I get a bit of drape effect where the existing depressions are.
Note the outboard flap is not shown. I don't have a great plan for it yet, but in all likelihood I will salvage it and reskin it. Gonna be a while before I do that...
So the leading edge (which will receive a litho skinning) - first I cut square holes for the approach light (port wing) and the gun camera (Starboard wing), where before there was nothing:
I have on order some .005 inch thick clear plastic sheet from Evergreen in the hopes the final product will be convincing. Fingers crossed. I must say that the wing fold area on the model is very inaccurate in many ways, especially the trim. So I had to get a bit creative in the placement of the approach light and gun camera holes. It'll be OK.
The gun openings - here is what they are supposed to look like:
That is a shot of the cover photo for KD431 Time Capsule Corsair by David Morris. Note the very Corsair-esque plates over the holes that transition into the blast tubes inside the wing with radiused welded corners. I have to duplicate that.
Here is what I have to work with:
Those are simply holes. No tubes, no nothing. That will never do.
My plan -
1. enlarge these holes to 3/16 inch diameter magically without breaking the local bond between upper and lower wing.
2. Insert 3/16 inch OD, 1/8 inch ID plastic tube with simulated gun barrels deep inside them into the holes and glue in place.
3. Trim and sand plastic tubes to leading edge contour.
4. Make litho plates, bond to wing, and sand/file radiused edges.
So I have done one of these already, before I realized how tough it is going to be to drape a litho skin around it with a perfect cutout to accept the plate. JAY - THE SKIN NEEDS TO GO ON FIRST! So I just made this skin harder. Will not repeat on the other wing....
Here it is:
Man, my plan really worked. I am more than satisfied. Now to somehow get a leading edge skin on there with a matching cutout. The other two - I will fabricate similar plates that match the already installed skin, with finished cutouts. MUCH easier. Note steps 1 through 3 have been done for the mid and inboard gun.
You will see all that next post. As our British contingent are fond of saying - TTFN!
-

 TwoHands got a reaction from daHeld in 1/18 P51C Mustang "Lopes Hope the 3rd"
HAMMER? He's using a hammer!!!!
-
TwoHands reacted to STM in Airfix 1/24 F6F-5 Hellcat
I took a slight detour when my decals arrived. I plan on finishing this model in the markings of CAPT. (then CDR and CAG) David McCampbell's "Minsi III", the leading US Navy ace in WWII and CMH recipient. But there is a hitch. Although CDR McCampbell's Minsi III was an F6F-5, it was an early one that still had the F6F-3 windows behind that cockpit. They were found to be basically useless so they were eventually deleted. The decals I found, by Aerocraft also had a resin conversion to backdate the -5 for McCampbells aircraft, at least as far as the windows go, but I chose not to use it. The clear resin is very clear but the detail work, especially the rivets, does not match the kit particularly well. And it would mean making a big cut in the fuselage which would require filling and a redo a lot of rivets. Instead, I chose to just use my -3 drawings and cut out the windows myself. I marked them on the fuselage in pencil and use my circle template to get the right curvature for the corners. I drilled out the corners and then cut the rest of the window with an X-Acto 2" razor saw (the one that goes with the 1/4" collet. Doing this meant adding some bracing between the pilot's rear bulkhead former and the next one aft. I will cut the windows from the styrene from a CD jewel case. The thickness of the styrene from the jewel case is almost exactly the same as that of the kit so it will work out perfectly.
I added the radios, wiring, control cables and permanently attached the cockpit and aft bulkheads to the right half of the fuselage. With that this side of the model is complete with the exception of the tail landing gear. There is some additional detailing in the tailwheel well and the fuselage halves will be ready to be joined.
The full build can be found at Airfix 1/24 F6F Hellcat | scottmurphyphoto (scottmurphyphotography.org)
-
TwoHands reacted to red Dog in Hog's firepower display - A-10C - Full makeup
I'll call the front section done
I know I still have to do the canopy but this is my weak point and there's no way I can keep the canopy pristine before painting and before assembling the whole jet, so Usually I deal with this at the end of the build.
Small things I added lately on both side of the fuselage:
- various straighteners plate
- and I added panel door hinges with stretched sprues. This makes a huge difference and it is very visible on the model surface.
Happy to move on to another part of the model. I'll need to decide between the aft fuselage with the tail and engines or the wings
-
TwoHands reacted to airscale in A Wish list of Aftermarket upgrade parts for the Airfix Spitfire MkIX
I added that to the upgrade set after you mentioned it
Peter
-
TwoHands reacted to airscale in airscale upgrade for 1/24 Airfix Spitfire Mk. IX
Hey everyone
I have been getting a lot of requests for updates on when we will release a set for the new Airfix Spitfire IX
Well, the test shot PE arrived today so I did a test fit I thought I would share...
The decals are in production, so sadly I don't have those to show yet, but now I know the PE is all good i can place the production order for them. I am being told the PE will be late December / early January but will see if I can get them to run a very small batch before Christmas
it's a sad fact Airfix wouldn't supply anyone with test sprues so we are all scrabbling round trying to design & produce from the kits we received when you did
..anyways on with the preview..
..here is the fret..
first up the seat gets some improved mounting brackets..
..the seat bulkhead has an improved finish and is detailed for those not using Armour Plate..
..and with Armour Plate and the correct seatbelt roller (tube not included..)
..rudder pedal treads..
..corrected and upgraded undercarriage selector..
..compass frame and missing fuel select lever..
..and what it really needs - a new IP and Blind Flying panel..
..how it looks in place..
..there are a number of other bits & bobs too..
will update again when I have decals - I need to pull all this apart to install them
It's a fabulous kit and has been a pleasure to put something together to help if folks feel it needs it
Pre-order available here
TTFN
Peter
-
TwoHands reacted to brahman104 in Sweetwater Jug: Hasegawa P-47D-40
Your attention to detail is incredible Sean! I know what you mean about rivet line references.... they're almost never correct or at best, contradictory.
Craig
-
TwoHands reacted to Woody V in Another Hasegawa FW190. I FIXED IT!
All of the rivet skins are on now. Next step is a close inspection for silvering which is kind of unavoidable when you completely cover your model with decals, especially when 95% is clear film. No big deal, just punch holes in the film with a needle and spray or brush some Micro Sol over the area. The MS gets under the film and silvering is gone. It’s just tedious.
Regardless, here’s some photos. With the pixel width of photos here only 800 you really can’t see much in a photo of the whole model so I didn’t post any.
That’s it for now.
Thanks for watching.
-
TwoHands reacted to quang in THE SHARK HAS LANDED! Curtiss Tomahawk 112sqn RAF
Indeed Alfonso. I rarely had so much fun with a model kit and it’s NOT over yet!
Some more progress with the EXHAUST STAINS
Note that they come in 2 distinct types:
1- heat stains shown by paint discolouration next to the exhaust pipes
2- smoke trails which are generally subjected to propeller wash. Characteristically they are not the same on RH and LH sides. Furthermore on the early Hawks, they don’t coincide with the whitish heat stains.
Note how the smoke trail on the LEFT side is pointing upwards …
… while it’s going down on the RIGHT side. This effect is caused by the wind created by the propeller turning in one direction (prop wash).
When one thinks ‘exhaust stains’, we automatically think ‘airbrush’. In fact it’s much easier to replicate with a paint brush because we have more control.. This is how I did it.
This is my oils palette for the whole build. For the exhaust trails, I only used sepia, ochre and a bit of Payne’s Gray.
Sepia and ochre are applied in tiny dots along the trail
Blend with a flat soft brush in up-and-down strokes
More blending with a softer brush
Add more dots to deepen the effect
The result
Time to call it a day.
Any questions, comments etc…
Have a glorious Sunday,
Cheers
Quang
-

 TwoHands got a reaction from chuck540z3 in 1/24 Airfix F6F-5 Hellcat "Kicked Up A Notch": New eBook Now Available!
That coat of primer and sanding really did the trick on that skin texture. I'll be doing that on my 'cat for sure.
-
TwoHands reacted to Woody V in Application of Mr Metal Color lacquer vs Mr Color lacquers
Generic lacquer thinner differs from "leveling" thinners in that it lacks an additive that slows the drying time allowing the paint to flow out smoother. I used to use the generic stuff for everything but now I only use it for cleaning my airbrush and to thin whatever paint (primer or clear) that will go down on bare styrene. The generic thinner is hotter than the hobby grade stuff and it will cause the paint to etch into styrene forming a molecular bond.
Here's a test I did:
The picture on the left is Mr. Color thinned with generic lacquer thinner. When aggressively sanded the paint feathers smoothly. The picture on the right is Mr. Color thinned with Mr. Color Leveling thinner. When aggressively sanded the paint scrapes off.
As always, YMMV
-
TwoHands reacted to Ryan in loupes - information please
You can get high magnification readers, I use a +4 but I think they go all the way up to +8.
They are cheap on eBay and allow for better viewing than any hood type optivisor (or otherwise) contraption.
-
 TwoHands got a reaction from geedubelyer in Airfix announcement - 1/24 Spitfire
I want one and whatever Peter makes for it. I'm sure that aftermarket support will be there like it was for the Hellcat. It's not Tamiya but it would really suck if I have to wait for Tamiya to come out with all the models I want to build. I'm way more loyal to my interest than I am to any brand. Yea, I'll take two now that I have thought about it.
-
TwoHands reacted to chuck540z3 in Airfix announcement - 1/24 Spitfire
Despite the challenges I'm having with the 1/24 Airfix Hellcat, I think the plastic is great, other than the short-shot sprue F that I received in my kit. As good as the Tamiya Spitfire is, it does have some shortcomings that are not on this Airfix model. The Tamiya Merlin engine is missing the oil filler neck on the bottom oil tank and there is no connection between the front glycol tank and the engine itself, which to me is a real miss. The spark plug cables and other items look very good and correct on the Airfix photos above, so I can see that detailing this engine could be really, really fun. I will buy this model for sure and build it right here- right after Peter makes a new instrument panel for it!
Cheers,
Chuck
-
TwoHands reacted to airscale in Airfix announcement - 1/24 Spitfire
so I spoke to airfix - interesting what they said for those knocking the details / plastic in the test shot..
"When it comes to a physical sample, the first shots weren’t ideal and we are due to receive second shots at some point that may change certain aspects. Provided that these second shots are up to standard, I’d be more than happy to send a sample across. I’ll keep you updated on the progress of these shots."
I have faith, it will be superb value and the ultimate canvas for a brilliant build (which airscale will give a little help to of course :))
Peter
-
TwoHands reacted to adameliclem in Airfix announcement - 1/24 Spitfire
Some people are hostile to the very idea of double cheeseburgers. We are a strange species.
Adam
-
TwoHands reacted to R Palimaka in Airfix announcement - 1/24 Spitfire
I agree. It is puzzling, there are some arguments on other sites as well saying that the Tamiya kit will likely still be superior and available for less money, so "why did Airfix do this?".
That's great, and I agree the Tamiya kit is magnificent, almost perfect, except for one major flaw...it's not 1/24 scale. The arguments don't make sense.
Although there is one major flaw that makes this Airfix kit unbuildable. It doesn't include Polish squadron markings...
...and yes, I'm kidding.
Richard
-
TwoHands reacted to airscale in Airfix announcement - 1/24 Spitfire
Fantastic news!
Will be on to airfix to get some test parts when available
I don't understand why everyone is going on about tamiya 1/32 Spits, this is a new 1/24 kit - you don't buy it if you want a 1/32 one..
I love large scale so happy days, I just wish it was a MkXlV but its great to see them make the investment in keeping the 'superkit' range alive
-
TwoHands reacted to Alain Gadbois in Hasegawa Fw190 F-8
Hi all!
The fuselage halves are now assembled as well as the lower wing part. A black wash was applied in the flap area as this will be impossible to do later when the top wings are in place. A bit of red putty to fill in the joint at the back of the cockpit.
There is a noticeable step at the engine fuselage joint that will need to be corrected.
Trying to fit the front cowl ring and the fan I realized the engine axis was slightly off. I had to unglue the bottom cowl from the engine and trim around the top edge to tilt the engine a bit so the fan would be free to turn. The fan sits too far forward and I removed a raised disk at the back.
After this I had to cut this bit out so the fan would sit correctly.
The result after all those small but bothersome tweaks.
Bye for now, and many thanks for watching!
Alain
-
TwoHands reacted to Alain Gadbois in Hasegawa Fw190 F-8
Essentially finished cockpit, all hand painted. I added only the throttle lever. The lead foil is for the seat belts.
Getting on to fit the wings, nose and fuselage together. Seems to be a small fit problem at the engine/wing root joint that will require a bit of filler.
More later...
Alain
-
TwoHands reacted to Alain Gadbois in Hasegawa Fw190 F-8
Hi!
The missing instructions were found on this very website and printed.
I've been cleaning up and gluing various bits, but here is one detail of interest: If you remove the lower part of the landing gear cover, don't follow the Hasegawa instructions, as you will remove about 2mm too much. Cut at the location shown in the photo below, then sand the raised section left on the exterior side. The upper and lower sections overlap in reality.
Here is the difference in fin thickness after scraping and sanding quite a bit. Still 3 more to go...(sorry for the slightly out of focus shot)
The lower wing inserts were carefully glued in place take care to have them flush with the adjoining wing sections. A bit of scraping in places and use of thin shims was required to achieve a pretty good result after a bit of sanding.
I forgot to drill out the locating holes for the bomb racks, as somehow I thought at first they would be somewhere else on the wings...Luckily, you could discern the emplacement by identifying the small circular deformation of the exterior plastic surface.
The wheel wells were glued in place at this point, and I kept a bit of runner to protect the fragile wing leading edge parts. This also keeps the geometry right as these bits are easy to bend when gluing.
No decals means I have to make masks. Here is the first attempt while looking at the photos. I will remove the tapes, and go over with a ruler and a circle template for the final cut lines.
Bye for now,
Alain
-
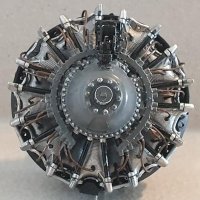
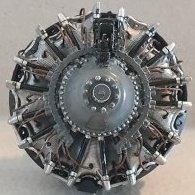
TwoHands reacted to Neo in Hobbyboss 1/18 Fw190
At this scale i would only do the buckles, its better to use thick foil strips (i use champagne bottle foil) then PE for the belt themselves. that would also take verry little space on the PE fret